Huma 1/72
Gotha
GO-145
|
KIT #: |
3002 |
|
PRICE: |
Around $15.00 MSRP or even less |
|
DECALS: |
Five options |
|
REVIEWER: |
Brian Baker |
|
NOTES: |
Treat it as a good short run kit |
 Developed by a team directed
by Dip. Ing. A. Kalkert in 1933-1934, this biplane became a standard Luftwaffe
training
aircraft of World War II, being
used for advanced training and
instrument instruction, as well as
for schools devoted to training aircrews for radio operation,
gunnery, bombing, and aerial
photography.
Approximately 12,000 were built in
Germany,
Turkey,
and Spain.
Later in the war, GO-145’s were used for night harassment of Russian troops.
Variants included the following:
Developed by a team directed
by Dip. Ing. A. Kalkert in 1933-1934, this biplane became a standard Luftwaffe
training
aircraft of World War II, being
used for advanced training and
instrument instruction, as well as
for schools devoted to training aircrews for radio operation,
gunnery, bombing, and aerial
photography.
Approximately 12,000 were built in
Germany,
Turkey,
and Spain.
Later in the war, GO-145’s were used for night harassment of Russian troops.
Variants included the following:
GO-145A
Two seat open cockpit trainer
GO-145B
Two seat gunnery trainer
GO-145C
Multi role trainer for bombing and
radio operators
GO-145D
Two seater with enclosed cockpit
and wheel pants
All of the above versions can be produced from this
kit.
The kit is molded in soft
white plastic, and includes 42 parts, including two clear windshields and a
canopy.
Extra parts are provided for the
above mentioned variants.
Casting is crisp with very little
flash. The plastic is soft and easy to work.
 Instructions
The
kit includes a four page assembly guide, with two pages of assembly diagrams and
two pages of history in German, English, and French. A color sheet gives five
different color schemes, including a GO-145A in pre-war civil registration, a
GO0-145B gunnery trainer with similar markings, an Austrian Air Force GO-145B,
and a canopied GO-145D in civil markings. These civil registered aircraft
were all Luftwaffe planes
before the Luftwaffe came out of
the closet.
On the back page is a
three view of a grey and green GO-145C in Russian Front markings.
Unfortunately, no history is given
about each aircraft for which color information is provided.
Accuracy
According to the drawings I have, the kit appears to
be completely accurate, and when completed, it looks like a GO-145, and I think
that is the point.
The cockpit includes two
seats, control sticks, instrument panels, and windshields.
A floor is provided, but there is
no sidewall detail. Without pilot figures, some sidewall detail must be
scratchbuilt. I added a bunch of stuff to mine.
Once
the cockpit is detailed to the modeler’s satisfaction, the fuselage halves can
be joined.
For the gunnery training version,
be sure to include the gun mount at this point. The engine insert, which goes
behind the cowling nose bowl, should be painted a dark color, with the cylinders
silver or light grey. The prop can be installed later.
 After
the fuselage halves are joined and the seams filled, the lower wings and
tailplane can be attached.
This is a good time to paint the
major assemblies, as it would be difficult to do the painting required after the
struts and upper wings are attached, unless maybe you are doing one of the
silver aircraft. Check the color of the struts on the painting guide. On the
silver aircraft, they are silver, but they are
76 on the camouflaged airplane. The
tailplane fit is excellent, and the cabane struts are almost foolproof, since
they have a third bracing strut which assures the correct mounting angle.
The landing gear looks a bit
spidery, but it is also a snap to install.
The upper wing goes on smoothly,
and I would suggest mounting the wing on the cabanes only, adding the
interplane “N” struts after the
wings are set in the proper position.
The wing is far enough forward that
the windshields can be attached after painting and other assembly is completed.
After
the fuselage halves are joined and the seams filled, the lower wings and
tailplane can be attached.
This is a good time to paint the
major assemblies, as it would be difficult to do the painting required after the
struts and upper wings are attached, unless maybe you are doing one of the
silver aircraft. Check the color of the struts on the painting guide. On the
silver aircraft, they are silver, but they are
76 on the camouflaged airplane. The
tailplane fit is excellent, and the cabane struts are almost foolproof, since
they have a third bracing strut which assures the correct mounting angle.
The landing gear looks a bit
spidery, but it is also a snap to install.
The upper wing goes on smoothly,
and I would suggest mounting the wing on the cabanes only, adding the
interplane “N” struts after the
wings are set in the proper position.
The wing is far enough forward that
the windshields can be attached after painting and other assembly is completed.
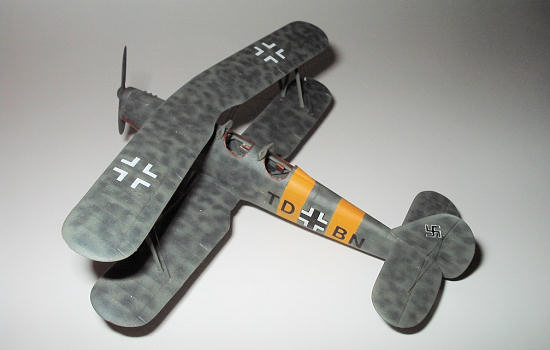
Rigging
is easy, with two sets of parallel landing and flying wires on each side.
The tailplane is also wire braced.
I used unstranded electronic wire,
although stretched sprue could also be used. There is no bracing on the landing
gear, and there were no radio antennas on the aircraft I modeled.
With
the kit’s instruction sheet, painting is not really a problem, although with the
camouflaged “C” model, you’ll have to follow a set procedure. Before the struts,
landing gear, and upper wing are attached, I would do the yellow trim first,
followed by the 76 blue underneath, followed by the 75 light grey and 74 dark
grey. Co lors are given in RLM shades, which is helpful. Unfortunately, I could
not find a photo of the aircraft depicted in the drawing, so I decided on a
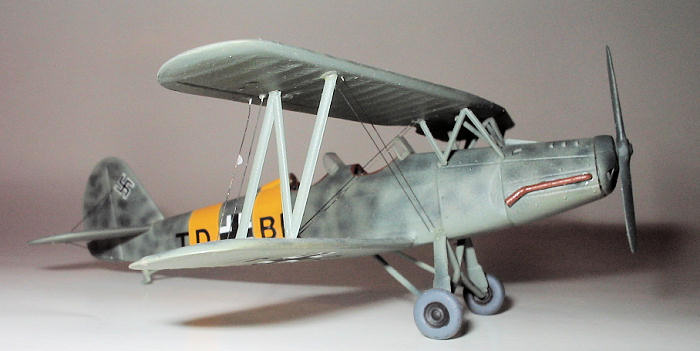
different aircraft, one I did have a photo of.
This appears on page 149 of K.A.
Merrick’s single volume,
German Aircraft Markings,
1939-1945.
The photo shows GO-145’s
and a solitary AR-96A on a German airfield shortly after VE-Day, with an Army
Willys Jeep and U.S.
troops conspicuous in the background.
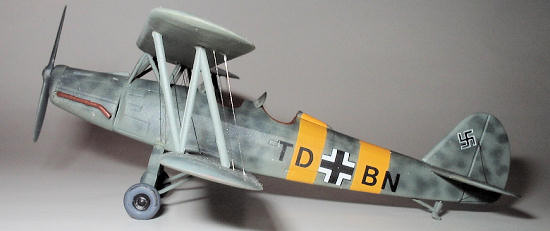
I used a base coat of 76
underneath, with an 02 topside coat heavily mottled with dark greens, 70 and 71.
Two 04 stripes on the fuselage
indicate an instrument training aircraft, although no instrument hoods are
visible on the aircraft.
lors are given in RLM shades, which is helpful. Unfortunately, I could
not find a photo of the aircraft depicted in the drawing, so I decided on a
different aircraft, one I did have a photo of.
This appears on page 149 of K.A.
Merrick’s single volume,
German Aircraft Markings,
1939-1945.
The photo shows GO-145’s
and a solitary AR-96A on a German airfield shortly after VE-Day, with an Army
Willys Jeep and U.S.
troops conspicuous in the background.
I used a base coat of 76
underneath, with an 02 topside coat heavily mottled with dark greens, 70 and 71.
Two 04 stripes on the fuselage
indicate an instrument training aircraft, although no instrument hoods are
visible on the aircraft.
I’m
admit that I am partial to training aircraft, having spent a lot of time in
them, but this kit was a very enjoyable build, and represents an airplane that
was as important to the Luftwaffe as the Stearman and N3N were to the American
training program.
I just wonder how many of them
would have become dusters and sprayers had the Germans not lost the war.
Any collection of World War II
aircraft should contain at least one of these.
Get one if you can find one. You
won’t regret it.
There
are few photos available of these aircraft, but
Merrick’s book has one good one, and several are to
be
found in the four volume Monogram
series on Luftwaffe Camouflage and Markings.
I would assume that, given Huma’s
reputation for accuracy, the kit schemes are probably correct.
Brian Baker
October 2008
Copyright ModelingMadness.com. All rights reserved. No
reproduction in part or in whole without express permission.
If you would like your product reviewed fairly and fairly quickly, please
contact
the editor or see other details in the
Note to
Contributors.
Back to the Main Page
Back to the Review
Index Page 2015