Xotic-72 1/72 Dornier Do-22
| KIT #: | ? |
| PRICE: | $ |
| DECALS: | Five options |
| REVIEWER: | Carmel J. Attard |
| NOTES: | Short run with vac canopy and resin parts |
| HISTORY |
Dornier Company has always been known for its design of
floatplanes. There was a period prior to WWII when the need for such a market
was on the decline and the company eventually decided into building land planes.
There was also the growing need of such types of aircraft in the upcoming new
Germany. The Do-22 was designed and built in this transition period and it was
to cater for a wide range of use that was to appeal to requirements of small air
forces. The Do-22 was a three seat reconnaissance and
 light bomber floatplane
which evolved in 1934. Basically the aircraft was of a sturdy metal construction
with fabric covering except areas around the engine and floats which were metal.
It was a high wing monoplane, powered by a Hispano-Suiza 12 cylinder liquid
cooled engine of 860 HP, driving a three blade propeller that gave the aircraft
a cruising speed of 186mph and a maximum speed of 217 mph. The aircraft was also
able to operate on land when floats were replaced by wheels. The crew of three
comprised of a pilot, an observer/navigator and a gunner. The aircraft was armed
with a twin mount for the rear gunner, one gun on the nose above the engine and
one ventrally in a tunnel beneath the rear crew station aiming down in the aft
fuselage. The arrangement was in line with custom of previous Dornier design and
gun positions mounted on other types as Do-11 and Do-23.
light bomber floatplane
which evolved in 1934. Basically the aircraft was of a sturdy metal construction
with fabric covering except areas around the engine and floats which were metal.
It was a high wing monoplane, powered by a Hispano-Suiza 12 cylinder liquid
cooled engine of 860 HP, driving a three blade propeller that gave the aircraft
a cruising speed of 186mph and a maximum speed of 217 mph. The aircraft was also
able to operate on land when floats were replaced by wheels. The crew of three
comprised of a pilot, an observer/navigator and a gunner. The aircraft was armed
with a twin mount for the rear gunner, one gun on the nose above the engine and
one ventrally in a tunnel beneath the rear crew station aiming down in the aft
fuselage. The arrangement was in line with custom of previous Dornier design and
gun positions mounted on other types as Do-11 and Do-23.
 Some 30 Do-22 were produced, which were all delivered to
foreign air forces in fact it never appeared in operational Luftwaffe markings
apart from the two prototypes. The first country to receive the Dornier Do-22
was the Royal Yugoslav Navy which ordered 12 aircraft. These were all
operational when the German army swept through Yugoslavia circa 1941. Luckily
the Do-22 had the advantage of having a long range (1400 miles) and eight of
these were able to escape across the Mediterranean to Egypt. The contingent of
Do-22 that arrived in Egypt reformed as No 2 Yugoslav Squadron under the command
of the RAF and continued to perform service on coastal patrol and reconnaissance
duties for a time until grounded by lack of spares. Greece, Latvia and Finland
also received the Do-22. Most of the Greek aircraft were lost in defence against
Germany whereas the Latvian aircraft were taken over by the German government
before delivery and transferred to Finland instead. The Fins used the 4 aircraft
extensively in a wide variety of roles and appeared as both floatplane and
landplane as well as on skis. The Do-22 had a length of 43’2” and a wing span of
53’2” The empty weight was 5,600 lbs.
Some 30 Do-22 were produced, which were all delivered to
foreign air forces in fact it never appeared in operational Luftwaffe markings
apart from the two prototypes. The first country to receive the Dornier Do-22
was the Royal Yugoslav Navy which ordered 12 aircraft. These were all
operational when the German army swept through Yugoslavia circa 1941. Luckily
the Do-22 had the advantage of having a long range (1400 miles) and eight of
these were able to escape across the Mediterranean to Egypt. The contingent of
Do-22 that arrived in Egypt reformed as No 2 Yugoslav Squadron under the command
of the RAF and continued to perform service on coastal patrol and reconnaissance
duties for a time until grounded by lack of spares. Greece, Latvia and Finland
also received the Do-22. Most of the Greek aircraft were lost in defence against
Germany whereas the Latvian aircraft were taken over by the German government
before delivery and transferred to Finland instead. The Fins used the 4 aircraft
extensively in a wide variety of roles and appeared as both floatplane and
landplane as well as on skis. The Do-22 had a length of 43’2” and a wing span of
53’2” The empty weight was 5,600 lbs.
| THE KIT |
The D0-22 kit is issued under the trade name Xotic-72 hence the scale is evident. The box cover indicated that it is a limited run kit and that it is recommended for the experienced modeller. Not that this should indeed be so but possibly since there are a few resin parts and a single vac-form cockpit canopy. The box cover art depicts a Do-22 making a low pass and is shown in what appears to be Finn AF camouflage and markings even though the Finn insignia appears as a light blue cross over a white circle.
 Upon opening the box there are two sprues of light grey
plastic components with fine engraved panel lines and detail areas having the
fabric covering are well represented. Flash is minimal and there are no sink
marks to be found. The ejector pin stubs are on the inside of parts while those
on the wing surfaces have to be removed. The kit contains nine resin parts and a
single vac-form cockpit canopy in clear acetate. The 4 page A4 size instruction
sheet is very well represented to follow a sequence of assembly in six steps.
Each of these steps is very well displayed with isometric clear sketches of
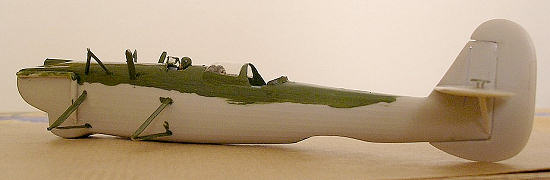
exploded views indicates each part and where it fits. The cockpit and crew
station is well fashioned and includes also a floor cushion on which the dorsal
rear gunner rests for firing downwards. One should note here that the resin
parts to fit inside are a bit proud and should be filed to reduce in size to
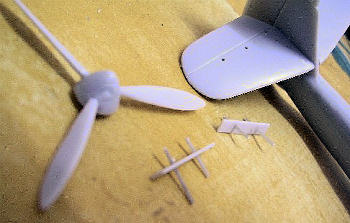
fit. Propeller blades come separate and this is where careful assembly may be
needed. A plan view showing the blades including angle of 120 degrees is printed
and one may suggest amplifying this sketch with a photocopier and assembling the
blades and leave to dry while these are positioned over the drawing and this
will assure that a correct propeller blade assembly is resulting. The upper nose
opening needs to be drilled and a hollow tube the size of the gun is inserted
inside. The two inverted ‘L’ shaped exhaust pipes also needs careful boring with
a small drill of a suitable size and the result will be very effective.
Upon opening the box there are two sprues of light grey
plastic components with fine engraved panel lines and detail areas having the
fabric covering are well represented. Flash is minimal and there are no sink
marks to be found. The ejector pin stubs are on the inside of parts while those
on the wing surfaces have to be removed. The kit contains nine resin parts and a
single vac-form cockpit canopy in clear acetate. The 4 page A4 size instruction
sheet is very well represented to follow a sequence of assembly in six steps.
Each of these steps is very well displayed with isometric clear sketches of
exploded views indicates each part and where it fits. The cockpit and crew
station is well fashioned and includes also a floor cushion on which the dorsal
rear gunner rests for firing downwards. One should note here that the resin
parts to fit inside are a bit proud and should be filed to reduce in size to
fit. Propeller blades come separate and this is where careful assembly may be
needed. A plan view showing the blades including angle of 120 degrees is printed
and one may suggest amplifying this sketch with a photocopier and assembling the
blades and leave to dry while these are positioned over the drawing and this
will assure that a correct propeller blade assembly is resulting. The upper nose
opening needs to be drilled and a hollow tube the size of the gun is inserted
inside. The two inverted ‘L’ shaped exhaust pipes also needs careful boring with
a small drill of a suitable size and the result will be very effective.
| CONSTRUCTION |
 When it comes to assemble the wing actuators it is suggested
to refresh the tiny locating holes which indicate their positions below the
wings and this is best done at some time before fixing the wings in place. A
unique feature about this aircraft is that it has what appears to look like dive
brakes fitted over the tail planes and care is also needed when fixing these at
their exact place .On the last page of the instruction sheet there are
additional building notes which one should not overlook. When it comes to fit
the wings it is suggested to glue the centre struts first and while these are
drying careful dry fit the wing to struts in order to ensure that the struts dry
in the proper aligned position. One may build a simple jig to help support the
wing in this endeavour to produce perfect alignment. Careful assembly of the
struts for the correct alignment is probably the trickiest step and is
emphasised on the ‘building notes’ in the instructions. It will take a while to
complete because of all the drying times sequence recommended. Some strut
placement dimples on the wings are not quite in the correct place and these are
blanked with a small amount of putty in the end.
When it comes to assemble the wing actuators it is suggested
to refresh the tiny locating holes which indicate their positions below the
wings and this is best done at some time before fixing the wings in place. A
unique feature about this aircraft is that it has what appears to look like dive
brakes fitted over the tail planes and care is also needed when fixing these at
their exact place .On the last page of the instruction sheet there are
additional building notes which one should not overlook. When it comes to fit
the wings it is suggested to glue the centre struts first and while these are
drying careful dry fit the wing to struts in order to ensure that the struts dry
in the proper aligned position. One may build a simple jig to help support the
wing in this endeavour to produce perfect alignment. Careful assembly of the
struts for the correct alignment is probably the trickiest step and is
emphasised on the ‘building notes’ in the instructions. It will take a while to
complete because of all the drying times sequence recommended. Some strut
placement dimples on the wings are not quite in the correct place and these are
blanked with a small amount of putty in the end.
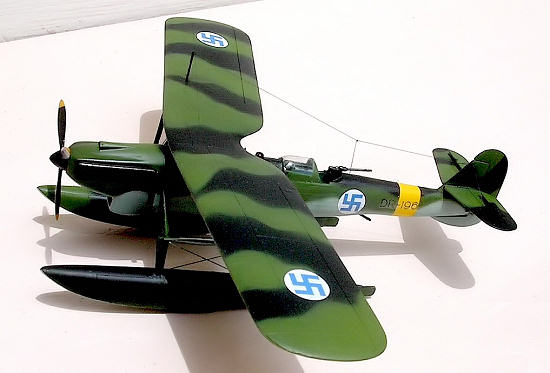
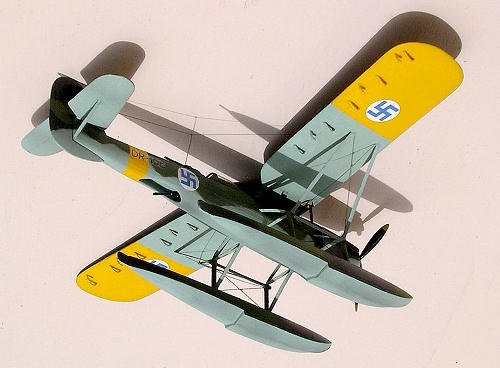
| COLORS & MARKINGS |
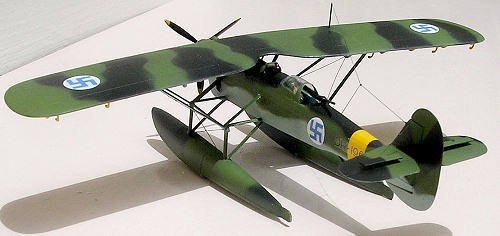 There
are markings for six aircraft. I selected to finish mine in Finn AF floatplane
version. One will have to make his own research for the correct pattern of the
black and medium green camouflage as an overall green is suggested. The
camouflage pattern may vary from one aircraft to another but are very close to
each other. Insufficient pattern detail also applies to the Greek AF version
which could be finished in beautiful camouflage of dark earth and olive green.
Otherwise one may opt to do a Yugoslav plane in overall aluminium with dark
green mottle on the upper surface. The decal sheet is superbly done and caters
for any of the following aircraft: Two Greek, two Yugoslav and a Finn AF one in
either land plane version or on floats. Showing the wheel version without spats
was somewhat irrelevant as only spaded wheel components are provided with the
kit unless of course one will make the extra effort to build ones.
There
are markings for six aircraft. I selected to finish mine in Finn AF floatplane
version. One will have to make his own research for the correct pattern of the
black and medium green camouflage as an overall green is suggested. The
camouflage pattern may vary from one aircraft to another but are very close to
each other. Insufficient pattern detail also applies to the Greek AF version
which could be finished in beautiful camouflage of dark earth and olive green.
Otherwise one may opt to do a Yugoslav plane in overall aluminium with dark
green mottle on the upper surface. The decal sheet is superbly done and caters
for any of the following aircraft: Two Greek, two Yugoslav and a Finn AF one in
either land plane version or on floats. Showing the wheel version without spats
was somewhat irrelevant as only spaded wheel components are provided with the
kit unless of course one will make the extra effort to build ones.
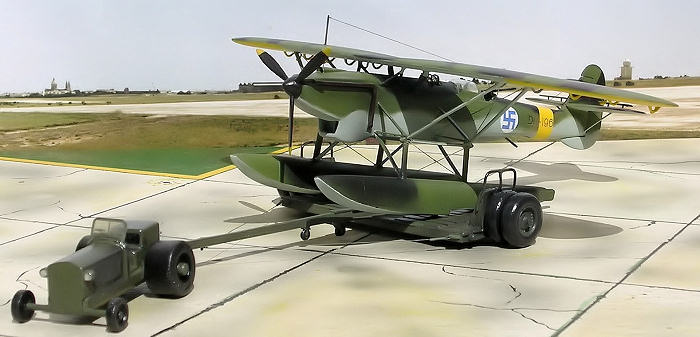
| CONCLUSIONS |
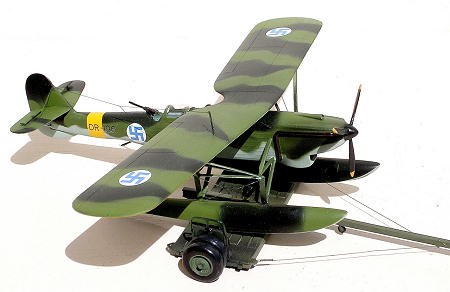 This is an interesting subject for a kit and one should
make careful assembly and achieve pleasing result as it also turns out to be an
eye catcher indeed. One may also look hindsight and ask why floatplane aircraft
of this sort are not supplied with a beaching trolley as we have seen recently
with kits of the Ro-43 and Ro-44. It took me some time again to research for the
type of beaching trolley that would be normally recommended for the Dornier
Do-22. Being an origin of German design I went for a beaching trolley the type
of which was used for the He-42, He-60 and Ar-96 that were in service with
Bulgarian AF and Chilean AF that continued to use German type of equipment. This
built was time consuming more than others of same category but was worth
spending time on it in view of its unique design and interesting colour scheme
and markings.
This is an interesting subject for a kit and one should
make careful assembly and achieve pleasing result as it also turns out to be an
eye catcher indeed. One may also look hindsight and ask why floatplane aircraft
of this sort are not supplied with a beaching trolley as we have seen recently
with kits of the Ro-43 and Ro-44. It took me some time again to research for the
type of beaching trolley that would be normally recommended for the Dornier
Do-22. Being an origin of German design I went for a beaching trolley the type
of which was used for the He-42, He-60 and Ar-96 that were in service with
Bulgarian AF and Chilean AF that continued to use German type of equipment. This
built was time consuming more than others of same category but was worth
spending time on it in view of its unique design and interesting colour scheme
and markings.
August 2006
Copyright ModelingMadness.com. All rights reserved.
If you would like your product reviewed fairly and fairly quickly, please contact the editor or see other details in the Note to Contributors.