Pavla 1/72 Siebel Fh-104 'Hallore'
| KIT #: | 72-062 |
| PRICE: | £15.50 |
| DECALS: | Five options |
| REVIEWER: | Carmel J. Attard |
| NOTES: | Short run with resin, vacuformed and etched brass parts |
| HISTORY |
 Developed in the early thirties, the Siebel Fh 104 evolved
from a project of a twin engine, low wing aircraft with retractable
undercarriage as a fast transport for five persons plus mail. It has rapidly
turned into a popular general purpose, courier and liaison aircraft and as a
squadron hack. The plant in Saxon Halle was taken over by Fritz W. Siebel, the
sport pilot. In this plant various German licensed types were produced. The
maiden flight of the Fh 104 took place in February 1937 and subsequent types
achieved successes in speed races and becoming famous in long distance,
cross-country flight to Cape Town. 46 aircraft were produced until 1942 and were
in service with the Luftwaffe to be flown by personalities as Adolf Galland and
Ernst Udet.
Developed in the early thirties, the Siebel Fh 104 evolved
from a project of a twin engine, low wing aircraft with retractable
undercarriage as a fast transport for five persons plus mail. It has rapidly
turned into a popular general purpose, courier and liaison aircraft and as a
squadron hack. The plant in Saxon Halle was taken over by Fritz W. Siebel, the
sport pilot. In this plant various German licensed types were produced. The
maiden flight of the Fh 104 took place in February 1937 and subsequent types
achieved successes in speed races and becoming famous in long distance,
cross-country flight to Cape Town. 46 aircraft were produced until 1942 and were
in service with the Luftwaffe to be flown by personalities as Adolf Galland and
Ernst Udet.
The Fh 104 had a wing span of 12.6m, length of 9.5m, and a height of 2.64m. It achieved a maximum speed of 350 Km/hour and had a range of 920 Km.
| THE KIT |
The kit is contained in a standard Pavla style of box with a
pair of colour side views depicted on each of the box covers. These are only
four of the five colour scheme options that come with the kit. A comprehensive
instruction booklet in form of an 8 page of A5 size containing 24 stages of
constr uction. The kit is
moulded n grey plastic with all the main parts on one sprue tree. The kit also
includes a vac form canopy which also includes a spare one; there is a brass
fret with good detail parts for cockpit office and undercarriage; and a nice
selection of resin detail parts comprising seats for cockpit and for main
passenger cabin area; undercarriage leg detail or a nice set of skis for
building the snow version. There is also a resin insert for the engine front
while the exhausts ports at the sides of engines are finely produced in photo
etch.
uction. The kit is
moulded n grey plastic with all the main parts on one sprue tree. The kit also
includes a vac form canopy which also includes a spare one; there is a brass
fret with good detail parts for cockpit office and undercarriage; and a nice
selection of resin detail parts comprising seats for cockpit and for main
passenger cabin area; undercarriage leg detail or a nice set of skis for
building the snow version. There is also a resin insert for the engine front
while the exhausts ports at the sides of engines are finely produced in photo
etch.
| CONSTRUCTION |
The first stages of construction deal with the assembly of the cockpit and cabin interior followed by the detailing of the undercarriage. The engine and nacelle is a sub assembly on its own and when it comes to the propellers one has to ensure that the blades are set properly when glued in place since they come as separate blade items so that the side alignment and the pitch of propeller are checked before these were allowed to set.
When it comes to assembling the undercarriage in lowered
position the first requirement is to clean parts from excess flush around the
wheel items using a smooth flat file. A 1mm diameter hole is then drilled at
centre of each wheel so that the oleo shaft
 will slide in it. The brass supports
are cut from fret using a pair of scissors. The mudguards needed some cleaning
up from flash. In assembling the undercarriage I suggest that the mud guards are
the last thing to go on the supports after the wheels and supports are first
inserted into the shaft. This will ensure a safe and easy alignment of parts
rather than fixing the mud guards to supports as suggested in instructions. When
it came to fit the two undercarriage assemblies to the wing a 1.5mm diameter
hole is drilled on the wings as per instructions and the undercarriage
will slide in it. The brass supports
are cut from fret using a pair of scissors. The mudguards needed some cleaning
up from flash. In assembling the undercarriage I suggest that the mud guards are
the last thing to go on the supports after the wheels and supports are first
inserted into the shaft. This will ensure a safe and easy alignment of parts
rather than fixing the mud guards to supports as suggested in instructions. When
it came to fit the two undercarriage assemblies to the wing a 1.5mm diameter
hole is drilled on the wings as per instructions and the undercarriage
 leg is
only inserted after the nacelles are in place and each correctly centred. The
oleo brass scissors are the last thing to go on the oleo.
leg is
only inserted after the nacelles are in place and each correctly centred. The
oleo brass scissors are the last thing to go on the oleo.
The assembly of the rest of the kit went smooth with the
fitting of the seating arrangement, cockpit instruments, rudder pedal, control
stick etc which are all fitted to the cockpit floor. A bulkhead fitted at the
back of the cabin complete and the assembly is glued to one half or the
fuselage. All the resin and brass etch items as well as seats and interior are
painted during the assembly as per instructions. Following this the vac form
canopy is cut to size using scissors until the best fit to the fuselage was
attained. This was then masked at the windows area and gently fitted onto the
fuselage using white glue. Once set a tiny drop of super glue was applied to a
couple of vintage points to further secure the canopy in place as white glue
alone may not be strong enough to stand further handling during blending with
filler at the joining line. The mainplanes and tailplanes are butt joining to
the fuselage sides, these
 also required minimal filling. It is suggested to
drill tiny locating holes where the under fuselage antenna is fixed, this will
make the task of centralising the horizontal antennae much easier. It was not
quite clear which was the correct way to fix these as the instructions side
views shows them fixed one way and the colour art work shows them different and
to me the latter seemed to be the ideal way to fix these for safety reason for
the ground crew. I also found that it was best to replace the mast antenna
fitted over the cockpit area with a steel pin of same thickness and length to
the brass etch one. This I found to be sturdier when the wireless, made of
0.25mm hi-tech quality ‘Camor’ fishing line, is joined from tail fin to the mast
upper.
also required minimal filling. It is suggested to
drill tiny locating holes where the under fuselage antenna is fixed, this will
make the task of centralising the horizontal antennae much easier. It was not
quite clear which was the correct way to fix these as the instructions side
views shows them fixed one way and the colour art work shows them different and
to me the latter seemed to be the ideal way to fix these for safety reason for
the ground crew. I also found that it was best to replace the mast antenna
fitted over the cockpit area with a steel pin of same thickness and length to
the brass etch one. This I found to be sturdier when the wireless, made of
0.25mm hi-tech quality ‘Camor’ fishing line, is joined from tail fin to the mast
upper.
| COLORS & MARKINGS |
 I have followed the instruction colour code so that the wheel
hubs are Schwartzgrau 66 and the interior of cabin, wheel oleo, nacelle
interior, frame of resin seats, floor, rudder pedals are Grey RLM2. Cabin
instruments are Schwartz grey 66 and black. Seats are leather colour. The
exterior of the aircraft are first painted in an overall undercoat of white
satin and after light wet and dry sanding the kit was given two coats of blood
red using Model Master 4352 which is a water wash up allowing an hour in between
coats. This produced very smooth finish in air brush but it produced equally
good finish during paint brush touch up. The kit was then given a coat of Glanzer floor polish liquid prior to applying decals. Cockpit and window masking
was then removed.
I have followed the instruction colour code so that the wheel
hubs are Schwartzgrau 66 and the interior of cabin, wheel oleo, nacelle
interior, frame of resin seats, floor, rudder pedals are Grey RLM2. Cabin
instruments are Schwartz grey 66 and black. Seats are leather colour. The
exterior of the aircraft are first painted in an overall undercoat of white
satin and after light wet and dry sanding the kit was given two coats of blood
red using Model Master 4352 which is a water wash up allowing an hour in between
coats. This produced very smooth finish in air brush but it produced equally
good finish during paint brush touch up. The kit was then given a coat of Glanzer floor polish liquid prior to applying decals. Cockpit and window masking
was then removed.
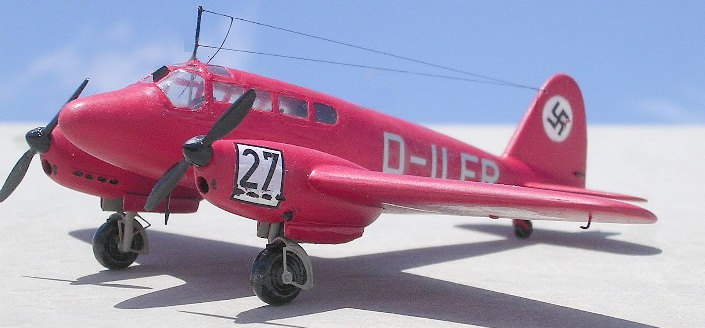
The decals are neatly printed and of very good quality
allowing application with ease. The only touching up that was needed was to the
‘racer number’ 27 which covers up the nacelle exhaust holes that were re touched
in black. This aircraft represented the one flown by Ernst Udet which carries
German registration D-ILFR that he flew in air race in 1938. As there is a
rudder balance weight applied to the Swastika decal area it is suggested to fix
the decal first and in the end place the rudder brass etch balance. This will
 avoid touching up as my experience have showed me since I placed the balance
brass etch before the decal. This decal option was in fact only one of five
others, all German. These include Galland’s famous DT+CL that is finished in RLM
70-71-65 and it has a Mickey Mouse on the engine nacelles and a full set of
squadron badges on both sides of the nose. Another offer is of the type based in
Greece circa 1942 which is finished in standard three tones as the previous one
with a difference that in addition there are desert camouflage areas. Another
one is in overall RLM 63 coded white 39. This was based in Norway and has skis
on the gear. Finally there is an overall RLM 63 which has also a black lightning
bolt running down the fuselage sides. So one cannot do without a Siebel Fh-104
as a hack or transport aircraft when you have a squadron of built 109s at this
scale!
avoid touching up as my experience have showed me since I placed the balance
brass etch before the decal. This decal option was in fact only one of five
others, all German. These include Galland’s famous DT+CL that is finished in RLM
70-71-65 and it has a Mickey Mouse on the engine nacelles and a full set of
squadron badges on both sides of the nose. Another offer is of the type based in
Greece circa 1942 which is finished in standard three tones as the previous one
with a difference that in addition there are desert camouflage areas. Another
one is in overall RLM 63 coded white 39. This was based in Norway and has skis
on the gear. Finally there is an overall RLM 63 which has also a black lightning
bolt running down the fuselage sides. So one cannot do without a Siebel Fh-104
as a hack or transport aircraft when you have a squadron of built 109s at this
scale!
| CONCLUSIONS |
This kit has turned into an overall nice build with no unusual hitches whatsoever. It goes together very well and displayed next to other brightly coloured civil registered pre war era aircraft still makes it to stand out. It is definitely recommended to Luftwaffe aircraft enthusiasts in particular. Those who never tried Pavla models before should have a go at this one and it is one of several twin engine type offered in the Pavla range.
August 2007
Copyright ModelingMadness.com. All rights reserved. No reproduction in part or in whole without express permission.
If you would like your product reviewed fairly and fairly quickly, please contact the editor or see other details in the Note to Contributors.