Revell 1/32 Ar-196A-3
| KIT #: | 04688 |
| PRICE: | £25-00 in 2014 |
| DECALS: | Two options |
| REVIEWER: | Frank Reynolds |
| NOTES: | Kagero decals |
| HISTORY |
The Arado 196 belongs to a class of aircraft that was all but consigned to history by the end of World War 2. Before the development of efficient shipborne radar, a ship-launched reconnaissance platform provided an essential view over the horizon and the major navies of the World equipped their battleships and heavy cruisers with catapult-launched flying boats and floatplanes that could be recovered by a ship’s crane. An organic air component also enabled a battleship or cruiser to range the World’s oceans in low threat environments without support from land based air assets.
 The Arado 196 first flew in 1938
and by its service introduction in 1939 qualifies as one of a few types of
aircraft that served throughout World War 2. It was introduced into German Navy
service to equip heavy warships such as the pocket battleship Graf Spee, and the
battleships Bismarck and Tirpitz. The type had a relatively heavy armament of
two 20mm MG FF cannon in the inboard wing sections, a single 7.9mm MG 17 machine
gun in the fuselage and up to two MG17s on a flexible mounting in the rear
cockpit. Two 110lb bombs could be carried under the wings. The versatile Ar196
was also capable of being operated from sheltered coastal waters as an
anti-submarine aircraft, convoy escort and on anti-ship operations. Agile and
tough, it was capable of being used in offensive patrols against Allied
anti-submarine aircraft in the Mediterranean theatre and the Bay of Biscay. It
was powered by a 970hp BMW 132K nine-cylinder air cooled radial engine giving a
cruising speed of 160mph and a combat range of 650 miles
The Arado 196 first flew in 1938
and by its service introduction in 1939 qualifies as one of a few types of
aircraft that served throughout World War 2. It was introduced into German Navy
service to equip heavy warships such as the pocket battleship Graf Spee, and the
battleships Bismarck and Tirpitz. The type had a relatively heavy armament of
two 20mm MG FF cannon in the inboard wing sections, a single 7.9mm MG 17 machine
gun in the fuselage and up to two MG17s on a flexible mounting in the rear
cockpit. Two 110lb bombs could be carried under the wings. The versatile Ar196
was also capable of being operated from sheltered coastal waters as an
anti-submarine aircraft, convoy escort and on anti-ship operations. Agile and
tough, it was capable of being used in offensive patrols against Allied
anti-submarine aircraft in the Mediterranean theatre and the Bay of Biscay. It
was powered by a 970hp BMW 132K nine-cylinder air cooled radial engine giving a
cruising speed of 160mph and a combat range of 650 miles
Some 224 were built by the parent company before an agreement with the Vichy French Government led to production switching to St. Nazaire, where 23 were built in 1942 and 1943. 69 were built at the Fokker factory on the Netherlands in 1943 and 1944.Small numbers of the Arado were made available to the air arms of Romania and Bulgaria.
| THE KIT |
There are fourteen parts frames, one in clear and the rest in a pale green-grey that seems to be common for Revell Germany. Surface detailing is positive consisting mainly of engraved panel lines with no unsightly rivets. The restrained fabric detail is most convincing.
Revell provides the option of wings folded back against the fuselage sides and the cockpit cover can be positioned open. In typical Revell style the 54 pictograms in the instructions have the potential to be confusing so careful study is advised.
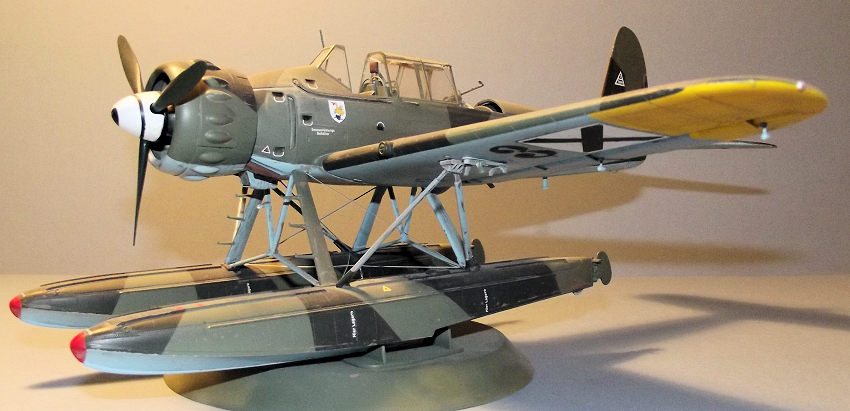
Unusually, the kit has a display base. Many modellers might choose to discard it and simply display the completed aircraft on an aftermarket beaching gear or catapult or even on the float keels. If the airframe is not fixed down then some balance weight is required at the front of the floats and the instructions recommend the required weight of a hefty 30g each side.
T he standard decal sheet has two options, both German. One
aircraft from III./ KG 100, Crete 1943; the second from Bordfliegergruppe 196 on
the Battleship Tirpitz, 1943. Both are in the standard type Luftwaffe sea
camouflage of the period with upper surfaces in a splinter patter of RLM 72
Green and RLM 73 Dark Green with RLM 65 Helblau under surfaces. Some stencilling
is provided, which I used to decorate the finished airframe.
he standard decal sheet has two options, both German. One
aircraft from III./ KG 100, Crete 1943; the second from Bordfliegergruppe 196 on
the Battleship Tirpitz, 1943. Both are in the standard type Luftwaffe sea
camouflage of the period with upper surfaces in a splinter patter of RLM 72
Green and RLM 73 Dark Green with RLM 65 Helblau under surfaces. Some stencilling
is provided, which I used to decorate the finished airframe.
The Kagero book, referred to below, has 20 pages of high quality plans in 1:48 and 1: 72 scale, including five pages of full colour profiles relating to the decals, which have a choice of unusual subjects. First is a civilian-operated, Swedish-registered aircraft based in Stockholm in 1946, essentially Silver painted overall with a Blue engine cowl. My choice was the Bulgarian-operated aircraft of the 161st floatplane squadron, Varna, 1943-44. Both of these subjects are offered in 1:72, 1:48 and 1:32 on the decal sheet. The book has a further insert of four A2 sized plans in 1:32 and 1:48 scale including some helpful sketches of interior features , gun and engine mounts and the pilot’s seat
| CONSTRUCTION |
This kit was built by me in 2014 since when it has been on display in my LHS. Regrettably, the owners have started to wind down the business for closure in late 2018 so it came back home . I had inherited this kit, rather than chose it, from a fellow modeller who realised that he did not have space to display it upon completion and I was the lucky recipient of the unmade kit plus the aftermarket goodies. The Bulgarian markings were an attractive and unusual option.
This is a kit that benefits from being divided into major sub-assemblies that can be built, painted, decalled and varnished before being brought together at the end of the build. It can be broken down as 1) fuselage with canopy glazing and tail unit installed 2) left and right wings 3) engine and its cowling 4) floats with main support structure 5) display base if required. Joining finished sub-assemblies is made easier by the fact that the wing to fuselage joint is at the fold line so a fractionally open joint can be tolerated.
 The interior is way more than the
usual arrangement of seat and instrument panel found in a fighter. Revell have
gone to town on the interior detail with a good representation of the tubular
space frame structure to which various brackets and tubular frames are attached
supporting the crew seats, instrument panels and rearward defensive armament.
All of the interior parts were identified and sprayed in Grau 02 while still on
the frame together with the inner surface of the fuselage and cowl components.
The interior is way more than the
usual arrangement of seat and instrument panel found in a fighter. Revell have
gone to town on the interior detail with a good representation of the tubular
space frame structure to which various brackets and tubular frames are attached
supporting the crew seats, instrument panels and rearward defensive armament.
All of the interior parts were identified and sprayed in Grau 02 while still on
the frame together with the inner surface of the fuselage and cowl components.
The crew compartment has a long stepped one piece floor that runs along its whole length. The pilot’s bucket seat is set on a tubular frame that is fixed onto a tubular bulkhead and this whole unit is backed with a comprehensive radio stack. A forward space frame supports the rudder pedals and instrument panel. A further space frame is located across the rear of the crew space. The seats have moulded in belts and these were brush painted to bring out the detail. A sub-floor is installed next which carries the wing boxes to support the spars. Long ladder-type side frames are installed along the full length and height of the cockpit area and the mouldings incorporate a suitable maze of cables, levers, switches and boxes to liven up the interior. Revell provide suitable colour call outs for painting the radio boxes and ancillaries in the cockpit which is adequate but I chose to use an Eduard coloured self-adhesive detailing set for the instrument panel, radios and control boxes, from their set 32267.
The parts were found to be well engineered and flash free so the side frames were glued in place to provide an assembly reminiscent of an open frame fuselage from the dawn of aviation. The rear seat for the gunner/radio operator can be installed on its sliding rails, facing rearward for gunnery or forward under the canopy and the strap back facing either way. Spare ammunition magazines are located on storage frames to the rear. The angled front firewall was next to be installed along with a large fuel tank.
The fuselage centre section was added together with the fuselage sides and I was pleased to find that the complex mouldings locked in place without fuss. Revell next suggest that the engine support frame is glued to the fire wall. I decided to postpone that until I had the engine built in order to check if any adjustments were required.
The extended wing option was a straightforward build. The ailerons are formed as upper and lower panels with substantial hinge brackets that are glued to the lower surface of the wing and the simple inner wing flaps attach to a one piece unit that is fixed inside the trailing edge. A triangular insert flap that is raised when the wing is folded was added to the rear corner of the trailing edge. A very substantial one piece moulding combines a wing root rib with a wing spar and two block-like wing locating tabs and this is glued behind the leading edge. The top wing panel was added and everything closed up nicely. The horizontal tail is a simple structure of upper and lower panels, one piece tip to tip and the elevators similarly formed, assembled with no problems. The flying surfaces were set aside for a trip to the paint shop later.
 The large circular base was cleaned
up and the two pairs of float support crutches glued in place so it would serve
as an assembly jig. The floats were assembled each with left and right halves
with a pair of internal bulkheads for strength. A separate insert along the
upper spine is detailed with various access panels and recessed sockets for the
support struts. The water rudders were added to the rear of the floats in the
retracted position.
The large circular base was cleaned
up and the two pairs of float support crutches glued in place so it would serve
as an assembly jig. The floats were assembled each with left and right halves
with a pair of internal bulkheads for strength. A separate insert along the
upper spine is detailed with various access panels and recessed sockets for the
support struts. The water rudders were added to the rear of the floats in the
retracted position.
The engine assembly could qualify as a kit in itself. The single row of nine cylinders is moulded as front and rear halves. To the front is a one piece moulding carrying the valve guides and ignition wiring; to the rear a one piece Octopus of induction tubing, to which two carb inlet trumpets are fixed. I found that the easiest way to deal with assembly was to glue all of the unpainted parts together to ensure accurate joints then spray the engine assembly in Tamiya Gunmetal. The complex looking exhaust pipes to the rear were painted Tamiya Red-Brown and proved to be easy enough to fix.
The cowling is built up around the engine, consisting of a forward cowl ring and a rearward ring of cooling gills braced apart by three small spacing bars that fit across the cylinder heads. The parts are well engineered by Revell with positive locations but I found it easier to assemble by using slower drying Revell Contacta glue applied from a squeeze bottle so that minor adjustments can be dealt with before the glue sets. The engine was suitably dirtied with a splash of well thinned Brown paint.
I returned to the fuselage sub assembly and glued in the tail surfaces , then the engine tubular supports were installed at the nose. The engine power egg was juggled around as a dry fit to ensure that it lined up with the mount, then glued to the fuselage nose. Before the cement dried the remaining nose panels were fettled into place, particularly the cowl panels with their very distinctive teardrop fairings.
The floats were dry fitted to the temporary jig of the base structure and tacked in place with Blu Tack reusable putty. The central float support struts are two massive one piece mouldings that reduce any worries about strut alignment and they were glued to the float tops. Using the slow drying cement technique they were dry fitted into the under fuselage locations to check their alignment, then the fuselage taken away and the floats sub-assembly left to set hard over a couple of days.
I then turned to the most baffling aspect of this kit. Unlike any other I have built in recent years, the cockpit glazing is made up from a series of flat panels. The windscreen and its side panels are separate parts; the pilot’s sliding hood cover consists of two sides and a top panel as does the rear cockpit cover. It is near impossible to join the parts together without some glue showing. I propped the parts in place to dry fit them on the fuselage and used Humbrol Clearfix as best I could but the parts still twisted slightly along the joints and I had to settle for “near enough”. Subsequent to this build I discovered that Alley Cat makes an aftermarket replacement in the form of one-piece clear resin castings.
| COLORS & MARKINGS |
The propeller spinner was painted
White and a strip of Tamiya tape wound around it to mask off the spiral. The
spinner and prop blades were painted in Schwartzgrun 70 and the completed
propeller set aside. The paints for the main camouflage came from the Xtracrylix
range: XA 1222 RLM Grun 72 and XA1223 RLM Grun 73 for the upper surfaces; XA
1202 RLM Hellblau 65 for the underside. The underwing yellow panels were sprayed
white, then in Xtracrylix Trainer Yellow and masked off.
the main camouflage came from the Xtracrylix
range: XA 1222 RLM Grun 72 and XA1223 RLM Grun 73 for the upper surfaces; XA
1202 RLM Hellblau 65 for the underside. The underwing yellow panels were sprayed
white, then in Xtracrylix Trainer Yellow and masked off.
The floats, fuselage assembly, wing panels and engine assembly were methodically masked off and painted, then each was coated with Klear floor polish as a base for the decals. The main insignia came from Kagero’s sheet and the stencils from Revell’s offering. A coat of Xtracrylix flat varnish sealed the finish. Finally a light covering of water based wash gave a slightly weathered look
For final assembly the floats assembly was glued into place under the fuselage centre section and the floats were glued down to the base. The whole assembly was carefully jigged and checked to ensure that it was square then left alone for a week to dry out. The outer wings were slipped into place with the large underwing V-struts assuring a self-aligned assembly. The floats were rigged with short lengths of copper wire tacked on with cyano glue. The canopy glazing was added to complete the build.
| CONCLUSIONS |
This is a well detailed kit and kudos to Revell for bringing it out. It is well engineered but still a bit of a challenge to build. As usual with the big scale Revell kits it is impressive value for money. The finished article is deceptively big when fixed to its display base, being about 350mm from float tips to the trailing edge of the horizontal tail and with a 400mm wingspan. It also weighs a ton. It is an imposing model and has plenty of scope for further detailing especially if the engine panels are opened up. If I were to build another I would seriously consider the folded wing option as a space saving solution.
| REFERENCES |
Warplanes of the Second World War, Vol 6, Floatplanes by William Green. Macdonald 1962.
Kagero Top Drawings No 14, AR 196 (All models) by Mariusz Lukasik, 2012
5 December 2017 Copyright ModelingMadness.com If you would like your product reviewed fairly and
fairly quickly, please
contact
the editor or see other details in the
Note to
Contributors. Back to the Main Page
Back to the Review
Index Page
Back to the Previews Index Page