Revell 1:72 Arado Ar E.555
| KIT #: | 4367 |
| PRICE: | $22.00 |
| DECALS: | Two options |
| REVIEWER: | Francisco Santoro |
| NOTES: | Fun to build, a pain to paint the canopy, many camouflage possibilities. |
| HISTORY |
Kampfgeschwader 7 was the latest bomber wing of Germany. Created in 1946 and operating from Tripoli, it had been designed to bomb the British controlled Egypt and other areas controlled by the Allies in Africa, thus its nickname "Afrika." The equipment of this wing was the brand new Arado Ar 555, a bomber with a 5000 km operational range and a 3000 kg payload. The unit had 12 of them.
It was now 1948, and Hans Weber, one of the newest bomber pilots sent to
serve with I/KG 7 "Afrika," questions his mechanic about the state of the
aircraft. "How´s the bomber?," he asks. "Fully loaded and ready for combat," the
mechanic answers. Soon after that, the alarm sounds. it´s time for take off.
Hans is briefed about the en-route weather, amount of fuel inside the aircraft,
and is told that JG 27, lead by Hans
 Joachim Marseille and equipped with tropicalised versions of the Me 262 and Ho 229, is ready to escort them from an
airfield in Mersa Matruh. The target, the port of Alexandria, main supply gate
for the Allies in the North of Africa. In case of problems, the flight of four
bombers is ordered divert and land at Tobruk.
Joachim Marseille and equipped with tropicalised versions of the Me 262 and Ho 229, is ready to escort them from an
airfield in Mersa Matruh. The target, the port of Alexandria, main supply gate
for the Allies in the North of Africa. In case of problems, the flight of four
bombers is ordered divert and land at Tobruk.
Weber climbs into the cockpit of the Ar 555, together with his co-pilot Walter and the radio operator/gunner Fritz. One by one, he starts the six BMW 003 engines, checking that every one of them is in working order. He looks to his side, and watches as the other three bombers begin their start up procedures. With the engines started, Weber gives the groundcrew the all clear sign, and is authorised by the control tower, together with the other three bombers, to taxi to the end of Tripoli´s airport newly built asphalt runway.
The Schwarm of four bombers is now lined up with the runway. Weber and his co-pilot push the six throttles forward, and the aircraft begins to pick up speed. Thirty seconds later, Weber pulls back on the control stick, and the Ar 555 lifts off the ground, the other aircraft following soon after. "If the weather maintains this condition, we´ll join JG 27 in 1 hour, reaching Alexandria an hour later," says Walter. "Very well," answers Hans, as they reach their assigned flight altitude of 8000m (26,000ft).
 The
reality: The Arado 555 began its life in the Arado facilities in Landeshut/Schlesien
in mid-December 1943 under the direction of Dr. W.Laute. When the project was
presented to the RLM in 1944, Arado was asked to build a bomber with a payload
of 4000kg, a range of 5000km, and have high speed. The designers at Arado
reached to the conclusion that they´d use the flying wing concept in order to
fulfill the order.
The
reality: The Arado 555 began its life in the Arado facilities in Landeshut/Schlesien
in mid-December 1943 under the direction of Dr. W.Laute. When the project was
presented to the RLM in 1944, Arado was asked to build a bomber with a payload
of 4000kg, a range of 5000km, and have high speed. The designers at Arado
reached to the conclusion that they´d use the flying wing concept in order to
fulfill the order.
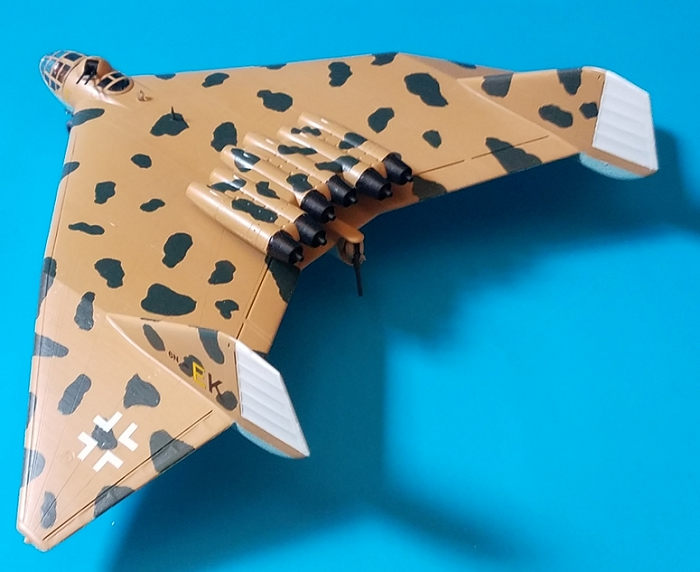
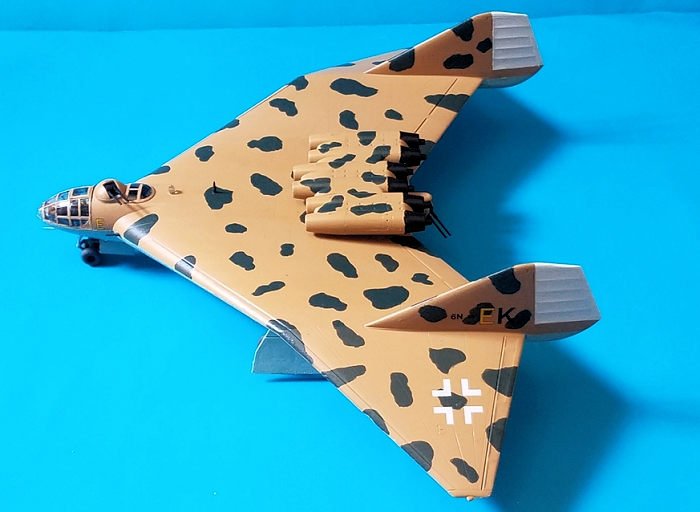
The Ar 555 was to be built entirely of metal, and was a full wing, with a circular cross section where the pressurised cockpit would be located. The main landing gear consisted of two tandem, dual wheeled units, with the nose gear being a single, double wheeled unit. Thrust was to be provided by six BMW 003 engines, mounted at the rear end of the fuselage.
Defensive armament consisted of two MK 103 30mm cannons installed in the wing roots, a turret with two MG 151/20 20mm cannons located behind the cockpit, and a remote controlled turret located at the end of the aircraft with two MG 151/20s of 20mm.
Arado was ordered to cease work on the Ar 555 at the end of 1944 due to the worsening situation of the war, and focused all its efforts in the production of fighters.
| THE KIT |
 I really have to thank Revell Germany (apart from their excellent spare
parts service) for going so far as to create Luft 46 models. Alongside the Ar
555, there´re the Horten Ho 229, Blohm & Voss BV 194, Me P1099 and its heavy
fighter variant, the Ar 240 and the rebox of the Dragon Me P1011, all in 1:72.
I really have to thank Revell Germany (apart from their excellent spare
parts service) for going so far as to create Luft 46 models. Alongside the Ar
555, there´re the Horten Ho 229, Blohm & Voss BV 194, Me P1099 and its heavy
fighter variant, the Ar 240 and the rebox of the Dragon Me P1011, all in 1:72.
The kit comes in Revell´s blue side opening box, with four sprues (three light grey and one clear) coming inside a single bag, with the clear one being on its own separate bag. Of the grey sprues, two are dedicated to hold the wings/fuselage and the empennages, while the third one has the cockpit, landing gear and their doors, and the bombs. The clear parts were nicely molded, with well defined framing. There was some flash present on the pieces, particularly in the main canopy, nothing that a (careful) swipe with a sharp hobby knife can´t solve.
| CONSTRUCTION |
This kit began with the cockpit. I painted all the parts in the sprue with Revell 78 (RLM 66), while also painting the landing gear well and the gear strut in Revell 45 (RLM 02). With the colours dry, I glued the control stick and several other parts to the cockpit floor, and left the to cure.
 My attention then went to the wings and the empennages. The wings were
separated from their sprue and the radio consoles were glued to the lower half
of the fuselage. The insides were painted with Revell 78 (RLM 66). The turret
immediately behind the cockpit was added, taking care to preserve the moving
functionality of it. The empennages come as a pair, and they were glued together
as the instructions indicated (follow them, because they´re keyed pieces, and
won´t fit into the wings if you glue them the wrong way).
My attention then went to the wings and the empennages. The wings were
separated from their sprue and the radio consoles were glued to the lower half
of the fuselage. The insides were painted with Revell 78 (RLM 66). The turret
immediately behind the cockpit was added, taking care to preserve the moving
functionality of it. The empennages come as a pair, and they were glued together
as the instructions indicated (follow them, because they´re keyed pieces, and
won´t fit into the wings if you glue them the wrong way).
I changed back from the fuselage to the cockpit. The landing gear has to be installed first, which I did. The cockpit was then glued to the lower wing and left to dry. With the cockpit secured to the wing, I began to ponder which lead weights should I use. Since Revell asked for 32g of weight in total, I cut in half a 60g weight and glued the halves in the nose, as close as possible to the front of the fuselage, with the thick UHU glue, and left it curing for some time.
After the UHU had cured, I glued the upper wing half and glued it, using tape to hold both halves together while they dried, while also adding the rear turret. Next I glued the empennages to the fuselage. With the aircraft mostly complete, I passed on to the engines. The intakes and exhausts MUST be glued to one half of the engine body first, glue the main body of the engine first and the intakes and exhausts won´t fit.
| COLORS & MARKINGS |
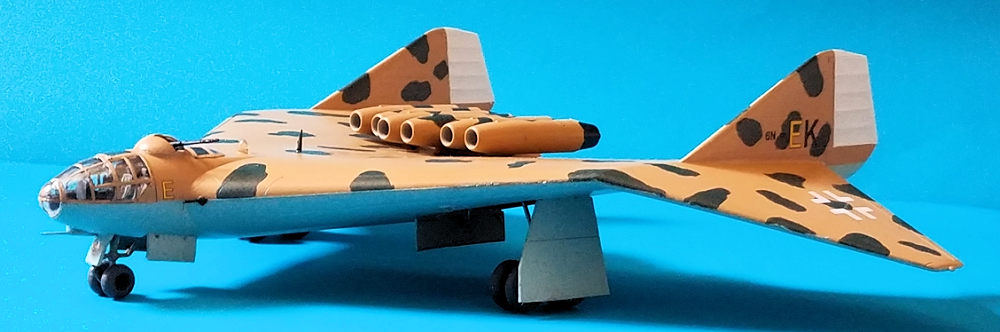
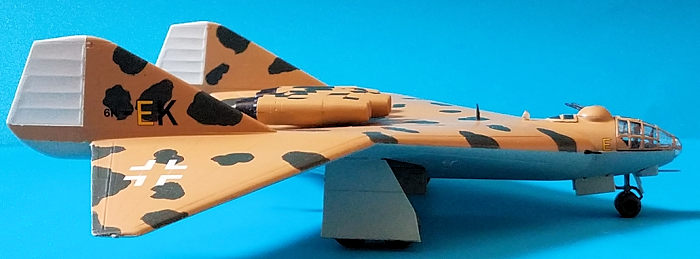
I had decided before opening the box that I didn´t want to paint any of the two colour schemes provided, so I printed three sheets of the painting schemes, and outlined different camouflages on each page. The first one was a regular bomber camouflage of RLM 70/71/65 with yellow rudders and yellow wing bands (provided on the kit), the second one was a desert camouflaged aircraft in RLM 79 with large patches of RLM 70 and RLM 65 for the undersides, and the third one was for a bomber in RLM 74/65.
I decided, as you may have already found out, for the desert camouflaged aircraft. I painted the uppers with Revell 17 (RLM 79) with several thinned coats of that colour to preserve the panel lines. With the RLM 79 cured, I used a fine brush and outlined with Revell 40 (RLM 70) the black green patches (I´m aware that the correct colour should have been RLM 80 Olive Green, but I had a satin Olive Green, and satin colours don´t cover as well as matt ones, besides, this is Luft 46), filling them later with RLM 70. I masked after that the upper wing, and painted the undersides with Revell 49 (RLM 65), brushing several thinned coats there too. The engine assembly was painted in the colours described above, but the exhausts were painted with matt black.
 After
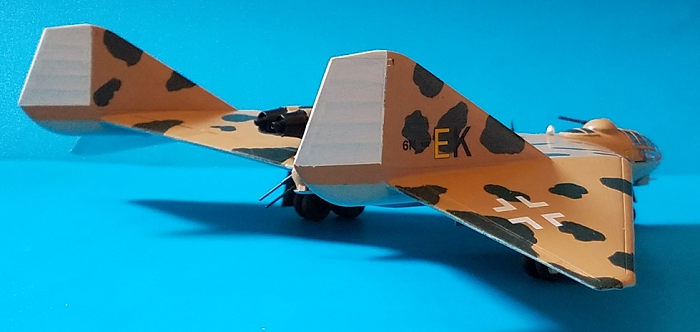
unmasking everything and giving the paint some touch ups, I masked the rudders
and painted them in white, to denote the aircraft´s operational theatre. The
model was then coated with Revell´s clear varnish twice, to prepare it for
decalling, while at the same time making the paint have the same finish.
After
unmasking everything and giving the paint some touch ups, I masked the rudders
and painted them in white, to denote the aircraft´s operational theatre. The
model was then coated with Revell´s clear varnish twice, to prepare it for
decalling, while at the same time making the paint have the same finish.
I used the kit decals, choosing the 6N+EK lettering option. I decalled the upper wings and empennages first, the undersides being done a bit later. Even though the decals were thin enough to sink into the panel lines without any help, I still brushed them with some decal softener, and let that dry. When dry, what remained of the decal solution was wiped out with cold water, and the model was brushed twice with Revell´s flat varnish. While I was handling the model, I began to hear a rattling noice insinde the aircraft, one of the weights had gotten lose inside the model. I guess I didn´t use enough glue to hold it in place.
| FINAL CONSTRUCTION |
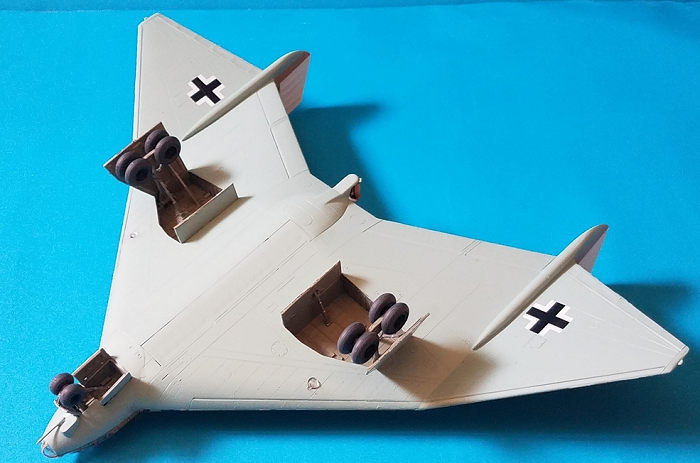
With the model decalled and varnished, it was time to glue the final parts. The wheels, landing gear, landing gear doors, retraction struts and engine assembly were painted, and were glued to their respective places in the aircraft.
 The gear doors come as a single piece, and you have to cut them if you
want to have the aircraft with the gear down. While slicing one, I pressed too
hard and the knife slipped to one side. Luckily you can´t see the damage unless
you point it out. Each door was glued into their respective position.
The landing lights were an exercise in patience, they
need to be trimmed in order to make them fit. You can leave them out if you
want, but I thought they´d be important on the finished model, since they can be
seen from the outside.
The gear doors come as a single piece, and you have to cut them if you
want to have the aircraft with the gear down. While slicing one, I pressed too
hard and the knife slipped to one side. Luckily you can´t see the damage unless
you point it out. Each door was glued into their respective position.
The landing lights were an exercise in patience, they
need to be trimmed in order to make them fit. You can leave them out if you
want, but I thought they´d be important on the finished model, since they can be
seen from the outside.
With the model now resting on its wheels, I had to take on the titanic chore of masking the canopy, which is devided into three parts. It took me five hours to paint it, making sure to fully paint the fuselage colour first, and then the camouflage colour. All the effort payed off after I put one canopy under the light, and there wasn´t any see-through effect. The clear parts were then glued with Revell Contacta Clear, and left to dry overnight.
| CONCLUSIONS |
This was a ton of fun to build, and thanks to its Luft 46 nature, you can go and paint it whatever you like, and still end up with a convincing scheme. It´ll also be a talking point with your friends.
| REFERENCES |
Luft 46.com entry about the Ar 555: http://www.luft46.com/arado/are555s.html
Francisco Santoro
12 November 2018
Copyright ModelingMadness.com
If you would like your product reviewed fairly and fairly quickly, please contact the editor or see other details in the Note to Contributors.
Back to the Main Page Back to the Review Index Page Back to the Previews Index Page