
Revell 1/72 Messerschmitt P.1099
| KIT #: | 4301 |
| PRICE: | 33$ |
| DECALS: | Two options |
| REVIEWER: | Francisco Santoro |
| NOTES: | Decals worked even after being 26 years old. |
| HISTORY |
 From
Wikipedia: "The design of the Me P.1099 was begun in the summer of 1943 and
was intended as an improvement to the Messerschmitt Me 262. The Me P.1099
was planned in a way which could later be developed into high-speed bomber (Schnellbomber),
reconnaissance plane, interceptor, night fighter and trainer versions.
From
Wikipedia: "The design of the Me P.1099 was begun in the summer of 1943 and
was intended as an improvement to the Messerschmitt Me 262. The Me P.1099
was planned in a way which could later be developed into high-speed bomber (Schnellbomber),
reconnaissance plane, interceptor, night fighter and trainer versions.
The Messerschmitt P.1099 was a 12 m long, conventional-looking aircraft with a wingspan of 12.6 m. It had a wider fuselage than the Messerschmitt Me 262 and was equipped with a cockpit for two pilots, located at the front end. The planned powerplants were two Junkers Jumo 004 turbojet engines, later to be replaced by Heinkel HeS 011 turbojets in a further development with swept wings, the Messerschmitt P.1100.[2] None of the variants was built, but this project was developed into the Messerschmitt P.1100 all-weather fighter project, which in turn would lead to the single-seat, single-jet Messerschmitt P.1101 design for the Emergency Fighter Program in July 1944."
| THE KIT |
 This is a
kit I haven't seen many builds of. Originally released in 1996 (same year I was
born), the kit has crisp details, with nicely done panel lines and a nicely done
(for the scale) cockpit. The Me P.1099 was then retooled by Revell in 1998 to
make way for the Me P.1099B Heavy Fighter, which was then re-released in 2010.
Maybe the original kit didn't sell well enough and Revell didn´t see fit to
re-release the single seater.
This is a
kit I haven't seen many builds of. Originally released in 1996 (same year I was
born), the kit has crisp details, with nicely done panel lines and a nicely done
(for the scale) cockpit. The Me P.1099 was then retooled by Revell in 1998 to
make way for the Me P.1099B Heavy Fighter, which was then re-released in 2010.
Maybe the original kit didn't sell well enough and Revell didn´t see fit to
re-release the single seater.
The parts come inside a single bag and are molded in a dark green plastic, something I've never seen before. No flash evident, this embodied what would be a nice, trouble free assembly. The only two areas that worried me were the decals (of 26 years of age), and the area in which to add the nose weight. The first one was solved by dipping a decal I woudn't use in warm water, and upon seeing it didn't break, I made a sigh of relief. The nose weight was also solved by cramming quite a bit just aft the cockpit bulkhead, and some more in the opening behind the pilot's seat.
| CONSTRUCTION |
 But I'm
getting too ahead of myself. I first painted all the cockpit parts with Revell
78 Tank Grey. The instruments were then painted black, and the seat cushions
were painted in brown. I then glued all the cockpit parts together, and glued
the cockpit to the left fuselage half. The wheel well is a single piece, which
has an arrow signaling the way to glue it. Once the cockpit was dry, I glued the
weights as far forward in the cockpit as possible with epoxy glue. After the
epoxy had dried, I glued both fuselage halves.
But I'm
getting too ahead of myself. I first painted all the cockpit parts with Revell
78 Tank Grey. The instruments were then painted black, and the seat cushions
were painted in brown. I then glued all the cockpit parts together, and glued
the cockpit to the left fuselage half. The wheel well is a single piece, which
has an arrow signaling the way to glue it. Once the cockpit was dry, I glued the
weights as far forward in the cockpit as possible with epoxy glue. After the
epoxy had dried, I glued both fuselage halves.
While the fuselage halves were drying, I glued the wings and engines together. The wings come in left and right. When the time came to glue the wings to the fuselage, I used tape to hold them in place and make them set in a proper dihedral. I then glued the horizontal stabilizers in place.
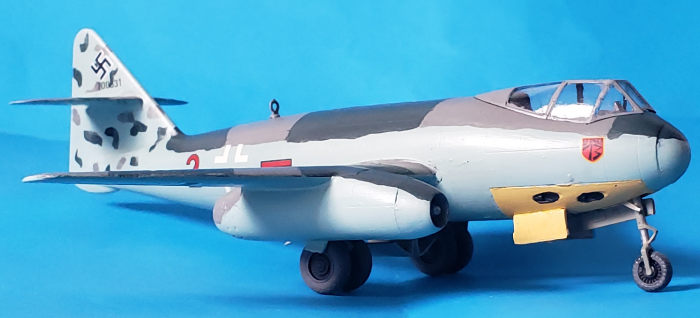
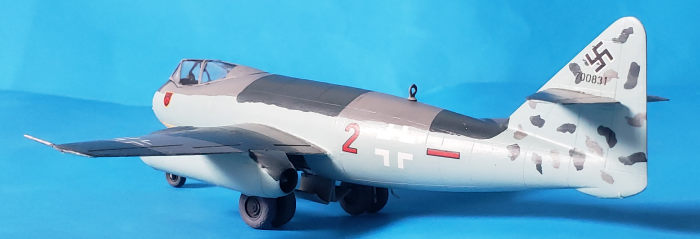
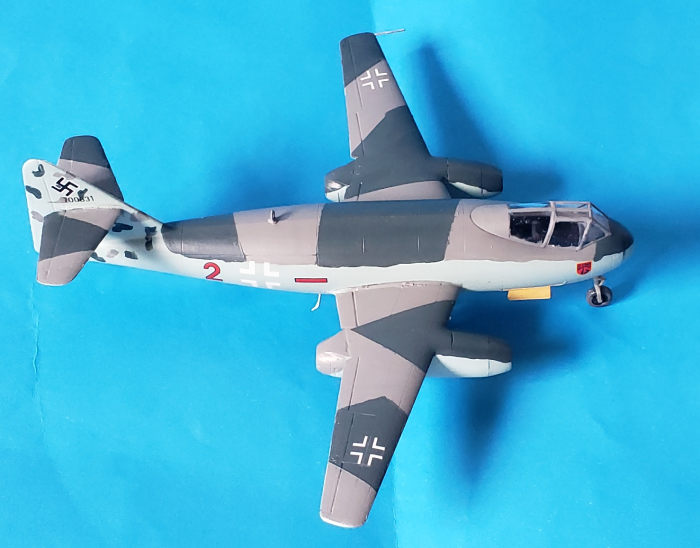
| COLORS & MARKINGS |
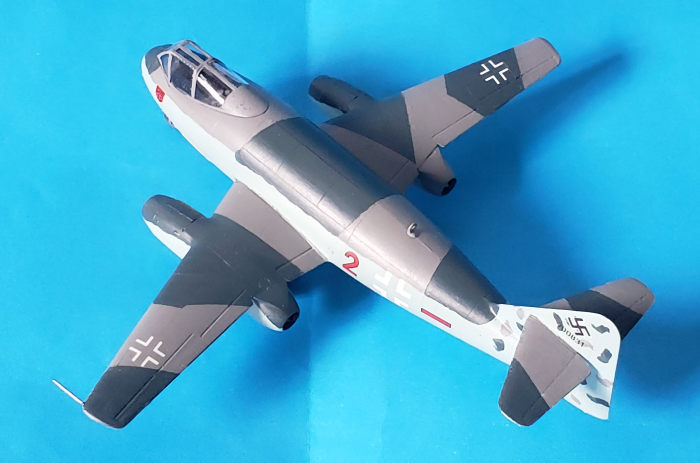 I decided
to paint this model in the earlier camouflage spintern scheme in RLM 74/75 with
some mottling on the empennage and a yellow nose. The undersides would be
painted in RLM 76. I first painted the RLM 75 (Revell 47 Mouse Grey), then the
74 (Revell 69 Granite Grey). The undersides were painted in RLM 76 (Revell 49
Light Blue). The yellow was Revell 15 Matt Yellow. I then glossed the model to
prepare it for the decals. Decalling was uneventful, all of them sliding from
the backing paper some seconds after dipping them in warm water. Once the decals
had set after an overnight waiting, I varnished the entire model with Revell's
Matt Varnish.
I decided
to paint this model in the earlier camouflage spintern scheme in RLM 74/75 with
some mottling on the empennage and a yellow nose. The undersides would be
painted in RLM 76. I first painted the RLM 75 (Revell 47 Mouse Grey), then the
74 (Revell 69 Granite Grey). The undersides were painted in RLM 76 (Revell 49
Light Blue). The yellow was Revell 15 Matt Yellow. I then glossed the model to
prepare it for the decals. Decalling was uneventful, all of them sliding from
the backing paper some seconds after dipping them in warm water. Once the decals
had set after an overnight waiting, I varnished the entire model with Revell's
Matt Varnish.
The landing gear legs were painted in RLM 02 (Revell 45 Light Olive), the wheels were painted with Revell 78 tyres and black hubs. Once the gear legs were painted, I glued them to their holes and left them to dry. I used a bit of CA to reinforce the union between the wheel well and the gear leg. After the gear legs had fully cured, I glued the wheels. I then painted and glued the canopy with white glue.
| CONCLUSIONS |
A fun kit to build, which will be a nice addition to any Luft 46 collection. Hopefully Revell will re-release it in the future. And who knows, maybe a new company (looking at you Amusing Hobby, with your 48th Triebflügel, Me 262 HGIII and Weserflug P.1003) will release a brand new tooling of the Me 1099 in 1:48.
| REFERENCE |
https://en.wikipedia.org/wiki/Messerschmitt_P.1099
16 August 2022
Copyright ModelingMadness.com. All rights reserved. No reproduction in part or in whole without express permission.
If you would like your product reviewed fairly and fairly quickly, please contact the editor or see other details in the Note to Contributors.