Dragon 1/72 Mistel 5
| KIT #: | 5002 |
| PRICE: | @$30.00 when new |
| DECALS: | Two options |
| REVIEWER: | Spiros Pendedekas |
| NOTES: | Luft '46 Heinkel He-162 and Arado E-377 |
| HISTORY |
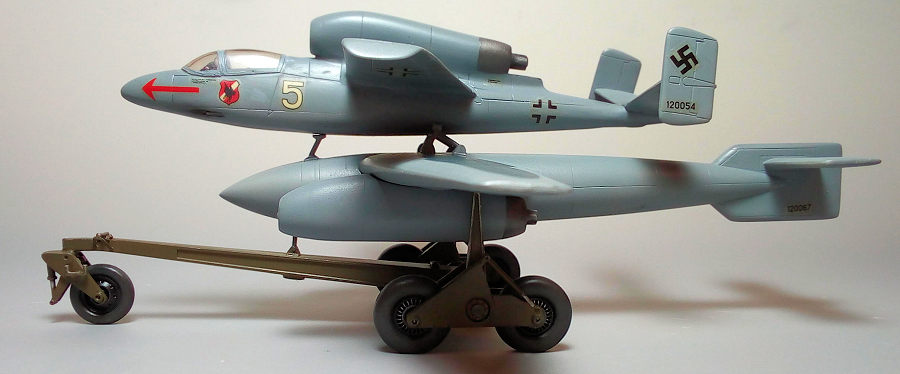
The Mistel 5 project was one of the last glide bomb developments submitted to the RLM before the end of WWII. Arado, working with Rheinmetall-Borsig, designed a simple glide bomb that could be powered or unpowered, to be carried beneath a Heinkel 162. The purpose of this flying bomb, which could be guided by remote control or a target guidance system, was to attack targets such as ships or large fixed objectives.
 Construction of the E.377 was wooden throughout the entire aircraft. The
fuselage was circular in cross section and was cigar-shaped. Mounted in the nose
was 2000 kg (4408 lbs) of Trialen 105, a high-explosive especially suitable for
ship attacks. In addition, 500 kg (1202 lbs) of an incendiary liquid was stored
in the rear fuselage which also acted as ballast to counterbalance the forward
warhead. A standard SC 1800 bomb could also be fitted in the forward fuselage of
the E.377 in place of the other explosive. The wings were tapered and
shoulder mounted. They also served as auxiliary fuel tanks for the parent
aircraft. Fuel was drawn from the E.377's tanks by means of jet pressure which
drove a compressor in the power plant of the parent aircraft. The tail unit was
symmetrical on top and bottom with a horizontal tail mounted on the upper half
of the fin.
Construction of the E.377 was wooden throughout the entire aircraft. The
fuselage was circular in cross section and was cigar-shaped. Mounted in the nose
was 2000 kg (4408 lbs) of Trialen 105, a high-explosive especially suitable for
ship attacks. In addition, 500 kg (1202 lbs) of an incendiary liquid was stored
in the rear fuselage which also acted as ballast to counterbalance the forward
warhead. A standard SC 1800 bomb could also be fitted in the forward fuselage of
the E.377 in place of the other explosive. The wings were tapered and
shoulder mounted. They also served as auxiliary fuel tanks for the parent
aircraft. Fuel was drawn from the E.377's tanks by means of jet pressure which
drove a compressor in the power plant of the parent aircraft. The tail unit was
symmetrical on top and bottom with a horizontal tail mounted on the upper half
of the fin.
Take off was accomplished by means of a releasable trolley which was similar to one that Rheinmetall-Borsig had designed for the Arado 234A. Since the Ar E.377 Mistel was heavier, an extra set of wheels were added to the new trolley. Once the aircraft reached takeoff speed, the trolley was released and slowed with a parachute and rockets. Assembly of this Mistel was carried out using a special trestle and frame to add each aircraft on top of the trolley.
Upon arrival at the target, the E.377 would be released by means of explosive bolts and then terred to its target by means of a control device. This device would make adjustments in the control and rudder movements from the carrier aircraft after launch, or the E.377 could just be set to glide straight after separation.
There was also a twin BMW 003 jet powered version to be used with the Heinkel 162, since the single jet engine of the He 162 would not have been powerful enough to carry the E.377. This version was known as the E.377a and was similar in all other aspects to the E.377. A piloted version was also planned, to be a suicide weapon, but was cancelled before the end of the war. The E.377 was never constructed due to the end of the war.
| THE KIT |
 First appearing in 1991, this 1998 rebox includes a full 1/72 Dragon He 162
(which had appeared one year earlier) and an “extra” Ar.377 flying bomb. Upon
opening the beautifully decorated top opening box, you are greeted with two very
well detailed kits, separately bagged. The He 162 has nicely rendered cockpit
and wheel well areas, with the kit also allowing the modeler to display the
beautiful mini model of the turbojet engine, by opening the access panels. The
same positive comments apply to the Ar.377 and its dolly. In all, there are 5
light gray styrene sprues with fine engraved detail and minimal flash. Clear
parts are nicely molded, but they are, strangely, “smoke” tinted. Well, since
this is a whatif project, I called the shade acceptable! A nice PE fret
accompanies the Heinkel, containing the instrument panel, a beautiful engine
harness and a few other detail goodies. A nice decal sheet is provided, for a
fictitious “White 5” Mistel.
First appearing in 1991, this 1998 rebox includes a full 1/72 Dragon He 162
(which had appeared one year earlier) and an “extra” Ar.377 flying bomb. Upon
opening the beautifully decorated top opening box, you are greeted with two very
well detailed kits, separately bagged. The He 162 has nicely rendered cockpit
and wheel well areas, with the kit also allowing the modeler to display the
beautiful mini model of the turbojet engine, by opening the access panels. The
same positive comments apply to the Ar.377 and its dolly. In all, there are 5
light gray styrene sprues with fine engraved detail and minimal flash. Clear
parts are nicely molded, but they are, strangely, “smoke” tinted. Well, since
this is a whatif project, I called the shade acceptable! A nice PE fret
accompanies the Heinkel, containing the instrument panel, a beautiful engine
harness and a few other detail goodies. A nice decal sheet is provided, for a
fictitious “White 5” Mistel.
| CONSTRUCTION |
I
started with the Heinkel. Since it would be built as a wheels up version, I did
not install the main landing gear bay, but only glued a couple of styrene pieces
inside of the LG well area, in order to provide some adhering support to the LG
doors. I then glued the fuselage halves together, followed by the one piece main
and landing gear doors that were glued shut. I then attached the engine
supporting base on top. No weight was added, since the Salamander would be
attached onto the Arado bomb, and I did not want to stress those scale looking
attachment struts. The lifeless side fuselage gun representations were sanded
flush and the housings were drilled through, with the plan to attach two scratch
built guns at later stages.
 It was then engine time: though I elected not to open the engine panels, the
basic engine must be assembled, as the compressor and turbine faces are visible
; I thus glued the two engine halves together, with the compressor face trapped
between them, followed by the intake bellmouth and rear turbine. The engine was
then attached on its base, with the side panels and finally the two piece
exhaust nozzle to follow. This was a fiddly process that took some patience, in
order to produce a homogenous result. Compressor was painted steel; turbine and
exhaust nozzle were painted burned metal.
It was then engine time: though I elected not to open the engine panels, the
basic engine must be assembled, as the compressor and turbine faces are visible
; I thus glued the two engine halves together, with the compressor face trapped
between them, followed by the intake bellmouth and rear turbine. The engine was
then attached on its base, with the side panels and finally the two piece
exhaust nozzle to follow. This was a fiddly process that took some patience, in
order to produce a homogenous result. Compressor was painted steel; turbine and
exhaust nozzle were painted burned metal.
The wings were attached, followed by the unnecessarily over engineered 5-piece
tail, Unless Dragon had some kind of future release in mind, that I am not aware
of, the tail plane base should have been molded in one piece with the fuselage
half, resulting in a stronger bond and easiness of alignment). The front
underbelly Mistel attachment mini plate was attached as well. In general, the
Heinkel fit was a tad on the fiddly side, with some appearing gaps initially
faired with liquefied styrene. I then had a nice basic Heinkel shape!
It was Arado bomb time: After trapping in quite a bit of lead weight with
modeling clay, I attached the two fuselage halves, followed by the already
assembled 2-piece wings and finally the tail planes. The pair of 4-piece
turbojet engines was assembled, but not installed, as to facilitate painting
(would be almost
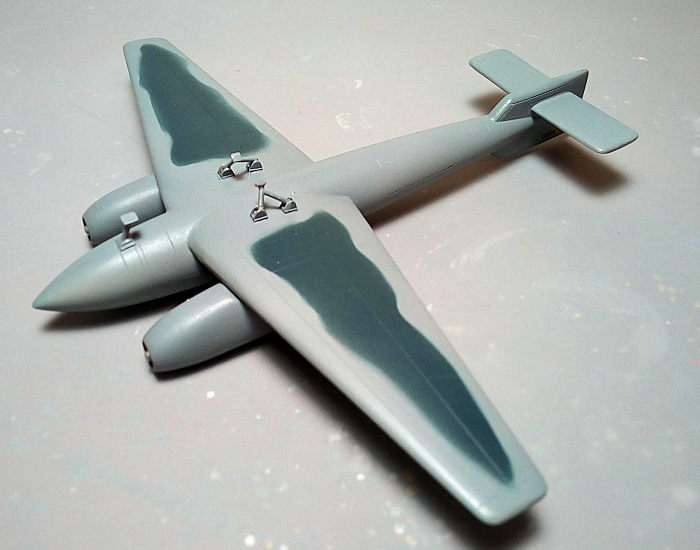 impossible for the airbrush spray beam to reach those inner
contours…). I left the rear turbine assemblies off, in order to install them at
later construction phases. Fit was excellent all over.
impossible for the airbrush spray beam to reach those inner
contours…). I left the rear turbine assemblies off, in order to install them at
later construction phases. Fit was excellent all over.
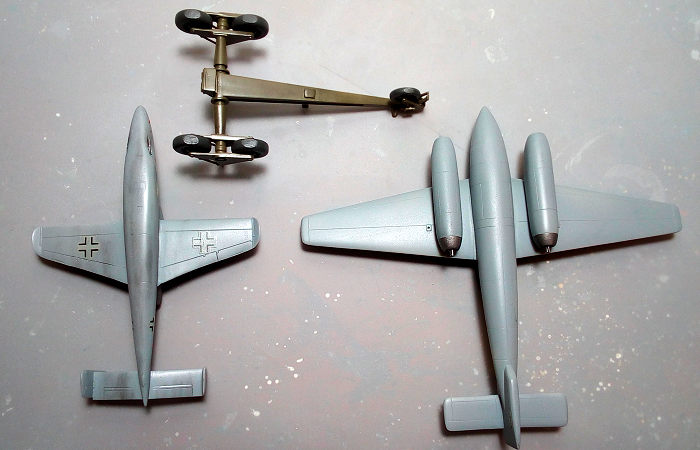
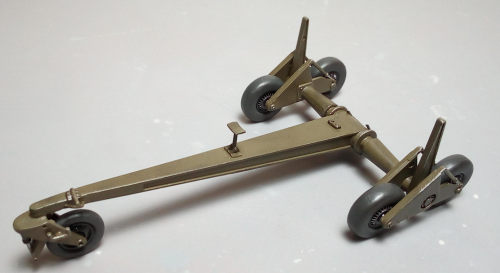
The nice dolly was a mini project and was done in a subassembly manner: I
assembled the 12-piece main body (including the 3-piece drag chute and 2-piece
rear axle bases), and the 3-piece and 2-piece main and nose wheel bogies
respectively. The four 2-piece main wheels were assembled as well and flattened
a tad with a file, for a “weighted” look.
Dolly Instructions wanted you assemble the main bogies with the already
pre-painted wheels trapped and axle bases attached, then attach the whole
assemblies to the dolly main body. Though this sequence looked appealing, I was
a tad worried about all the paired wheels alignment, topped by the fact that the
attachment points for the Arado were on the bogies themselves, not on the main
body. I thus deviated from the instructions and assembled the bogies, sans the
wheels, cut the wheels axles, drilled the corresponding areas, with the plan to
attach the wheels using pin pieces during final assembly. Τwo pin pieces were
used to strengthen the bogie/main axle joint as well. The wheels were painted
black, dry brushed silver, with dark gray tires.
I then gave the Heinkel, the Arado and the dolly main body an initial coarse
sanding, then some filling here and there (mostly at the Heinkel, the Arado
needed almost none), followed by the final 1000grit sanding. I attached the
delicate top Mistel attachment lugs and struts on the Arado and headed to the
paint shop!
| COLORS & MARKINGS |
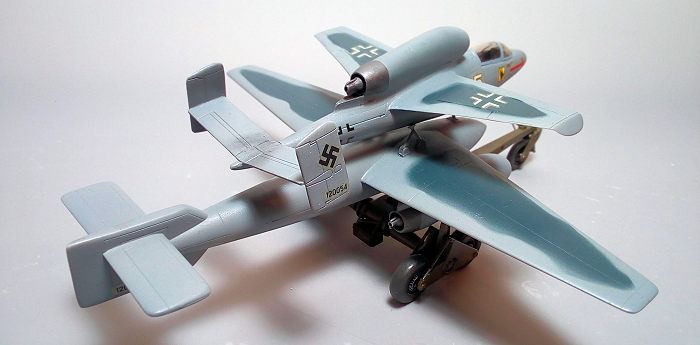
 Since
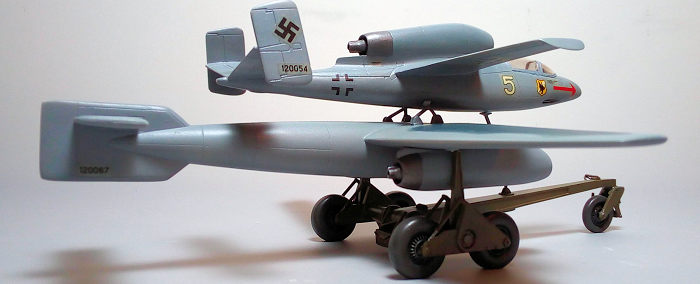
this was a what-if model, I planned to represent it as a maritime Mistel,
intending to hit ships with the Arado bomb. I thus gave both Heinkel and Arado a
whole coverage of a leftover Molak Compass Gray enamel, which, I have to admit,
sprayed nicely. After a protective coat of Future, I used Patafix-tac to create
four rough top wing areas, one at each wing, which were then carefully sprayed
with Hu77 Navy Blue. Upon removing the Patafix, a nice what-if maritime pattern
emerged! All dolly structural elements were painted Hu155 Olive Drab and a coat
of Future sealed everything.
Since
this was a what-if model, I planned to represent it as a maritime Mistel,
intending to hit ships with the Arado bomb. I thus gave both Heinkel and Arado a
whole coverage of a leftover Molak Compass Gray enamel, which, I have to admit,
sprayed nicely. After a protective coat of Future, I used Patafix-tac to create
four rough top wing areas, one at each wing, which were then carefully sprayed
with Hu77 Navy Blue. Upon removing the Patafix, a nice what-if maritime pattern
emerged! All dolly structural elements were painted Hu155 Olive Drab and a coat
of Future sealed everything.
I used the kit decals, which, despite their age, went on like a dream. Apart from yellowing (which is not that obvious), there’s nothing to report. I attached the bomb s/n onto the bomb (and not onto the dolly, as Dragon instructed…). Oh, yes, the white is actually ivory, which raises my suspicions that they might have been printed by Hasegawa (or the subcontractor who printed for Hasegawa back in the 90s: the decals look dead-on Hasegawa style…)
| FINAL CONSTRUCTION |
I left the cockpit for those final
stages. I installed the front middle console base and stick, followed by the
dashboard with the PE instrument panel under it, and finally attaching the seat.
As simple as it might sound it was not such: especially the dashboard, which
doubles as foot pedals support, rests on two practically nonexistent sidewall
attachment points. Attaching the PE instrument panel under it was not that easy
as well, let alone the fact that the very nice PE dials were invisible after
painting, so I resorted to a leftover decal IP depiction. I believe that the kit
cockpit offers amazing detail, but putting it together requires some effort.
Basic cockpit color was Hu32 (for RLM66), with black instrument panel, grip and
head cushion, leather seat back and light green bottom cushion. Two guns, made
of stretched sprue, were painted gunmetal and attached in the predrilled holes.
By that time, the two engines were attached to the Arado, as well.
 Trying to figure out a way to assemble the dolly, so that it would have a
natural posture, with all wheels touching the ground, I ended up by first
attaching the wheels at each individual bogie body, align them and let the
bogies rest on themselves. I then attached the front wheel assembly at the
dolly. With the slow curing cyano still pliable, I attached the complete bogies
at the dolly body, aligned everything and let the cyano cure. 8 pins in total
were used, in order to secure the wheels and their bogies at this very
interesting construction. Upon curing, I gave the bogie oleos a silver coating
with my Pilot Silver pen and touched up any of the cyano-glued joints that
required so.
Trying to figure out a way to assemble the dolly, so that it would have a
natural posture, with all wheels touching the ground, I ended up by first
attaching the wheels at each individual bogie body, align them and let the
bogies rest on themselves. I then attached the front wheel assembly at the
dolly. With the slow curing cyano still pliable, I attached the complete bogies
at the dolly body, aligned everything and let the cyano cure. 8 pins in total
were used, in order to secure the wheels and their bogies at this very
interesting construction. Upon curing, I gave the bogie oleos a silver coating
with my Pilot Silver pen and touched up any of the cyano-glued joints that
required so.
I decided to apply minimal weathering to the bomb (as it would understandably
have zero what-if hours) and some more weathering/dirtying to the Heinkel and
the dolly. For this I used dark colored pastel chalks to represent some Heinkel
engine exhaust stains and wheels area dirtying (at the dolly also). The dolly
received minimal paint chipping and rusting as well.
A final satin Humbrol enamel coat (50/50 matt/gloss) sealed everything and gave
the Mistel its final finish. The transparencies were hand painted and then
detached from their sprue tree. The pour gates were thick and close in
proximity, meaning, sadly, that some stress fractures would be noticeable there.
I decided to “paint’ the frames a tad broader, as to “mask” those discrepancies.
Having already attached an acetate piece gun sight glass, I attached the
windscreen and canopy with minimal styrene glue, then faired all joints with
white glue. The Salamander sports a characteristically long front pitot that is
not to my liking (!!) and, since this is a what-if project, I assumed
the designers used some different means to measure the airspeed, so I deleted
it…
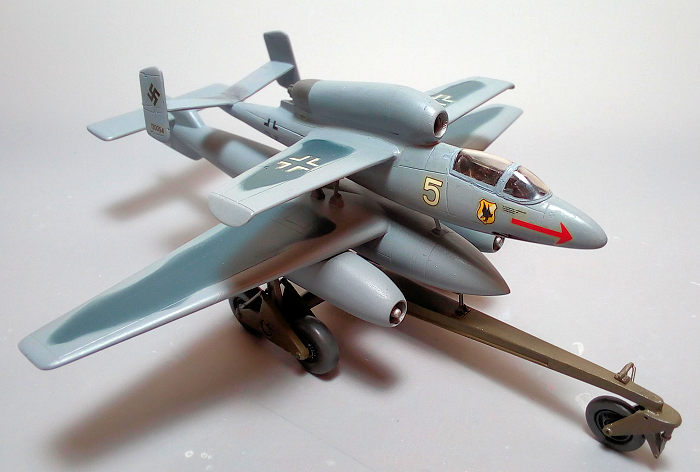
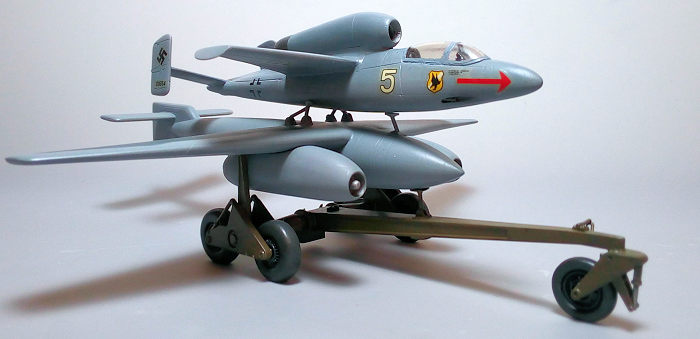
I was very tempted not to glue the Mistel elements together, but let them rest
at their mounted positions (so I can remove them and, admittedly, play with
them…). To my satisfaction, this was possible, with the Heinkel posture a tad
forward of its “projected” position. Since this is a what-if build, I called the
“new” position acceptable (very dynamic looking, too!) and called this beauty of
a Mistel done!
| CONCLUSIONS |
 This is a jewel of a kit (but, beware,
jewel might not necessarily mean easy…): it essentially is two kits in one
(three, considering that the retractable dolly is a model by itself). Detail
level is very high for the scale, nicely engraved, especially at the Heinkel,
unbelievable for an early 90’s kit, allowing to depict, out of the box (OOB), a
very fine result of this paper project. However, all this detail comes at the
cost of some fiddleness in construction, mostly evident, again, in the Heinkel,
where the modeler will at cases have to deal with some tiny parts needing
attachment onto nowhere (!). Dolly assembly needs some care, too, in order for
those interconnected wheels and struts to look aligned and homogenous. Bomb
assembly was super, no remarks whatsoever. Taking into account the above
remarks, a novice modeler should consider tackling some “simpler” kits, before
commencing work on this one.
This is a jewel of a kit (but, beware,
jewel might not necessarily mean easy…): it essentially is two kits in one
(three, considering that the retractable dolly is a model by itself). Detail
level is very high for the scale, nicely engraved, especially at the Heinkel,
unbelievable for an early 90’s kit, allowing to depict, out of the box (OOB), a
very fine result of this paper project. However, all this detail comes at the
cost of some fiddleness in construction, mostly evident, again, in the Heinkel,
where the modeler will at cases have to deal with some tiny parts needing
attachment onto nowhere (!). Dolly assembly needs some care, too, in order for
those interconnected wheels and struts to look aligned and homogenous. Bomb
assembly was super, no remarks whatsoever. Taking into account the above
remarks, a novice modeler should consider tackling some “simpler” kits, before
commencing work on this one.
This kit was reboxed during the 90’s (with the fourth and last reboxing by
Revell in 2000), but has not been reboxed ever since. The fact that it is not
that often seen built, together with the fact that, after more than 20 years,
can still be found at “normal” prices, might be an indication for its low sales
numbers and consequent company reissuing reluctance.
That said, it was a most enjoyable (though at times a tad challenging) build:
the finished model looks very imposing and unique, kind of an eye catcher. Since
it was a paper project, the modeler can unleash his artistic talents upon
choosing a camo. If you own this kit, or happen to find it at a good price, you
might consider building it: it will not be a shake’n’bake build, but a
definitely rewarding one.
Happy modeling!
| REFERENCES |
The amazing Dan Johnson’s Luft46 website: http://www.luft46.com/. My sincere thanks to Dan, for letting me use parts of it.
14 February 2022
Copyright ModelingMadness.com. All rights reserved. No reproduction in
part or in whole without express permission.
If you would like your product reviewed fairly and fairly quickly, please contact the editor or see other details in the
Note to
Contributors.