Fonderie Miniature 1/48 BV.212P
| KIT #: | 6013 |
| PRICE: | €35 |
| DECALS: | Two options |
| REVIEWER: | Spiros Pendedekas |
| NOTES: | I |
| HISTORY |
Alternate history
Flughafen am Dammschen See, located on the Eastern bank of the Oder River
in the Pomeranian city of Szczecin, was seemingly a quiet airstrip in 1942.
During the last 6 months not a lot of flight activity was evident...apart
from some Ju-52 “mysterious” flights. Those Ju-52s would arrive at
non-specified intervals, always with fighter escort, taxi towards a small
hangar which they would approach closely, their cargo door facing the hangar
door. With engines running, some “boxes'' would quickly be unloaded and
transferred to the strange hangar, its doors closing as quickly as they
opened, the Ju-52s fleeing away...
Something serious was going on, in that small hangar: a Secret Project for
sure, but what kind of? Apart from the strange Ju-52 deliveries, the only
other clue were the hissing loud noises that could only be heard at nights:
some nights those noises were monotonous, whereas some other nights the
noise would slowly fade away, gradually reappearing (but at a lower level)
after half an hour or so, as if something fey would go away and return.
 Well, it was one of those sweet warm June 1942 mornings, when the same
hissing sound became clearly audible: that was a first! Those noises had
only been heard during night time so far! Gerard Stachnik's curiosity, a
15yo student with passion for anything that flew, rose to extreme levels: he
rushed to a nearby mound, from where the small strip was clearly visible. If
something were to happen at the airport, this would be the perfect spot to
witness it…and there it was! A plane for sure, not a big one, but...where
was the propeller? And its engine sounded more like a rocket than a piston
one!
Well, it was one of those sweet warm June 1942 mornings, when the same
hissing sound became clearly audible: that was a first! Those noises had
only been heard during night time so far! Gerard Stachnik's curiosity, a
15yo student with passion for anything that flew, rose to extreme levels: he
rushed to a nearby mound, from where the small strip was clearly visible. If
something were to happen at the airport, this would be the perfect spot to
witness it…and there it was! A plane for sure, not a big one, but...where
was the propeller? And its engine sounded more like a rocket than a piston
one!
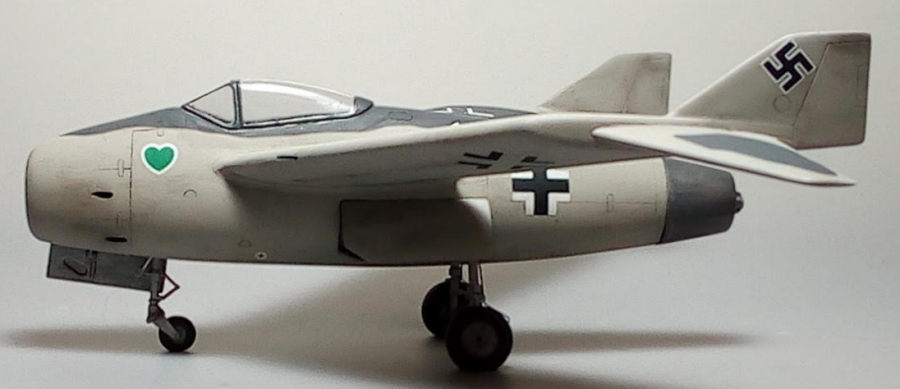
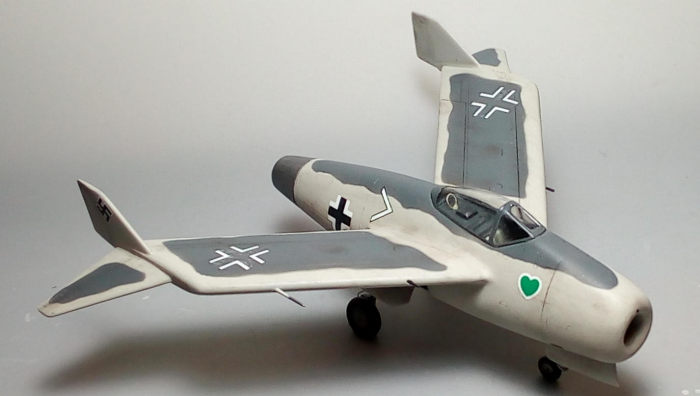
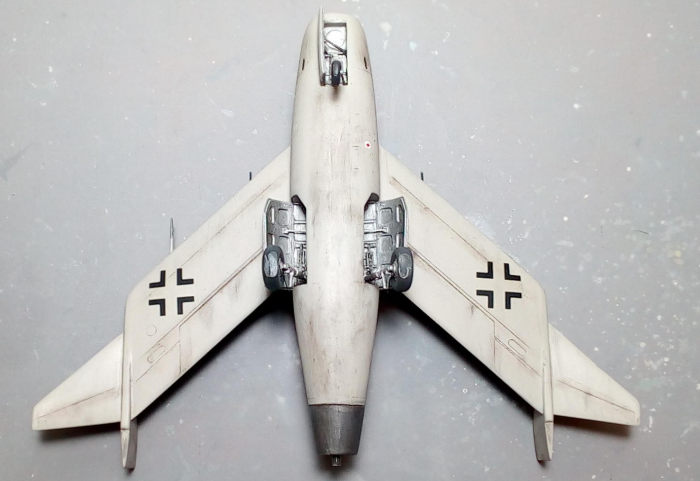
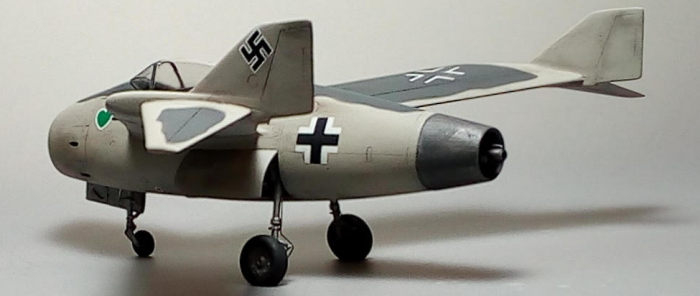
As the plane was taxiing, more astonishing details would become evident: to
start, there was a hole at the front, from where air was seemingly sucked to
feed the mysterious engine. Then, it was this futuristic swept wing shape
that started with a dihedral, sharply changing to an anhedral towards the
tips; no tail at all, but two fins located on the wings at the dihedral to
anhedral changing point. And, of course, the tricycle landing gear that gave
the strange plane, painted in a weird two tone gray disruptive camo, an
unusual, horizontal posture!
Many other features could have become evident, but there was no time to spot
them, as Oberleutnant Marcel Rösch, the proud but very focused pilot, pushed
very gently the demanding machine’s throttle, with the engine slowly but
steadily picking up revs, the noise levels gradually increasing: moment of
truth: the plane started to accelerate at an unprecedented rate! Soon it
rotated and lifted off, with its camo, shape and, of course, speed,
rendering it invisible at no time…
That Rösch was very happy with “his” plane was apparent: it was fast yet
agile (those conservative critics of the design were proved wrong), its
firepower was adequate, at least for the moment, and it seemed to be a
rugged machine. In a few words, a successful design with a lot of potential.
Of course, no one would be naive enough to believe that design limitations
or even “misses”, together with teething problems would not take place,
this being especially true for the captious and extremely skillful Rösch.
The main landing gear was narrow, deeming the heavy crosswind landings very
tricky. The brakes were quickly overheating, leaving Rösch with no other
choice but land the “hot” BV close to its stall speed and touch the runway
at its very edge, so that he would land as slow as possible and use the
maximum allowable runway length. The fact that the engine would take
ages to pick up speed if something went wrong, only added to the tricky
landing procedure, which, like in the Komet, would more or less have to be
perfect every time…
 Endurance was not at all great, merely sufficient for the BV’s “point
interceptor” role - that engine would consume a lot of fuel! Finally, the
engine severely surged upon ingesting gun exit gases during firing,
necessitating throttling back before shooting.
Endurance was not at all great, merely sufficient for the BV’s “point
interceptor” role - that engine would consume a lot of fuel! Finally, the
engine severely surged upon ingesting gun exit gases during firing,
necessitating throttling back before shooting.
Rösch had also noted that when speed approached 600 knots during dives,
there was unusual buffeting and the controls became stiffer. Upon discussing
the issue with his supporting team, he was told that he approached the speed
of sound, but they were yet uncertain of how this was connected with the
observed remarks…
Anyway, another successful flight was nearing its end: Rösch made a spotless
landing, quickly taxiing towards the small hangar, leaving young Gerard
speechless and astonished. He was determined to stay more on the mound,
maybe spotting other interesting details, but the sound of a closing patrol
would change his plans. He left the mound as quickly as he could.
This was the day that changed Gerhard's life forever. After the war that he
was lucky enough to survive it, he moved to France where he studied
Aeronautical Engineering, then excelling as an aerodynamic designer in a “Société
des Avions” company that was run by a gifted man who firmly believed that a
successful aircraft design cannot result in anything less than a
aesthetically pleasing aircraft...
| THE KIT |
| CONSTRUCTION |
Changing my lifetime habit, I carefully read
the instructions...speaking of which they are definitely aimed at the
experienced modeler (as is nevertheless the whole kit), meaning all info is
provided, but in a kind of minimalistic manner. If you take your time
reading them and figure out what goes where, all is clear though.
I started by washing the sprues with lukewarm water and some dish soap, in
order to remove any leftover mold residue, then removed the parts from the
sprues and cleaned all flash or excess plastic with my hobby knife or by
sanding.
 I first assembled the 4-piece MLG wells, then attached each of them to the
respective fuselage half. The resin cockpit tub was subsequently secured at
the starboard fuselage innard with liquefied styrene, followed by attachment
of the instrument panel and aft seat “anti-glare” horizontal panel that has
some sort of radio box molded onto it. The fuselage halves were then joined.
As expected, fit was challenging but manageable after the necessary
trimming/test-fitting loops. The resulting gaps were at first treated with
liquefied styrene.
I first assembled the 4-piece MLG wells, then attached each of them to the
respective fuselage half. The resin cockpit tub was subsequently secured at
the starboard fuselage innard with liquefied styrene, followed by attachment
of the instrument panel and aft seat “anti-glare” horizontal panel that has
some sort of radio box molded onto it. The fuselage halves were then joined.
As expected, fit was challenging but manageable after the necessary
trimming/test-fitting loops. The resulting gaps were at first treated with
liquefied styrene.
After giving the fuselage an initial coarse sanding, I assembled the inner
wing parts and butt-fitted them to the fuselage. Their external parts were
progressively built-up by sequentially attaching the fins and winglets. This
was a process easier said than done, since fit was not precise, requiring
the usual loops of checking and trimming, with the kit provided head-on view
being very helpful on setting those areas at the correct angles.
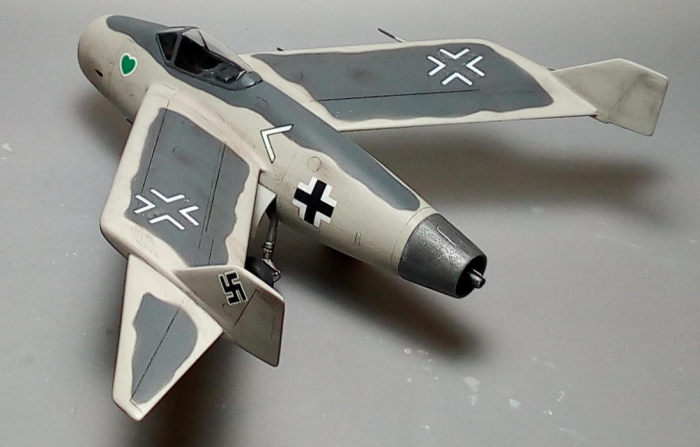
Next was the NLG well and intake installation: since the model cried to be a
potentially severe tail seater, I “secured” with liquefied styrene a good
amount of small-cut fishing weights circumferenciently at the intake’s lip
innard. The intake itself was in “reality” supposed to be ducted under
the cockpit, but the shallow kit provided intake ended nowhere: to (kind of)
provide believable looks, I attached a straw of suitable diameter at the
inner end of the intake. Then, upon attaching the nose, I lightly squeezed
it and carefully routed it under the resin cockpit. The "duct" was painted
steel.
The basic model was then filled and sanded at all
areas requiring attention (and there were quite a few of them). It was by that
time I realized that a few shrinkage spots were formulated at the nose, due to
stagnated liquefied styrene (used to secure the fishing weights), meaning I
would have to patiently wait a couple of days for the irritating shrinkages to
stop and then fill/sand the affected areas (also meaning that liquefied styrene
must NOT be used in cases where it has chances to stagnate at places you do not
want it to, but use another bonding/securing agent of the plenty available -
cyano, white glue, clay etc).
The gun ports were drilled out and aerodynamically “faired” (by moving the
microdrill back and forth, kind of like a circular mini file), as their openings
were not looking very convincing. The kit-rendered gun opening at the lower lip
of the intake was deleted (filled and sanded), since in “reality” it would be
impossible to cram a gun beside it, as the NLG housing was immediately aft.
After a final filling round, the model received a 1500 grit sanding and headed
to the paint shop!
| COLORS & MARKINGS |
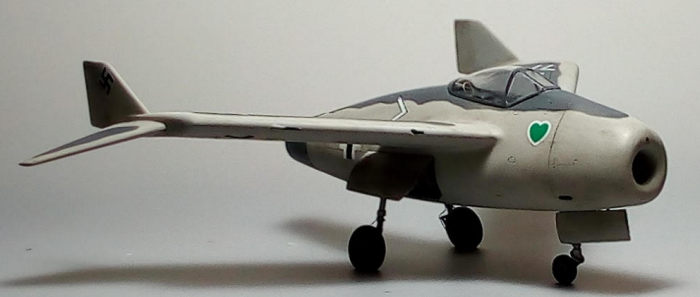
Trying to figure out an “operationally believable” what-if scheme, a picture of
the YF-23 s/n 203 prototype caught my attention, featuring an all-around light
gray basic color with the top areas loosely painted with a darker gray. Fully
inspired, I first applied an overall coat of Hu129 US Gull Gray, with the three
gear doors painted the same color. Then, with my airbrush at “fine” settings, I
applied on top areas Hu123 Extra Dark Sea Gray at loose patterns formulated with
strings of tack. By spraying at appropriate angles, I used the tack’s height to
create a subtle “shadow” effect at the camo borders, neither too hard nor too
soft (called “hardsoft” in my AMS - Advanced Modeling Syndrome - dictionary!).
 Upon removing the tack, I found the result “interesting”, with a coat of Future
preparing the model for decaling. I used the kit decals to depict a "Grünherz"
example. The decals behaved very well in general, no remarks whatsoever! A coat
of Future sealed them.
Upon removing the tack, I found the result “interesting”, with a coat of Future
preparing the model for decaling. I used the kit decals to depict a "Grünherz"
example. The decals behaved very well in general, no remarks whatsoever! A coat
of Future sealed them.
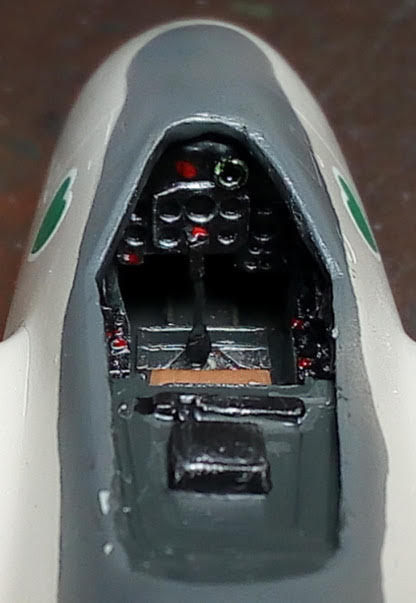
The cockpit (which has the seat molded-on) and the
rear anti-glare area received a base coat of Hu32 (for the RLM66), then had its
instrument panel, side consoles, stick gaiter, grip and rear top mounted radio
painted black. The plentiful cockpit raised details were silver-dry brushed.
Various “knobs” were replicated by red and yellow “pins” with a 10/0 brush.
Interestingly, a small radar scope is molded onto the instrument panel (for a
“future” FuG radar installation?), with a blob of Humbrol clear green inside it
simulating the scope glass.
The seat had RLM66 framing, light green upper and “leather” lower cushions. Seat
belts were fabricated from masking tape and had “bukles” done with a fine silver
pen. I decided to add a loop antenna aft of the top mounted radio, which would
lie under the canopy (like at some Zero variants). It was formulated from
stretched sprue and painted cream, to replicate the insulating coat. I opted for
crude/hand made looks, like it was fabricated on the spot, with the insulating
sealant sloppily applied, as to add realism to this mysterious plane's
"experimental/evaluating" looks!
Landing gear was next: I first cleaned all white
metal parts and carefully attached them per the instructions, including the
doors with their retraction arms. In order to have some time for aligning all
these clunky items before glue curing, I used slow-setting cyanoacrylate (mixed
with some liquefied styrene, so it would “grab” onto the styrene wheel wells).
Though it took some effort, putting together and aligning all these parts was
easier than initially feared, with the only “unusual” act being that all
retraction arms were longer than required and had to be cut after taking
measurements (the usual cut/test-fit loop…). Landing gear parts, door innards
and wheel wells were painted “steel”. All oleos were highlighted with my fine
silver pen. I could not resist and added brake lines made of black stretched
sprue, accordingly bent and attached.
The 2-piece main wheels were assembled and sanded smooth. Since in “reality”
they would have a positive camber, they were accordingly filed at an angle, so
they would look correctly weighted. Together with the nose wheel, they were
subsequently attached with the above-mentioned cyano/styrene “ home brewed
glue”. Tires were painted a dark gray and the rims steel.
 The exhaust cone, as well as the engine’s aft section, were painted Testors
Burned Metal and attached, with the latter having its center section hollowed,
per the HeS 011 engine’s real looks. Two symmetrically mounted wing mini guns
and a starboard wing pitot tube were made of stretched sprue and attached. It
was then time for some weathering.
The exhaust cone, as well as the engine’s aft section, were painted Testors
Burned Metal and attached, with the latter having its center section hollowed,
per the HeS 011 engine’s real looks. Two symmetrically mounted wing mini guns
and a starboard wing pitot tube were made of stretched sprue and attached. It
was then time for some weathering.
I decided to apply an amount of weathering, “as if” the plane had flown a good
number of test flights. I thus first applied a black wash to accentuate all
recessed details, with a heavier application at the landing gear parts, rims,
wheel wells and door innards. A brown/black dry-pastels application followed at
places where dirt, soot, or fluid leaks would be found (namely tires, guns,
hinges and all undersides), all faired towards the direction of the airflow.The
model then received its final almost matt coating.
It was then (vac) canopy time! After separating it from its base material with a
pair of scissors, I carefully trimmed it to shape with a mini file and by also
gently rubbing it against a 220 grit sandpaper laid on a flat surface. Upon
exhibiting a passable fit, it subsequently had its frames painted fuselage color
and attached with white glue, which doubled as a gap filler. It was then
time to call this daring whatiffer done!
| CONCLUSIONS |
Once the above aspects are catered for, putting together this kit is a
relatively straightforward process, with the low number of parts, good material
quality and quite small model size being very helpful, not to mention the
excellent decals.
 Since this is a what-iffer, I cannot comment on the kit’s accuracy (though,
maybe, Luft46 Experten could compare the model’s shape with drawing plans???).
“Believability” was my aim, and here the kit scores well, with its basic
elements exhibiting a good degree of realism. Painting and weathering were also
applied towards the direction of a realistically looking prototype that had
flown a good number of evaluation flights..
Since this is a what-iffer, I cannot comment on the kit’s accuracy (though,
maybe, Luft46 Experten could compare the model’s shape with drawing plans???).
“Believability” was my aim, and here the kit scores well, with its basic
elements exhibiting a good degree of realism. Painting and weathering were also
applied towards the direction of a realistically looking prototype that had
flown a good number of evaluation flights..
This kit is very difficult to find nowadays, as it has only been issued
once and at very low numbers per the Fonderie Miniature’s trend. However, if you
are an experienced modeler and happen to come across one, it might not be a bad
idea to give it a go: the end result will definitely qualify as a head turner, a
model rarely seen! Who knows, another “Alternate History” might as well emerge,
maybe regarding Major Meinard Vogt and his decision to modify the BV212 and put
it into production!
Happy modeling
30 June 2022
Back to the Previews Index Page
Back to the Previews Index Page