Revell/MPM 1/72 Ju-290Z Zwilling
| KIT #: | 04340/C72003 |
| PRICE: | 90 euros for the three kits |
| DECALS: | |
| REVIEWER: | Spiros Pendedekas |
| NOTES: | All improvements scratch built |
| HISTORY |
Alternate History
Hauptman Steinhoorn was a true envisionist (some called him mad): upon seeing the first Ju 290s developed from the civil Ju 90 versions, he put pressure on everybody to adopt Junkers concept of joining two 290s with a common central wing, using a reinforced central wing part, strong enough to tolerate massive twisting stresses the unjoined tails would impose! The resulting plane would have exceptional range and endurance, a so sought after maritime patrol aspect, retaining (more or less) the “original” 290’s reinforced construction (the lack of which doomed the Condor).
There were concerns that such projects would
desperately need their “parasite” fighter protection, in case an enemy fighter
showed up, yet, the proposed Me-328 “Parasite Fighter” project was far from
being materialized. The daring Steinhoorn would undertake the task of
constructing a heavily modified He-178V1
 prototype,
making it all-metal, adding 4 small guns at the wings and install two aft
pulsejets (!), with two down facing winglets to compensate for the stability
problems the pulsejets would impose. His superiors (well, everybody, apart from
the Junkers Company mad designer…), told him he was crazy…
prototype,
making it all-metal, adding 4 small guns at the wings and install two aft
pulsejets (!), with two down facing winglets to compensate for the stability
problems the pulsejets would impose. His superiors (well, everybody, apart from
the Junkers Company mad designer…), told him he was crazy…
Well, beginning is half of everything and Steinhoorn knew that. All (!) he had to do was to somehow manage getting his project started simultaneously with the beginning of the standard 290 project, otherwise, any potential interest would fade in time. The siege of his superiors lasted for two weeks before they gave up, signaling a “green light” to him, them remaining in wondering how on earth they gave permission to use two (!) Ju290s, practically prototypes, in order to be joined after having their preciously designed wings cut, with a gremlin parasite prototype carried on top…The rest was untold history…
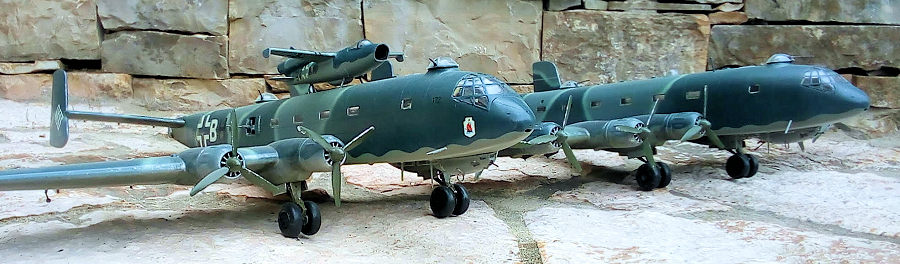
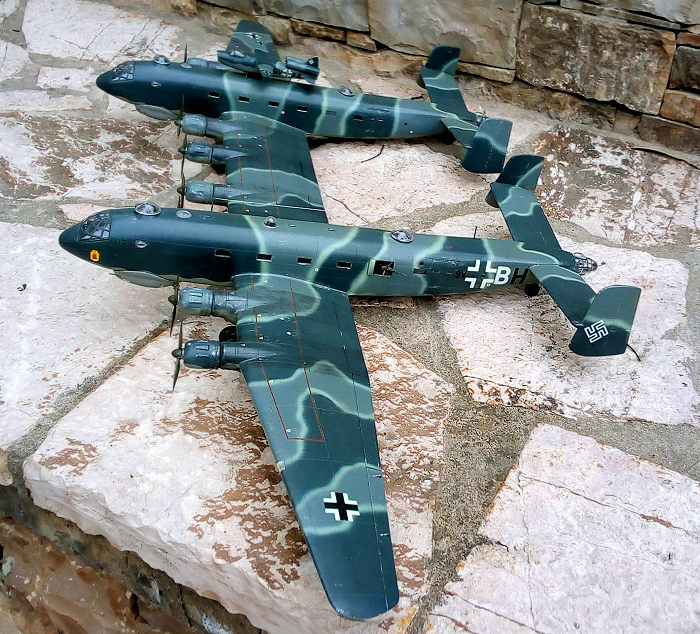
It was one of those cold February nights in 1943, with Steinhoorn comfortably seated in “his” Ju 290Z left cockpit, executing yet another long maritime patrol. “Long” is an understatement! With those extra fuel tanks added in the central wing and 4 of the 8 engines feathered during patrolling, his flying giant could stay airborne for the whole night! Enemy night fighters had little luck discovering him with their primitive (if any) radars. That “night blue” camo (Steinhoorn’s idea) helped the massive Zwilling remain unseen above the Atlantic in practically all weather conditions. This really daring scheme consisted of a disruptive pattern of “Navy” dark blue/intermediate blue tops, their borders highlighted with light blue. That disruptive top camo kind of “stealthed” the giant over the endless Atlantic waters, even under the moonlight. Indeed, his one-off Zwilling had already accumulated a full operational year, patrolling the vast North Atlantic area, being responsible for many ships and submarines sinking.
 Based
at Merignac, operating strictly at night, covered by large camoed canvases
during daytime, the Zwilling was really a lucky giant, for not having been
discovered. The effects of weathering were evident: pressed into service,
chipped paint could be seen at places, mainly as no proper salt resistant
priming was applied under the “night blue” camo. Quite a bit of dirtying was
evident, as it was avoided to remove the canvas cover of the giant for cleaning
during daytime. Oh, and those underwing RATO exhaust gases stains….It was
another Steinhoorn’s idea to fit two prototype RATOs under the central wing
part, in order to shorten the takeoff run. He loved them, used them everytime!
Based
at Merignac, operating strictly at night, covered by large camoed canvases
during daytime, the Zwilling was really a lucky giant, for not having been
discovered. The effects of weathering were evident: pressed into service,
chipped paint could be seen at places, mainly as no proper salt resistant
priming was applied under the “night blue” camo. Quite a bit of dirtying was
evident, as it was avoided to remove the canvas cover of the giant for cleaning
during daytime. Oh, and those underwing RATO exhaust gases stains….It was
another Steinhoorn’s idea to fit two prototype RATOs under the central wing
part, in order to shorten the takeoff run. He loved them, used them everytime!
So there he was, with his 18-man crew, plus his
friend, Hauptman Ziegel, patiently seated in the modified Heinkel parasite,
sporting the same “Midnight Blue” camo, as well (only an extremely skillful
pilot would be allowed in the handful Heinkel). Steinhoorn had somehow foreseen
the war outcome, not very favorable for his country, his one-off Zwilling not
enough to make any difference. Still, he was proud that he insisted on this
ultra-long range and endurance maritime reconnaissance project, with time
proving that he was right. Deep in his heart, all he wished was an end for this
mad war, with the least possible damage, so he could establish some magic
friendships with his – by that time – enemies…
And the real story:
The Junkers Ju 290 was a large German, four-engine
long-range transport, maritime patrol aircraft and heavy bomber used by the
Luftwaffe late in World War II that had been developed from an earlier airliner.
Junkers project documents from 1942 to 1944 indicated that a Zwilling variant
was proposed. It was to be composed of two Ju 290 fuselages and powered by eight
BMW 9-801 engines; two mounted on each outboard wing and four on the inboard
wing. It was to carry a single Messerschmitt Me 328 parasite fighter on top of
the right fuselage. The Ju 290Z was canceled in favor of the Ju 390.
| THE KIT |
Revell continued to impress us by issuing this
extremely comprehensive 1/72 kit of the Seeadler, back in 2003: a mainstream kit
of an iconic plane, even though only 65 were actually built. Please read Scott’s
thorough review of the Seeadler here.
 It was
2005, when I saw a beautiful Ju290Z/Me-328 model built by Mike Glinsky,
featuring a black underside and a gorgeous RLM 70/71 splinter over “wave” RLM 65
pattern. I was so inspired to dare building my own Zwilling interpretation, by
scratch building the central wing joining part. I thus bought two kits of the
Revell Seeadler. As for the parasite, I went ballistic and decided to use the
also available Condor/MPM 1/72 He-178, which I would heavily modify.
It was
2005, when I saw a beautiful Ju290Z/Me-328 model built by Mike Glinsky,
featuring a black underside and a gorgeous RLM 70/71 splinter over “wave” RLM 65
pattern. I was so inspired to dare building my own Zwilling interpretation, by
scratch building the central wing joining part. I thus bought two kits of the
Revell Seeadler. As for the parasite, I went ballistic and decided to use the
also available Condor/MPM 1/72 He-178, which I would heavily modify.
So, here I was, getting the nice limited run Condor kit too! Upon opening its
lovely tiny box, I was surprised to see that it is an exact scaled down version
of the same company’s quarterscale model. There were 25 well cast styrene parts,
a PE fret, an acetate instrument panel and a well-executed vacform canopy. The
styrene parts are “old school” limited run, meaning some injector stubs have to
be removed. However, it looked like a tempting, not extremely difficult build.
Armed with those three kits, off I went to my workshop.
| CONSTRUCTION |
I started by constructing the two Seeadlers.
Cockpits and crew compartments are very well appointed, with more than 60 pieces
for both of them (!). At each main floor, I attached the 4 foot pedals, the
2-piece control yokes, instrument panel, pilot and copilot 3-piece seats,
navigator, operator and rest crew members’ seats and corresponding
bulkheads/consoles (14 pieces). The cockpit area assembly was then completed.
Basic cockpit color was Hu32 (for RLM66), with black instrument panels, yoke
handles and consoles, brown leather cushions, linen seat belts and bulkhead
mounted curtain.
I proceeded by attaching the 34 windows from the inside of the fuselage halves
and the accordingly painted 4-piece MG 151 guns, with their corresponding
magazines (only at the outer fuselage parts, you have to cut a panel, in order
to accommodate them). I attached the rear bulkheads and glued the side
cargo/passenger doors shut. Basic cargo interior color was Testors Steel (for
the kit’s suggested unpainted aluminum), with
 gunmetal
guns.
gunmetal
guns.
I went on joining the fuselage halves, with the central floor (that included the
assembled cockpit) trapped in between. To my joy, fit was nice! I figured out
that by shaving the surrounding stem from the turret bases, the four turrets
could be press fitted at later stages. This was another joyful moment, as, one
of the things I really digress in WWII bombers is installing the assembled
turrets before painting. I happily then attached the roofs and had two nice
enclosed fuselages! Since the parasite would be attached on top of the starboard
fuselage, I deleted the right astrodome and covered the hole with a suitable
round cut styrene sheet. The noses were attached as well.
I then affixed the rear wheel wells, followed by the two-piece ramps (at closed
position). I attached the three-piece main landing gear legs in their
wells, but left the two piece tail wheel arms off. All wheel wells, landing gear
doors innards and landing gear legs were painted Testors Steel. The very nice
dual fin tails were assembled (6 pieces each) and attached as well.
I continued by attaching the impressive central wing parts under the fuselages,
followed by attaching the top left and right wing halves, finishing with the
left and right bottom outer parts. This was another deviation from the
instructions: my approach was to attach wing parts to the fuselage first, and
then mate the wing halves, to assure a gap free wing root joint, as I hate
filling wing roots. Fit was great allover and I was pleased with the result.
The gondolas are an 11-piece affair each, including transparencies and guns.
They were assembled, had their innards painted RLM66, and left apart, to be
installed at final stages. The four turrets were likewise prepared. I finished
by assembling the four piece main and two piece tail wheels, 10 wheels in total.
Their rims were painted black, drybrushed with silver, with black tires.
The eight nice engines were then assembled. They were a 7-piece affair each,
including the inlet fans. They were painted black (including the fans) and
drybrushed with silver. The 4-piece cowlings were also assembled, filled and
sanded (with their innards painted Testors Steel), then had the engines fitted
in and installed in position. The two piece nice props were assembled and
painted Hu91 (for RLM70), then lightly drybrushed with silver.
Having the two basic Seeadler airframes assembled, I gave them a filling and
sanding session, before attempting to join them, as handling of the joined wings
monster would be challenging.
Then it was wing joining time! After measuring the distance between inner and
outer engines, I proceeded by cutting the left and right wing outer parts, from
the two Seeadlers respectively, at the point where the resulting distance
between the paired engines would roughly be the same as the one measured
beforehand. I glued sprue chunks at all inner hollow areas, then I attached the
wings with thin liquid glue, hoping that capillary action will lead it to every
styrene contacting point, thus strengthening the joint.
 An
application of liquefied styrene followed, strengthening the joint even further.
Upon curing, after being satisfied with the rigidity of the structure, I sanded,
filled, and re-sanded the area, (with some additional work was at the central
flap), followed by rescribing of the panel lines, in order to present a
homogenous wing joint look. The finished joint looked realistic (in its
fictitious paper project nature, of course!).
An
application of liquefied styrene followed, strengthening the joint even further.
Upon curing, after being satisfied with the rigidity of the structure, I sanded,
filled, and re-sanded the area, (with some additional work was at the central
flap), followed by rescribing of the panel lines, in order to present a
homogenous wing joint look. The finished joint looked realistic (in its
fictitious paper project nature, of course!).
The He-178 “improved” Parasite:
This was a full mini model in itself! Due to its old school limited run nature,
all parts were first removed from the sprues, cleaned and sanded smooth to even
any surface imperfections. I started by attaching the two fuselage halves, with
the cockpit floor, rear bulkhead, front intake blanking plate and main engine
exhaust trapped between them. I then attached the top main wing part, followed
by the two lower wing halves, opting for a gap-free root joint. The two piece
tail plane was attached too, as well as the small underbelly landing skid. Fit
was generally good. I microdrilled two holes at each wing leading edge, in order
to represent four fictitious wing mounted guns.
The adequate detailed cockpit received its 3-piece foot pedals, stick, seat and
4-piece instrument panel. I only added seat belts from cream doped masking tape.
Color rendition was the same as the Zwilling’s.
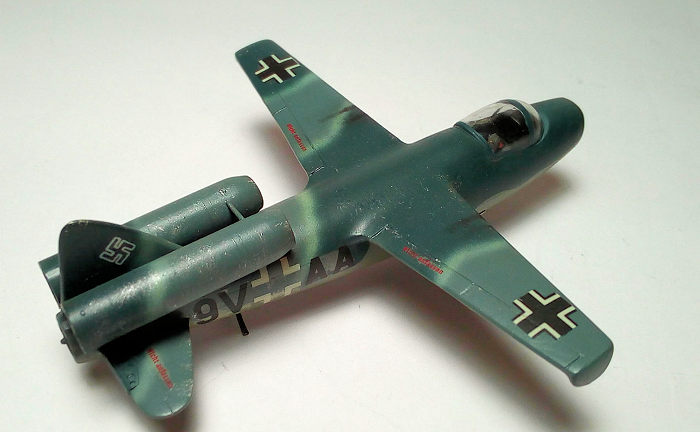
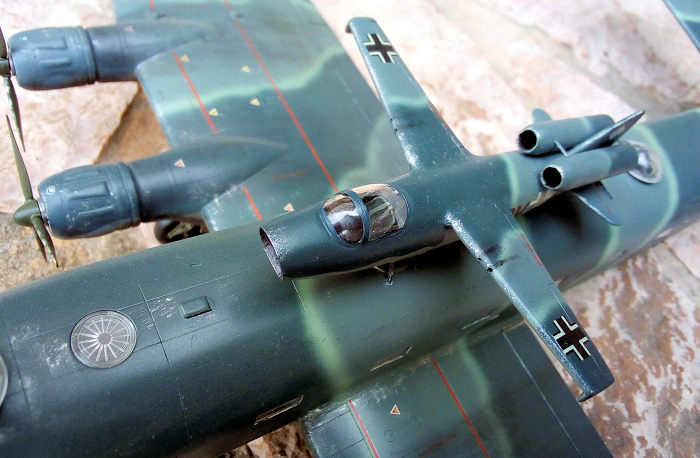
In order to “what if” improvise the Heinkel prototype, it received two
simplified pulsejets over the tailplane: they were fabricated by modifying
rocket bodies from my spares. There was no space to install them under the
tailplane, which means that half of the fin area was covered by them. Well, my
idea was that differential thrust would be used, in order to compensate for the
reduced rudder effective area… As a “stability enhancer”, I cut the parasite’s
wingtips and glued them downwards. After attaching the nice PE main landing gear
fuselage reinforcing braces, I gave this petite model a filling and sanding
session and accompanied the Mothership Zwilling to the paint shop.
| COLORS & MARKINGS |
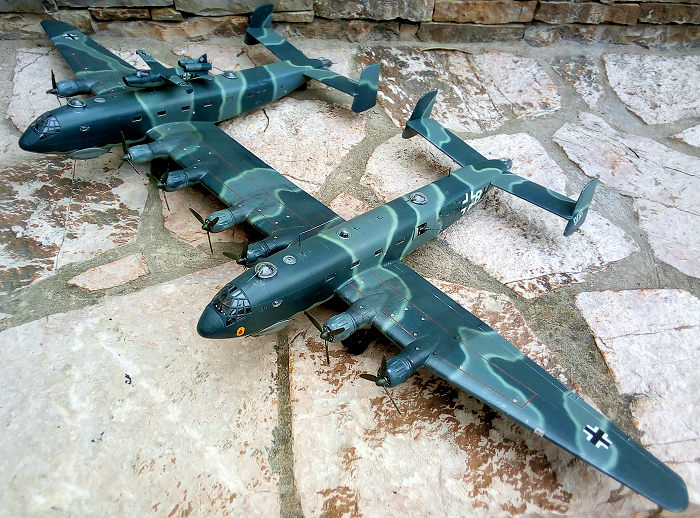
 After
blanking the Zwilling’s openings and masking the installed transparencies, I
gave all undersurfaces (including the gondolas and the Heinkel), a good two
bottles Hu127 U.S.Ghost Gray, followed by masking. I then applied Hu144 (for the
intermediate blue) on top, followed by a freehand custom pattern (meaning: my
inspiration) application of Hu77 (for the Navy dark blue). Upon drying, I
applied a top (protective) coat of Future and, with my Badger SG-100 at
ultra-fine settings, I applied Hu65 Light Blue pencil thickness demarcation
lines on all dark/intermediate blue borders. Thin Hu65 paint and low compressor
pressure were my allies during this fine process. The same camo was applied to
the Heinkel parasite.
After
blanking the Zwilling’s openings and masking the installed transparencies, I
gave all undersurfaces (including the gondolas and the Heinkel), a good two
bottles Hu127 U.S.Ghost Gray, followed by masking. I then applied Hu144 (for the
intermediate blue) on top, followed by a freehand custom pattern (meaning: my
inspiration) application of Hu77 (for the Navy dark blue). Upon drying, I
applied a top (protective) coat of Future and, with my Badger SG-100 at
ultra-fine settings, I applied Hu65 Light Blue pencil thickness demarcation
lines on all dark/intermediate blue borders. Thin Hu65 paint and low compressor
pressure were my allies during this fine process. The same camo was applied to
the Heinkel parasite.
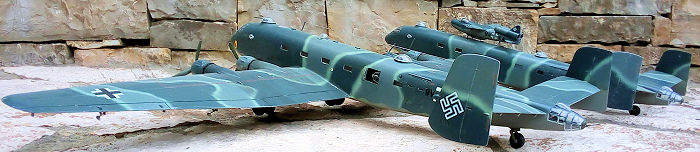
After masking removal, with the painting results deemed acceptable, I applied an
allover coat of Future, in order to prepare the models for decaling. I used the
kit decals for the Zwilling, depicting a fictitious (for 1943) 9V+BH machine.
They Cartograf decals behaved “Cartography”: excellent allover, nothing to
report! The extended maintenance stenciling provided added a lot to realism. The
Swastikas used were taken from a generic equally excellent (printed by Cartograf…)
Icarus Decals sheet.
The Heinkel received some leftover decals from my dungeon, some maintenance
stenciling that I saved from the Zwilling decals and Icarus Decals Swastikas. It
“became” 9V+AA.
A coat of Future sealed the decals and I proceeded to the not so small task of
final put together.
| FINAL CONSTRUCTION |
I first attached the gondolas, which, to my relief,
fitted nicely. Then I attached the bazillion of moving surfaces hinges and mass
balances underneath, plus the various top and bottom antennas (roughly 70 pieces
in all!), all painted fuselage color. I did not install the FuG radar antennas,
as I find it difficult to apply them and I decided (!) that the Zwilling had no
FuG installed in 1943 (translation of above: I am lazy…).
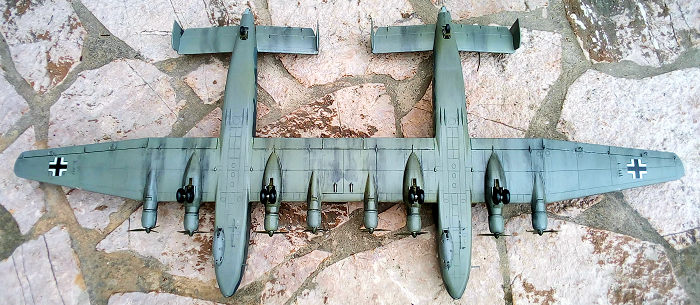
 Two
leftover F-84G RATOs, painted gun metal, were attached under the strong
structure of the interconnecting wing, in order to reduce the massive plane’s
takeoff run. Then I attached the 10 wheels and let the giant rest on them,
ensuring that all 10 were aligned and touched the ground.
Two
leftover F-84G RATOs, painted gun metal, were attached under the strong
structure of the interconnecting wing, in order to reduce the massive plane’s
takeoff run. Then I attached the 10 wheels and let the giant rest on them,
ensuring that all 10 were aligned and touched the ground.
All transparencies, including the four front blisters, the port astrodome and
the four turret tops, were prepared, had their frames (where applicable) easily
hand painted (due to the well-defined frames) and attached with tiny amounts of
styrene glue, the resulting micro gaps faired over with white glue. The turrets
were then press fitted into their corresponding holes.
I ran a wire, made of silver stretched sprue, only between the two port fuselage
top antenna masts…..yes, you guessed it: neither antenna masts, nor astrodome
(only a blanking plate) on the starboard fuselage, as the Heinkel was to be
attached there!
Speaking of the Heinkel: I did not like the kit provided shallow-hole “blanking
plate” representation of the characteristic Heinkel intake: it had a toy-ish,
unrealistic look. Modifying the blanking plate to look like an FOD cover might
be an option, but I elected to improvise the area: I first thinned the intake
walls as much as I could, then stapled flat one of my sons’ usual straws of
suitable diameter (they come at many diameters and colors!!) at its end, and
trimmed its edges. I then inserted it in the intake as deep as possible, with
its flattened end reaching deep and under the cockpit, just like in reality. I
trimmed the other edge, and blended it with the intake lips, using white glue.
It was painted Testors Steel, with its “stapled” end matt black, looking like a
nice, deep, realistic air intake!
The main landing gear legs (no wheels) and a small “V” shaped supporting strut
(from stretched sprue) at the rear wheel area were attached, painted underside
color. Then the parasite, with its sporting intake, was affixed on top of the
starboard fuselage, at the main wings area.
I decided to perform some chipping, assuming that the Zwilling was pressed into
service with incomplete priming. Chipping was performed with a stiff 10/0 brush
(its bristles were cut very short…), using Testors Steel. Then I applied dry
dark colored pastels, to represent engine staining and (especially RATO) sooting,
underside dirtying, particularly at the wheels surrounding areas. Tiny amounts
of dark brown temperas represented hinge grease leaks; all towards the airflow
direction.
I then called this not exactly small project of a beautiful giant of the night
skies done!
| CONCLUSIONS |
First, I want to thank MM Readers for reading my
(inevitably?) long review so far!
This was a multi- aspect big project, as it essentially involved the build of
two Seeadlers and a limited run Heinkel, not the simplest builds (each one for
its own reasons), let alone the “improvisations” performed. The finished model
is massive, wider than the 1/72 B-36, so if you decide to undertake the task of
building it, you should really have allocated a big "showcase"space.
The Revell Seeadlers are amazing kits: excellent allover, including the very
reasonable price they are offered. They are complex kits (due to the plane size
and the detail offered), but not complicated, all they need is patience and
time, in order to come up with a big beautiful result. Should you wish to
improve or super detail this already very detailed kit, you will not be
disappointed, as a lot of aftermarket (AM) is out there, including helpful
canopy masks! With the above said, it is highly recommended for anybody but the
novice. It has been reissued once (2009) and I believe its next reissue will not
be that far away (as of 2021).
The Condor/MPM Heinkel is an absolute jewel of a limited run kit: though old
school, all it requires is a good cleanup to come up with a nice result of an
iconic prototype. The absence of resin parts (only some nice PE is provided), is
a welcome “simplifier” as well! I would dare to recommend it as a first limited
run kit to an average modeler (or, he may try the exactly identical quarterscale
version - only some extra PE cockpit details are provided). No aftermarket
products seem to exist, but, frankly, you don’t need them! These kits are
frequently reboxed by Special Hobby.
To join two Seeadlers to a Zwilling, there is a beautiful Bird Models resin
conversion, available at a very reasonable price. If you opt to follow the
“documented” studies, you should attach a 1/72 Me 328 Parasite on top of the
Zwilling (you have quite a few options there, I recommend checking the
definitive Scalemates site).
As usual, I went my own way! Regarding my scratchbuilt wings joining conversion,
I proceeded bravely and found out it was not as daunting as initially feared,
all it needed was some styrene surgery and rescribing. As for my what if
parasite, I tried to make it look exotic, yet operationally believable.
I bet Hauptleute Steinhoorn and Ziegel had some War Diary stories to write
there!
Happy Modeling!
Spiros Pendedekas
12 November 2021
Copyright ModelingMadness.com. All rights reserved. No reproduction in part or in whole without express permission.
If you would like your product reviewed fairly and fairly quickly, please contact the editor or see other details in the Note to Contributors.