Airmodel 1/72 He.P1078C
| KIT #: | AM-2058 |
| PRICE: | 28 Euros |
| DECALS: | None included |
| REVIEWER: | Spiros Pendedekas |
| NOTES: | Resin kit |
| HISTORY |
The Heinkel P.1078 (He P.1078) was a projected single seat interceptor
developed for the Luftwaffe by Heinkel aircraft manufacturing company under the
Emergency Fighter Program during the last years of the Third Reich.
 The project had three quite different variants. All of them were single-seat
fighters with polyhedral swept wings. The wings were swept back at 40 degrees
and included wood in their construction. All of the projected aircraft had the
wing tips angled downwards and all of them would be powered by a single Heinkel
HeS 011 turbojet.
The project had three quite different variants. All of them were single-seat
fighters with polyhedral swept wings. The wings were swept back at 40 degrees
and included wood in their construction. All of the projected aircraft had the
wing tips angled downwards and all of them would be powered by a single Heinkel
HeS 011 turbojet.
The first variant, P.1078A, was the most conventional-looking of the three
designs submitted for it was the only one having a tail. Its armament was two MK
108 cannons, as in the following two variants.
The P.1078B was a tailless asymmetric jet-powered interceptor with a short
fuselage in which the air intake of the engine was located in the middle between
two gondolas. The cockpit was located on the gondola of the left side, while the
right side gondola contained the front undercarriage leg and cannon armament.
The P.1078C was a tailless interceptor project similar to the P.1078 B but with
a single short fuselage. Both the He P.1078B and P.1078C had wing tips angled
downwards at a more pronounced angle than the P.1078A.
The high-altitude fighter designs brought forward by other German aircraft
makers were the Messerschmitt P.1110, Focke-Wulf Ta 183 Huckebein, Blohm & Voss
P 212 and the Junkers EF 128, the official winner of the competition. After
being subject to severe criticism, the project was cancelled by Heinkel at the
end of February 1945.
| THE KIT |
Upon opening the top opening box, you are greeted with some nicely cast resin parts and a vac canopy. All are excellently packed in 4 separate sections of a common base bag, to eliminate the risk of breakage of those delicate resins. There’s no sign of molding agent on the resin surfaces, letting me assume that the parts were washed by the manufacturer before packing.
There is a main fuselage part, where the builder is supposed to attach the top cockpit part, the intake, the engine exhaust and the two beautifully shaped gull looking wings.
 The rest of the parts (doors, landing gear parts and cockpit parts) are
not molded with the “pouring from a base resin block” technique, but as parts of
a big resin sheet that contains them. This is ok for the wheels, doors, seat and
instrument panel, as they can be detached and trimmed effectively, but a bit
problematic for the intricate parts, such as the one piece main landing gear
legs, that kept breaking upon cleaning from the surrounding resin. It might be
for this reason (among others) that Airmodel has currently reissued this kit
with improved/revised molds, including “pour block base” technique and more
strength for fragile bits.
The rest of the parts (doors, landing gear parts and cockpit parts) are
not molded with the “pouring from a base resin block” technique, but as parts of
a big resin sheet that contains them. This is ok for the wheels, doors, seat and
instrument panel, as they can be detached and trimmed effectively, but a bit
problematic for the intricate parts, such as the one piece main landing gear
legs, that kept breaking upon cleaning from the surrounding resin. It might be
for this reason (among others) that Airmodel has currently reissued this kit
with improved/revised molds, including “pour block base” technique and more
strength for fragile bits.
Just a few air bubbles were observed, which is expected for resin parts; nothing that my thick gap filling cyano cannot handle!
The canopy is a very clear one piece vac part that doesn’t show any sign of yellowness, despite its age (about 20 years old!)
Decals are not included, but any moderate decal dungeon will come up to the chosen “what if” scheme.
Instructions are adequate, providing a detailed history and specs of this never materialized project, a 3-view diagram and a two-step construction process. I think they will be sufficient for most of the potential resin kit builders (meaning not absolute beginners).
| CONSTRUCTION |
 Just to be safe, I washed the resin parts with warm soapy water.
Then started to assemble the fuselage, using thick cyanoacrylate. I
attached the top cockpit part and the bottom NLG wheel well part. Upon drying, I
sanded smooth the front part of the fuselage and attached the beautiful intake.
The exhaust piece, containing the rear visible turbine section, was also
attached at the back.
Just to be safe, I washed the resin parts with warm soapy water.
Then started to assemble the fuselage, using thick cyanoacrylate. I
attached the top cockpit part and the bottom NLG wheel well part. Upon drying, I
sanded smooth the front part of the fuselage and attached the beautiful intake.
The exhaust piece, containing the rear visible turbine section, was also
attached at the back.
The assembled fuselage was given an initial coarse sanding, to eliminate any resin steps. I didn’t like the shallowness of the intake, so decided to give it some depth. After some successful test drills with my pin vise, I used my Dremel style tool and carved well inside. The resulting intake trunking was painted Testors Steel, with matt black at the end, looking more realistic now.
Well, the intake acquired some good looking depth, but the cockpit floor and a part of the front wheel well wall disappeared in the process, meaning I would have to refabricate them. This was done by using styrene sheet pieces, cut from my sons’ ice creams plastic trays. After being cut and carefully bent to the required shape, those pieces were superglued in place. Then, the nice instrument panel was attached and side consoles were scratchbuilt to beef up the cockpit looks.
Main cockpit color was RLM66 (Hu32) with black instrument panel side consoles and stick grip. The instrument panel, as well as the side panels, were silver drybrushed, with red, white and yellow microdetails added. The good looking resin seat was painted Testors Steel (looks like dull aluminum) and was supplemented with seat belts, made of green doped masking tape with buckles made with my PILOT silver pen.
A small gunsight, made of acetate piece, was added on top of the dashboard with white glue. I hope cockpit will look sufficient now under the very clear vacformed canopy.
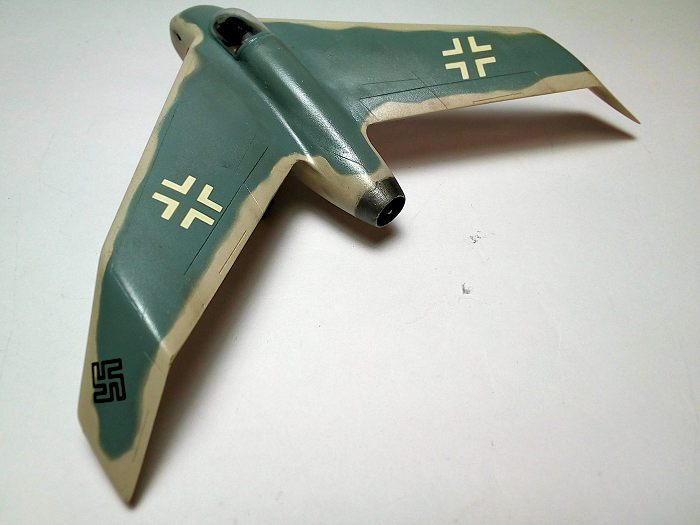
 I was a bit worried upon establishing a solid attachment of those long
resin wings to be hanged at good dihedral to the fuselage. In order to avoid
horror sessions, I drilled two holes at each wing root, two at the corresponding
fuselage mating surfaces, so I could install reinforcement pins. Then, I
attached the wings to the fuselage, using generous amounts of thick superglue
and checking the alignment as the glue was curing. When the glue cured, I found
myself with two strongly bonded and nicely aligned wings, but with big irregular
gaps. Those gaps, as well as the rest of the gaps, were taken care of multi
session thick superglue application and sanding. The end result was not bad at
all! Nice and smooth! Of interest was the fact that, since superglue is
transparent, one could see great portions of light emerging through the big
gaps!
I was a bit worried upon establishing a solid attachment of those long
resin wings to be hanged at good dihedral to the fuselage. In order to avoid
horror sessions, I drilled two holes at each wing root, two at the corresponding
fuselage mating surfaces, so I could install reinforcement pins. Then, I
attached the wings to the fuselage, using generous amounts of thick superglue
and checking the alignment as the glue was curing. When the glue cured, I found
myself with two strongly bonded and nicely aligned wings, but with big irregular
gaps. Those gaps, as well as the rest of the gaps, were taken care of multi
session thick superglue application and sanding. The end result was not bad at
all! Nice and smooth! Of interest was the fact that, since superglue is
transparent, one could see great portions of light emerging through the big
gaps!
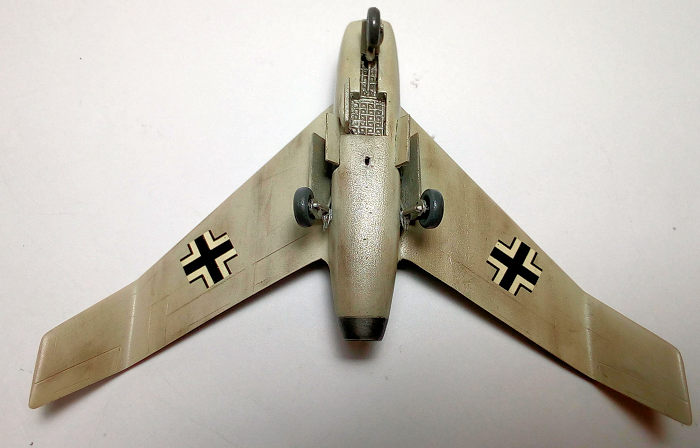
I decided to add some interest to the flat surfaces of the wheel wells, so I superglued appropriate pieces of micro mesh and then painted the wheel wells Testors Steel. They look busier now!
The remaining parts, such as landing gear components and doors, wheels and cockpit components were cleaned from the excess resin. The main landing gear legs were very brittle and fragile, so they were replaced with 1/72 Heller Mirage 2000 legs that look very much similar (it’s a fictional plane anyway!). Pieces of stretched sprue, bent accordingly, were added to the main gear legs to represent brake lines.
The three nice resin wheels were painted black, drybrushed in silver, with dark gray tires.
So, with all structural components installed and coarse sanded, the whole model, including the landing gear doors, was sanded smooth with 1500 grit and headed to the paint shop.
| COLORS & MARKINGS |
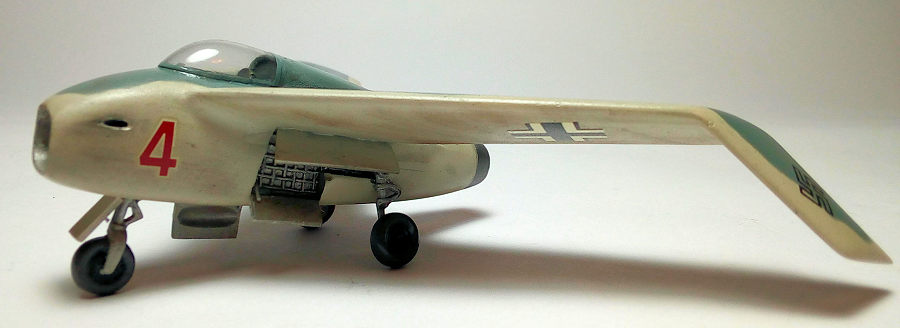
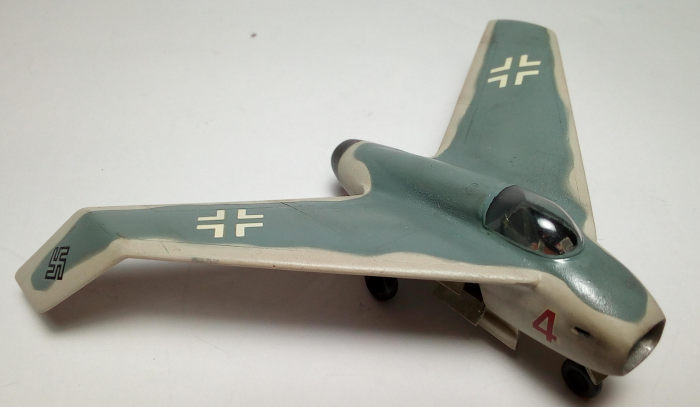
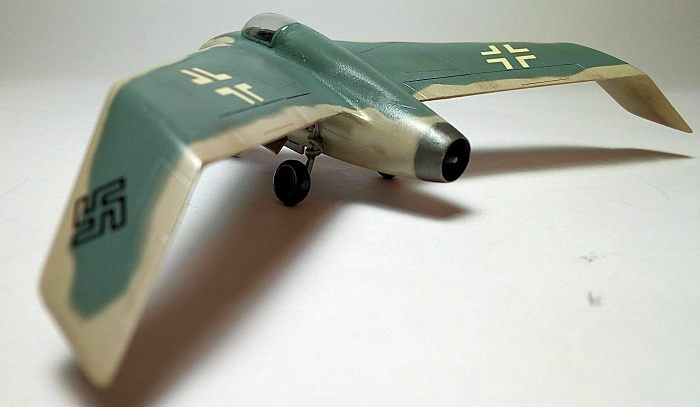
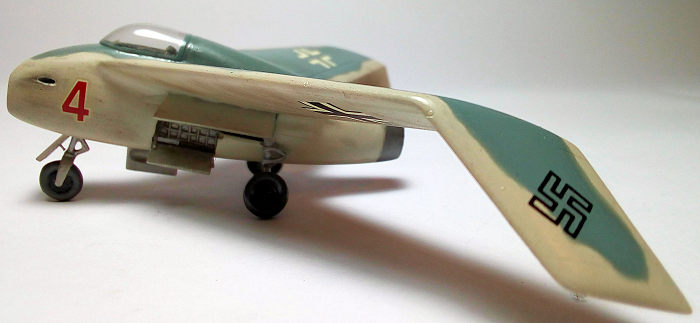
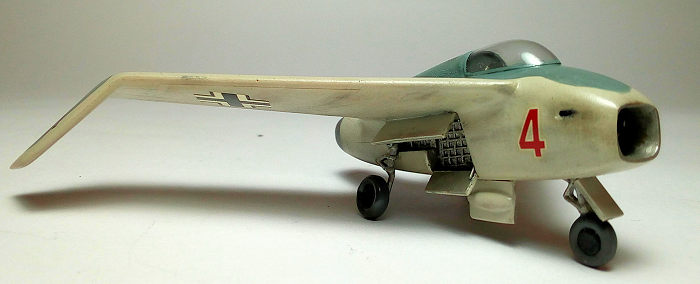 I opted to give the model an “air superiority” scheme, inspiration drawn
by a Russian experimental scheme. This was all over very light grey, with
topsides some kind of blue grey that did not extent to the extreme top edges. It
looked very cool to my eye, yours truly wondering: “why not?”
I opted to give the model an “air superiority” scheme, inspiration drawn
by a Russian experimental scheme. This was all over very light grey, with
topsides some kind of blue grey that did not extent to the extreme top edges. It
looked very cool to my eye, yours truly wondering: “why not?”
So, with my Revell Vario I gave the whole model a coat of Humbrol 196 light grey, followed by a freehand top-side application of Humbrol 145 “medium grey” (which actually turns into a lovely blue grey), followed (after curing) by a coat of Future to gloss, seal and protect the paintjob.
For the markings, I dag into my decal dungeon and easily found appropriate Luftwaffe markings. Fictionalized Red ”4” was depicted, the “4”s borrowed from the leftover numbers of the very comprehensive Hasegawa 1/48 Val sheet. Why “4”? It is my lucky number! Another coat of future sealed the decals in.
| FINAL CONSTRUCTION |
 I attached the landing gear legs at the wheel wells. The MLG was glued
at a slightly rearward angle, to prevent the model from tail sitting. The wheels
were then attached, as well as the landing gear doors, their posture being
beefed up with some actuation rods made of stretched sprue. Careful alignment is
needed here, with slow setting superglue being your ally.
I attached the landing gear legs at the wheel wells. The MLG was glued
at a slightly rearward angle, to prevent the model from tail sitting. The wheels
were then attached, as well as the landing gear doors, their posture being
beefed up with some actuation rods made of stretched sprue. Careful alignment is
needed here, with slow setting superglue being your ally.
A small “aerodynamically correct” radio antenna, made of acetate and painted black, was attached at the belly, immediately aft of the MLG. Some subtle weathering was performed here and there, using black and brown chalks.
The very clear canopy was separated from its backing sheet and after some trial and error microtriming, was a good fit. Its frames were hand painted with the same top color. It was attached with white glue, which also acted as a filler. After my usual final “walkaround” to the model, to check that everything is ok and to perform any micro touch ups, I called this baby done!
| CONCLUSIONS |
This was my first resin kit and I have to say it was a very nice experience. Its progress was smooth and no obstacles were experienced, the main requirement being some extra care here and there, due to the special characteristics of resin media.
The kit itself, being quite simple and of very high quality, and also with the scheme decision left to the builder, is an ideal candidate for your first resin kit.
If you have an itch to build a resin kit, but never tackled one before, go on and choose a simple one like this. After a bit of quality work, you’ll end up a proud resin builder, ready to tackle more demanding ones!
| REFERENCES |
Wikipedia
Various internet sites (pics, info and models built)
22 March 2021
Copyright ModelingMadness.com. All rights reserved.
If you would like your product reviewed fairly and fairly quickly, please contact the editor or see other details in the Note to Contributors.