Revell 1/288 Sanger transporter
| KIT #: | 4804 |
| PRICE: | AU$15.00 |
| DECALS: | One option |
| REVIEWER: | George Oh |
| NOTES: |
| HISTORY |
We all know that, when you throw a stone into a lake, it usually arcs through the air, then, when it hits the surface, the water parts in a circular shape and allows the stone to sink out of sight, leaving nothing but rings of ripples. But, if the stone is travelling fast enough, AND it strikes the surface at just the right angle, it will instead bounce across the surface in a series of skips. The shape of the stone also is a factor in producing the skips. British scientist and engineer Barnes Wallis understood this when he designed his 5-ton bouncing bomb with-which the RAF destroyed dams during WWII. All Space Agencies also know this and calculate the precise window (= minimum and maximum angles) - termed a re-entry corridor, that a vehicle must be within to smoothly re-enter the Earth's atmosphere from the vacume of space, and continue on its trajectory. Should even one of the parameters be wrong, the object might dive into the atmosphere (and then into the Earth), or be bounced off it, and back into space.
 During WWII, German
engineer, Eugene Sanger, proposed to attack North America, by launching a
very-fast aircraft-like re-entry craft (to be called Silbervogel/Silverbird)
from a trackway in Germany, flying it out of the Earth's atmosphere, then
skipping it across the atmosphere over to America. An extension of the plan was
to continue the flight to land in Japan, and then to re-launch and fly the rest
of the Round-the-World loop to hit a different target (in British India, or
Russia?), before landing back in Germany. Always, it would fly westwards,
because the Earth would rotate beneath it. Fortunately, the war ended before
this idea could be pursued to a completed device, or fleet.
During WWII, German
engineer, Eugene Sanger, proposed to attack North America, by launching a
very-fast aircraft-like re-entry craft (to be called Silbervogel/Silverbird)
from a trackway in Germany, flying it out of the Earth's atmosphere, then
skipping it across the atmosphere over to America. An extension of the plan was
to continue the flight to land in Japan, and then to re-launch and fly the rest
of the Round-the-World loop to hit a different target (in British India, or
Russia?), before landing back in Germany. Always, it would fly westwards,
because the Earth would rotate beneath it. Fortunately, the war ended before
this idea could be pursued to a completed device, or fleet.
In the 1960/70/80s, the West German Government revived Sanger's re-entry aircraft (known as a SSTO - Single Stage To (low) Orbit) concept, either as a very-fast long-range passenger aircraft, or as the Mothership (to be called a Sanger) for launching an Orbiter (known as HORUS - HORizontal Upper Stage), or an unmanned cargo pod/delivery vehicle (known as a CARGUS) from its back. The Sanger was never built because 1) cheaper alternates were developed by other nations (eg, the US Space Shuttle and reusable rockets) and 2) sufficiently-powerful engines for the Sanger Mothership were not available. A model of the Sanger and Horus exists in the Technik Museum Speyer. Did anyone consider the safety of the passengers in the event of an emergency while the Sanger was in space? Would each passenger have to wear a $1M spacesuit while undertaking the trip? Was the Orbiter to land back on the Sanger, or land on a runway? Was the Cargus reusable, or expendable?
| THE KIT |
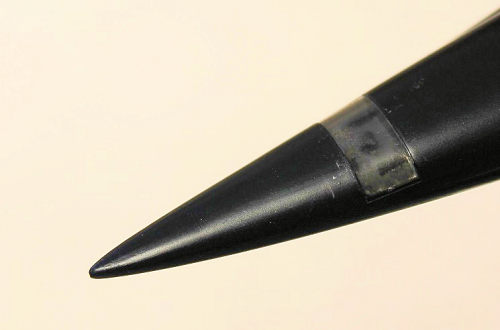
A modelling college (hi E) of mine recognised this kit in my stash. On opening it, I found that the few large parts were removed from the sprues. I can't recall buying it, or why I bought it in the first place. In fact, I'd never even heard of the Sanger before. It came in a typical flimsy Revell lid-&-tray box. There were 49 (including 24 little wheels and 2 large triangular) parts, and one clear bit, for the Mothership. The main craft comes in a lower body with inserts for the wing undersides, and an upper body with the rest of the wings, and a recess on the spine into-which the Orbiter (but not the Cargus) should nestle. Naturally, there is no cockpit detail. The Mothership can be modelled to carry on its back, either the Orbiter or the cargo pod. Each is provided with 3 rocket bells - a large one, and 2 tiny ones that are moulded solid (Rats!!) Externally, the detail is raised, but very fine. As well, there were some random cracks over the surface where the flows of the molten plastic had met.
| CONSTRUCTION |
 During a Build & Bull
session with modelling colleges, E was showing us his Silbervogel kit and he
told us about the Silbervogel Project, while I examined my Sanger kit. As we
talked, I removed the sprue-gate nubs from the parts of the Orbiter and the
cargo pod, then dry-fit them together. Fit was terrific, so I started building
this kit when I hit them with glue as well. The only trimming I did was to thin
the trailing edges of the Cargus pod and the Orbiter's fuselage. I left the
engine bells off to make painting easier. I'd drill-out the little ones, then
attach them all toward the end of the build. How did the crew see out of the
Horus? Like Kirk (& crew) did in the original Star Trek series?
During a Build & Bull
session with modelling colleges, E was showing us his Silbervogel kit and he
told us about the Silbervogel Project, while I examined my Sanger kit. As we
talked, I removed the sprue-gate nubs from the parts of the Orbiter and the
cargo pod, then dry-fit them together. Fit was terrific, so I started building
this kit when I hit them with glue as well. The only trimming I did was to thin
the trailing edges of the Cargus pod and the Orbiter's fuselage. I left the
engine bells off to make painting easier. I'd drill-out the little ones, then
attach them all toward the end of the build. How did the crew see out of the
Horus? Like Kirk (& crew) did in the original Star Trek series?
At this point, I resolved to build the Sanger Mothership in-flight, with the Orbiter being launched, so I glued the undercarriage doors in the closed position onto the large belly piece. The job was made easier because the roof of the wells were separate (detailed) parts, and I left them off so that I could push the doors level with the outside surfaces. They fit in very tightly. I irrigated the random cracks with glue (as a precaution), filled them with Mr Surfacer (twice), then finally finely sanded all surfaces to smooth the filler, and to give the surfaces some tooth to help the paint stick. I completed the belly piece by painting its intake and exhaust pieces (but NOT the moulded-on baffle plates) with Citadel Miniatures (CM) boltgun metal (a dark sliver colour), then gluing them tightly in place. A little pressure was applied to ensure all of the contact surfaces met correctly.
Before gluing the top to the bottom, I taped the main parts together and worked-out its Centre-of-Gravity (CG), then drilled a hole under it. Later, I'll insert the mounting post into it. The large parts were a little warped, so they had to be stitch-glued to ensure a snug fit, and to minimise the need for filler. Filler as still needed in the chord-wise underwing seams, then sanding was needed to bring the underwing surfaces level (cos they weren't - despite my careful stitch-gluing).
Two fins needed to be added to the tail to complete the airframe, but they were virtually butt-joined into place. Getting them both positioned at the same angle was a bit challenging till I hit on a solution. I clamped identical thicknesses of wood to the wings (using the wing marks as a guide), and the fins leaned on them as they dried overnight. This worked.
| COLORS & MARKINGS |
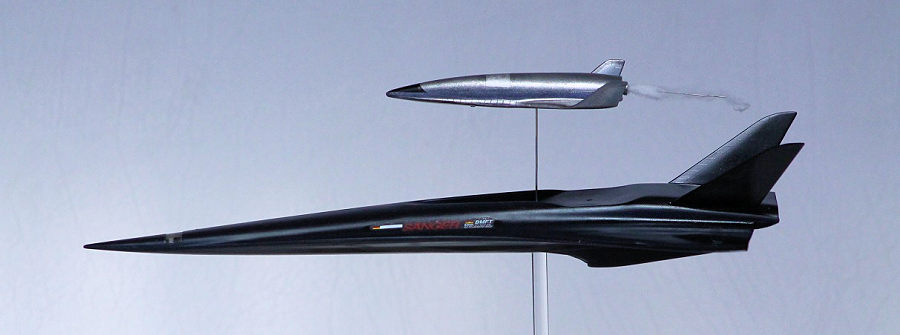
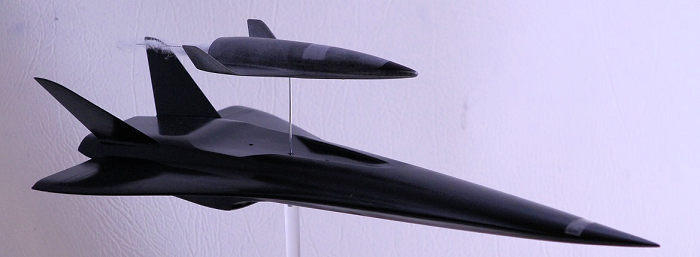
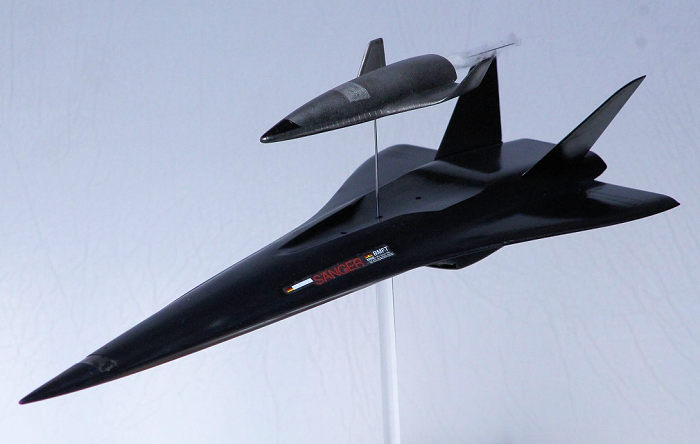
The Orbiter was to be painted in a metallic grey, but as an alternative, I misted it with a dark(ish) silver over the black plastic. It needed a black nosecone and a black decal stripe from it back to the tail. Fortunately, the decal stripe is to be cut from a continuous length, so the size and shape (aka, the positioning) of the nosecone wasn't too critical. Someone didn't do some close research because the Orbiter has some sort of tile-like structure along the leading edge of the chimes, wings and up the tailfins, but the black nosecone overlaps it. I had the black nose cone avoid this structure, then I painted it with the CM boltgun metal, for some contrast. There was a hatch on the spine of the orbiter, and so I painted it CM silver for a 3rd colour tone.
 On the boxart, the Sanger
is depicted as black, yet appears dark blue from certain angles (similar to the
effect I've seen on some cars - both model and 1:1). This in beyond my current
capabilities, so I sought advice from fellow club members. I sought a paint with
which I could achieve the effect with a single application. An alternate
suggestion was to paint the Sanger with a smooth gloss black, then to mist a
dark blue over it. So that's what I did, but it didn't work-out as I had hoped.
On the boxart, the Sanger
is depicted as black, yet appears dark blue from certain angles (similar to the
effect I've seen on some cars - both model and 1:1). This in beyond my current
capabilities, so I sought advice from fellow club members. I sought a paint with
which I could achieve the effect with a single application. An alternate
suggestion was to paint the Sanger with a smooth gloss black, then to mist a
dark blue over it. So that's what I did, but it didn't work-out as I had hoped.
The whole decaling process was harder than it should have been. Both the Orbiter and the Sanger required a profusion of delineations around panels & control surfaces, and longitudinal cheat stripes & name plates on the sides of the Sanger. But instead of required shapes, the decal sheet provided continuous lengths of red, white and blue stripes that the modeller must trim to a correct length, then place in position. Some modellers prefer this approach, but not me, because it makes At least the name plates are standard.
But the delineations don't appear the museum display or on the boxart, and the Sanger's nameplates don't appear on the boxart. After a lot of consideration, I went with the museum display by using only the name plates, and placing them adjacent to where the wings join the body. As I was applying them, each fractured into 4 pieces. This lead me to refrain from using any other decals, especially the longer ones. As well, they looked a bit out-of-register, but are acceptable because of their small size.
| FINAL CONSTRUCTION |
The Sanger's plain cockpit well was painted with a light grey, and the inside of the clear piece was misted with Tamiya smoke. This allowed the cockpit to be clearly identified, yet hide its emptiness. Unfortunately, dryfitting showed that the cockpit was clearly visible, so I glued-in a few pieces onto the cockpit's flat plate to have something to look-at, under the canopy.
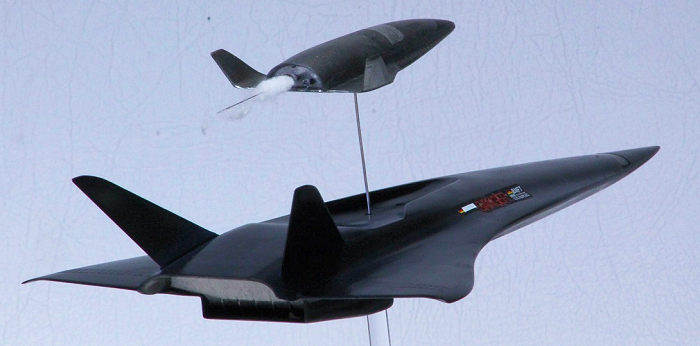
 For a splash of colour on
the Orbiter, I painted the outsides of the rocket bells with a bright silver
outside, and the insides white with a gloss black throat. I added some white
cotton in the large bell to simulate the rocket's ignition, though logic says
that it wouldn't have been fired till after the orbiter was well-clear of the
Mothership.
For a splash of colour on
the Orbiter, I painted the outsides of the rocket bells with a bright silver
outside, and the insides white with a gloss black throat. I added some white
cotton in the large bell to simulate the rocket's ignition, though logic says
that it wouldn't have been fired till after the orbiter was well-clear of the
Mothership.
The Sanger was mounted atop a piece of clear acrylic rod, and the Orbiter was mounted above it atop a length of thin wire. Hopefully, it looks like they've just separated, with the Orbiter just igniting its main engine as it starts on its higher trajectory.
And because I had the parts, I also built the Cargus. For the colour, and to recall NASA's rockets, I painted it white, with black trimmings.
| CONCLUSIONS |
Macroscopically, this is just a futuristic pair mounted Mistel-style. The strength of this kit (in my opinion) is that it side-steps the need for seams along the spine and belly. Because a mock-up exists, I should have followed the painting guide. I did, but to a limited degree. Another modeller might want to build it on its wheels. A courageous modeller might fill the Sanger's recess (on its spine), then build it in its original concept of a global passenger liner, or in its ancestral concept as a global-range bomber.
It is a relatively-easy build, thanks to the low parts count, the excellent fit of the parts and the extreme differences in the size of the parts, so I'm happy to recommend it to other modellers.
| REFERENCES |
Just the instructions and the boxart, and I looked in the Internet, too.
8 August 2022
Copyright ModelingMadness.com. All rights reserved. No reproduction in part or in whole without express permission.
If you would like your product reviewed fairly and fairly quickly, please contact the editor or see other details in the Note to Contributors.