Special Hobby 1/72 Me-262 Nightfighter (Luft '46)
| KIT #: | SH 72006 |
| PRICE: | $10.00 'used' |
| DECALS: | One set |
| REVIEWER: | George Oh |
| NOTES: | short run kit |
| HISTORY |
The WWII Luftwaffe’s Me-262 was the first jet-propelled aircraft to see combat. A revolutionary aircraft, it is no surprise that a two-seater version was developed to train potential pilots on the new aircraft. But so dire was the German strategic situation in 1945 that it is no surprise that the trainer version was adapted into a nightfighter. Less well-known is the proposed redesign into a 3-seater (pilot, radio operator and navigator - who had to be as close together as possible) nightfighter version. Large parts of the existing A1 and B2 versions of the 262s were used, to lessen the development time.
 The forward
tip of the fuselage still housed the weapons, but it was extended to accommodate
an improved radar that did away with the old antler-type antennas. To achieve
the required maximum speed, HeS 011 engines were provided in conjunction with a
sharply-swept wing. The wing area was enlarged to 28 square-metres using a new
middle section and the 262 outer wings. Fitting-in the third man is made
possible by a 2m rearward extension of the fuselage. 3,200lt of fuel was
accommodated in the airframe, allowing 2.5 hours at 10,000m altitude. With 2 x
600-litre external tanks, the flight time could be increased to 3.4 hours at
that height. Drawings showed two variants. One had the engines attached to
standard 262 under-wing positions. The other had them buried in the wingroots,
with a subsequent repositioning of the undercarriage. But there were no full
three-view, nor were precise dimensions for the design included with the
description. As such, it would appear that the design was rejected before the
final selection phase of completion. So this is a 1946 Luftwaffe ‘What-if’
subject.
The forward
tip of the fuselage still housed the weapons, but it was extended to accommodate
an improved radar that did away with the old antler-type antennas. To achieve
the required maximum speed, HeS 011 engines were provided in conjunction with a
sharply-swept wing. The wing area was enlarged to 28 square-metres using a new
middle section and the 262 outer wings. Fitting-in the third man is made
possible by a 2m rearward extension of the fuselage. 3,200lt of fuel was
accommodated in the airframe, allowing 2.5 hours at 10,000m altitude. With 2 x
600-litre external tanks, the flight time could be increased to 3.4 hours at
that height. Drawings showed two variants. One had the engines attached to
standard 262 under-wing positions. The other had them buried in the wingroots,
with a subsequent repositioning of the undercarriage. But there were no full
three-view, nor were precise dimensions for the design included with the
description. As such, it would appear that the design was rejected before the
final selection phase of completion. So this is a 1946 Luftwaffe ‘What-if’
subject.
| THE KIT |
 Scott
analysed this kit at
this
link, and his write-up is pretty-well spot-on, so I won’t bore you with a
repeat of it. My kit differed from his in that it didn’t have replacement wheels
to replace the crappy kit ones. I will reiterate that ALL joins were butt-joins
– there were no alignment pins or tags.
Scott
analysed this kit at
this
link, and his write-up is pretty-well spot-on, so I won’t bore you with a
repeat of it. My kit differed from his in that it didn’t have replacement wheels
to replace the crappy kit ones. I will reiterate that ALL joins were butt-joins
– there were no alignment pins or tags.
I bought this kit from a Club College (Hi, C) because he was relocating to a smaller dwelling, and so he had to dematerialise his possessions (and stash) somewhat. I started building it because, as the rest of the Model Club also bought some of his kits, someone blurted-out that we should have a competition at the end of the year, of a completed model bought from C. Serves me right for being a nice guy.
| CONSTRUCTION |
Like many(?) of you, I build in subassemblies. I started this kit when I freed the 6 x fuselage parts and the 4 x wing parts from the sprues. All were scrubbed against sand paper to true-up their mating surfaces, and then the 4 x wingtip parts were glued to their corresponding middle-fuselage piece with 5-minute 2-part epoxy glue (= strong bond). I lay them on a flat surface to dry, and so that they’d mate nicely later-on. Next day, I cut grooves across the underside of the wing/fuselage join seam so that I could lay pins across them (for later strength). Only when I looked at the instructions did I notice that the wingtips were supposed to be angled upwards a little – Rats!!! For good measure, I attached, then pinned, the wing-tank pylons with extra-long pins (for later).
At the same time, I fitted the tail planes onto their positions. Some filing was necessary because one surface was flat and the other was curved. To future-proof the model, I drilled holes into the fin’s mating surface then, when the tail planes were in position and dry, I redrilled the holes from the inside and into the tail planes so that I could reinforce the bonds with pins. I also painted the cockpit parts, then assembled them. Instructions say to double-side 2 x IPs. I found that this would have made the cockpit quite crowded, so I didn’t. Rudimentary instruments were painted onto the 3 x IPs, and the PE seat belts were replaced with (more-flexible) tape ones. I also left-out the PE rudder pedals (couldn’t see them) and replaced the PE control column with a piece of wire (which I could anchor through the floor). When all was dry, I positioned the cockpit tub into the fuselage upper centre section.
 The nose
halves housed the nose wheel bay, and this lessened the space for my favourite
anti-tail-sitter device – spare threaded nuts. My solution was to use a bolt,
with the shaft inside the nose, and the hex-head inside the fuselage.
Fortunately, there was plenty of space forward of the pilot’s IP. The 6 fuselage
halves, and the 4 wing halves, joined nicely (thanks to that previous
sand-papering), then the 3 sub-assemblies also came together nicely, because I
flat-sanded them, too. But yes, filler WAS needed. There was a crack up the
training edge of the rudder (too much sandpaper), so I shoved-in a strip of thin
card, faired it in with putty, then trimmed it to shape. Nobody realizes that
the rudder has about an extra 1mm of chord.
The nose
halves housed the nose wheel bay, and this lessened the space for my favourite
anti-tail-sitter device – spare threaded nuts. My solution was to use a bolt,
with the shaft inside the nose, and the hex-head inside the fuselage.
Fortunately, there was plenty of space forward of the pilot’s IP. The 6 fuselage
halves, and the 4 wing halves, joined nicely (thanks to that previous
sand-papering), then the 3 sub-assemblies also came together nicely, because I
flat-sanded them, too. But yes, filler WAS needed. There was a crack up the
training edge of the rudder (too much sandpaper), so I shoved-in a strip of thin
card, faired it in with putty, then trimmed it to shape. Nobody realizes that
the rudder has about an extra 1mm of chord.
The only details that needed fixing were the panel lines that crossed the fuselage join seams (they needed rescribing), and the lips of the engines needed nicks and chips filled with putty. I used different drill bits to get the inside curvature just right, before the putty set.
With much trepidation, I carefully and lightly scribed around the vac-formed cockpit canopy. Gradually, I got braver (and the scribing got deeper) because I had a line to follow. Finally, I freed the canopy by cutting along the scribed line with small sharp scissors. Dry-fitting it showed where a little sanding was needed. After a dipping in Future, I positioned the canopy then tacked it in-place with dots of superglue (for strength) where the frames met the rim of the cockpit – first along one side, then I flexed the other side into its correct alignment before gluing it, too (NOT 10% successful). The rest was filled-in with white glue. This completed the airframe.
| COLORS & MARKINGS |
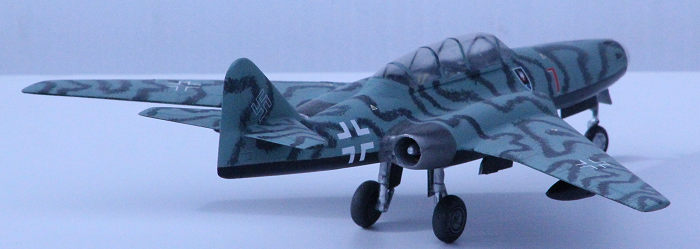
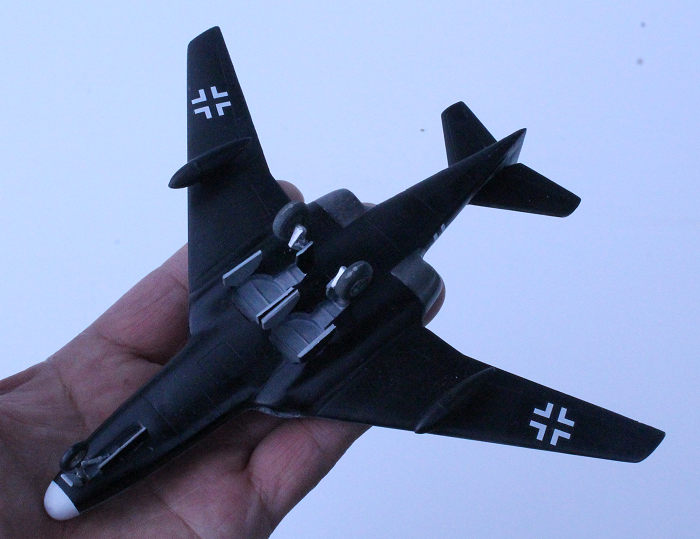 For ease of
masking and decaling, I sprayed the undersides, UC doors and the external tanks
with Tamiya X-1 gloss black. Masking the undersides was easy. Then I made it
hard for myself. Not having much imagination, I elected to replicate the light
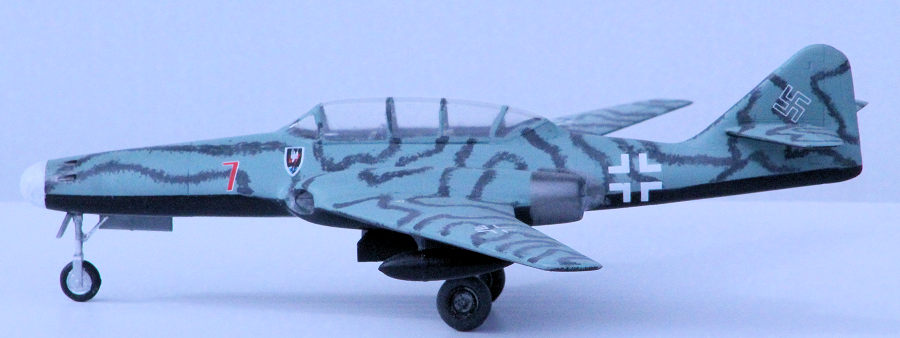
blue/dark grey squiggles of the boxart. My attack-plan was to spray the tops
with a dark grey, drape it with cooked wet noodles (‘cos they have built-in
loops), then spray white, then the light blue over it. This failed because the
loops wouldn’t lie flat on the surfaces. Double Rats!!! So, I tried wet strands
of a very-thin cooked pasta. This failed too, because my AB blew it away. Triple
Rats!!! Eventually (after stripping-off the layers of paint and starting again),
I sprayed the tops with Tamiya XF-23 light blue, then stippled-on squiggles and
loops of Citadel Miniatures Dark Grey. At least this method allowed me to
replicate the boxart/painting guide very closely. The uppers were glossed-over
with Future so that I could apply the decals.
For ease of
masking and decaling, I sprayed the undersides, UC doors and the external tanks
with Tamiya X-1 gloss black. Masking the undersides was easy. Then I made it
hard for myself. Not having much imagination, I elected to replicate the light
blue/dark grey squiggles of the boxart. My attack-plan was to spray the tops
with a dark grey, drape it with cooked wet noodles (‘cos they have built-in
loops), then spray white, then the light blue over it. This failed because the
loops wouldn’t lie flat on the surfaces. Double Rats!!! So, I tried wet strands
of a very-thin cooked pasta. This failed too, because my AB blew it away. Triple
Rats!!! Eventually (after stripping-off the layers of paint and starting again),
I sprayed the tops with Tamiya XF-23 light blue, then stippled-on squiggles and
loops of Citadel Miniatures Dark Grey. At least this method allowed me to
replicate the boxart/painting guide very closely. The uppers were glossed-over
with Future so that I could apply the decals.
Nothing startling here. I used the kit decals (even the tiny warnings and Unit shield) to create it as Red 7. Since I had them, I went for an after-market broken-cross. All settled nicely onto the gloss coat before they were sealed-in with a (too?)flat coat.
| LAST BITS |
 Special
Hobby acknowledged that the kit wheels aren’t the best, and since my kit didn’t
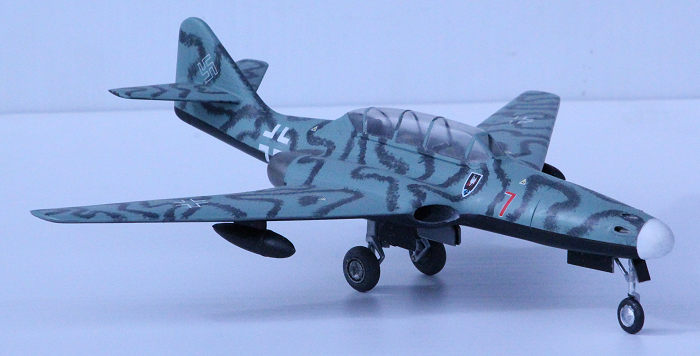
have replacements, I elected to buy a resin set of-which I used the main wheels
only. The wheel wells, inside their doors & the UC legs were painted silver (for
a contrast) with chrome steel oleos. For durability purposes, I pinned the
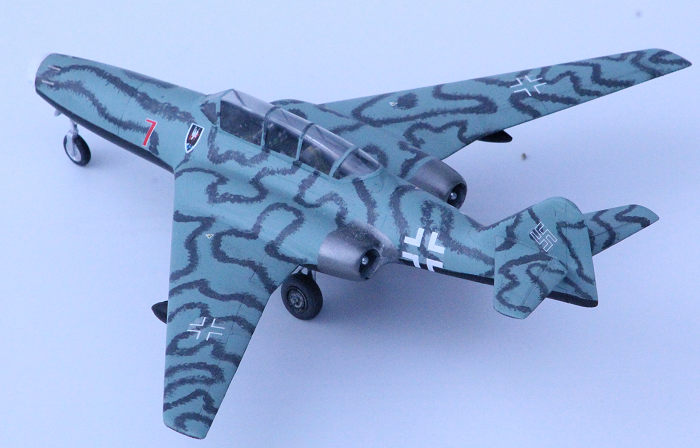
wheels to the legs, and the legs to the wings. The engine rear areas were masked
and then they, the mouths and the gun ports, were brush-painted CM boltgun
metal. The engine bullets were chromed with Molotow silver ink. Last to go on
were the external tanks. They went on over those extra-long pins that pierced
the pylons. Some areas of the underside were brushed with some black (for some
contrast in colour and texture), and the nose was painted gloss white.
Special
Hobby acknowledged that the kit wheels aren’t the best, and since my kit didn’t
have replacements, I elected to buy a resin set of-which I used the main wheels
only. The wheel wells, inside their doors & the UC legs were painted silver (for
a contrast) with chrome steel oleos. For durability purposes, I pinned the
wheels to the legs, and the legs to the wings. The engine rear areas were masked
and then they, the mouths and the gun ports, were brush-painted CM boltgun
metal. The engine bullets were chromed with Molotow silver ink. Last to go on
were the external tanks. They went on over those extra-long pins that pierced
the pylons. Some areas of the underside were brushed with some black (for some
contrast in colour and texture), and the nose was painted gloss white.
You will note that I left-off some PE antennas because they were to be butt-joined into the outer fuselage where they would be easily knocked-off. So sue me…….
| CONCLUSIONS |
This build was hindered, but not stopped, by the short-run nature of the kit, and enhanced by the terrific fit of the parts. I would recommend it to modellers with some experience with short-run kits under their belt, but not to a novice.
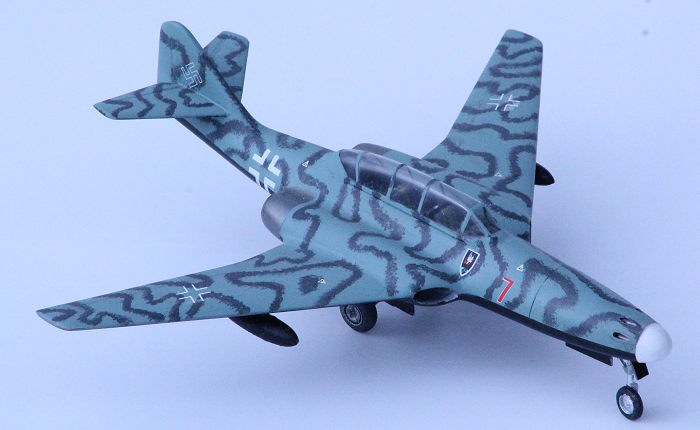
I’d never heard of this version of the 262 before I saw this kit, and now I understand why-not. Nor have I ever seen one built. The completed model looks draggy (that sticking-up canopy) and tippy (the close-together main wheels), but you can do that on a 1946 Luftwaffe model, and get away with it. Aircraft of this genera have interesting shapes (bestowed upon them by designers) and colour-schemes (bestowed on them by us modellers) – and NOBODY can prove you wrong.
30 November 2023 Copyright ModelingMadness.com. All rights
reserved. No reproduction in part or in whole without express permission from
the editor. If you would like your product reviewed fairly and fairly quickly, please contact the editor or see other details in the
Note to
Contributors. Back to the Main Page
Back to the Review
Index Page
Back to the Previews Index Page