Fujimi 1/48 FW-190A
| KIT #: | 5A13 |
| PRICE: | @$5.00 in the early '80s |
| DECALS: | Five options |
| REVIEWER: | George Schembri |
| NOTES: | AeroMaster 48-233 |
| HISTORY |
The FW 190 was designed as a result of a development contract placed by the R.L.M. with the Focke Wulf Flugzeugbau in the autumn of 1937 for a new single-seat fighter. The first prototype, the FW 190V1 was flown on June 1, 1939, powered by a fan-cooled 1,550 horsepower BMW 139 engine. An unusual feature was the use of a ducted spinner to reduce the drag of the bulky radial engine. The ducted spinner resulted in some engine overheating and was removed and replaced by a more orthodox low-drag cowling.
 Shortly
after the FW 190V1’s first flight, it was decided to abandon the BMW139 engine
in favour of the newer BMW801 which possessed similar dimensions and had greater
development potential. The engine change resulted in the relocation of the
engine further aft which helped solved center of gravity problems and also
eliminated intrusion of exhaust gasses into the cabin experienced with the
previous engine. Prototype variations including wing modifications continued up
to the FW 190V6
Shortly
after the FW 190V1’s first flight, it was decided to abandon the BMW139 engine
in favour of the newer BMW801 which possessed similar dimensions and had greater
development potential. The engine change resulted in the relocation of the
engine further aft which helped solved center of gravity problems and also
eliminated intrusion of exhaust gasses into the cabin experienced with the
previous engine. Prototype variations including wing modifications continued up
to the FW 190V6
With Models A-0 through A-7 preceding it, the FW190A-8 was introduced at the end of 1943. Sub-variants included the A-8/R1 Zerstorer with four 20-mm MG 151 canons mounted in pairs mounted in gondolas under each wing. TheA-8/R-2 had separate 30-mm MK 108 cannon under each wing replacing the MG 151s. The A-8/R-3 was similar to the R-2 but had MK 103 long-barrel 30-mm canons which had a lower fire rate but a higher muzzle velocity. The A-8 Sub-variants went up to R11 and R12 with some variants designed for ramming attacks and others with Turbo-charged types and automatic pilot and other all-weather capabilities.
| THE KIT |
 I found
this kit on a ‘final sale’ table in a hobby store in Toronto back sometime in
the mid 1980’s (yup – 1980’s) with an opened crushed box, but it was a compete
kit. From what I remember (and found on Google), Fujimi initially released this
kit back in 1970 with a Bachmann-Fujimi ‘Motorized’ version becoming available
in 1973. The specific date of this kit is not known but the kit does identify
the original kit designation No.5A13 with English lettering and instructions.
Kit variations you can choose to build from include A-6, A-7, A-8 and A-9 models
with the different versions apparently being achieved by selecting the
appropriate center gun cowling cover with different selections of underwing
stores and outer wing cannon configurations as well as optional Trop filters.
The only canopy supplied is the Common-Flat canopy which can only be mounted in
a closed position. Reference drawings for decal placement and painting are
provided on the back of the box. Decals provided allow a choice of five
different aircraft which include markings identified as Heinz Bar’ Squadron,
Udet’ Squadron or Richtofen’ Squadron.
I found
this kit on a ‘final sale’ table in a hobby store in Toronto back sometime in
the mid 1980’s (yup – 1980’s) with an opened crushed box, but it was a compete
kit. From what I remember (and found on Google), Fujimi initially released this
kit back in 1970 with a Bachmann-Fujimi ‘Motorized’ version becoming available
in 1973. The specific date of this kit is not known but the kit does identify
the original kit designation No.5A13 with English lettering and instructions.
Kit variations you can choose to build from include A-6, A-7, A-8 and A-9 models
with the different versions apparently being achieved by selecting the
appropriate center gun cowling cover with different selections of underwing
stores and outer wing cannon configurations as well as optional Trop filters.
The only canopy supplied is the Common-Flat canopy which can only be mounted in
a closed position. Reference drawings for decal placement and painting are
provided on the back of the box. Decals provided allow a choice of five
different aircraft which include markings identified as Heinz Bar’ Squadron,
Udet’ Squadron or Richtofen’ Squadron.
| CONSTRUCTION |
 The English
instructions were complete and straightforward, starting with the assembly of a
simple cockpit which does have some raised details on the control panel and side
consoles but there was no side wall panel detail. Parts fit well with
instructions identifying which holes are required before assembly depending upon
the version to be built. Some filler was required at the wing roots and front
engine cowling. There is minimal engine detail but all detail is hidden by a
separately mounted coolant fan located in front of the engine. The Propeller and
hub are simply molded together in a single piece. I decided to utilize the
A-8/R-3 option mounting the double 20-mm MG 151 canons under each wing and
relocation of the Pitot tube. The wing canon muzzles lack any detail expect for
the MK103 muzzles which do have protruding nibs on the sides but will required
scrapping away of the injection mold lines. Some care is required when
assembling the sturdy landing gear to ensure proper alignment – instructions
indicate to slide the main wheels onto the main landing gear strut shaft and
then flatten the end of the shaft with a heated screw driver to allow the wheel
to free spin (I just cemented the wheel to ensure proper alignment and trimmed
the shaft).
The English
instructions were complete and straightforward, starting with the assembly of a
simple cockpit which does have some raised details on the control panel and side
consoles but there was no side wall panel detail. Parts fit well with
instructions identifying which holes are required before assembly depending upon
the version to be built. Some filler was required at the wing roots and front
engine cowling. There is minimal engine detail but all detail is hidden by a
separately mounted coolant fan located in front of the engine. The Propeller and
hub are simply molded together in a single piece. I decided to utilize the
A-8/R-3 option mounting the double 20-mm MG 151 canons under each wing and
relocation of the Pitot tube. The wing canon muzzles lack any detail expect for
the MK103 muzzles which do have protruding nibs on the sides but will required
scrapping away of the injection mold lines. Some care is required when
assembling the sturdy landing gear to ensure proper alignment – instructions
indicate to slide the main wheels onto the main landing gear strut shaft and
then flatten the end of the shaft with a heated screw driver to allow the wheel
to free spin (I just cemented the wheel to ensure proper alignment and trimmed
the shaft).
| COLORS & MARKINGS |
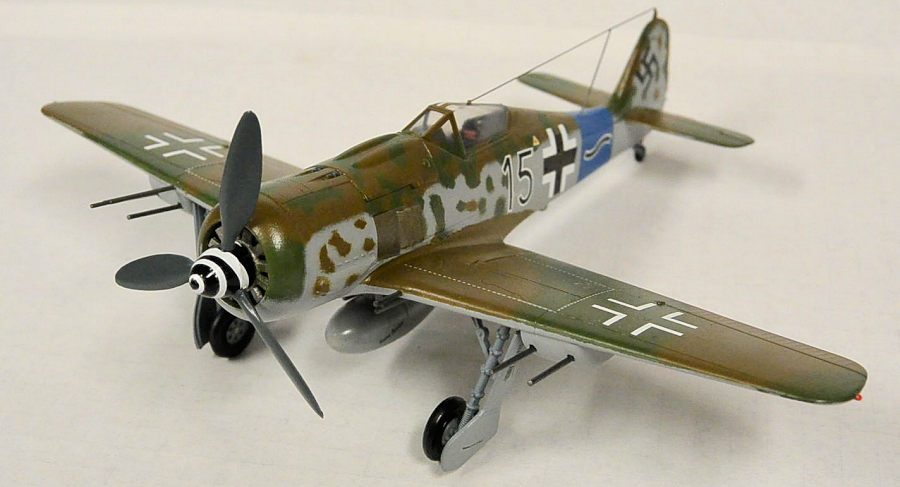
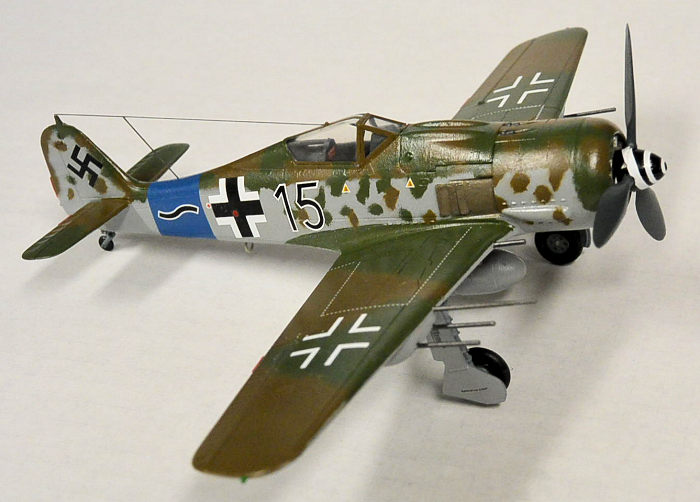
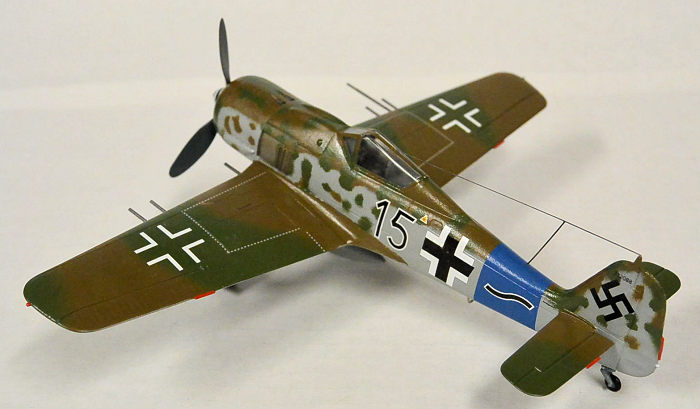
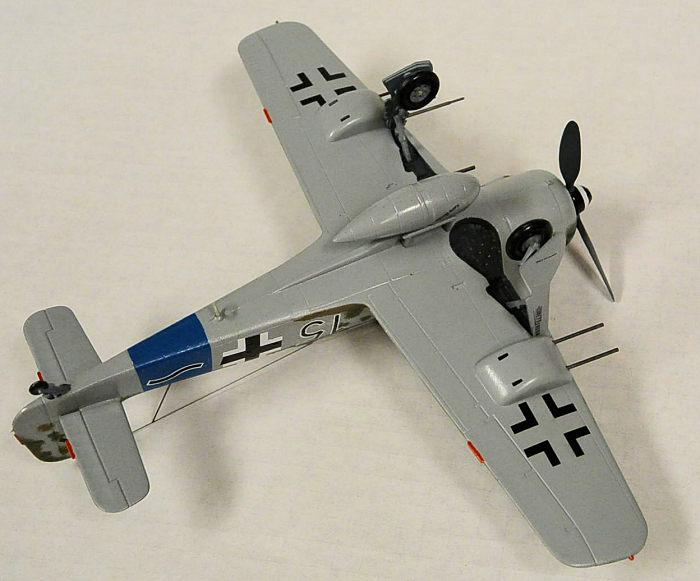
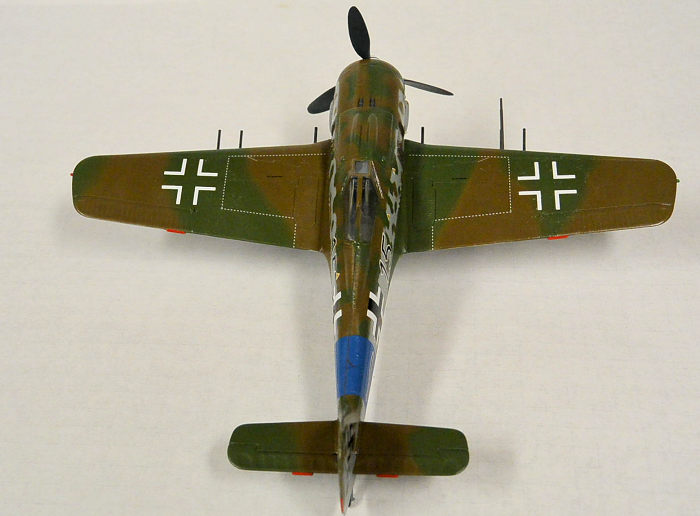
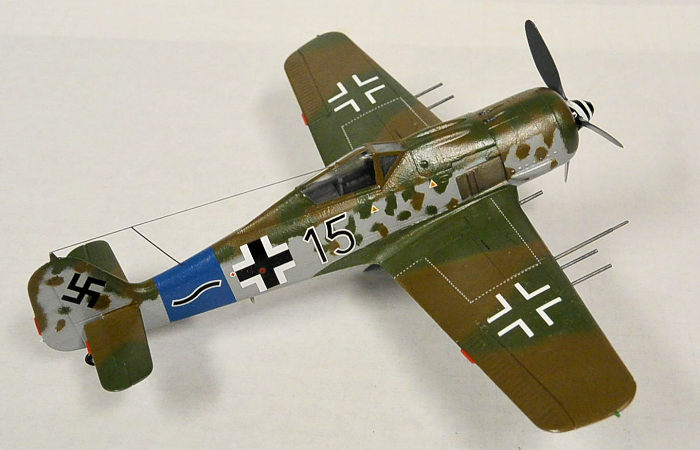
The kit decals were tempting but initial testing indicated that they were not useable due to age and were extremely brittle and would not be able to be softened and would crack when applied to any surface with even the most minimal curving. Aero Master decals #48-223 Operation Bodenplatte Jan 1945 (Pt.2) were selected to continue with the completion of the kit. Operation Bodenplatte (Baseplate) was an attempt by the Luftwaffe to cripple Allied air forces in the Low Countries and gain air superiority during the Battle of the Bulge. The Aero Master decals included markings for several different aircraft types from BF-109K, ME-262A-2A to a FW190D-9 all used during Operation Bodenplatte. The Decals included a sole Fw190A-8 #732088 flown by Uffz. Gerhard Ohlenschlager. No information is provided as to which sub variant he flew, but the kit was already assembled as an A-8/R-1 and that was that. Also, diagrams show aircraft #732088 had a blown canopy. But being one of my first kits returning back to the hobby and I decide to give myself some slack and forgive specific details.
 I had to
make to same concessions when selecting the paints to complete the model due to
limited paint supplies during the initial weeks of the Covid-19 pandemic
shutdown. Painting instructions indicated the under surfaces were to be painted
with RLM76/FS26473 – I actually had Vallejo Model Air 71.046–Pale Blue Grey
identified as F.S. 36473. For the upper surfaces RLM81 and RLM 82 were required
and I did not have the actual colour match– After several cross reference checks
I dug into my ‘Testors Custom Enamel’ Stash and decided to forge ahead with
subbing RLM81 with Testors No.1702 Field Drab and subbing RLM82 with Testors No.
1712 Field Green. The Vallejo Model Air Acrylic RLM76 was easily applied using
my ol’ Paasche H1 eternal mix airbrush with no thinning. This was my first real
application using Vallejo paint and I liked how things went – I will definitely
be investing the additional Vallejo paints with future models. The Enamel Field
Drab was applied next after being thinned down with Tamiya Lacquer Thinner and a
decent result was achieved having to use minimal masking. Next the Field green
was thinned and applied to the wings and the upper fuselage areas using masking
and stenciling techniques. Then came the fun part of attempting to apply the
RLM81/82 splotches over the RLM76 – YIKES – I was definitely out of practice!
After a couple of attempts of stencilling and dry brush techniques, the fuselage
side panels were repainted/reset with the RLM76 and a reattempt of stenciling
was done – and I was happy with the final result. Minimal overspray areas were
cleaned up with a brush. Propeller blades painted with Model Master Acrylic
RLM70 Schwarzgrun and hub painted with Tamiya X-18 Semi-Gloss Black. Trim tabs
painted with Testors Red 1104 – close enough. The complete model was spray
covered with Future/Pledge Floor Gloss in preparation for the decals.
I had to
make to same concessions when selecting the paints to complete the model due to
limited paint supplies during the initial weeks of the Covid-19 pandemic
shutdown. Painting instructions indicated the under surfaces were to be painted
with RLM76/FS26473 – I actually had Vallejo Model Air 71.046–Pale Blue Grey
identified as F.S. 36473. For the upper surfaces RLM81 and RLM 82 were required
and I did not have the actual colour match– After several cross reference checks
I dug into my ‘Testors Custom Enamel’ Stash and decided to forge ahead with
subbing RLM81 with Testors No.1702 Field Drab and subbing RLM82 with Testors No.
1712 Field Green. The Vallejo Model Air Acrylic RLM76 was easily applied using
my ol’ Paasche H1 eternal mix airbrush with no thinning. This was my first real
application using Vallejo paint and I liked how things went – I will definitely
be investing the additional Vallejo paints with future models. The Enamel Field
Drab was applied next after being thinned down with Tamiya Lacquer Thinner and a
decent result was achieved having to use minimal masking. Next the Field green
was thinned and applied to the wings and the upper fuselage areas using masking
and stenciling techniques. Then came the fun part of attempting to apply the
RLM81/82 splotches over the RLM76 – YIKES – I was definitely out of practice!
After a couple of attempts of stencilling and dry brush techniques, the fuselage
side panels were repainted/reset with the RLM76 and a reattempt of stenciling
was done – and I was happy with the final result. Minimal overspray areas were
cleaned up with a brush. Propeller blades painted with Model Master Acrylic
RLM70 Schwarzgrun and hub painted with Tamiya X-18 Semi-Gloss Black. Trim tabs
painted with Testors Red 1104 – close enough. The complete model was spray
covered with Future/Pledge Floor Gloss in preparation for the decals.
And that’s pretty much when my mouth dropped – the decals did not match the sizing /placement as indicated in the decal instructions. A quick measurement check revealed that this kit is pretty much a 1/50th scale, not the 1/48th scale as indicated on the box cover. But no big deal really as this was a learning experience - the decals would generally fit in the required areas and I am also just trying to sharpen my modelling skills. Micro Set and Micro Sol were to be used to assist in the decal application.
 To begin
with – the rear fuselage blue band (RVD Band?) was a bit oversized and required
some trimming. Reading the Aero Master instructions, some bubbling can be
expected and did occur but they systematically disappeared with time when the
decal was softened and allowed to properly form .The rest of the decals went on
with great results with great adhesion. Aero Master supplied just enough
stencilling to make the model look complete for my liking.
To begin
with – the rear fuselage blue band (RVD Band?) was a bit oversized and required
some trimming. Reading the Aero Master instructions, some bubbling can be
expected and did occur but they systematically disappeared with time when the
decal was softened and allowed to properly form .The rest of the decals went on
with great results with great adhesion. Aero Master supplied just enough
stencilling to make the model look complete for my liking.
The front propeller hub was a bit of a challenge – the spiral decal was a bit oversized and the fact the propeller and hub were one piece made the task a little difficult; this was my first attempt in such a spiral application. Some cracking did occur and trimming with an Xacto blade was required but in the end a few dabs of acrylic gloss white completed things nicely.
Landing gear was glued in place ensuring proper alignment (or the best I could) then the drop tank and external cannon muzzles. The canopy was separately masked and brush painted with an initial interior colour coating followed by the external camouflage colours. Micro Kristal Clear was used to set the canopy in the closed position (no option) and minimal gaps were filled. The antenna wire was pulled by heating up an extra sprue and glued in place with Mercury Adhesive Thin M5T.
| CONCLUSIONS |
I purchased this kit close to 40 years ago, and started to build it before it ended up in storage. This kit was brought out only recently when I decided to take the hobby up again- I always thought this kit to be 1/48th scale and looking back I always thought it looked small but this was my first and only FW190 and just figured it was that small of an aircraft when compared to my Mustangs and Spitfires and other WWII fighters I had built in the past. This was a straight forward build with a decent looking result. It’s not going to compare well with the more detailed and accurate Eduard and Tamiya kits I plan on purchasing but it did provide me with a few hours of building entertainment allowing me to gauge my capabilities and gave me an opportunity to practice my painting skills in preparation for a more challenging kit. The kit would be definitely recommended for the beginner but keep in mind the age of the kit and the decal scaling situation.
| REFERENCES |
Warplanes of the Third Reich – William green – Galahad Books
George
Schembri 8
September 2020 Copyright ModelingMadness.com Review Kit courtesy of my paper route back in 1980 If you would like your product reviewed fairly and fairly quickly, please contact the editor or see other details in the
Note to
Contributors. Back to the Main Page
Back to the Review
Index Page
Back to the Previews Index Page