| KIT #: | 04869 |
| PRICE: | 133$ |
| DECALS: | Two options |
| REVIEWER: | Francisco Santoro |
| NOTES: |
| HISTORY |
From the instructions: “After the Bf 109, the Fw 190 was the second standard fighter in the German Luftwaffe.
In contrast to the 109, the Fw 190 proved to be more robust and versatile. Along with the Fw 190A-8, the heavier Fw 190F-8 fighter-bomber was produced in large numbers from early 1944 onwards. The "F" series was developed in 1943 specifically for the ground attack role. It differed on the A-8 with its so-called "large bomb-electrics". This meant that all 5 external load points could be individually jettisoned. A 500kg (1100 lb) bomb could be carried on the existing ETC 501 standard external load pylon under the fuselage and a 50kg (110 lb) bomb on each of the four ETC 71 wing racks. Aditionally the armour protection in the fuselage was more extensive and the wings were strengthened in the area of the main landing gear.Otherwise, the F-8 corresponded to A-8 fighter version.
 After
the start of series production a new propeller blade made of wood and a
bubble-shaped canopy with reinforced head protection were also introduced onto
the F-8.
After
the start of series production a new propeller blade made of wood and a
bubble-shaped canopy with reinforced head protection were also introduced onto
the F-8.
In order to reduce weight the outer wing weapons and all corresponding openings were dispensed with.
On some of the production aircraft, the "blisters" on the upper and lower wing surfaces were also removed. Most F-8´s however could be retrofitted with the outer weapons instead of the bomb carrier. Flight performance deteriorated significantly with the additional weight of armour plating and through carrying heavy external loads. Carrying all external loads on the fuselage and wings the maximum speed dropped by 90km/h.
Performance in the climb, service ceiling and range were also reduced. The bomb carriers were particularly disruptive after the external loads had been dropped and reduced both the aircrafts manoeubravility and maximum speed. Both rocket launch rails, the load rack ER4 for four 50 lb bombs and bomb containers for dropping small cluster bombs were used as external load carriers. -From February 1944 until the end of the war Focke Wulf and eight other aircraft factory´s as well as a variety of sub-contractors produced more than 6500 Fw 190A-8´s and F-8´s.- All aircraft were fitted with a MW-50 unit to increase performance from the BMW 801D to 2000bhp for a period of 10 minutes.
They could also carry either a 300 litre auxiliary fuel tank or a bomb load on the fuselage pylon. Fitting a GM-1 unit was also possible for high altitude flight.”
| THE KIT |
 The
Revell big scale Fw 190F-8 was the first variant of a family of three, the other
two being the A-8/R11 and the A-8/R2. Released in 2014, the kit is molded in a
light grey, soft plastic with recessed panel lines. Parts are bagged separately,
which avoids them getting damaged/lost in transit. Clear parts come inside their
own bag. The model comes with a fully detailed BMW 801 engine, possibility of
gluing the cowling panels open to display said engine, two canopy types (blown
and regular), and several underwing ordnance (such as two wing fuel tanks and a
single SC500 bomb, or a single SC250 on the central rack and four SC50s on the
outer racks). Decals provide two options, both from SG10 and painted in RLM
75/82/76 with yellow nose band and rudder. Flaps can be posed up or down thanks
to Revell’s decisión of providing both.
The
Revell big scale Fw 190F-8 was the first variant of a family of three, the other
two being the A-8/R11 and the A-8/R2. Released in 2014, the kit is molded in a
light grey, soft plastic with recessed panel lines. Parts are bagged separately,
which avoids them getting damaged/lost in transit. Clear parts come inside their
own bag. The model comes with a fully detailed BMW 801 engine, possibility of
gluing the cowling panels open to display said engine, two canopy types (blown
and regular), and several underwing ordnance (such as two wing fuel tanks and a
single SC500 bomb, or a single SC250 on the central rack and four SC50s on the
outer racks). Decals provide two options, both from SG10 and painted in RLM
75/82/76 with yellow nose band and rudder. Flaps can be posed up or down thanks
to Revell’s decisión of providing both.
| CONSTRUCTION |
I started by building the engine. You’ll need to add every engine piece in order to add the prop in the end and be able to attach it to the cowling notches that locate the parts properly. This assembly was only painted at the front in black, because once the propeller is added, the cooling fan won´t let you see beyond it.
Next was the propeller, which was painted RLM 70 (Revell 40 Black Green) with metallic roots and a nose cone painted white first, and then masked and painted black to get a spiral.
Cockpit
parts were painted RLM 66 (Revell 78 Tank Grey) with details in black and red.
The seat cushion was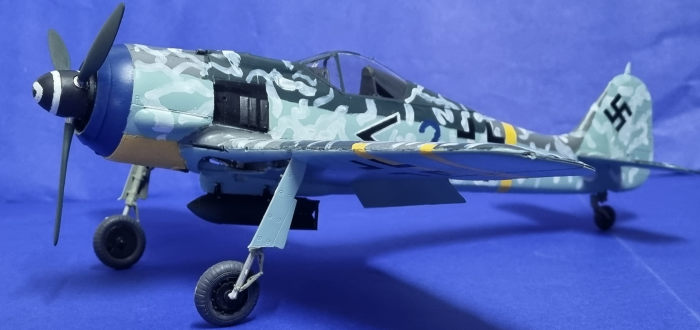 coated in Revell 46 NATO Brown (RLM 81). Once that was done, I glued all
the parts together, making sure to add the gunsight to the upper instrument
panel, then sliding it under the coaming (if you don´t do so as Revell instructs,
you won’t be able to fit the sight). I then painted the tailwheel strut in RLM
02 (Revell 45 Olive Green) ang glued it to the fuselage half. Then the fuselage
halves were glued together, with the cockpit being added from below. The cockpit
coaming was also added at this time.
coated in Revell 46 NATO Brown (RLM 81). Once that was done, I glued all
the parts together, making sure to add the gunsight to the upper instrument
panel, then sliding it under the coaming (if you don´t do so as Revell instructs,
you won’t be able to fit the sight). I then painted the tailwheel strut in RLM
02 (Revell 45 Olive Green) ang glued it to the fuselage half. Then the fuselage
halves were glued together, with the cockpit being added from below. The cockpit
coaming was also added at this time.
While the fuselage assembly was curing, I tackled the wings. All the parts were painted RLM 02 and glued together to the lower single span wing. The wingspars were glued, providing a tough assembly, with no chance of getting an incorrect dihedral. The lower wing was then glued to the fuselage, glued the flaps in the extended position, and glued the top wings. I taped everything and waited for some hours before I returned to the model. Once the main assembly was dry, I glued the horizontal and vertical stabilizers.
I have to warn those who wish to build this kit. If you follow the instructions and add the engine supports with the firewall, you´ll find out it doesn’t fit, it’s too far forward. What I did was glue the bulges to the lower wing, left them to harden, and then added the engine. This allowed me to build the nose without much trouble.
The entire model was sean filled with Vallejo’s Perfect Plastic Putty. Seams that were stubborn were covered with CA and then sanded away.
| COLORS & MARKINGS |
I bought this kit just to test my masking skills with homemade masks. I
found online a site which stores the
Luftwaffe font used
during WW2. Click on the link and it’ll download the
Font to your computer, the page has the padlock indicating it´s a safe site.
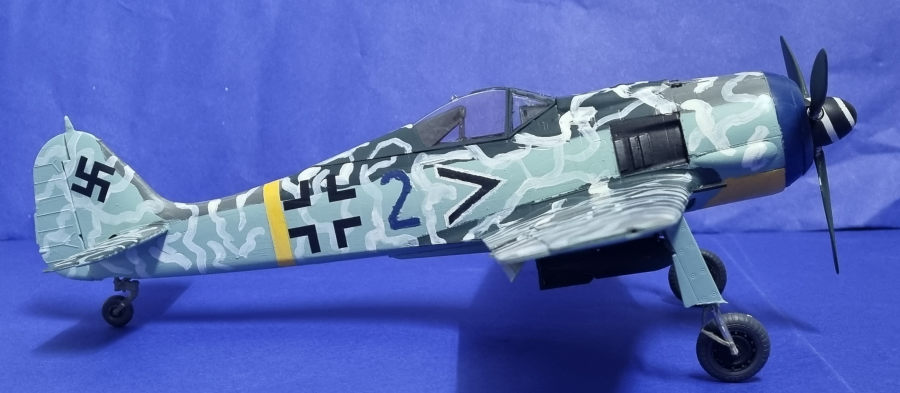
Right, back to the model. I wanted to paint the plane as “Blue 2,” an SG2 Fw
190F-8 based at Raab airfield in Hungary during late 1944/early 1945. The área
where the 2s would be located were painted Revell 56 Matt Blue, and the áreas
for the chevrons were painted Revell 08 Matt Black, and the band son the wing
and fuselage 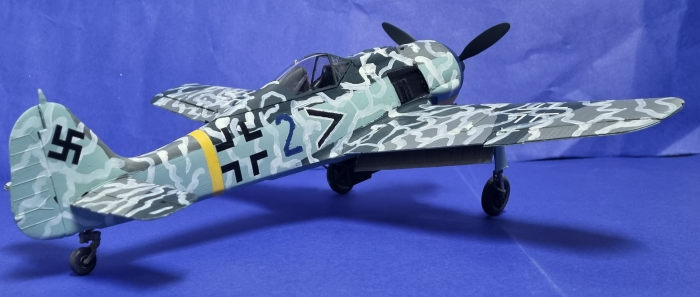 painted
Revell 15 Matt Yellow. The masks were applied over the paint, and I set off to
brushpaint the whole model. I used Revell 47 Mouse Grey (RLM 75), 69 Granite
Grey (RLM 74), and 49 Light Blue (RLM 76). Once the paint had cured, I removed
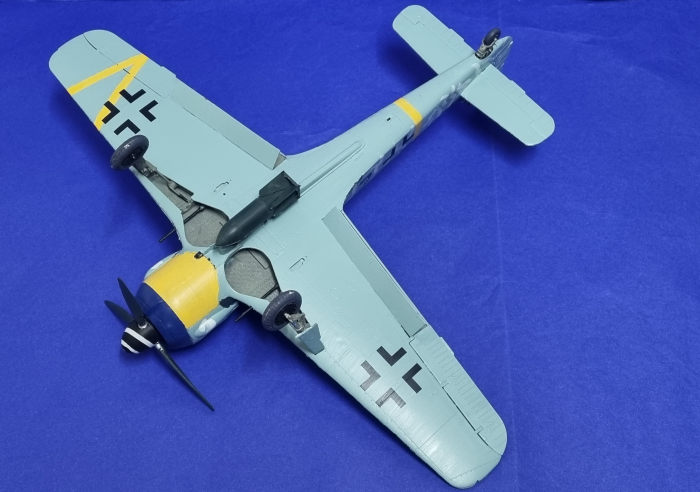
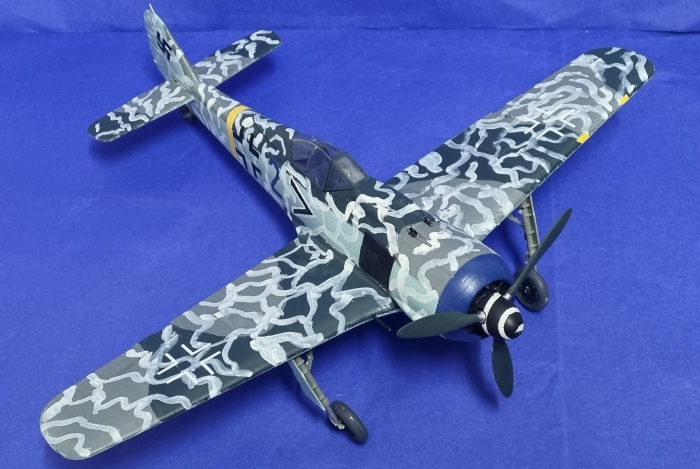
the masks and painted the white outline on the chevrons. The Winter scheme was
handpainted randomly and without worrying much about covering properly the
streaks bacause the original was washable and prone to rub off. The model was
glossed with Revell 01 Gloss Varnish, and the decals were added. I applied
Microsol over them to help them conform to the surface, but the decals began to
wrinkle. I left the Microsol go off and with a cotton bud, removed carefully the
distorted areas. The model was left overnight to dry and was then matt coated
with Revell 02 Matt Varnish.
painted
Revell 15 Matt Yellow. The masks were applied over the paint, and I set off to
brushpaint the whole model. I used Revell 47 Mouse Grey (RLM 75), 69 Granite
Grey (RLM 74), and 49 Light Blue (RLM 76). Once the paint had cured, I removed
the masks and painted the white outline on the chevrons. The Winter scheme was
handpainted randomly and without worrying much about covering properly the
streaks bacause the original was washable and prone to rub off. The model was
glossed with Revell 01 Gloss Varnish, and the decals were added. I applied
Microsol over them to help them conform to the surface, but the decals began to
wrinkle. I left the Microsol go off and with a cotton bud, removed carefully the
distorted areas. The model was left overnight to dry and was then matt coated
with Revell 02 Matt Varnish.
The only photo of Blue 2 that exists shows a single SC250 bomb hanging under the central rack on the fuselage. I painted the bomb RLM 70.
The original Blue 2 had the lower part of the gear doors removed to avoid mud collection when operating in the harsh and humid Winter of Europe, so I followed suit and cut them off from my model. The landing gear was glued in place, I added the SC250 bomb, clear parts, and propeller. I then turned the model down upside and placed it on its gear.
| CONCLUSIONS |
This one is my third Fw 190 from Revell in 32nd scale. A fun kit to build, and I´d love to get another one. The model is big, and will look nice next to other 1:32 kits.
| REFERENCES |
Kit instructions, Eduard painting guide and several online photos.
15 August 2023
Copyright ModelingMadness.com. All rights reserved. No reproduction in part or in whole without express permission.
If you would like your product reviewed fairly and quickly, please contact the editor or see other details in the Note to Contributors.