Tamiya's 1:48 Focke Wulf Fw 190D-9.
| KIT #: | 61041 |
| PRICE: | 65$ |
| DECALS: | Three options |
| REVIEWER: | Francisco Santoro |
| NOTES: | Poor fit in some areas. |
| HISTORY |
 From the
instructions: "Following the successful entry of the Focke Wulf Fw 190A series
of fighter aircraft over the English channel during Autumn of 1941, the German
RLM requested a high altitude version to complement the fighter fleet, and three
projects were started. The Fw 190B used the BMW 801 turbosupercharged radial
engine and a pressurised cockpit, but very few of these were built. The Fw 190C
was powered by a 1750hp Daimler Benz DB 603A in-line engine, of which three
prototypes were built. The third high altitude project was based on a Focke Wulf
Fw 190A airframe and powered by a Junkers engine. The fuselage was lengthened to
accommodate the V-12 cylinder, liquid cooled, 1750hp Jumo 213 engine, and made
its initial flight during the Winter of 1941-42. Five further prototypes were
produced, plus a small batch of Fw 190D-0s were completed from standard
production Fw 190A-7 airframes. These pre-production aircraft were followed by
the Fw 190D-1s, which had increased area in the vertical fin and rudder. There
were no Fw 190D-2 through D-8 designations.
From the
instructions: "Following the successful entry of the Focke Wulf Fw 190A series
of fighter aircraft over the English channel during Autumn of 1941, the German
RLM requested a high altitude version to complement the fighter fleet, and three
projects were started. The Fw 190B used the BMW 801 turbosupercharged radial
engine and a pressurised cockpit, but very few of these were built. The Fw 190C
was powered by a 1750hp Daimler Benz DB 603A in-line engine, of which three
prototypes were built. The third high altitude project was based on a Focke Wulf
Fw 190A airframe and powered by a Junkers engine. The fuselage was lengthened to
accommodate the V-12 cylinder, liquid cooled, 1750hp Jumo 213 engine, and made
its initial flight during the Winter of 1941-42. Five further prototypes were
produced, plus a small batch of Fw 190D-0s were completed from standard
production Fw 190A-7 airframes. These pre-production aircraft were followed by
the Fw 190D-1s, which had increased area in the vertical fin and rudder. There
were no Fw 190D-2 through D-8 designations.
The Fw 190D-9 began production in June of 1944, with early versions having the flat topped canopy, and from W.Nr. 210001 onwards, had the Galland hood. It went into combat with III/JG 54 "Grünherz (Green Hearts)" in September 1944 at Achmer, Germany, as top cover for the new Messerschmitt Me 262 jet fighters then entering service."
| THE KIT |
 The kit comes
in three bags. One has the clear parts, and the other two the regular grey
pieces. They're perfectly molded, with no signs of flash or short shot parts.
They're are also very smooth to the touch. The single lower wing half is not
correct for the D-9, since it doesn't have the opening for the engine typical of
this design and later variants (including the Ta 152). This happened because the
aircraft Tamiya measured (in 1996) had the incorrect wing.
The kit comes
in three bags. One has the clear parts, and the other two the regular grey
pieces. They're perfectly molded, with no signs of flash or short shot parts.
They're are also very smooth to the touch. The single lower wing half is not
correct for the D-9, since it doesn't have the opening for the engine typical of
this design and later variants (including the Ta 152). This happened because the
aircraft Tamiya measured (in 1996) had the incorrect wing.
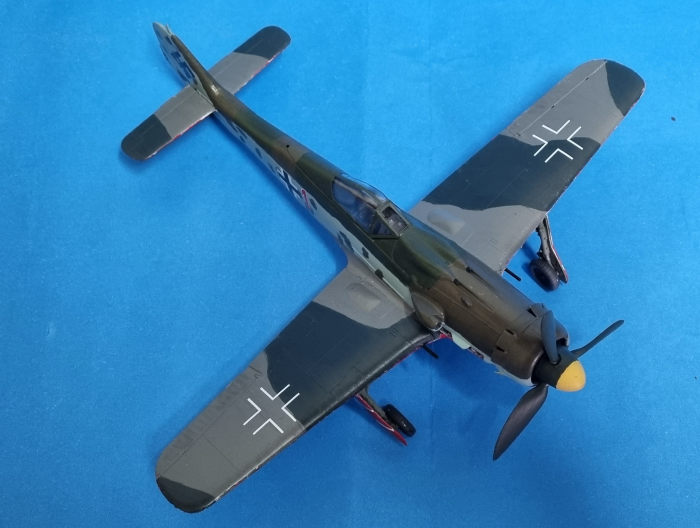
Decals provide options for three aircraft: 4/JG 301 (Straubing, Bavaria, 1945), Stab/JG 4 at (Rhein-Main airfield, Germany, Spring 1945), and Theo Nibel's Dora in service with 10/JG 54 (Belgium, January 1st 1945).
| CONSTRUCTION |
I began construction by painting as many parts as I could in the sprues. This means RLM 66 for the cockpit, RLM 02 for the wheel wells and landing gear legs, rust for the exhausts, and tyre colour for the wheels. After painting all those parts and letting them dry, I glued them together using UHU's scale modelling cement (similar to Revell Contacta Professional, but with more content).
While the paint was drying, I glued the fuselage halves and taped them together. I then glued the cockpit from below. This assembly was left to dry while I worked on the wings.
 The wings were
the first subassembly in which I had issues. I glued the wells in place, and
then added the upper halves. The left one fitted just fine, but the right one
didn't want to sit properly. I don't know why that happened, but I taped that
wing with as much pressure as possible, and hoped for the best. I didn't open
the holes for the external fuel tank because JV 44 Doras didn't have them (at
least for Red 1).
The wings were
the first subassembly in which I had issues. I glued the wells in place, and
then added the upper halves. The left one fitted just fine, but the right one
didn't want to sit properly. I don't know why that happened, but I taped that
wing with as much pressure as possible, and hoped for the best. I didn't open
the holes for the external fuel tank because JV 44 Doras didn't have them (at
least for Red 1).
I then turned my attention back to the fuselage and added the horizontal stabilizers. These fitted nicely in their openings.
After letting the wings thoroughly dry, I test fitted them to the fuselage. Second area with fit issues. There were big gaps in the join between fuselage/wings. I then used a trick I leared from Tom Cleaver's Dragon 190s, which was add a spreader bar under the cockpit. I added one below the cockpit and managed to reduce the gaps in the middle, but didn't consider adding a second one. I then glued the wings in place, let them dry, and then filled the gaps with CA (La Gotita). The hardened remains were sanded back with an 800 grit sandpaper.
With the airframe complete, it was time to paint the model.
| COLORS & MARKINGS |
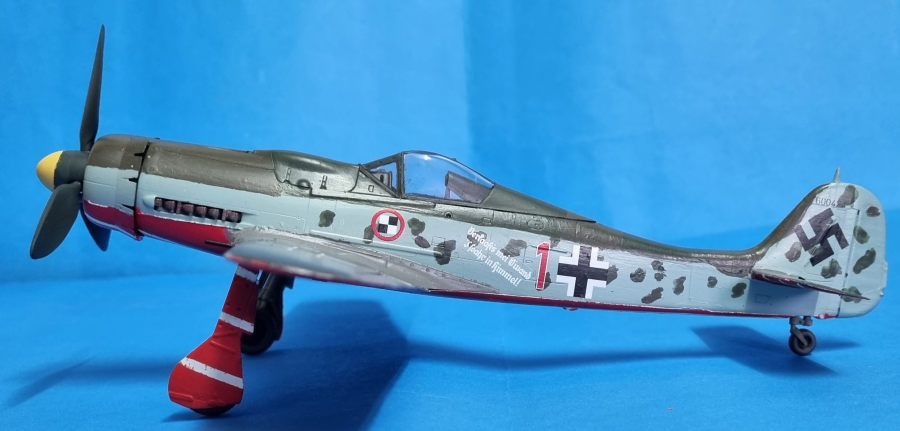
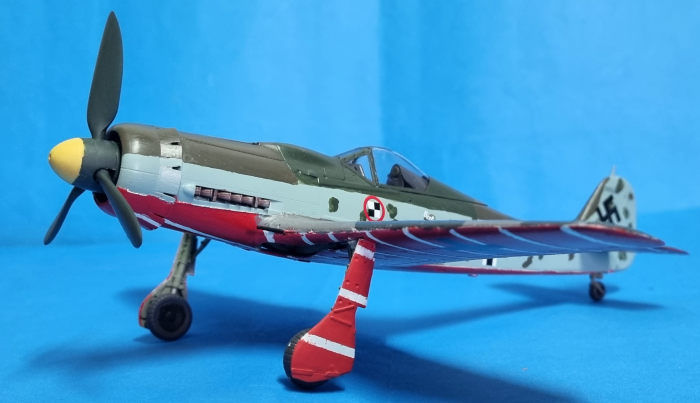
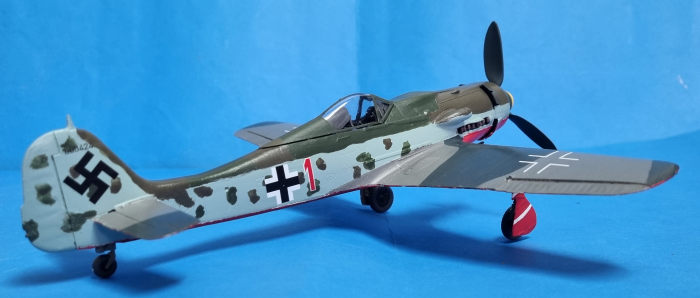
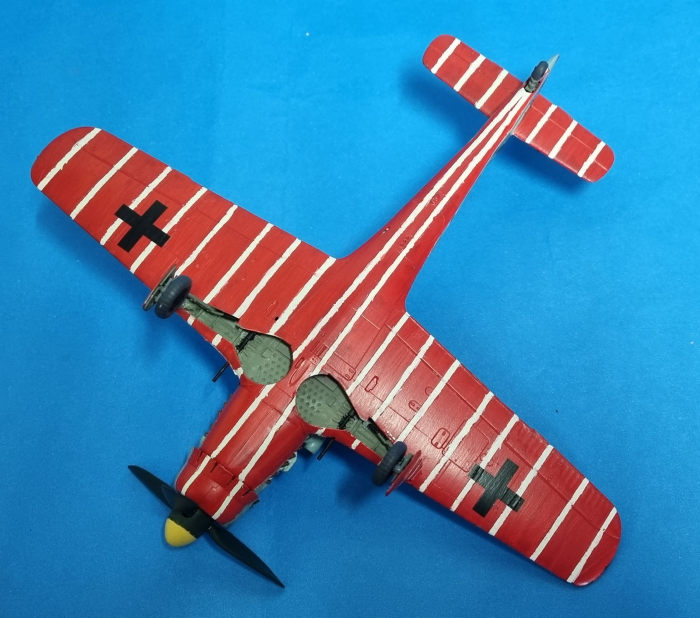 My idea with
this kit was to paint it as one of the most colourful aircraft of WW2, JV 44´s
Papagei Staffel Fw 190D-9 "Red 1." I decided to use Eduard's most recent
painting instructions for their Weekend Dora in 1:48, which called for a
fuselage in RLM 76/81/82 and wings in RLM 74/75. The fuselage was painted with
Revell Aqua acrylics 46 NATO Brown (RLM 81), 65 Bronze Green (RLM 82), and 49
Light Blue (it's RLM 65, but I like the way it looks). The wings were then
painted with Revell 47 Mouse Grey (RLM 75) and 69 Granite Grey (RLM 74). The
upper surfaces were subsequently masked, and the undersides were painted white
and red, making sure to first mask the white bands. The landing gear doors were
also included in the masking. There was quite a bit of bleed through of the red
over the white, so I touched it up with a fine brush. This gave a rather
irregular look to the white bands. Since the real aircraft had the lower
surfaces painted in the field, I think I achieved a closer look for my model. I
then glossed the entire surface with Revell Aqua Gloss varnish.
My idea with
this kit was to paint it as one of the most colourful aircraft of WW2, JV 44´s
Papagei Staffel Fw 190D-9 "Red 1." I decided to use Eduard's most recent
painting instructions for their Weekend Dora in 1:48, which called for a
fuselage in RLM 76/81/82 and wings in RLM 74/75. The fuselage was painted with
Revell Aqua acrylics 46 NATO Brown (RLM 81), 65 Bronze Green (RLM 82), and 49
Light Blue (it's RLM 65, but I like the way it looks). The wings were then
painted with Revell 47 Mouse Grey (RLM 75) and 69 Granite Grey (RLM 74). The
upper surfaces were subsequently masked, and the undersides were painted white
and red, making sure to first mask the white bands. The landing gear doors were
also included in the masking. There was quite a bit of bleed through of the red
over the white, so I touched it up with a fine brush. This gave a rather
irregular look to the white bands. Since the real aircraft had the lower
surfaces painted in the field, I think I achieved a closer look for my model. I
then glossed the entire surface with Revell Aqua Gloss varnish.
The decals that came with the kit didn't look great. I tested one, which promptly broke after trying to move it with a brush from the backing paper. After that, I decided to use spares from an Xtradecal sheet for the insignia, the small crosses and numbers coming from a Skymodel decal sheet (which has options for multiple 190Ds and a Ta 152. There´re enough stencils and crosses to make on aircraft). To soften up the decals and make the conform to the panel lines, I used Microsol. The decals were left overnight to dry thoroughly. I applied Revell's matt varnish the next day.
| FINAL BITS |
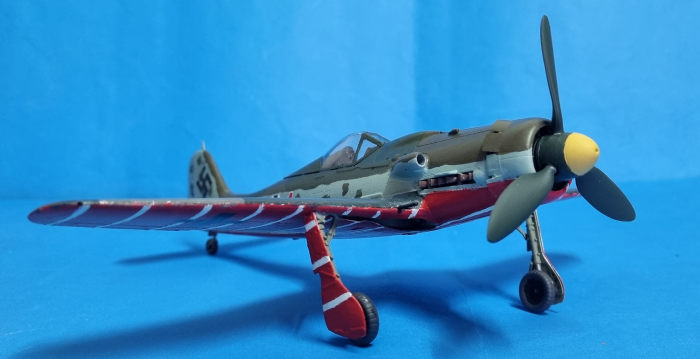 Two of the
most time consuming phases on an aircraft model are building and painting the
propeller(s) and painting the clear parts. The first one was easy, RLM 70 with a
yellow nose. The clear parts were masked and painted with the interior colour
first, and then the camouflage colour. While those parts were drying, I glued
the landing gear in place and left it to fully cure for a good 6hs. This wasn't
enough though, because when I placed the aircraft over its wheels, the right
hand side landing gear strut was still moving. A lot. So I applied CA glue and
made a wedge that was promptly glued in front of the leg. The combination
between the CA and the plastic wedge reinforced the strut perfectly. It was at
this time that I painted the wheels.
Two of the
most time consuming phases on an aircraft model are building and painting the
propeller(s) and painting the clear parts. The first one was easy, RLM 70 with a
yellow nose. The clear parts were masked and painted with the interior colour
first, and then the camouflage colour. While those parts were drying, I glued
the landing gear in place and left it to fully cure for a good 6hs. This wasn't
enough though, because when I placed the aircraft over its wheels, the right
hand side landing gear strut was still moving. A lot. So I applied CA glue and
made a wedge that was promptly glued in front of the leg. The combination
between the CA and the plastic wedge reinforced the strut perfectly. It was at
this time that I painted the wheels.
Once I was sure I wouldn't need to do anything major to the aircraft, I placed the model over its wheels and glued the clear parts. The propeller was just a press-fit thanks to the polycap included in the kit.
| CONCLUSIONS |
There're four 1:48 Dora 9s currently available: Dragon's, Eduard's, this one and Hobby Boss's. The first one doesn't have the engine, and the landing gear hangs straight down instead of raking forward. It also has some nasty gaps between the wings and fuselage. The cowling on the Dragon kit is also too long, which means the nose won't fit properly unless you cut it. The Eduard kit seems to be the most complicated of the bunch, with lots of small pieces and a tricky assembly of the engine compartment, which will throw everything off if you don't build it correctly. This one doesn't have the engine and has some fit issues in the wings and the wing/fuselage area. The last one, Hobby Boss's kit (built two of them), is by far the easiest to build, with near perfect fit between all the parts (the only issue would be the too long front bulkhead of the cockpit, which will throw off the fit of the wings if it's not trimmed).
If I were you, I'd get the Hobby Boss 1:48 Dora. I don't know if it's accurate, but it's easy to build and looks like the photos of the Dora I've seen on the Internet. Also, if we're lucky, maybe Tamiya will decide to retool their Dora, giving us the ultimate 1:48 Fw 190D-9, both in detail and fit.
28 November 2022
Copyright ModelingMadness.com. All rights reserved. No reproduction in part or in whole without express permission.
If you would like your product reviewed fairly and fairly quickly, please contact the editor or see other details in the Note to Contributors.