Hasegawa 1/48 FW-190A-5
| KIT #: | ? |
| PRICE: | $ |
| DECALS: | Two options |
| REVIEWER: | Francisco Santoro |
| NOTES: |
| HISTORY |
From the kit´s instructions: "The Fw 190 was designed as an auxiliary fighter for the Luftwaffe´s mainstay Messerschmitt Bf 109 series. It was powered by a radial engine, rare in a European fighter design. The Fw 190 was a brilliant design, with a robust airframe and high performance characteristics thanks to its high horsepower to weight ratio.
The A-4 model, generally considered the
"definitive" A series model, was basically and upgraded A-3 fitted with a BMW
801D-2 engine with MW50 water/methanol injection apparatus capable of giving the
aircraft a 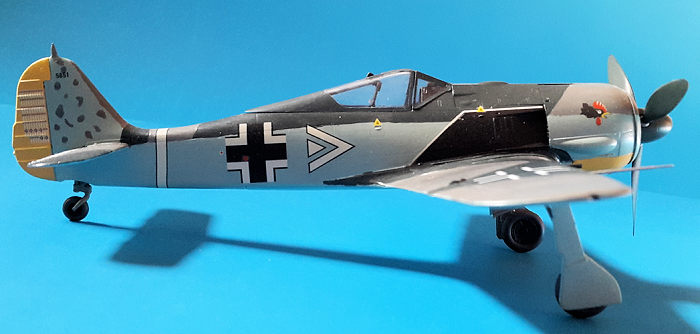 huge temporary boost of up to 2100hp and reach 670km/h.
New FuG 16Z air-to-air radio gear gave the A-4 an antenna wire mast on the vertical stabilizer. Some A-4 types participating in the Reich air Defense campaign were fitted with special FuG 16Z-E radios, which used a Morane type antenna mast projecting from the underside of the left wing.
The A-5 required an extension on the cowling by 150mm to compensate for the shift in the centre of gravity on its airframe, the cumulative result of all the various upgrades and additional equipment added to the A series since the original A-0. For fixed armament, the A-5 inherited the A-4´s array of two MG17 7,92mm machineguns, two MG151/20 20mm cannons and two MG/FF 20mm cannons. There were actually few "standard model" A-5s produced, while on the other hand, many variant models rolled off the production lines, fitted with various equipments and, in some cases, experimental large caliber weapons."
| THE KIT |
Hasegawa´s kit 09798 comes in a top opening box showing Walter Nowotny´s Fw 190A-5 flying above Russian land, showing the two types of camouflage painted on the aircraft.
 Inside the box, you´re greeted by two
transparent plastic bags, the largest one containing the all the sprues, and the
smaller one with the decals and transparent parts. The parts are moulded in a
smooth, dark grey hard plastic.
The decals come with
two options, Walter Nowotny´s aircraft in RLM 70/71/74/75/76, and Egor Mayer´s
aircraft in RLM 74/75/76. They provide the yellow Eastern Front band for
Nowotny´s aircraft and the white band for Mayer´s aircraft. The decals are of
the old Hasegawa style, with an ivory looking white.
Inside the box, you´re greeted by two
transparent plastic bags, the largest one containing the all the sprues, and the
smaller one with the decals and transparent parts. The parts are moulded in a
smooth, dark grey hard plastic.
The decals come with
two options, Walter Nowotny´s aircraft in RLM 70/71/74/75/76, and Egor Mayer´s
aircraft in RLM 74/75/76. They provide the yellow Eastern Front band for
Nowotny´s aircraft and the white band for Mayer´s aircraft. The decals are of
the old Hasegawa style, with an ivory looking white.
The instructions tell you to fill and sand two panel lines to properly create and Fw 190A-5 replica. Instructions are of the foldable type, with 12 construction steps and a painting page for both decal options.
| CONSTRUCTION |
I began construction by painting on the sprues the cockpit parts and by removing the fuselage halves from said sprues and paiting them separately. They all received several coats of a brush painted Revell 78, leaving them to dry before continuing the build.
With all the parts properly painted, I went on and glued the cockpit parts together with Revell Contacta (great glue, it´s lasted six models, and I still believe is half full), waited for them to be fully dry, and glued the completed cockpit to the right fuselage half, gluing the other half soon after.
The wings were next. I had to be really
careful to not break the single lower piece while removing it from the sprue
(I´m looking for a proper sprue cutter/razors, but the guy who imports them
hasn´t received
 them yet). The wheel wells on this part were painted Revell 45
and left to dry. I also attached the access hatches for the outer wing
machineguns for the aircraft I had planned to built (Nowotny´s one).
them yet). The wheel wells on this part were painted Revell 45
and left to dry. I also attached the access hatches for the outer wing
machineguns for the aircraft I had planned to built (Nowotny´s one).
While the lower half was drying, my attention went to the two upper wing parts. They were removed from the sprue and the wheel wells were painted in Revell 45 and left to dry.
With the paint of the wings dry, I went ahead and glued them together.
The next step was to glue fuselage and wings together, but before doing that, I had to sand the right hand fuselage to allow for a good fit between the two. After some minutes of sanding, I test fitted both, and glued the wings and fuselage together.
Next came the engine assembly. I added every piece as the instructions told me, except for the cooling fan, a decision that would come to bite me later while painting the aircraft.
With the engine section ready, I glued it to the aircraft, and went on with the build.
To complete the aircraft, I glued the horizontal stabilizers to the fuselage, the aircraft was complete, and it was ready for painting.
| COLORS & MARKINGS |
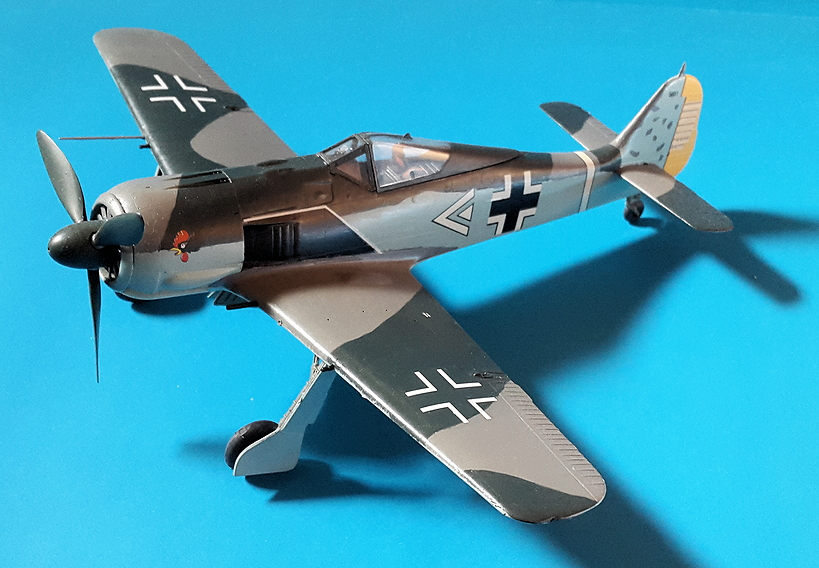
I had the idea of painting the model as Nowotny´s aircraft, so I chose to follow Eduard´s painting instructions (aircraft painted in RLM 70/71) instead of the Hasegawa ones (aircraft painted in RLM 70/71/74/75 and with a much more difficult fuselage camouflage).
I outlined with a pencil the camouflage for the entire aircraft, and then began to brush paint the areas in RLM 70 with Revell 40. When those areas were fully dry and well covered, I began to paint the RLM 71 areas with Revell 39.
 Now that the upper surfaces were fully
painted, I started to paint the lower surfaces in RLM 65, and needed quite a few
coats to completely paint the undersides.
Now that the upper surfaces were fully
painted, I started to paint the lower surfaces in RLM 65, and needed quite a few
coats to completely paint the undersides.
This is where the fun began. After finishing painting the entire model, I applied all the decals, leaving the yellow bands for the end. The bands didn´t have the greatest fit, so I decided to remove them (while they were wet) and paint them with yellow. That was a mistake, because I had the bright idea of eyeballing the size of the area to mask, instead of measuring the yellow bands and replicating the size on the masking tape. Too long didn´t read, when I applied the fuselage crosses, the yellow band ended up being too big, and I tried to correct it, creating a mess on the paintjob. So I decided to remove the paint of the model and start again.
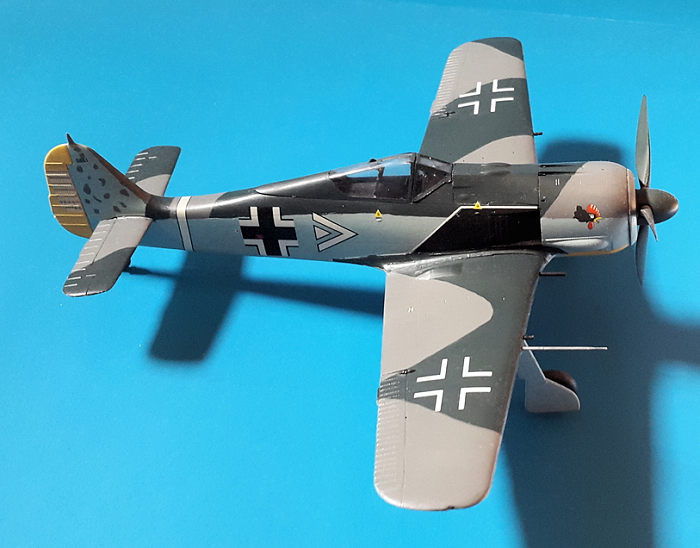
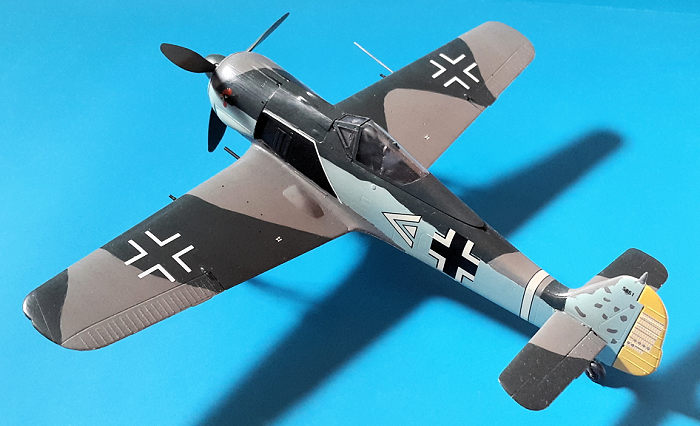
For the second camouflage, I had to buy aftermarket decals just to get the upper crosses and open the holes for the outer wing cannons. I also followed Eduard´s painting instructions (again) for Mayer´s aircraft. But everything went well, I painted the aircraft as Egon Mayer´s mount in RLM 74/75/65 (Revell 69, 47 and 49) and yellow,brushed a coat of gloss varnish (Revell 01), applied all the decals, the finishing touch to the camouflage being the white band of JG 2.
The model was then covered with two coats of Revell´s 02 matt varnish, to seal the decals in place.
| FINAL CONSTRUCTION |
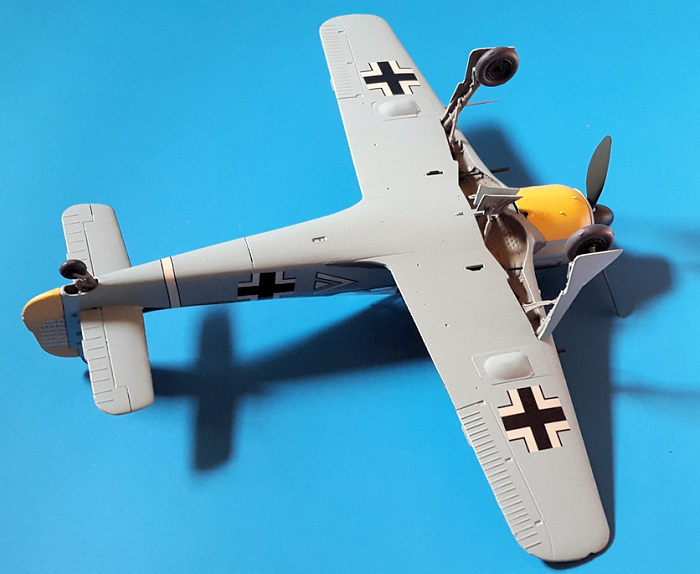 The final stages of the kit involved
painting the landing gear struts, trimming the landing gear covers (because they
don´t fit inside the wheel wells if you leave them out of the box). I glued the
struts to the aircraft, glued the wheels, the tailwheel, and finally I added the
landing gear doors to the struts (one was trimmed too much, leaving a gap
between the wing the gear door).
The final stages of the kit involved
painting the landing gear struts, trimming the landing gear covers (because they
don´t fit inside the wheel wells if you leave them out of the box). I glued the
struts to the aircraft, glued the wheels, the tailwheel, and finally I added the
landing gear doors to the struts (one was trimmed too much, leaving a gap
between the wing the gear door).
With all that done, I let the landing gear dry for a bit, before putting the aircraft on its wheels, but the story didn´t end up here! When I put the model on its final position, I noticed the right hand landing gear was still moving, the mounting peg had melted. As a last resource, I used superglue on it, applied back pressure, and left it to dry for an hour. I later was told that had happened because there was paint on the peg, and the Contacta hadn´t been able to have a strong grip on the area, so it remained fresh.
| CONCLUSIONS |
Another nice model from Hasegawa, however, the need to trim the right hand fuselage and the landing gear doors shouldn´t be there. Personally, I believe that´s a design error. Aside from that, the model didn´t show any troubles and was easy to build.
18 June 2018
Copyright ModelingMadness.com.
If you would like your product reviewed fairly and fairly quickly, please contact the editor or see other details in the Note to Contributors.
Back to the Main Page Back to the Review Index Page Back to the Previews Index Page