Eduard 1/48 FW-190D-9
| KIT #: | 8184 |
| PRICE: | $39.95 MSRP |
| DECALS: | Six options |
| REVIEWER: | Dan Lee |
| NOTES: |
Used Master Details FW190A-8 gun barrel/pitot tube set |
| HISTORY |
A Very Brief Overview of the Dora 9
The FW190-D9 was the interim development of
mating an inline Jumo engine to the FW-190A series fighter by Kurt Tank to
improve high altitude performance so it could intercept US bombers at altitude.
Initial reaction from the Luftwaffe was reluctance and doubt as the
previous attempts to improve the FW190 were failures as well as the fact that
the Long nosed Dora had a worse roll rate when compared to the A series.
This changed when the Dora was actually flown where it was proved to be
superior to the A at turn rate, climb, dive and speed while carrying a lighter
armament than the A-8 (two 13mm MGs in the top of the fuselage and two 20mm
cannon located in the wing roots synchronized to fire through the propeller.)
 Doras were equal in performance to the latest
Allied fighters, but produced too late and too little numbers to even put a dent
in the overwhelming late war Allied Air Supremacy.
Doras were equal in performance to the latest
Allied fighters, but produced too late and too little numbers to even put a dent
in the overwhelming late war Allied Air Supremacy.
Hans Dortenmann
Hans Dortenmann was originally an infantryman,
but transferred to the Luftwaffe and underwent flight training in 1941.
After he graduated, he was assigned to II/JG54, the Grunharts in 1943.
JG54 was assigned to the Eastern Front and one of the most famous
Luftwaffe fighter groups due to its distinctive Green Heart emblem and colorful
markings. By the time Hans and the
II/JG54 were transferred to the Western Front in June 1944, Hans had shot down
14 Soviet planes.
In total Hans shot down 38 aircraft, 22 on the
Western Front and 16 on the Eastern Front, but what makes him notable is that he
was the FW190D9 aces of aces. He
shot down 18 allied aircraft in the Dora.
Hans survived the war to live in West Germany,
became an architect and died in 1973.
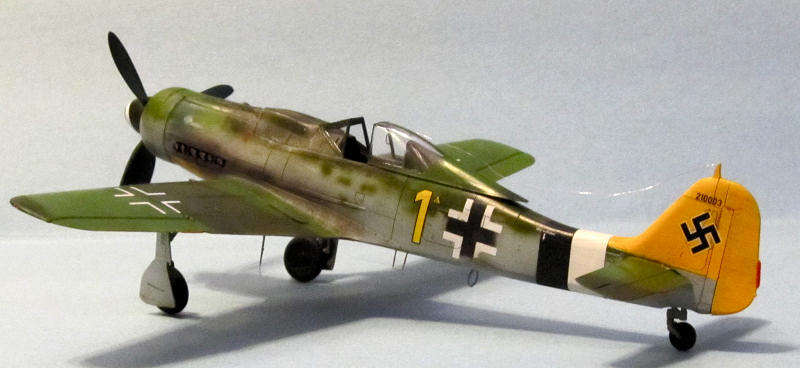
The markings of this plane is Hans’ personal D9
which he flew from August 1944 till the end of the war when he destroyed it
before surrendering to the allies.
| THE KIT |
 The Eduard D9 kit was eagerly awaited by Wurger
fans since the line was announced a couple of years ago.
The profipack kit includes a six sprues of Eduard’s standard light olive
green plastic, a sprue of clear plastic, a mask set and small fret of PE parts
for the interior. The plastic parts
are extremely well done and the detail is crisp and lightly done.
The Eduard D9 kit was eagerly awaited by Wurger
fans since the line was announced a couple of years ago.
The profipack kit includes a six sprues of Eduard’s standard light olive
green plastic, a sprue of clear plastic, a mask set and small fret of PE parts
for the interior. The plastic parts
are extremely well done and the detail is crisp and lightly done.
It has three common sprues to the A8 kit
(landing gear, cockpit, clear parts and wings), but has different parts
(obviously) for the D9 fuselage, the visible rear portion of the engine and the
nose.
The kit comes with a large decal sheet (made by Cartograph) with six sets of markings and a lot of stencils which are in register.
| CONSTRUCTION |
It all began with the cockpit.
Eduard thoughtfully supplies both plastic and PE bits.
I like the look of the PE bits and used them, but it seems to be a bit of
a waste as the cockpit opening for the FW-190 family is rather small and you
don’t see all that much unless you get close enough to poke out your eye with
the control stick. The plastic bits
were sprayed with Tamiya’s version of RLM66 and various tiny bits were painted
flat black/silver/red with toothpicks.
Once all the pieces were assembled, the last thing I did with the cockpit
was adding the PE seatbelts.
 The next subassembly was to make the rear
portion of the Jumo engine and the top gun bay which was empty as I was closing
everything up. The pieces were
carefully removed, cleaned of mold markings and then aluminum, black, RLM02
and/or steel. Much like my
experience with the A8, the D9 engine compartment was a touch fiddly and
requires a great deal of patience (which I had this time!)
It is a delicate assembly which should be carefully fitted into the
engine compartment. This is the
major difference between the Eduard D9 and the previous D9 kits (Tamiya and the
Dragon/Italieri/Trimaster) which had the enclosed landing wheel bays of the
Anton series (and if you wanted to correct them then you needed to order
aftermarket correction sets.)
The next subassembly was to make the rear
portion of the Jumo engine and the top gun bay which was empty as I was closing
everything up. The pieces were
carefully removed, cleaned of mold markings and then aluminum, black, RLM02
and/or steel. Much like my
experience with the A8, the D9 engine compartment was a touch fiddly and
requires a great deal of patience (which I had this time!)
It is a delicate assembly which should be carefully fitted into the
engine compartment. This is the
major difference between the Eduard D9 and the previous D9 kits (Tamiya and the
Dragon/Italieri/Trimaster) which had the enclosed landing wheel bays of the
Anton series (and if you wanted to correct them then you needed to order
aftermarket correction sets.)
As some of you right remember, I built the
FW-190A8 and it wasn’t very pleasant as I fought with the kit.
Unlike the last time, I opted to close everything up to simplify my work
and help reduce my headaches. The
D-9 parts fit a bit easier than the A8 did.
One thing to watch out for is the alignment of the firewall/ejector
chutes for the fuselage mounted 13 mm MGs.
I strongly suspect that it was this part that drove me nuts the last time
I put an Eduard FW190 together. I
did not have any major fit/alignment problems when I assembled the fuselage.
The top gun bay cover went on, but there were some obvious gaps that
needed filler (
 Since the wing of the D9 is identical to the A8
so I figured that I wouldn’t have too many issues with fit (I obviously didn’t
reread my own review of the A8.)
Hahaha. The joke was on me as the
wings did not go well together just like the A8.
I had to spend an hour playing with the fuselage, lower wing and upper
wing pieces so they could fit. I
managed to get some approximation of alignment and then poured the glue and
clamped everything down. I had more
issues when I glued the wing gun bay covers in.
They didn’t fit as well as I hoped.
During the build, I bought a Master brass gun barrel set for the FW-190A8
(which is almost identical to the D9’s) and glued (with CA glue) the painted
base portion of the 20 mm wing root cannon barrel into the landing gear well.
Since the wing of the D9 is identical to the A8
so I figured that I wouldn’t have too many issues with fit (I obviously didn’t
reread my own review of the A8.)
Hahaha. The joke was on me as the
wings did not go well together just like the A8.
I had to spend an hour playing with the fuselage, lower wing and upper
wing pieces so they could fit. I
managed to get some approximation of alignment and then poured the glue and
clamped everything down. I had more
issues when I glued the wing gun bay covers in.
They didn’t fit as well as I hoped.
During the build, I bought a Master brass gun barrel set for the FW-190A8
(which is almost identical to the D9’s) and glued (with CA glue) the painted
base portion of the 20 mm wing root cannon barrel into the landing gear well.
The ill fitting wing pieces meant that I needed
to add filler to seal up the gaps between the wings and fuselage, the rather
large gaps in the trailing and leading wing edges and the gaps between the wing,
fuselage and gun covers. I was not
very happy with it, but it isn’t impossible to fix.
I used Tamiya’s Lacquer based filler to fill in the various gaps.
Once it was fully cured, I had to carefully sand around the gun covers to
smooth everything out. It took a
couple of applications of filler to finally get everything smooth.
The hardest areas were the leading/trailing edges at the wing roots which
needed a lot of CA glue and sand paper to fix.
It took several tries due to poor sanding on my part.
I rubbed down the sanded areas with 3200 grit
and then I rescribed all the missing panel lines and used a pin to replace any
missing rivets.
| COLORS AND MARKINGS |
 I was going to use Hans Dortenmann’s late war
markings because it was the most colorful of the bunch.
The tail and underside of the nose were sprayed flat white and once dry,
the area of the fuselage band was masked off with 8mm wide Tamiya Tape and then
the forward portion of the ID band was sprayed using gloss black.
When the gloss black portion was dry, it too was masked off.
Next, the tail and underside were sprayed with Xtracrylix RLM04.
I am quite impressed with Xtracrylix’s RLM04 because it had the best
coverage of any manufacturer’s RLM04 paint which I have used as I only needed
two light coats to get a brilliant yellow.
When that was dry, I masked it off using Tamiya tape for the other
colors. I was building other models
at the time and used the excess paint to preshade the Dora (colors included
RLM66, gloss black and light grey.)
I was going to use Hans Dortenmann’s late war
markings because it was the most colorful of the bunch.
The tail and underside of the nose were sprayed flat white and once dry,
the area of the fuselage band was masked off with 8mm wide Tamiya Tape and then
the forward portion of the ID band was sprayed using gloss black.
When the gloss black portion was dry, it too was masked off.
Next, the tail and underside were sprayed with Xtracrylix RLM04.
I am quite impressed with Xtracrylix’s RLM04 because it had the best
coverage of any manufacturer’s RLM04 paint which I have used as I only needed
two light coats to get a brilliant yellow.
When that was dry, I masked it off using Tamiya tape for the other
colors. I was building other models
at the time and used the excess paint to preshade the Dora (colors included
RLM66, gloss black and light grey.)
Polly Scale RLM 76 (light bluish grey) was
sprayed on and left to dry for a day.
The areas next to the wing roots were masked and then Polly Scale RLM82
light green was sprayed on at low pressure.
Next the RLM82 areas were masked o ff using paper masks and Tamiya XF-58
Olive Green was sprayed on. Why
XF-58? Was it because of some
brilliant new insight into Luftwaffe colors?
Nah, it was because my last bottle of Polly Scale RLM-83 was sealed shut
and I couldn’t remove the cap without breaking the bottle.
Desperate for an alternative I found that XF-58 was close enough and used
it. I made some mottles along the
edges and mid fuselage based on the excellent color profile provided by Eduard.
Finally, I used a flat wide brush to paint the red trim tabs on the
various control surfaces.
ff using paper masks and Tamiya XF-58
Olive Green was sprayed on. Why
XF-58? Was it because of some
brilliant new insight into Luftwaffe colors?
Nah, it was because my last bottle of Polly Scale RLM-83 was sealed shut
and I couldn’t remove the cap without breaking the bottle.
Desperate for an alternative I found that XF-58 was close enough and used
it. I made some mottles along the
edges and mid fuselage based on the excellent color profile provided by Eduard.
Finally, I used a flat wide brush to paint the red trim tabs on the
various control surfaces.
The propeller was done earlier in the build as
the blades were painted with RLM70 and hand painted aluminum at the base of each
prop while the hub was painted initially flat white, then a crude spiral was
masked and the hub painted gloss black.
It is a little extra work and seems a bit pointless considering that
Eduard provides a decal for the prop spiral marking, but I’ve had problems with
decals on a complex curve and long ago preferred to use a crudely painted spiral
as it was a more realistic representation.
Decals
The decals went on well for the most part with
the one exception being the fuselage iron crosses.
These were the “hollow” kind with the white outline only, but were filled
in. I masked the areas out (rougher
than I hoped) and sprayed on black gloss paint.
 Unfortunately, I did not get the lengths correct and had to remove the
excess using a 3200 grit sanding cloth.
In the end the result was less than fully filled iron crosses.
I just left it instead of trying to make them look better (if I wanted
perfectly filled iron crosses I could have used the extra ones I have in my
collection of spare decals.) I added
many of the stencils, but not all of them.
Unfortunately, I tore the portside iron cross decal while weathering the
model. Instead of redoing it, I left
it to complete the worn and battered look.
Unfortunately, I did not get the lengths correct and had to remove the
excess using a 3200 grit sanding cloth.
In the end the result was less than fully filled iron crosses.
I just left it instead of trying to make them look better (if I wanted
perfectly filled iron crosses I could have used the extra ones I have in my
collection of spare decals.) I added
many of the stencils, but not all of them.
Unfortunately, I tore the portside iron cross decal while weathering the
model. Instead of redoing it, I left
it to complete the worn and battered look.
Weathering
I chose the end of the war markings for
Dortman’s FW-190D9. It was supposed
to be worn and dirty (at least according to Eduard’s color profile.)
All but the prop were weathered using a watercolor wash (black, burnt
sienna and raw umber with a drop of dish soap.)
After the excess was removed using wet Q-Tips, I used the Tamiya
weathering set for the oil stains and gunfire residue.
Lastly, I sprayed on thinned coats of flat black and Tamiya smoke for the
exhaust stains with the exhausts painted with burnt sienna and dry brushed flat
white.
Once dry, the entire plane was sprayed with
Xtracrylix Flat as a final coat.
| FINAL BITS |
 The only delicate area of note was the
redrilling of the hole for the pitot tube.
The excellent Master gun barrels were inserted into their respective
holes and held in place with CA glue.
The only delicate area of note was the
redrilling of the hole for the pitot tube.
The excellent Master gun barrels were inserted into their respective
holes and held in place with CA glue.
Next to be put on were the landing gear.
Unlike other FW190 models, the Eduard legs are notched so that one can
achieve the correct angle without any effort, but the joint is a butt joint so I
used CA glue to attach them in place.
The rear canopy and internal bracing were glued
together with white glue; a small hole was drilled in the canopy where the radio
aerial made of slightly mangled steel wire was attached to the bracing.
The assembly was then glued in canopy open position using white glue
while the other end of the steel wire was glued to the tail with a tiny drop of
CA glue.
I attached the prop using white glue.
Lastly, I hand painted the PE
| CONCLUSIONS |
If you are an experienced builder and want to build a Dora-9 that is reasonably accurate including the correct underside detail in the wheel well as (in the case of the Tamiya kit) the correct wing (without any of the pricy correction sets) and PE then I recommend this kit for you. The kit will try your patience at times, but in the hands of the average builder the end result will look good.
A
| REFERENCES |
From wikipedia and the Eduard summary.
Thanks to
If you would like your product reviewed fairly and quickly, please contact me or see other details in the Note to Contributors.