| KIT #: | 128 |
| PRICE: | $ |
| DECALS: | Two options |
| REVIEWER: | Peter Kwong |
| NOTES: |
| HISTORY |
Please see the many fine articles available on Modeling Madness for a thorough history of the Fw-190D-9.
| THE KIT |
The kit has 44 parts molded in dark grey styrene and 3 clear parts. I did not find any sink marks or flash in my kit. The surface details are fine raised lines whereas the control surfaces are deep recessed lines. Exhausts are molded to the fuselage halves whereas the rudder is a separate piece. A pilot is included but, unfortunately, suffers from a missing bowel and was quickly consigned to the sickbay. A bomb and bomb rack is available for one of the aircraft options. A clear stand for the aircraft is included.
A complete cockpit consisting of a floor, rear bulkhead, blank side consoles, seat, control column, pilot and instrument panel is provided. Two inserts for the wheel well are provided. The main landing gears have very petit gear retraction arms. The gear doors are suitable thin. The kit can be built with gear down or gear up using the kit provided gear doors. For the gear up configuration, the instructions do not tell you to put the wheel in the wheel bay. For gear down configuration, you are told to cut off the top part of the gear door.
Instructions consist of 5 exploded diagrams and a sprue diagram. It begins with an introduction to the aircraft, something I miss seeing in some modern kits. Detailed painting instructions are provided in the instructions, but only generic names are given. More specific RLM colours are given for the external camouflage.
Decals allow one of 2 versions to be made. One is black 12 from 10/JG54 flown by Lt Nibel, and the other is yellow 2 from 2/JG26 flown by Nordhorn. Black 12 has a spinner stripe but no decal is provided. The picture on the side of the box has markings not supplied in the kit. No swastika is provided.
| CONSTRUCTION |
Building this old and inexpensive kit was
intended to be an exercise in focusing on the basics of assembly and painting.
The fit was of the parts were generally very good. One tricky area is the wheel
wells where you have to glue half the wheel well to the other half molded on the
lower wing half, then eliminate the seam line running through the wheel well. I
wasn’t particularly patient and left the seam line there. In the end, you end up
with an enclosed whee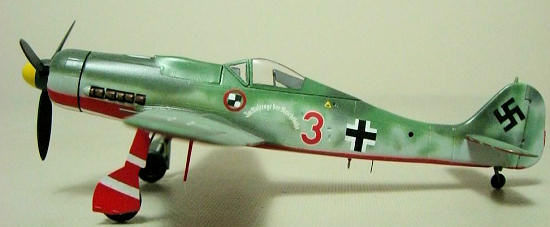 l
well that is supposed to be incorrect for a D-9.
l
well that is supposed to be incorrect for a D-9.
The upper wings were glued to the lower wings
and this whole assembly was glued to the fuselage ensuring the dihedral was the
same on both sides. Little to no putty or sanding was needed. The tail planes
were glued ensuring they are at right angles to the vertical fin. The kit was
now ready for painting.
| COLORS & MARKINGS |
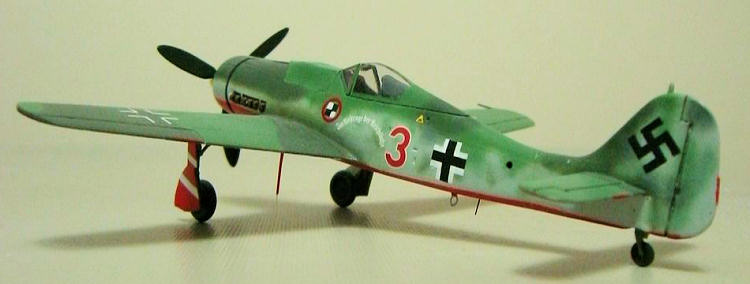
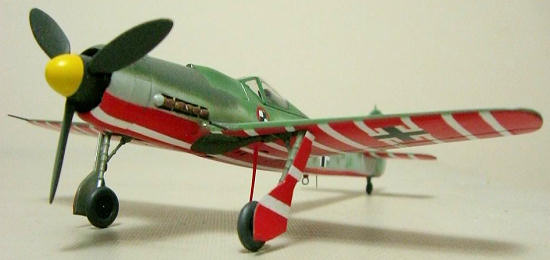
Neither of the 2 schemes interested me so I
decided to do the overdone scheme for JV44 with the red and white bottoms. Yes
this scheme has been done to death, but it is colourful and JV44 does have an
interesting history behind it. I
first sprayed the wheel wells and gear struts with Gunze RLM02 and masked the
wheel wells off with wet tissue.
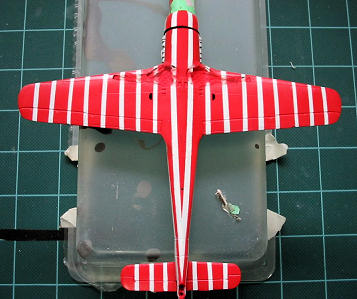 Then I
sprayed the fuselage bottom and spinner with Polly Scale Railroad Reefer White.
Strips of thin tape were sized approximately, cut and used to mask off the white
strips. Polly Scale Railroad Caboose Red was sprayed for the red colour. I
didn’t even try to line up the white strip on the landing gear cover on the
assumption the real plane was painted with the gear door in the down position,
rather than closed like modelers would normally paint them.
Then I
sprayed the fuselage bottom and spinner with Polly Scale Railroad Reefer White.
Strips of thin tape were sized approximately, cut and used to mask off the white
strips. Polly Scale Railroad Caboose Red was sprayed for the red colour. I
didn’t even try to line up the white strip on the landing gear cover on the
assumption the real plane was painted with the gear door in the down position,
rather than closed like modelers would normally paint them.
The red and white bottom was masked with tape
and the fuselage sides sprayed with ProModeller acrylic RLM 76. This really old
bottle of paint just did not dry by itself so I added some Future to the paint
so that the paint would harden.
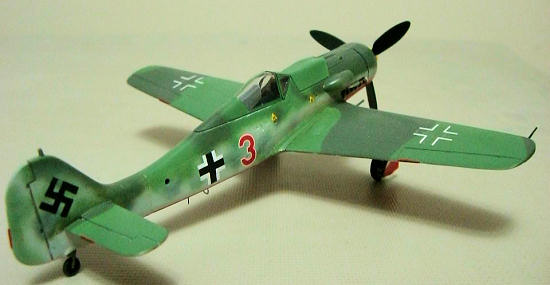
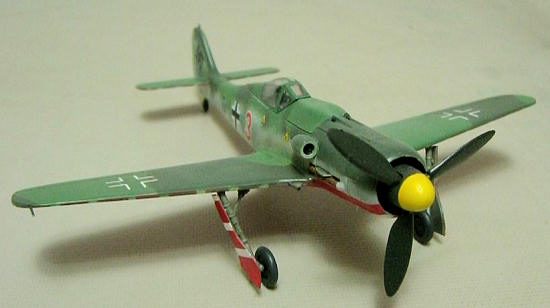
Once dried, the wing to fuselage/tail plane
areas were masked off and Model Master Acryl RLM 82 and RLM83 were sprayed
freehand on the top surfaces. The windscreen and canopy, after being masked,
were sprayed at the same time. The fuselage side mottles were sprayed with a
thinned RLM 82 and 83 and lots of patience, with touching up until it was good
enough from several feet away.
 The wing
crosses were from the decal sheet. The tail swastika was patiently masked off
with tape, sealed with Future then brushed with Humbrol acrylic flat black. The
fuselage cross was made by cutting strips of white decal film of the correct
width, then rubbing black dry transfer lines down the middle. The strips were
then cut to the proper size and applied crosswise to each other. Some more black
dry transfer was rubbed on to finish making the black cross. The red 3 and the
slogan were taken from a Hasegawa 190D-9 kit. The black and white die was made
using white decal film with the black hand-painted using flat black. The red
concentric circle around the black die was cut from red decal film using a
circle template and a sharp #11 blade. (TIP: when cutting a circle with a circle
template, tape the decal film to the template and rotate the template rather
than try to move the knife around the edge of the template. This avoids you
accidentally scraping the decal film by dragging the side of the blade across
the film.)
The wing
crosses were from the decal sheet. The tail swastika was patiently masked off
with tape, sealed with Future then brushed with Humbrol acrylic flat black. The
fuselage cross was made by cutting strips of white decal film of the correct
width, then rubbing black dry transfer lines down the middle. The strips were
then cut to the proper size and applied crosswise to each other. Some more black
dry transfer was rubbed on to finish making the black cross. The red 3 and the
slogan were taken from a Hasegawa 190D-9 kit. The black and white die was made
using white decal film with the black hand-painted using flat black. The red
concentric circle around the black die was cut from red decal film using a
circle template and a sharp #11 blade. (TIP: when cutting a circle with a circle
template, tape the decal film to the template and rotate the template rather
than try to move the knife around the edge of the template. This avoids you
accidentally scraping the decal film by dragging the side of the blade across
the film.)
All the decals and the paint job were sealed with a few light coats of semi-gloss clear made from a mix of Future and flat base. The exhausts were painted leather brown and washed with thinned black paint. The landing lights were painted with red and green to the left and right wingtip lights respectively. The exhaust stains were made by dry brushing dark grey and brown pastels.
| FINAL CONSTRUCTION |
After the semi-flat clear coat was applied, all
the various bits were glued using white glue, starting with the windscreen and
 canopy. The
landing gear struts were glued to the gear covers (my gear covers look too short
after cutting off the top part as per kit instructions) and this assembly was
then glued with white glue, making sure the struts had a forward rake (the
bottom of the gear cover should be parallel to the ground when the forward rake
is sufficient) and toe-in. Once the white glue has dried, superglue was used to
give the joint strength. Then the retraction struts and tires were glue to the
gear struts. The tail wheel was also glued at this time.
canopy. The
landing gear struts were glued to the gear covers (my gear covers look too short
after cutting off the top part as per kit instructions) and this assembly was
then glued with white glue, making sure the struts had a forward rake (the
bottom of the gear cover should be parallel to the ground when the forward rake
is sufficient) and toe-in. Once the white glue has dried, superglue was used to
give the joint strength. Then the retraction struts and tires were glue to the
gear struts. The tail wheel was also glued at this time.
A pitot tube was made from stretched tubular
plastic with a piece of wire inserted and this was added to the right wing. The
under-wing antenna mast was by cutting stretched plastic tubing near the end
where the stretched part meets the unstretched part and then a strand cut from
an old toothbrush was inserted into it. The under-fuselage antenna was made from
a piece of wire glued with superglue. Finally, the propeller hub assembly was
glued to the front cowling with white glue and the model was declared complete.
| CONCLUSIONS |
Although most people will gravitate to the more
modern kits from Tamiya, Hasegawa or Academy, this inexpensive and easy to
assemble kit lets you focus your time painting it rather than putting it
together. You also have the option of putting it on a stand for an in-flight
pose that is absent from newer kits. This kit is suitable for modelers of all
levels.
| REFERENCES |
None used. Got lots of inspiration and ideas, however, from other JV44 builds on the Internet, especially the technique to mask the swastika for painting from http://www.geocities.jp/yoyuso. Brilliant method.
Peter Kwong
February 2012 If you would like your product reviewed fairly and fairly quickly, please contact the editor or see other details in the
Note to
Contributors.