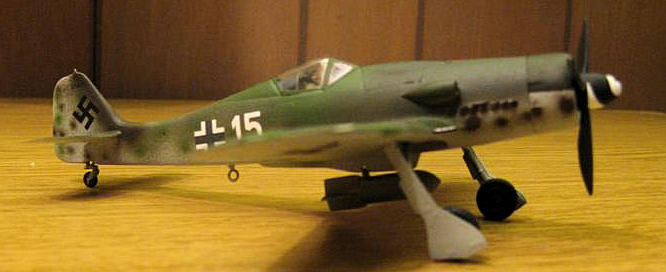
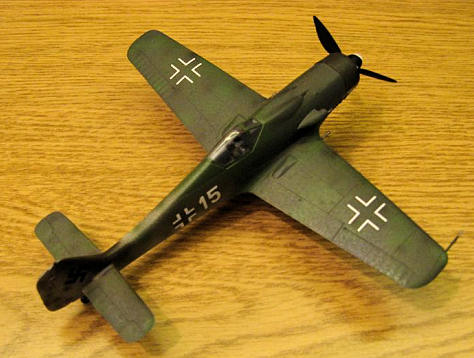
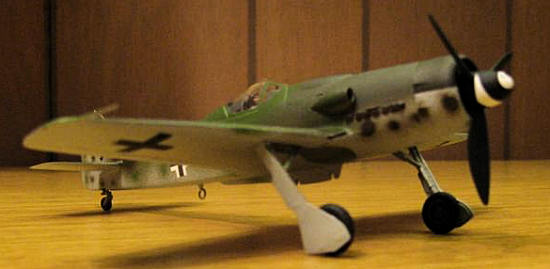
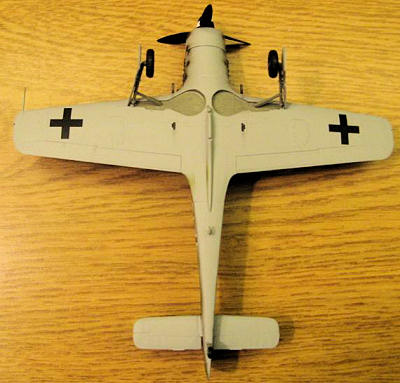
Hasegawa 1/72 FW-190D-9
|
KIT #: |
? |
|
PRICE: |
$ |
|
DECALS: |
? |
|
REVIEWER: |
Lee
Fogel |
|
NOTES: |
Kit acquired for free; CE decals also
free |
The Fw 190 series of aircraft is regarded by
many as one of the finest piston-engine fighters of World War II.
For some modelers the definitive version of this aircraft is the D
series. The amazing variety of
late-war markings and variants makes for both passionate building and a unique
looking model every time you build one.
I saw this listed as a freebie on another
website and was fortunate enough to receive it.
This is the old mid 1970’s release of this kit.
The decals were given to me by a fellow modeler here on MM as he does not
build 1/72 scale. This decal sheet
is long discontinued and had a single opti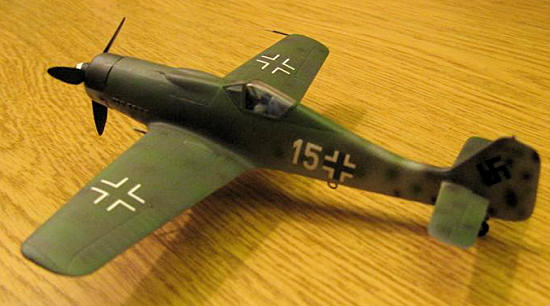 on
for a Fw 190D-9 variant with the other three options being for a pair of Fw
190A-8s and a captured US Navy Fw 190A-5.
on
for a Fw 190D-9 variant with the other three options being for a pair of Fw
190A-8s and a captured US Navy Fw 190A-5.
-Initial Assessment-
This kit is molded in light grey
plastic with very fine recessed panel lines.
A single (and very clear) canopy is included.
This is a one-piece “blown” style canopy with no option for a standard
canopy. The main wheels are based
on the A series airframe making them inaccurate and should be replaced with a
resin set or leftovers from a newer D-9 kit.
The cockpit is very plain by today’s standards with only a seat (oversized),
flat instrument panel (with no detail)
and a pilot. Detail on the pilot is
pretty good though. The oversize
seat will be a moot point if you use the pilot figure. The instructions are
clear and complete. However, they
are in Japanese so follow closely to the part numbers.
The decals appear to be typical Cutting Edge quality with concise color
instructions for airframe colors and placement.
The decals are thin and settle down very nicely and will withstand
Solvaset.
I started things off by painting
and assembling the cockpit using Plastruct liquid cement.
Everything fit together very well and soon I was ready to button this up.
The cockpit parts were painted Model Master RLM 66.
Using a detailed cockpit panel rendering in the Osprey Modeling Manuals
20: Focke Wulf Fw 190, I
used Testors flat black, red, yellow and white to create the instrument panel
details. Testors clear gloss was
then added to each dial to replicate a glass lens.
A simple dry brush with Testors Silver was done and some light weathering
with pastels finished this off. The
pilot was painted MM Feldgrau and detailed with Testors silver, Polly S light
earth, Floquil RLM 70 (for the goggle
lenses), MM flat black and MM medium skin tone.
 Next
I moved to the fuselage. I glued
the cockpit in place and then both fuselage halves were glued together and set
aside to dry. The fit here was very
good with only a small seam to clean up.
Next up I glued the upper and lower wing sections together.
This is straightforward and the fit is, again, very good.
Make sure to take your time and check for a clean alignment on the
trailing edge fit though. It’s very
easy to get this ever so slightly off-kilter.
Doing so will affect the wing root fit to the fuselage.
Upon cleaning up this area the rest of the build really was academic.
I mated the fuselage to the wing section with nary a gap topside.
The lower drop tank/bomb rack fit very well and was glued into place with
Plastruct liquid glue. The upper
gun cowling is molded as one piece and it fits very well.
Just take your time and triple-check it before you whip out the glue!
The front cowling is molded as a single piece with the prop, spinner and
prop pin being molded separate. I
used a leftover resin block to glue the prop pin to.
This also was a spacer between the cowling and the front of the fuselage
halves. That way the prop could
spin freely and that I could glue the prop on after painting was done.
Also of note is the outstanding fit of the cowling front to the fuselage
halves. This requires no glue at
all as it is a snug fit. This makes
it easier to remove for transport or (in
my particular case) to paint the cowl separate and then attach it.
Next
I moved to the fuselage. I glued
the cockpit in place and then both fuselage halves were glued together and set
aside to dry. The fit here was very
good with only a small seam to clean up.
Next up I glued the upper and lower wing sections together.
This is straightforward and the fit is, again, very good.
Make sure to take your time and check for a clean alignment on the
trailing edge fit though. It’s very
easy to get this ever so slightly off-kilter.
Doing so will affect the wing root fit to the fuselage.
Upon cleaning up this area the rest of the build really was academic.
I mated the fuselage to the wing section with nary a gap topside.
The lower drop tank/bomb rack fit very well and was glued into place with
Plastruct liquid glue. The upper
gun cowling is molded as one piece and it fits very well.
Just take your time and triple-check it before you whip out the glue!
The front cowling is molded as a single piece with the prop, spinner and
prop pin being molded separate. I
used a leftover resin block to glue the prop pin to.
This also was a spacer between the cowling and the front of the fuselage
halves. That way the prop could
spin freely and that I could glue the prop on after painting was done.
Also of note is the outstanding fit of the cowling front to the fuselage
halves. This requires no glue at
all as it is a snug fit. This makes
it easier to remove for transport or (in
my particular case) to paint the cowl separate and then attach it.
The rear horizontal stabs were
glued on and fit very well. The
main landing gear has a bit of a loose fit but is angled for a foolproof to
ensure that the gear legs are indeed at the proper angle.
To my untrained eye it appears that the legs may be angled a bit too far
forward but I’ll leave that to the experts.
The tail wheel and gear are molded to the fuselage and have decent
detail. I painted the tail wheel
gear, main gear and wheel wells MM RLM 02.
Keep in mid that some of the detail in the main gear bay is now
inaccurate as the area is molded after the A series.
The main wheels were painted MM flat black and the hubs gloss black and
detailed with a very light dry brushing of Testors silver and then MM RLM 66 to
tone down the sliver. At this point
I turned my attention to the drop tank and bomb as I was unsure of what choice I
wanted to use. Checking the fit
here the sway braces are molded to both pieces and are a tight, snug fit on the
lower rack. So, changing either
piece out is a breeze. Both the
drop tank and bomb are a two-piece affair that goes together as expected and
looks acceptable but is not up to today’s detail standards.
I assembled them both, sanded the seams and set them aside for paint.
The canopy was masked with Bare Metal Foil and glued into place using
5-minute epoxy.
I started by painting Floquil RLM 76 on the drop tank, underside of
the wings and sides of the fuselage.
I then used Floquil RLM 75 for the topside of the wings and cowling
areas. Then Floquil RLM 82 was used
to fill in the upper wing camouflage and the
 spine of
the fuselage and gun cowling areas.
Next was Floquil RLM 83 for the remaining camouflage and mild mottling.
Floquil RLM 81 was used for the final mottle on the upper wings and
fuselage. This was also used
exclusively on the top of the front cowling (per the color instructions) and
makes for a unique looking plane. The
exhausts were painted MM flat black the dry brushed with MM rust, MM bronze
metalizer and then Testors steel.
To wrap up the painting MM RLM 02 was used to paint the bomb.
The kit was then sprayed with Testors gloss coat and readied for decals.
The kit came to me with no decals.
Thankfully a fellow modeler had recently sent me a set of Cutting Edge
decals that included a single Fw 190D-9 option.
The decals are the typical good quality from this (defunct)
company. The markings are for a D-9
found in May, 1945. They settled
down very nicely but I did have one Balkenkreuz split in half.
This was easily repaired though.
Once completed I let the model sit over night and the following day
applied Testors flat coat.
spine of
the fuselage and gun cowling areas.
Next was Floquil RLM 83 for the remaining camouflage and mild mottling.
Floquil RLM 81 was used for the final mottle on the upper wings and
fuselage. This was also used
exclusively on the top of the front cowling (per the color instructions) and
makes for a unique looking plane. The
exhausts were painted MM flat black the dry brushed with MM rust, MM bronze
metalizer and then Testors steel.
To wrap up the painting MM RLM 02 was used to paint the bomb.
The kit was then sprayed with Testors gloss coat and readied for decals.
The kit came to me with no decals.
Thankfully a fellow modeler had recently sent me a set of Cutting Edge
decals that included a single Fw 190D-9 option.
The decals are the typical good quality from this (defunct)
company. The markings are for a D-9
found in May, 1945. They settled
down very nicely but I did have one Balkenkreuz split in half.
This was easily repaired though.
Once completed I let the model sit over night and the following day
applied Testors flat coat.
Weathering consisted of using
Formula P3 Armor Wash for an oily wash on the main gear.
For exhaust, gear bays, wheels and gun residue I used my trusty set of
chalk pastels and a .07 Pentel mechanical pencil.
The guns were painted MM flat black and dry brushed with Testors steel.
The landing lights were painted using Tamiya clear red and green.
 Well,
for an oldie this kit certainly went together quickly and with very little fuss.
I had it completed in 8 days from arrival to display.
The external detail is very nice and holds up to today’s standards for
sure. The two areas lacking are the
main wheels and the cockpit. Both
of these areas can be easily improved upon by products from True Details or
Aires. I do not know if someone
makes a plug for the gear bay but if they do there is plenty of room to cut and
add this piece in if the modeler feels the need to do so.
Coupled with a unique and quality choice of aftermarket decals this model
makes for a nice looking product when completed.
I highly recommend this kit for both the novice and expert modeler!
Well,
for an oldie this kit certainly went together quickly and with very little fuss.
I had it completed in 8 days from arrival to display.
The external detail is very nice and holds up to today’s standards for
sure. The two areas lacking are the
main wheels and the cockpit. Both
of these areas can be easily improved upon by products from True Details or
Aires. I do not know if someone
makes a plug for the gear bay but if they do there is plenty of room to cut and
add this piece in if the modeler feels the need to do so.
Coupled with a unique and quality choice of aftermarket decals this model
makes for a nice looking product when completed.
I highly recommend this kit for both the novice and expert modeler!
 German
Aircraft Cockpits 1911-1970, Cohausz,
Peter W., Schiffer Publishing, 2003. ISBN: 0-7643-1873-X, pp 176-177
German
Aircraft Cockpits 1911-1970, Cohausz,
Peter W., Schiffer Publishing, 2003. ISBN: 0-7643-1873-X, pp 176-177
The
Great Book of World War II Airplanes,
Grinsell, Robert, Zokeisha Publications, 1984.
ISBN: 0-517-459930, pp 501-502.
Osprey
Modeling Manuals 20: Focke-Wulf Fw 190,
Sommerville, Donald (series editor), Osprey Publishing, 2002.
ISBN: 1 84176 268 7, pp 48-51.
Osprey
Masterclass: World War 2 Luftwaffe Fighter Modeling,
Coughlin, Geoff, Osprey Publishing, 2000.
ISBN: 1-84176-060-9
Lee Fogel
November 2009
If you would like your product reviewed fairly and quickly, please
contact
me or see other details in the
Note to
Contributors.
Back to the Main Page
Back to the Reviews Index Page