Italeri 1/48 Ta-152H-1
|
KIT #: |
861 |
|
PRICE: |
SEK 150 |
|
DECALS: |
Two options |
|
REVIEWER: |
Ingemar Caisander |
|
NOTES: |
Kit from 1999 |
The Ta 152 was one of the
last propeller driven fighters produced in Germany before the Second World War
ended. Developed from the long-nosed FW-190D, the Ta 152 H version was a very
powerful high-altitude fighter designed to take on the swarms of heavy four-engined
bombers that were marauding Germany nearing the end of the war.
By combining
long-span wings, a pressurized cockpit, and a powerful Junkers Jumo inverted V12
engine, the fighter had some rather impressive performance figures including a
top speed of 755 kph and a service ceiling of more than 14.000 meters.
 The Jumo 213E-1 engine,
with a swept cylinder volume of 35 litres and equipped with a three-speed
two-stage supercharger, produced 1750 hp at take off, and when the MW-50
methanol-water injection boost was engaged this was increased to a staggering
2100 hp. In addition to the MW-50 system (which was used as an emergency power
boost on lower altitudes), the Ta 152 H-1 also carried the high-altitude nitrous
oxide GM-1 injection system. The GM-1 system enabled the engine to produce up to
1740 hp at full throttle (3250 rpm) at an altitude of 10.000 meters. The Ta 152
H-1 was one of the very few German aircraft to combine these two power
augmenting systems.
The Jumo 213E-1 engine,
with a swept cylinder volume of 35 litres and equipped with a three-speed
two-stage supercharger, produced 1750 hp at take off, and when the MW-50
methanol-water injection boost was engaged this was increased to a staggering
2100 hp. In addition to the MW-50 system (which was used as an emergency power
boost on lower altitudes), the Ta 152 H-1 also carried the high-altitude nitrous
oxide GM-1 injection system. The GM-1 system enabled the engine to produce up to
1740 hp at full throttle (3250 rpm) at an altitude of 10.000 meters. The Ta 152
H-1 was one of the very few German aircraft to combine these two power
augmenting systems.
Main armament
consisted of a single 30mm MK 108 autocannon with 85-100 rounds and firing
through the propeller hub, and one 20mm MG 151/20 autocannon with 175 rounds in
each wing root.
Fortunately
for the Allies, only very few of these powerful fighters, most assigned to JG
301, entered service before the war ended.
Today, a
single surviving Ta 152 H-0 (Werknummer 150020, one of the last
pre-production models) is in storage at the
National Air and
Space Museum Paul E. Garber Preservation, Restoration, and Storage Facility
in Suitland, Md., where it currently is awaiting restoration.
This is the
old Italeri offering from 1999, and despite its age it is a very nice kit. You
get a total of four sprues in grey plastic, plus a clear sprue with the canopy,
windshield, Revi gunsight, and wingtip position lights. Detai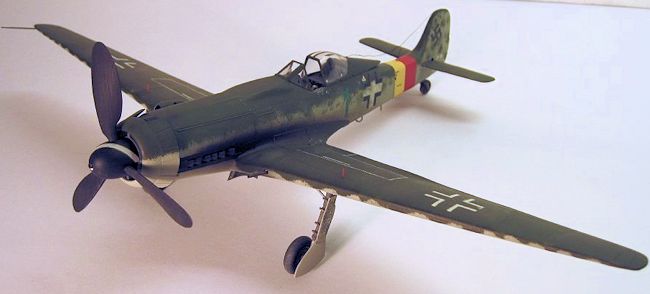 ling is good and
all panel lines are nicely recessed.
ling is good and
all panel lines are nicely recessed.
Unfortunately no engine
(or even engine plug) is provided and this is really a shame as the gear wheel
well is rather "open" and will look a bit empty with no engine present. The
quick and easy fix to this, though, is not to display the model upside-down…
Decals are
provided for two aircraft: grün "1" and gelb "1", both of Stab./JG 301. The
decals are a bit on the thick side but with a little persuasion they will work
just fine. No swastikas are provided.
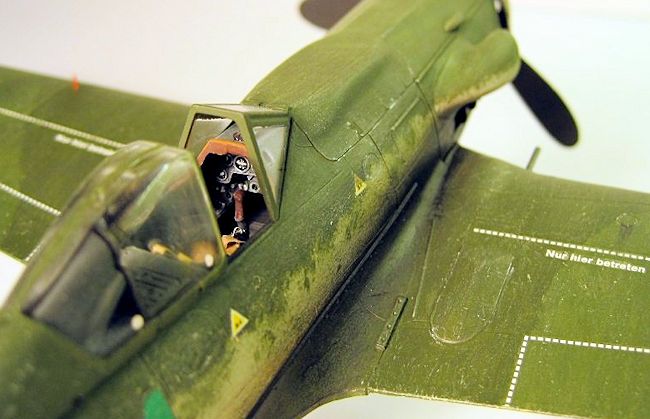
Construction began with
the cockpit and detailing here is rather good – considering how little you will
see (especially if you have the canopy closed), an after market cockpit detail
set really isn’t necessary. I only added seatbelts made from masking tape, with
buckles manufactured from a piece of aluminum electrical wire.
The whole cockpit tub and instrument panel was painted and weathered before
being trapped inbetween the two fuselage halves.
At the same time the ends
of the exhaust stacks were drilled out and cemented in place – a note here: you
will have to cut off the mounting tabs on the s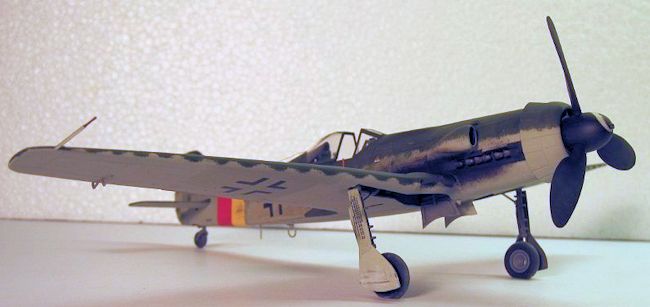 tacks and sand away the receptors
in the fuselage halves, otherwise the stacks will sit too deep inside the
fuselage. When the tabs and receptors are removed, fit is perfect.
tacks and sand away the receptors
in the fuselage halves, otherwise the stacks will sit too deep inside the
fuselage. When the tabs and receptors are removed, fit is perfect.
Assembly of the wings is
next. They might look a bit intimidating at first, having a very long span, but
by working slowly and cementing them from the tips inwards, you will be able to
get them straight with no warping. I used a piece of masking tape to hold them
together every 10-15mm or so until the glue had set. There is a long internal
centre wing spar that will help get the correct alignment, and the only real
difficult area is near the wing roots. I couldn´t get the wing roots "thick"
enough (meaning there would be a small step to the fuselage wing root fillets),
and in the end I had to cement small pieces of plastic rod between the upper and
lower half of the wing roots in order to spread them enough to form a smooth
transition.
The instructions will have you install the landing gear indicator pins at this
time, but I recommend leaving them off for now as they are very fragile and
definitely will be broken off during later handling and painting.
Mating the
fuselage and wing assembly presented no problems – I used masking tape in an
X-pattern from the underside of the wing roots and up over the fuselage to
ensure that no gaps developed as the glue set. At this point the (IMHO)
beautiful lines of this late-war fighter really started to present themselves.
With its long nose and large wing span, this definitely is a very unique
aircraft.
The landing
gear, tailwheel, and supercharger intake were assembled and cemented in place –
note that you will have to cut off about 5 mm of the top of the landing gear
c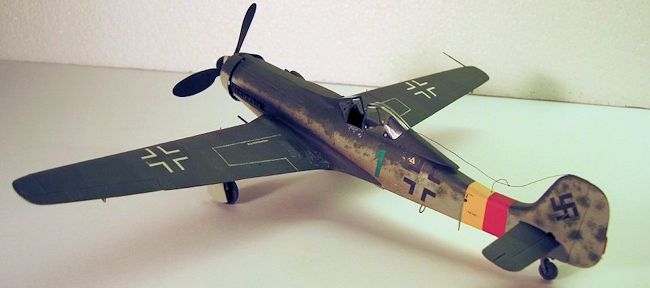 overs in order achieve a good fit. The underside of the tires were slightly
sanded to give them a "weighted" look.
The instructions will have you install a screen (part 9H) inside the
supercharger intake – I left this screen off, though, as I couldn’t find any
picture of it in my references. Maybe only some aircraft carried this?
overs in order achieve a good fit. The underside of the tires were slightly
sanded to give them a "weighted" look.
The instructions will have you install a screen (part 9H) inside the
supercharger intake – I left this screen off, though, as I couldn’t find any
picture of it in my references. Maybe only some aircraft carried this?
Final assembly
before painting included all the small fittings on the underside, the inner
landing gear doors, pitot tube, and the nose radiator cowling with its separate
upper ventilation panel. The kit only provide a cowling with open radiator flaps
– to be completely accurate you would have to add the inner regulating linkages
(made from stretched sprue) to these flaps, but I skipped this as they can
hardly be seen anyway.
I also left off the MG
151/20 gun barrels (later replaced by hollow hypodermic needles) for now, as
well as the long whip-like "Morane" antenna which I skipped altogether, as I
thought it disrupted the otherwise rather "clean" underside of the aircraft.
The propeller
assembly was also completed at this stage but not added to the model until after
painting. You will have to be careful when cementing the propeller blades in
place, as there are no locating pins setting the pitch. I made a small jig on
the surface of my workbench to ensure all three blades got the same pitch angle.
The solid aperture for the 30mm MK 108 autocannon in the centre of the propeller
hub was also drilled out.
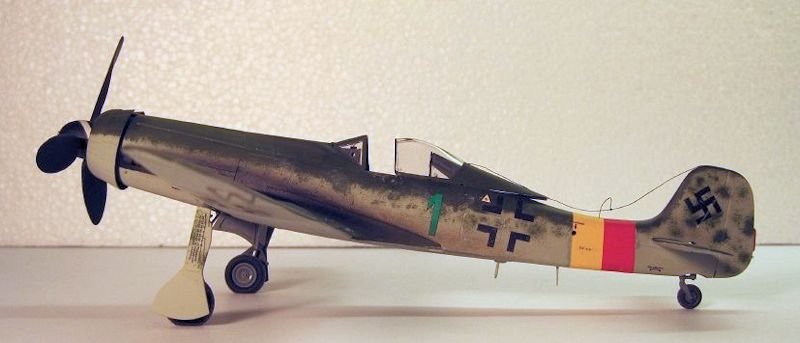
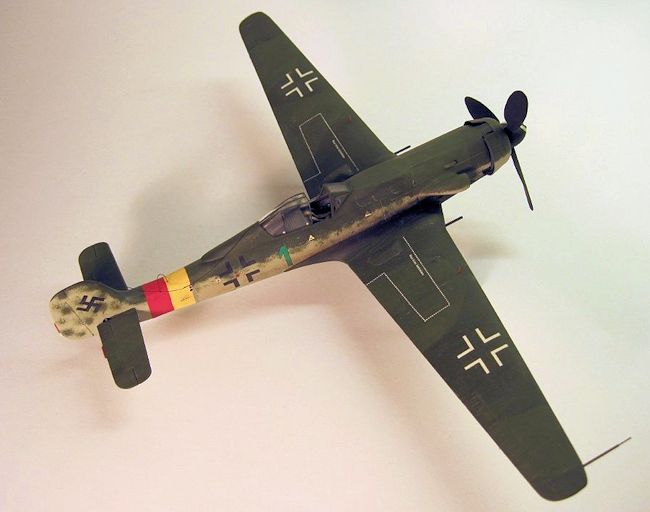
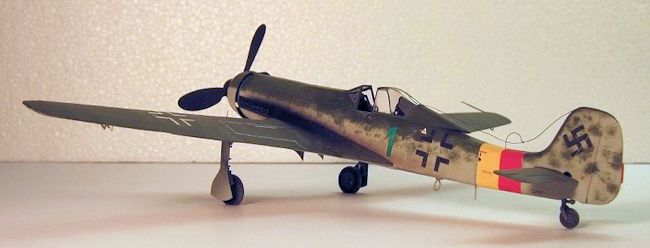
My model was to be
completed as "grün 1" of Stab./JG301, based at Neustadt-Glewe in Germany during
the spring of 1945. This aircraft sported the sort of standard Ta 152 H
camoflage of RLM 82 and 83 greens over very light RLM 76 blue, this latter color
sometimes erreanously being referred to as "RLM 84".
 I began by
painting the entire aircraft in light RLM 76 (by mixing 25% Humbrol 175 Light
Blue with 75% Humbrol 121 off-white), and then the upper surfaces of the wings
and fuselage were painted in a sharp-edged splinter camoflage of RLM 82 (Humbrol
117) and RLM 83 (Humbrol 116).
I began by
painting the entire aircraft in light RLM 76 (by mixing 25% Humbrol 175 Light
Blue with 75% Humbrol 121 off-white), and then the upper surfaces of the wings
and fuselage were painted in a sharp-edged splinter camoflage of RLM 82 (Humbrol
117) and RLM 83 (Humbrol 116).
The sides of the fuselage
and tailsection were then mottled with the two green colors using a semi-drybrushing
technique. This sort of mottling is much easier to do using an airbrush, but as
I always brush paint my models I had to imitate the sprayed-on appearance of the
paint the best I could.
Note the "waved"
demarcation line on the leading edge of the wings – all Ta 152 H’s featured
this.
When the main
camouflage had dried properly I added all the detailing: red trim tabs, black
panels around the exhaust stacks, small off-white dots on the canopy (imitating
the silica pucks used to prevent condensation on the real aircraft), etc.
The propeller assembly was
finished in RLM 70 Schwarzgrün (Humbrol 116 and 33 mixed 50/50), with a
white spiral decal from an old Bf 109 kit.
The entire model was then sealed with gloss varnish in preparation for the
decals.
The decals of the kit are
a bit on the thick side but can be used with a little persuation – I experienced
some silvering, especially on the fuselage Balkenkreuzes, but this was fixed
with a bit of touch-up paint.
I also had some difficulties with the red/yellow JG 301 fuselage band, as the
decal supplied in the kit didn´t want to conform to the fuselage without
wrinkles, so in the end I gave up and painted it on instead.
The swastikas on
 the tail were "borrowed" from another kit.
After a couple of days the entire model was again clearcoated, this time with
flat varnish.
the tail were "borrowed" from another kit.
After a couple of days the entire model was again clearcoated, this time with
flat varnish.
Weathering was
next. As these aircraft only saw very limited service in addition to being
rather well maintained, I kept weathering to a minimum. A light general
drybrushing with Humbrol 121 and some scuff marks around the engine panel lines
and near the cockpit was pretty much it.
As opposed to this, I
added rather extensive soothing around and behind the exhaust stacks – this late
in the war German aviation fuel often had a sub-standard quality, which made the
large Jumo engines quite dirty powerplants.
The exhaust stacks were also lightly treated with graphite powder to give them a
sort of burnt metallic look.
With painting
and weathering completed all the final small bits and pieces were added:
propeller assembly, hollow MG 151/20 gun barrels (made from hypodermic needles),
landing gear indicator rods, radio aerial made from a piece of thin oxidized
copper strand, etc.
Note the sagging of the radio aerial when the canopy was open – the Ta 152 did
not feature an internal tensioner for the antenna and hence it slacked
considerably with the hood open.
I also added a small position light manufactured from a piece of thin clear
stretched sprue on the tail rudder.
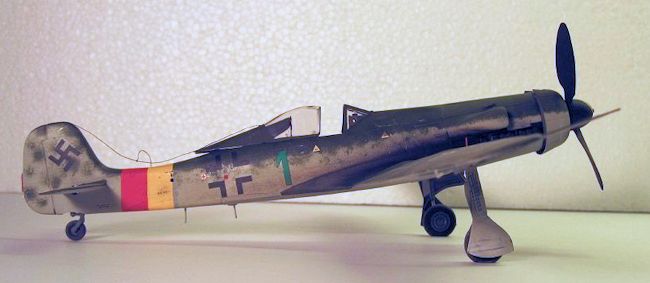 Looking at the
completed model I think the Italeri kit definitely captures the look of this
powerful late war high-altitude fighter. The huge paddle-bladed VS 9 propeller
and the long-span wings really make it stand out on the model shelf.
Agreed, there are better kits out there, especially considering the latest 1/32nd
scale releases, but with regards to the affordable price tag of the Italeri kit
and the relatively simple construction, I must say it is a bargain.
Looking at the
completed model I think the Italeri kit definitely captures the look of this
powerful late war high-altitude fighter. The huge paddle-bladed VS 9 propeller
and the long-span wings really make it stand out on the model shelf.
Agreed, there are better kits out there, especially considering the latest 1/32nd
scale releases, but with regards to the affordable price tag of the Italeri kit
and the relatively simple construction, I must say it is a bargain.
Highly recommended!
"Focke-Wulf
Ta 152"
by Dietmar Harmann (Schiffer 1999)
"Focke-Wulf
Ta 152"
by Thomas H. Hitchcook, Monogram Monarch 3 (Eagle Editions 2010)
"Wings
of the Luftwaffe"
by Eric Brown (Hikoki 2010)
Ingemar
Caisander
April 2014 If you would like your product reviewed fairly and fairly quickly, please
contact
the editor or see other details in the
Note to
Contributors.
Back to the Main Page
Back to the Review
Index Page