Hasegawa 1/48 Bf-109G-2
|
KIT #: |
09588 |
|
PRICE: |
€29.95 |
|
DECALS: |
Two options |
|
REVIEWER: |
Sjon van der Heiden |
|
NOTES: |
This is the rest of the
diorama. Ed. |
I’ve already told you about Major Schlemiel and his Bf 109 G2. How he
wrecked his plane in a muddy field just 24 hours from Tuzla. I also
told you I still had to build that diorama to give the plane its final
resting place so to speak. Well, at long last I finished it.
Sjon has already covered the building of the kit with
this article. What follows
is the building of the rest of the diorama.
 I’ve always thought there are two ways to approach a diorama. First of
all you can create a scene in which your model is portrayed to its
best. This is usually best done with the “more is less” method. The
other way is to try and capture a frozen moment in time of a certain
place or event. Somewhat like a holiday snapshot. That picturesque
little church is on the photo alright, but due to renovation it
happened to be greatly obscured by scaffolding, and there’s somebody
walking halfway through the frame. That somewhat messy scenery was
exactly what I was looking for when I was going to depict the recovery
of Schlemiel’s plane at the edge of the muddy field.
I’ve always thought there are two ways to approach a diorama. First of
all you can create a scene in which your model is portrayed to its
best. This is usually best done with the “more is less” method. The
other way is to try and capture a frozen moment in time of a certain
place or event. Somewhat like a holiday snapshot. That picturesque
little church is on the photo alright, but due to renovation it
happened to be greatly obscured by scaffolding, and there’s somebody
walking halfway through the frame. That somewhat messy scenery was
exactly what I was looking for when I was going to depict the recovery
of Schlemiel’s plane at the edge of the muddy field.
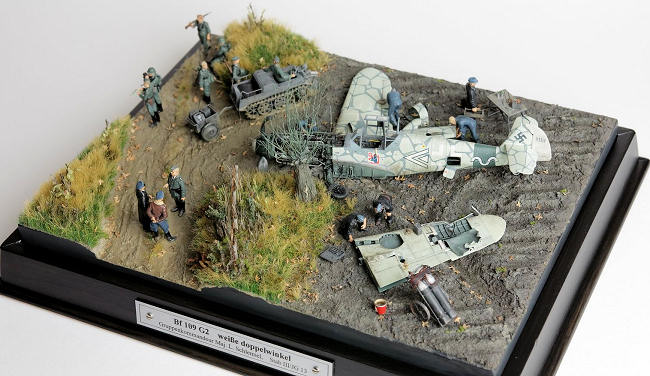
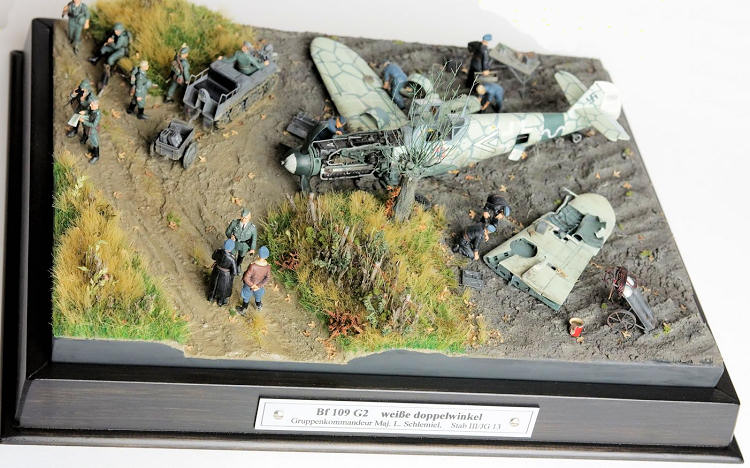
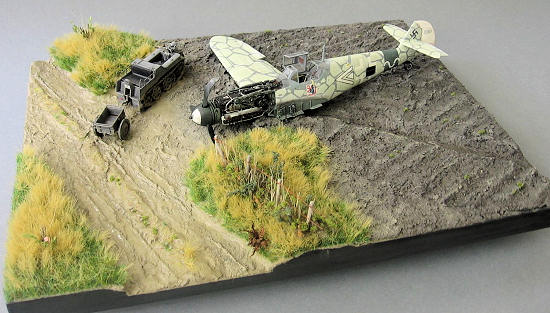
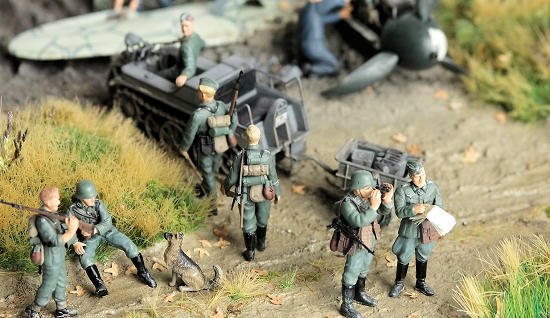
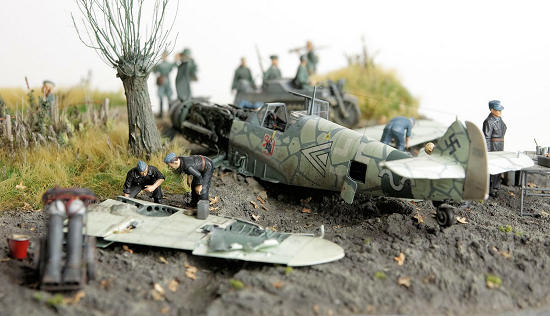
I envisioned a field in which the plane had come to a stop, and a muddy
road alongside it. Separated by a bushy growth in which the tree stood
which seriously damaged the portside wing. The plane would be
surrounded by mechanics dismantling it, while on the road the
commanding officer of a platoon of Wehrmacht soldiers who had been
guarding the plane is discussing the progress of the recovery with a
couple of airmen.
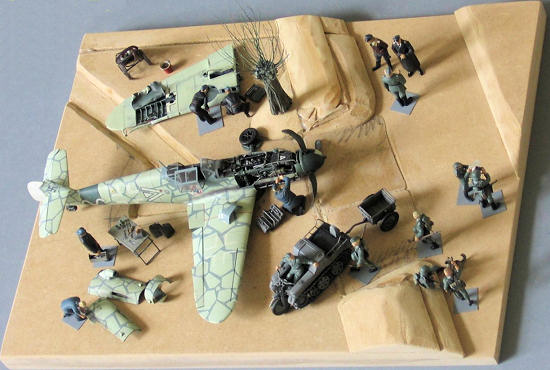
I made the base out of MDF. It’s easy to saw and can even be cut with a
sharp hobby knife. And it will provide for a firm base in which you can
glue your figures with the help of a metal pin. The trench the Bf 109
dug when it made its unfortunate belly landing was made with a router.
After this I glued some ordinary bandage onto the base so my groundwork
would have something to
 adhere to. When the glue had cured I painted
everything (including sides and bottom) with primer. Finally I put four
screws in every corner of the bottom in order to get the base a couple
of centimetres of the workbench. This will facilitate handling and
working on it. I use screws because the base may warp because of the
paint and or glue. If so you can easily adjust the appropriate screw to
stop the base from wobbling around on your workbench.
adhere to. When the glue had cured I painted
everything (including sides and bottom) with primer. Finally I put four
screws in every corner of the bottom in order to get the base a couple
of centimetres of the workbench. This will facilitate handling and
working on it. I use screws because the base may warp because of the
paint and or glue. If so you can easily adjust the appropriate screw to
stop the base from wobbling around on your workbench.
The groundwork is made with modelling putty from Berka which I
pre-coloured with pigments from Busch (set 7595). It’s amazing stuff.
You have ample time before it starts drying and when it’s fully cured
it is hard as rock. The only downside is that it has much more body to
it then for instance plaster. You will not be able to press fine detail
into it such as tank tracks or footprints. Since the diorama involved a
rather muddy road, these should be visible. So I ended up making little
ridges behind the tracks of the Kettenkraftrad instead of depressions.
Providing the right colour, the modelling putty makes for very
convincing mud, but the earth of the field would have to look a lot
less smooth. So I mixed in a couple of spoonfuls of cork granulate. I
was only able to get it in a reddish sort of colour, and I feared I
would have to paint each and every “lump” afterwards, but the cork
turned out the exact same colour as the rest because of the pigments I
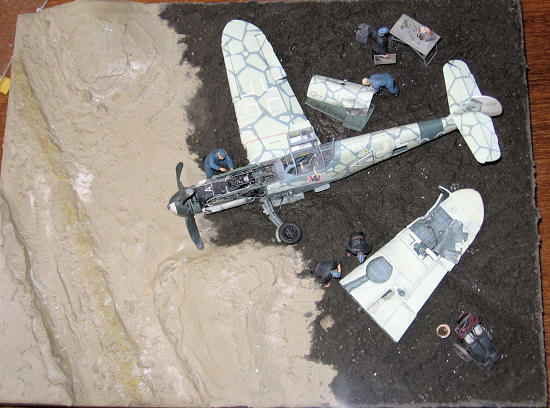
had added. To make the earth look as if it had been ploughed I made
linear depressions with a dispensable brush from my children (well,…
there was little else you cold do but dispense it once I was finished
with it, sorry lads). This was also the moment to position the plane
onto the base. Several piles of dirt were formed around it, after which
the plane was removed once more. You can’t really finish this step of
the process by removing the plane, but it would end up completely
wrecked if we didn’t. The final touches will have to be applied at a
later stage.
To get ride of the varying sheen of the groundwork I spray painted it
with Testors Dull coat. After this I drybrushed the transition from mud
to field to get a more convincing result (fortunately, Humbrol # 72
turned out to be the exact same colour as my mixture
 of mud). The
ridges of the ploughed earth were treated the same way, as if the wind
of mud). The
ridges of the ploughed earth were treated the same way, as if the wind
had dried them. After this I drybrushed the lower parts with gloss
varnish to get a moist look. Wet parts were painted so. The muddy road
was treated accordingly. In the field I made some roots out of tiny
pieces of silk thread. Giving them a black wash blended them in with
the surrounding earth.
I used a ready-made piece of grassland from Busch (#1307). This is made
up of a dark green layer of short grass, into which patches of long
strands of yellow grass are randomly placed. These are sold on
approximately A4 format and their price is pretty hefty (some variants
are sold for over € 20,-), but the effect is unbelievably realistic and
far better then what I could have achieved with static grass alone. It
is easily cut to size and to make for a convincing transition I cut
small strips of the stuff and placed them randomly at the edges. I also
used Decovlies from Heki (#1574). This can be strung out to
 virtually
nothing and will give the borders a very natural look to them.
virtually
nothing and will give the borders a very natural look to them.
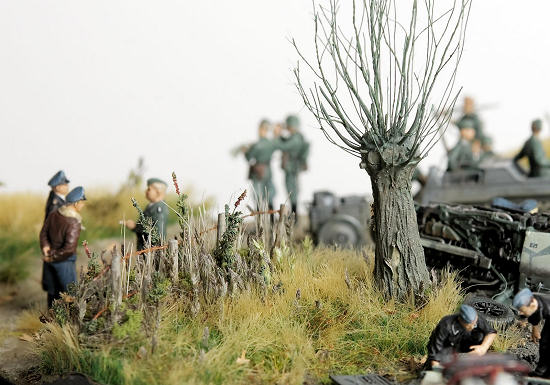
In one of the green patches I made a barbed wire fence. Underneath this
the undergrowth gets an opportunity to flourish. I started with some
thorny bushes made from strung out steel wool. Onto this I attached
some Underbrush from Woodland Scenics. I used that same material for
the transition of the field and very sparingly in the field itself. In
between the bushes I placed long grass made from reed from Heki
(#3115). From dried floral pieces I made tall weeds and glued some
“flowers” on top of these made out of copper wire with grains of sand
glued onto them. And then I placed an awful lot of “nettles” in the
grass. These are made from seeds of grass which grow anywhere, perhaps
even your own back garden. The grass was dried for a couple of weeks,
and then every individual “nettle” was cut from the grass and was glued
onto the base one by one. The ferns are just that: pieces of real fern.
Dried, painted and glued together.
I made the barbed wire myself from sewing thread made rig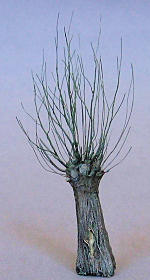 id with the
help of diluted white glue. Then I bent a
id with the
help of diluted white glue. Then I bent a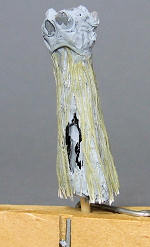 lot of oversized V-shapes and
glued these with cyano acrylate at regular intervals onto the thread.
Once cured I cut back the V’s to tiny little barbs. After this the
whole assembly was painted with Humbrol gun metal and rust and was
finally given a good dusting with orange pigment powder. This all
turned out to be such an amount of work I didn’t bother with making the
barbs on the lower of the two wires. It’s so much obscured by the
undergrowth, no one will notice.
lot of oversized V-shapes and
glued these with cyano acrylate at regular intervals onto the thread.
Once cured I cut back the V’s to tiny little barbs. After this the
whole assembly was painted with Humbrol gun metal and rust and was
finally given a good dusting with orange pigment powder. This all
turned out to be such an amount of work I didn’t bother with making the
barbs on the lower of the two wires. It’s so much obscured by the
undergrowth, no one will notice.
The pollard willow is made out of pieces of sprue and an awful lot of
Tamiya putty. The portside wing of Schlemiel’s plane crashed into it so
I figured it should show some battle damage. I made that out of wine
bottle foil. The netted structure of its bark was made gluing several
diameters of sewing thread to the trunk with the help of copious
amounts of gloss varnish. For about two weeks the tree sported branches
made out of stretched sprue, but by then I just couldn’t take it
anymore. It looked ridiculous! So I cut of all of those (after all, it
is a pollard willow) and replaced them with ones made out of twisted
copper wire. This just goes to show: never be too easily satisfied.
 So, now it’s time to put everything in place. All figures were given a
copper pin in one of their feet, and with this they were firmly secured
to the base. As already said it was just impossible to press the
figures and the Kettenkraftrad into the groundwork. This didn’t matter
much with the figures, but the vehicle appeared to be hovering above
the mud. So I cut of all of the (carefully painted!) detail from the
undersides of the tracks and this gave the Kettenkraftrad a much more
natural look. I blended it in even more with a bit of additional mud I
mixed up. The plane itself had to blend in as well so I also mixed up
some additional earth. A bit tricky to get it the same colour as the
original batch, but there is a lot some paint can do later on. As a
final touch I dispersed a lot of autumn leaves across the diorama.
These Silver beech seeds were collected in my own backyard. At this
final stage I wasn’t very keen on spraying diluted white glue all over
the diorama, so they were all glued one by one.
So, now it’s time to put everything in place. All figures were given a
copper pin in one of their feet, and with this they were firmly secured
to the base. As already said it was just impossible to press the
figures and the Kettenkraftrad into the groundwork. This didn’t matter
much with the figures, but the vehicle appeared to be hovering above
the mud. So I cut of all of the (carefully painted!) detail from the
undersides of the tracks and this gave the Kettenkraftrad a much more
natural look. I blended it in even more with a bit of additional mud I
mixed up. The plane itself had to blend in as well so I also mixed up
some additional earth. A bit tricky to get it the same colour as the
original batch, but there is a lot some paint can do later on. As a
final touch I dispersed a lot of autumn leaves across the diorama.
These Silver beech seeds were collected in my own backyard. At this
final stage I wasn’t very keen on spraying diluted white glue all over
the diorama, so they were all glued one by one.
 And with that we finish our story of Colonel Von Trapp’s Bf 109,… oh
wait, Captain Kirk’s?… Oh never mind: Schlemiel’s! OK, everybody hands
in the air who knew the good Major belonged in the same categories as
these two? Jagdgeschwader 13? Come on: everybody knows the Germans were
superstitious. As I’ve said before: I paint with a brush, and feathered
edges are quite challenging that way. So I invented my own interesting
(and hard edged) scheme. And by then I just couldn’t resist to come up
with an equally interesting story. I suppose I’m more of a modeller
than a historian. Have a nice April fool’s day!
And with that we finish our story of Colonel Von Trapp’s Bf 109,… oh
wait, Captain Kirk’s?… Oh never mind: Schlemiel’s! OK, everybody hands
in the air who knew the good Major belonged in the same categories as
these two? Jagdgeschwader 13? Come on: everybody knows the Germans were
superstitious. As I’ve said before: I paint with a brush, and feathered
edges are quite challenging that way. So I invented my own interesting
(and hard edged) scheme. And by then I just couldn’t resist to come up
with an equally interesting story. I suppose I’m more of a modeller
than a historian. Have a nice April fool’s day!
Sjon van der Heiden
April 2010
If you would like your product reviewed fairly and quickly, please
contact
me or see other details in the
Note to
Contributors.
Back to the Main Page
Back to the Review
Index Page