Zvezda 1/48 Bf-109F-4
| KIT #: | 4806 |
| PRICE: | ~23 Euros |
| DECALS: | Two options |
| REVIEWER: | Fernando Rolandelli |
| NOTES: |
| HISTORY |
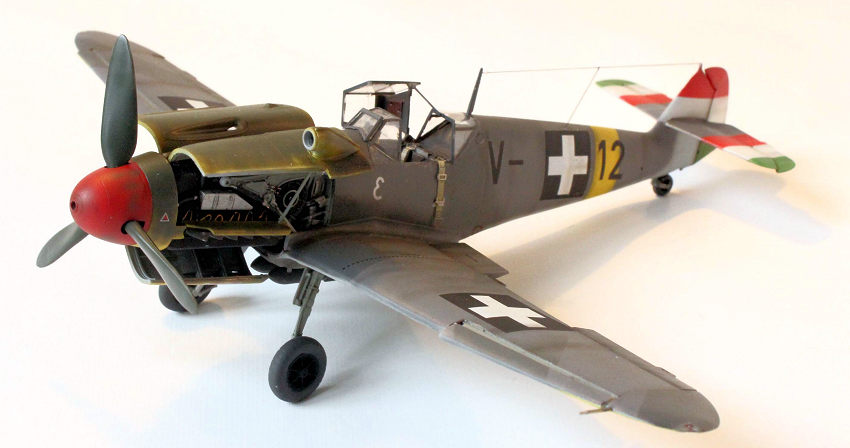
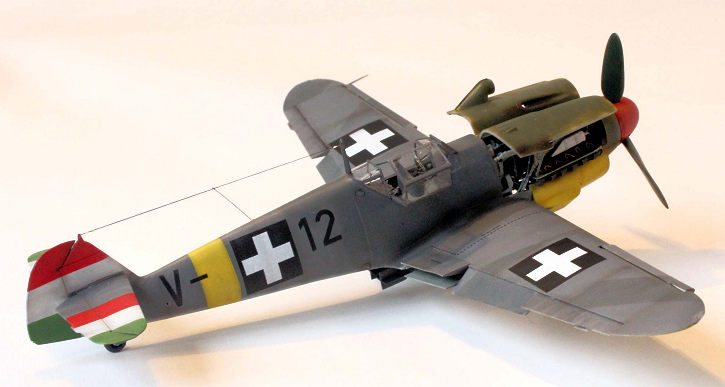
Messerschmitt Bf-109F-4/B, Hadnagy György Debrödy, 5/2. Vadászszázad, Royal Hungarian Air Force, Uman airfield, spring 1943.
In October 1942, the German
government agreed to hand over Bf-109Fs to Hungary, at the front line.
Previously, the request, including a production license, had been denied for
political reasons. The first 12 machines, ex-Luftwaffe, were handed over by the
Luftflotte 4 depots in November. These were German property, and were marked
with German Balkenkreuz plus the Hungarian national colours on the fin,
therefore marked with simple tactical number and not with the Hungarian codes.
The unit was known to the Germans as “1. Ungarische Jabostaffel”, and “Bánlaky-csoport”
(for the name of its
 commander) to Hungarians, officially part of the 1/1. Vadászszád. Missions were at first Jabo, detested by Hungarian pilots as much as
by anyone else, and then Frontjäger.
commander) to Hungarians, officially part of the 1/1. Vadászszád. Missions were at first Jabo, detested by Hungarian pilots as much as
by anyone else, and then Frontjäger.
By the end of December, both 1/1.
and 5/2. Had been reequipped, and the machines received the Hungarian codes, a
“V-“ for vadász (fighter), plus a three-digit code. V-012 was assigned to 5/2. A
total of around 50 machines were delivered, mainly F-4, though the Wk.Nr denotes
some F-2, probably upgraded to the later standard. Some were fitted with G-2
cowlings, with the characteristic little twin intakes. All were ex-Luftwaffe,
previously used machines, and sported variations of the standard Luftwaffe
scheme, modified to a varying extent. There is another Hungarian 109F, seemingly
in the typical early RHAF tri-color scheme and Hungarian crosses, which some
sources (Merrick, “Luftwaffe Colours”) have claimed to be an example of “German
export scheme”, assuming it was delivered to the Hungarians. Other sources (Bernád-Punka)
believe it was part of a factory propaganda shooting when talks for license
production were being held. The fact that the machine lacks the Hungarian code
is a tell-tale (Hungarian code is not a “tactical” but a serial number), for it
indicates the machine is not Hungarian property. Besides, the very existence of
a “German export scheme” similar to the pre-war tricolor scheme (RLM61/62/63/65)
is debatable, as most exported machines show either the standard Luftwaffe or
very simple schemes (Swiss and Jugoslavian 109Es, for instance) However, some
researcher s have given credit to this theory. In fact the Hungarian pre- and
early-war tricolor scheme was inspired in the German; though in local Kreyer
paints, those were based in the German Titanine colours. Me, who am a
tertiary-sources researcher at best, stay with Bernád-Punka.
s have given credit to this theory. In fact the Hungarian pre- and
early-war tricolor scheme was inspired in the German; though in local Kreyer
paints, those were based in the German Titanine colours. Me, who am a
tertiary-sources researcher at best, stay with Bernád-Punka.
On his part, György Debrödy graduated as 2nd Lt in 1942, being posted to 5/I FG, 5/2. Vadazsazád, flying fighter bomber missions until the next summer, when he made ace during the Kursk campaign. He was shot down behind enemy lines but returned to his unit on 25.09.43, and again on 25.02.44, when he was rescued by 2nd Lt. Kenyerés who daringly put his own machine next to his comrade and took him off. In April, with 18 victories, he was posted to 101/3. at home, where he took his share of combat against the USAAF, claiming several P-38s, P-51s, a B-17 and two B-24. He became squadron commander but was wounded in combat on 16th November, by Soviet fighters, putting an end to his combat career, with a total of 26 claims. He migrated to Spain, Canada and the US, passing away in 1982.
| THE KIT |
This is the famed Zvezda 1/48 kit, in
its 109F-4 incarnation. I have built two in parallel, a F-2 “buttoned up”, which
was shown in this very site a short time ago, and this one, an “open engine”
F-4. It must be said that the “open engine” option entails no more work than the
closed one; no surprises, as the kit is intended to be built as such. The kit is
uncompromisingly accurate in shape and details, designed at plac es as the real
aircraft is built; unfortunately, this provokes some complexities that makes the
build unnecessary difficult. The F-4 boxing comes with a complete F-2 plus the
parts needed for the later version; there are lots of options in clear parts and
armament. There are even some unused parts whose presence is unexplainable: a
complete extra set of exhaust stacks, engine bearers, instrument panels and
cowlings come to my mind. It would have been nice if those included the G-2 type
cowlings seen in some late F-4s, but that’s not the case. Nor is the presence of
some parts to make an easy closed engine model. It should be mentioned that
there is an unexplainable step in the bulkhead just behind the canopy, traces of
which I could not find in any picture.
es as the real
aircraft is built; unfortunately, this provokes some complexities that makes the
build unnecessary difficult. The F-4 boxing comes with a complete F-2 plus the
parts needed for the later version; there are lots of options in clear parts and
armament. There are even some unused parts whose presence is unexplainable: a
complete extra set of exhaust stacks, engine bearers, instrument panels and
cowlings come to my mind. It would have been nice if those included the G-2 type
cowlings seen in some late F-4s, but that’s not the case. Nor is the presence of
some parts to make an easy closed engine model. It should be mentioned that
there is an unexplainable step in the bulkhead just behind the canopy, traces of
which I could not find in any picture.
Decals are not good looking, but they are usable (in the F-2 they are considerable better), if only the scheme provided (Ostermann’s “Black One”, 8./JG54, in both Summer and Winter liveries) were a bit more attractive. The unexplainable lack of some stencils would force you to aftermarket decals, not their average quality, though!
I used the specific Eduard PE set (for the F-2, actually) which went well, but the cockpit is suitably furnished as is; only the instrument panel and harness would be strictly needed.
| CONSTRUCTION |
I followed the instructions to the letter, at least at first. Cockpit was finished first, then the fuselage halves closed; the cockpit floor is added from below, as well as the rear canopy parts. The moulded seat looks as if it protrudes the rear pan, but once the canopy sill is added, it is suitably flush. The fuel line I added to the sidewall rather than to the floor. As always, I refused to get carried by PE parts and used as much of the plastic in the kit as possible. On that, I added the tail section as a “bucket”; it goes remarkably well on a panel line, but some sanding was necessary to eliminate steps, and the internal bulkheads have provoked sink marks that should be filled.
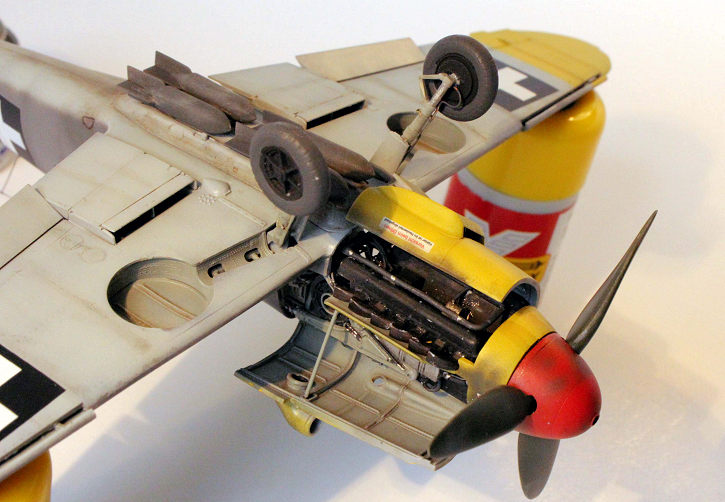
Then I detailed the engine, which
is basic but well detailed, and some extra wiring would make it stand as if an
aftermarket item. The inner sides of cowling and specially the lower bath are
superbly detailed as well, though the underside of the engine is completely
bare. The supercharger intake has a sepa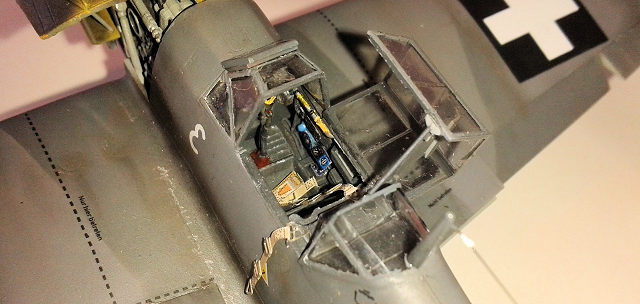 rated ring that solves the inner seam
handsomely, but the weld line on the outside must be added. The MG17 lack the
characteristic muzzle shrouds. The assembled engine is added to the firewall, by
two tiny connector points, and then to the completed fuselage, to which is added
the upper coaming with the instrument panel. I had hoped to be able to detail it
and simply fit it in place, and certainly dry fitting showed that was possible.
Unfortunately, it was not so: the firewall must have been displaced by some
microns and the attitude of the engine was tilted up. I juggled with it until it
looked better, losing much of the added detail, which had to be restored.
rated ring that solves the inner seam
handsomely, but the weld line on the outside must be added. The MG17 lack the
characteristic muzzle shrouds. The assembled engine is added to the firewall, by
two tiny connector points, and then to the completed fuselage, to which is added
the upper coaming with the instrument panel. I had hoped to be able to detail it
and simply fit it in place, and certainly dry fitting showed that was possible.
Unfortunately, it was not so: the firewall must have been displaced by some
microns and the attitude of the engine was tilted up. I juggled with it until it
looked better, losing much of the added detail, which had to be restored.
Once the engine had been persuaded into place, I tackled the wings. The wheel bays are multipart affairs, perfectly closed and accurate. They even have the lightening holes in the strut bays, and the actuation arm behind. However, if sitting just a micron up, they will affect the fit of the wing. I sanded the top of the parts to help the leading edge close better. The wings I fit by gluing the top halves to the fuselage and then adding the lower one; the fit was good though the diedhral looks excessive. The separate panel on the undersurface looked as an unnecessary complication and they delivered just that: no way a big square surface with a subtly curved profile would fit flush where it is intended to stay. Furious puttying and sanding achieved a good result at the expense of losing detail. In the other build, I glued those parts before closing the wing halves, but the result was not dramatically better. Radiator assembly is also complicated, the forward lips, which are separated, are better glued before the housing is fitted to the wing (and of course they lack the actuators) I also added the actuators to the slats for a better look. Separated wingtips are a call for trouble, and they had to be faired in with putty, while alignment remained under suspicion. All flying surfaces were posed deflected with no problems.
The aircraft I modelled was a fighter-bomber, and I chose to arm it with the ETC50 carrier for four SC50s. This is a multipiece affair that looks great, but you could also fit the ETC250 or the fuel tank to equally well detailed and accurate carriers.
 Undercarriage lacked a positive fit
but could be presented to the fuselage to check the symmetry. It looked good
enough, but was deceiving: once finished the model showed a drop in the right
wing that was corrected to an extent by some juggling with the leg’s angle (both
my kit took the same problem)
Undercarriage lacked a positive fit
but could be presented to the fuselage to check the symmetry. It looked good
enough, but was deceiving: once finished the model showed a drop in the right
wing that was corrected to an extent by some juggling with the leg’s angle (both
my kit took the same problem)
Clear parts did not fit completely well. Windscreen clicks against the canopy sill but rides a bit high, while the rear fixed part is undeniably wider than the fuselage. Central hood fits well. The armored windscreen was added after everything was painted to prevent paint leaks.
Final assembly posed no great challenges, as the fearsome looking cowling parts (opening up like a vintage car’s hood) behaved reasonably well, exception made of the front ring, that simply refused to sit well against the exhausts stacks, and had to be persuaded by some almost illegitimate ways. I feared the propeller (of exemplary fit) would be thrown out of alignment, but everything went right.
| COLORS & MARKINGS |
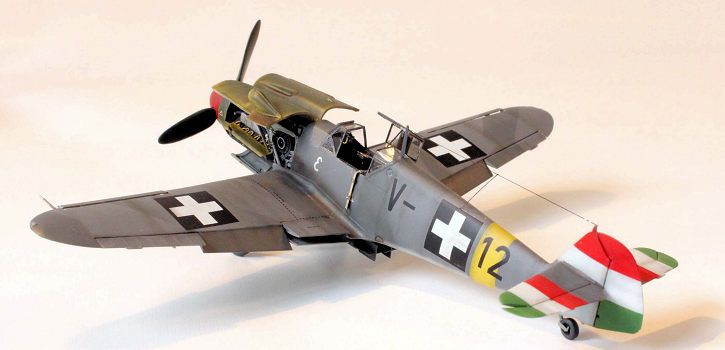 I wanted to build the model as a
Royal Hungarian AF machine, to honour this people, one of the most grievously
affected by WW2. I got the HAD decals for 109Fs, but actually, and surprisingly,
it shows a bit of lacking research. V-012 is presented in an almost standard
German camouflage, while pictures in Bernád’s book show a completely repainted
fuselage. Hungarian square/crosses are also much smaller. I resorted to several
sheets to get some more appropriate. The scheme is the standard 74/75/76 with a
mainly solid 75 rear fuselage, with some solid 74 in front. Nose is Yellow
obliterated with 71; spinner is Red. Technically, HAD decals behaved perfectly,
being thin and not silvering at all. No stencils were placed on fuselage, on
account of the complete repaint, exception made of the fuel triangle. German
Balkenkreuzen on upper wings were obliterated in 75. An old Aeromaster sheet
presents Debrödy’s machine as “V-003”, and so do some internet sources.
I wanted to build the model as a
Royal Hungarian AF machine, to honour this people, one of the most grievously
affected by WW2. I got the HAD decals for 109Fs, but actually, and surprisingly,
it shows a bit of lacking research. V-012 is presented in an almost standard
German camouflage, while pictures in Bernád’s book show a completely repainted
fuselage. Hungarian square/crosses are also much smaller. I resorted to several
sheets to get some more appropriate. The scheme is the standard 74/75/76 with a
mainly solid 75 rear fuselage, with some solid 74 in front. Nose is Yellow
obliterated with 71; spinner is Red. Technically, HAD decals behaved perfectly,
being thin and not silvering at all. No stencils were placed on fuselage, on
account of the complete repaint, exception made of the fuel triangle. German
Balkenkreuzen on upper wings were obliterated in 75. An old Aeromaster sheet
presents Debrödy’s machine as “V-003”, and so do some internet sources.
| CONCLUSIONS |
Well, these are laborious kits to build, but a very good-looking model can be extricated from them. Not that the kits are not well designed and moulded, but the overengineering is evident and annoying in places. Of course, we are talking of an accurate, well detailed kit that offers a real chance of building an open-engine model OOB. Not so long ago, we were killing for some PE-resin-vac conversions that only made a half-hearted job. Here in Europe, they are very reasonably priced, comparable to an Eduard Overtree and almost half a Hasegawa kit, and attractive schemes are not exactly lacking, so, if they were just a bit friendlier to build, one would be tempted into building heaps of them.
| REFERENCES |
“Hungarian Fighter Colours, 1930-1945”, Dénes Bernád, György Punka, MMPBooks.
“Hungarian Aces of WW2”, György Punka, Osprey Publications
“Hungarian Air Force in WW2”, György Punka, Squadron Signal Publications
“Luftwaffe Camouflage and Markings 1933-1945”, K.A. Merrick, Classic Publication
“ Hungarian Air Force Zusammenstellung aus Magazine” Pro Modell Archiv
10 July 2017 Copyright ModelingMadness.com.
If you would like your product reviewed fairly and fairly quickly, please contact the editor
or see other details in the
Note to
Contributors. Back to the Main Page
Back to the Review
Index Page
Back to the Previews Index Page