Hasegawa 1/32 Bf-109G-14
| KIT #: | 08068 |
| PRICE: | £22-00 |
| DECALS: | Two Options |
| REVIEWER: | Frank Reynolds |
| NOTES: |
| HISTORY |
The Messerschmitt 109G-14
was one of a number of attempts by Germany’s aircraft industry to standardise on
the best elements of the 109 series that had been developed during its
production history. It was introduced in the summer of 1943. Its Daimler Benz DB
605A engine of 1,475hp was a progressive i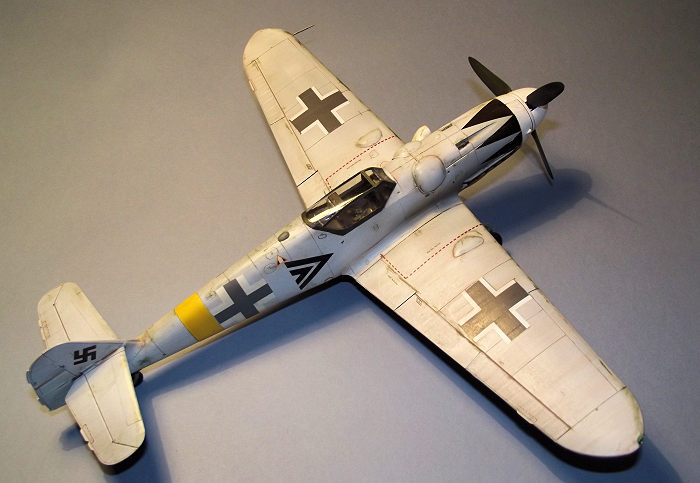 mprovement on the 1,100hp DB601 that
had been introduced in the Bf109 series of 1938. The intention was to standardise on such features as the tall tail fin, “Erla-type” clear canopy, and
a belly drop tank. The plan was to make life simple in managing the network of
sub-contractors serving the assembly lines, but in the increasing chaos of war
the plan simply failed, which is why the configuration of late war 109s is such
a rich source of study for historians.
mprovement on the 1,100hp DB601 that
had been introduced in the Bf109 series of 1938. The intention was to standardise on such features as the tall tail fin, “Erla-type” clear canopy, and
a belly drop tank. The plan was to make life simple in managing the network of
sub-contractors serving the assembly lines, but in the increasing chaos of war
the plan simply failed, which is why the configuration of late war 109s is such
a rich source of study for historians.
One pilot forever associated with later model Bf109s is Erich “Bubi” Hartman. His aircraft are much beloved of kit and decal manufacturers due to the distinctive “Black Tulip” nose markings that he adopted when a senior officer in the Luftwaffe. He had a remarkable career as a combat pilot between 1942 and 1945, being credited with 352 kills, all but seven being Soviet aircraft. At the end of Word War 2 he was imprisoned in the USSR for ten years and upon his release joined the newly formed West German Luftwaffe, where his distinctive Black Tulip insignia was worn of the F-86s of JG 71 – the Richtofen Squadron.
| THE KIT |
Hasegawa’s late model 109s in 1:32 scale are typically offered in the UK at prices from £48 to £55, so when finding this G-14 at a specialist vendor at International Air Tattoo 2017 in England for just £22-00, an impulse purchase was near to a no-brainer. Whether the kit was new or second hand was unclear but it was mint, boxed with all parts in sealed bags. The box had a 2002 copyright reference.
 I was drawn in by the box
art showing a winter camouflage aircraft against frozen mountainous landscape;
the price was right, the presentation was right, this was coming home with me.
I was drawn in by the box
art showing a winter camouflage aircraft against frozen mountainous landscape;
the price was right, the presentation was right, this was coming home with me.
My modelling is based on a fascination with variations in shapes and colours of aircraft types and I tend to swerve into a series of linked subjects that hold my interest until the next diversion sets in. The 109 in 1:32 is a go-to subject that that never quite leaves me. I have twelve of them so far and it is always the draw of exotic colour schemes that calls me back.
I chose to trust Hasegawa entirely with this one by relying on what was in the box and using minimal aftermarket. The extra interest would come in trying to create the winter colour scheme.
A detailed preview of the kit has appeared in MM and can be located in the previews section of the site.
Hasegawa have provided a pick and mix of 12 parts frames from their product line to give the required configuration for a G-14. The result is that there are very few “parts not required”, these are a set of under wing cannon pods, a couple of small aerials, an armoured head rest and a windscreen.
 The parts were well
moulded in a medium grey slightly stiff plastic with subtle engraved panel
lines. I could find no significant flash on the parts.
The parts were well
moulded in a medium grey slightly stiff plastic with subtle engraved panel
lines. I could find no significant flash on the parts.
The instruction sheet was in Hasegawa’s familiar fold out style, all in grey scale with exploded views covering fifteen stages of construction.
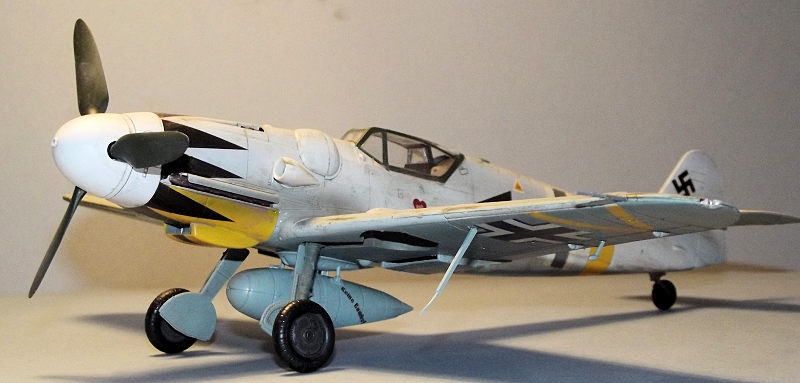
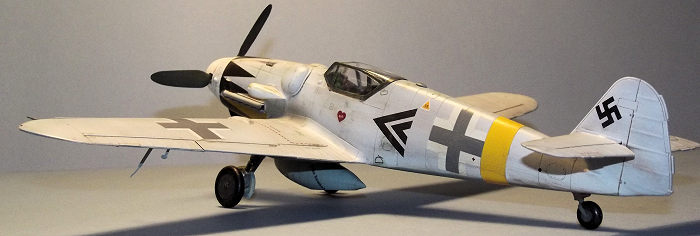
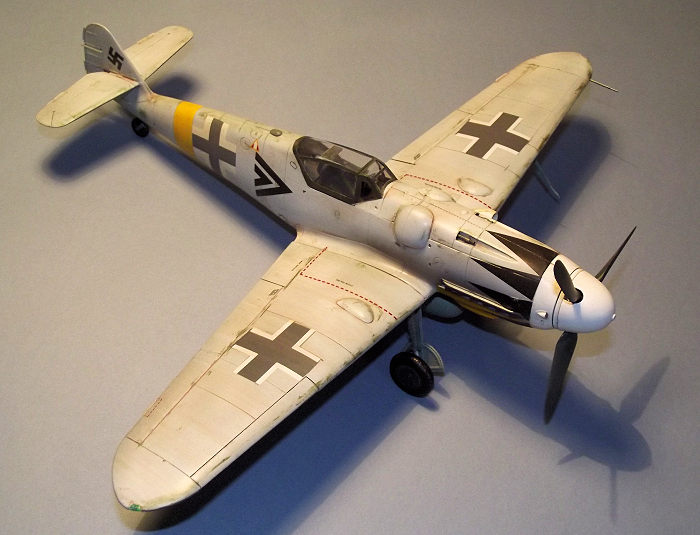
The theme of the decal sheet was two aircraft flown by Oblt. Erich Hartman, one in the winter colours and an alternative in the more conventional 74/75/76 Grey/Grey-Violet/Blue camouflage. The sheet includes an array of stencils, instrument panel, spinner spiral and yellow theatre markings.
| CONSTRUCTION |
I look for a few sub-assemblies to get construction under way in order to get a feel for how the plastic reacts to trimming and being glued. The main and tail wheel halves were a suitable start followed by the two piece belly tank and its mounting plate. Next, the propeller spinner back plate and blades were sprayed White using Tamiya Ultra Fine White primer from a rattle can. With the spinner parts so finished the blades received a quick blast of airbrushed Tamiya XF-27 Black Green. The blades almost clicked into place on the spinner backplate, then a touch of glue secured the spinner to complete the propeller assembly.
Hasegawa ’s instructions
commence the build with a cockpit interior that is rather simpler than some of
its rivals. A one piece floor and rear half bulkhead are mated to a front half
bulkhead to form the basic structure. The rear breech section of the hub centre
cannon was glued to its floor box, followed by installation of the rudder
pedals, control column, seat pan and a pair of trim wheels. Hasegawa intends
that the cockpit detail should be fleshed out with the installation of a seated
pilot figure with a parachute backpack and harness moulded in. If the pilot is
omitted, as in this case, a little extra detail is advisable in view of the
relatively large clear canopy. I used a seat harness from the excellent rang of
HGW seatbelts, which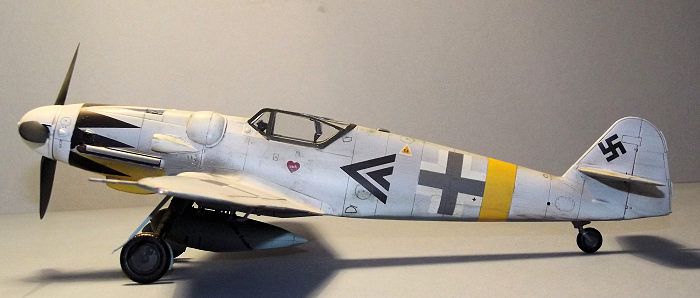 provide laser cut fabric belts and tiny etched buckles.
They provide a happy evening’s modelling in their own right in threading the
tiny buckles onto the straps, but once completed they are a neat addition to the
cockpit. Rather than provide a cockpit tub, Hasegawa has moulded some cockpit
detail onto the inside of the fuselage halves as a simplified representation of
the various boxes and pipework to which a couple of switch boxes and levers are
added. I elected to assemble all of these parts and when dry they were
airbrushed in Xtracrylix XA1203 RLM 66 Schwarzgrau, the same colour being
applied to the cockpit floor and bulkhead assembly. While the airbrush was
charged with RLM 66 the wheel hubs were painted, along with the instrument
panel. The seat belts were secured with a few dabs of superglue. An instrument
panel decal is provided and this settled onto the raised detail of the panel
with the assist of a little decal softening solution.
provide laser cut fabric belts and tiny etched buckles.
They provide a happy evening’s modelling in their own right in threading the
tiny buckles onto the straps, but once completed they are a neat addition to the
cockpit. Rather than provide a cockpit tub, Hasegawa has moulded some cockpit
detail onto the inside of the fuselage halves as a simplified representation of
the various boxes and pipework to which a couple of switch boxes and levers are
added. I elected to assemble all of these parts and when dry they were
airbrushed in Xtracrylix XA1203 RLM 66 Schwarzgrau, the same colour being
applied to the cockpit floor and bulkhead assembly. While the airbrush was
charged with RLM 66 the wheel hubs were painted, along with the instrument
panel. The seat belts were secured with a few dabs of superglue. An instrument
panel decal is provided and this settled onto the raised detail of the panel
with the assist of a little decal softening solution.
The kit is designed so that the fuselage halves can be glued together before the cockpit interior is installed. Once joined, the rear fuselage section is added. This is formed to include the tall fin, rudder and first bay of the rear fuselage as one unit and is moulded to include a subtle, but definite, offset rudder – a neat touch.
The instrument panel and cockpit structure were threaded into the fuselage from underneath and the units glued into positive locations. A pair of stub wing spars were glued to the inside of the wing centre section and the whole box structure locked in place under the cockpit.
The wings are simple
structures consisting of upper and lower halves that are designed to slip onto
the spars. The wheel wells require minor trimming to a circular shape by cutting
away a thin web of plastic and this is made clear in the instructions. Small
radiator grilles are buried in the wing structure and I painted them silver
before installation. The upper and lower wing halves can be joined without fuss
although care should be taken to ensure that there is no unwanted glue in the
slots that will house the wing spars – at least until you are ready to glue the
wings on. The small upper wing bulges are glued into place over the whe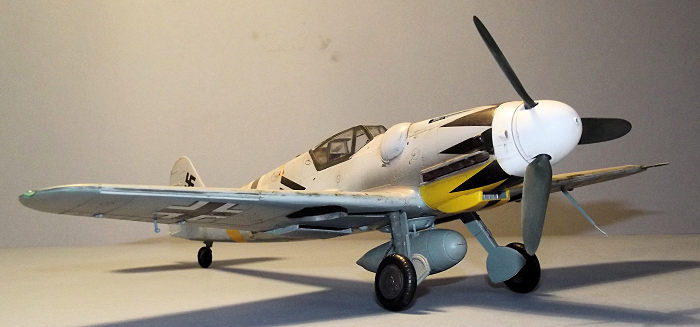 el bays –
the instructions highlight where small locating holes need to be drilled – and
the left and right wing panels glided into place to butt up against the fuselage
fairings. A large plug is installed in the fuselage nose to support the
propeller assembly and the upper cowl glued in place – one of a choice of two
types according to the paint finish offered in the kit. The next stages of
construction highlight the installation of parts that can be postponed until
after painting. The kit is designed to allow the exhaust pipes and shrouds to be
added from the outside and this avoids the need for awkward masking. The
supercharger intake was also set aside to be added at the finishing stage.
el bays –
the instructions highlight where small locating holes need to be drilled – and
the left and right wing panels glided into place to butt up against the fuselage
fairings. A large plug is installed in the fuselage nose to support the
propeller assembly and the upper cowl glued in place – one of a choice of two
types according to the paint finish offered in the kit. The next stages of
construction highlight the installation of parts that can be postponed until
after painting. The kit is designed to allow the exhaust pipes and shrouds to be
added from the outside and this avoids the need for awkward masking. The
supercharger intake was also set aside to be added at the finishing stage.
While the main structure was settling the simple undercarriage mouldings were dealt with. The one piece main legs and tailwheel fork were hand painted in RLM Grau 02 (Tamiya XF-22) and the tyres in XF-85 Rubber Black.
The main airframe was completed with the installation of one piece tailplane and elevator units to each side of the tail fin. An oil cooler intake is constructed as a sub assembly with front and rear radiator faces and this was slotted in place under the engine cowl. Flaps to the rear edge of the wings are moulded with inset hinges so that they can be displayed open. This is at odds with the fixed ailerons, elevators and rudder which are moulded integrally with the adjacent flying surfaces, so the hinges were trimmed away and the flap assemblies cemented closed up. Similarly the leading edge slats were trimmed and cemented closed.
The cockpit area was completed by the installation of the gunsight and armoured headrest inside the hood, both painted Black to match the cockpit interior. The hood was secured with Humbrol Clearfix cement and the clear glazed areas masked with Tamiya tape trimmed with a fresh scalpel blade.
The airframe was checked over for any dings and scratches, and then sprayed overall with Grey auto primer dispensed from a rattle can. This has the bonus of providing a grey interior to the canopy glazing.
| COLORS & MARKINGS |
The canopy area was airbrushed Dark Green 71 ( XF-61) and masked a second time to cover up all of the framing.
Although the yellow
arrowhead striping under the left wing and the band to the rear fuselage are
supplied as decals, there is a further area of yellow under the nose and as I
had no confidence in my ability to find yellow paint to match, I elec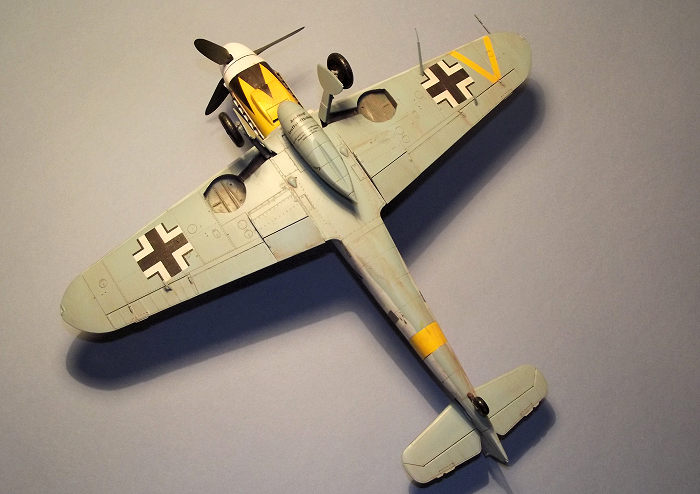 ted to
forget the decals and to paint all of these areas, where a localised white
undercoat would be needed.
ted to
forget the decals and to paint all of these areas, where a localised white
undercoat would be needed.
My favourite way of applying white is from Tamiya’s rattle can range. Their fine surface white primer dries dense and smooth and gives a satisfactory result when finished off with a coat or two of varnish.
The rattle can White was applied to the front portion of the nose, the lower cowl, around the rear fuselage and under the left outer wing. Having masked the extreme nose with Tamiya tape, the remaining white areas were first airbrushed with Tamiya XF-3 Flat Yellow followed by Xtracrylic’s XA1011 RAF Trainer Yellow. The yellow under surface chevron and rear fuselage stripes were then taped over.
Under surfaces were finished RLM 76 Blue using Tamiya XF-23, then masked partially with Blu Tack putty along the lower edges of the rear fuselage and under the leading edges of the wings to give a soft demarcation line. With the rest of the under surfaces masked over with tape I was left with an airframe that was essentially dark grey.
The airbrush was set at 10psi and Tamiya XF-2 White was ghosted over the airframe leaving enough dark grey primer showing through to give a grubby effect. The airframe was next dry brushed with XF-81 RAF Dark Green to give a worn look to the wing leading edges and the fuselage spine.
After overnight drying the airframe was stripped of all masking except to the canopy glazing, checked over for any small areas that needed to be touched in then sealed with two hand brushed coats of Future/Klear floor polish.
I had a decals disaster.
Perhaps distracted by how straightforward the build had been thus far I was
happily floating the decals into place, each with the help of some Micro Set
when I decided that the larger crosses could be hurried along with a liberal
dose of Micro Sol. I watched in horror as the large crosses to the upper wings
shrivelled, cracked and crazed. Over the next 24 hours I tried to revive them
with applications of more Micro Sol but eventually had to accept that they
looked like a Roman mosaic and could not be saved. The rest of the decals had
gone on without fuss, so it was only my error in sloshing on Micro Sol when it
was not needed that had caused a problem. The black petals for the nose are
supplied as a linked trio for the cowl sides and I found it easier to cut them
apart and apply each one separately, especially around the engine exhausts, yet
even these settled into place without the use of Micro Sol so I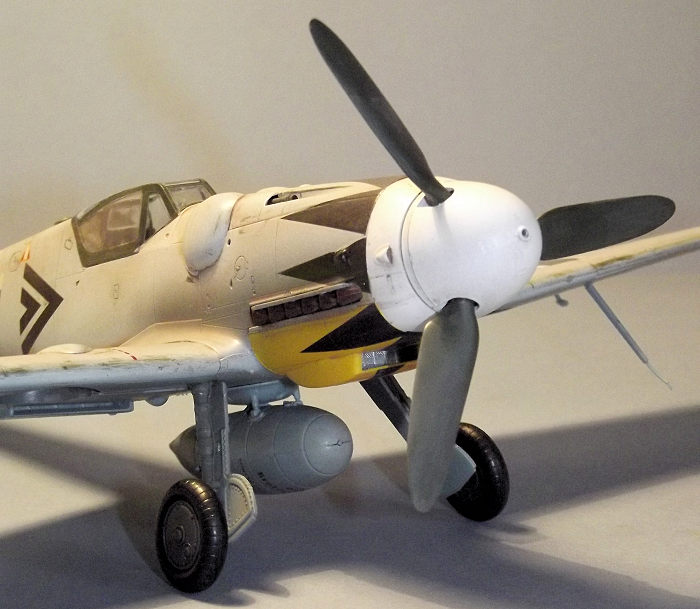 had made a
significant error. I completed the installation of all the available decals and
contemplated how to put things right.
had made a
significant error. I completed the installation of all the available decals and
contemplated how to put things right.
Since I had chosen to model the colour scheme featuring toned down upper surface crosses with a grey infill, replacements were not forthcoming from my decal dungeon, or from anything that I could find on the web. The wrecked decals were lifted off by sticky tape and the paintwork allowed to dry off. It was fortunate that the second option on Hasegawa’s decal sheet features outline white crosses of the correct size so they were used as a pattern to build up a Tamiya tape mask on each upper wing which permitted a solid cross to be sprayed in grey – I used Tamiya XF-77 IJN Grey. The white outline crosses were cut into quarters and each chevron-shaped section juggled onto the new grey painted cross, the outline crosses having been split up to allow for any imperfections in the geometry of my masking.
The previously painted supercharger intake was glued to the side of the cowl, and the exhausts, painted red-brown were added. The whole airframe was sprayed with Xtracrylix flat varnish, and then received a generous wash of hand-brushed Pro Modeller Earth Brown, which was wiped away with a damp sponge to leave just a trace of dirt. I tried to follow the direction of the airflow over the aircraft with the weathering. With a quick blast of Tamiya X-19 Smoke along the sides of the engine cowlings, the paintwork was complete and the canopy masking could finally be removed.
Installation of the belly tank, landing gear and a couple of aerials brought the project to life. The final detail was the addition of the wing tip light covers.
| CONCLUSIONS |
Pricing aside, if you want a relaxed and worry-free build of a 109, grab one from Hasegawa. This G-14 has an option that is free from the challenges of mottling the camouflage and the white upper surfaces can be finished pristine or worn to suit individual tastes. Unless you suffer from Advanced Modeler Syndrome you surely cannot go wrong. With virtually no need for filler and no gimmicks, it is an ideal way to practice the pure pleasure of modelling.
Recommended to all.
| REFERENCES |
Messerschmitt Bf109.The Operational Record by Jerry Scutts; Airlife
Publications, 1996
The Fighting ME109 by Uwe Feist, Arms and Armour Press, 1988
11 August 2017
Copyright ModelingMadness.com
Kit courtesy of my wallet.
If you would like your product reviewed fairly and fairly quickly, please contact the editor or see other details in the Note to Contributors.
Back to the Main Page Back to the Review Index Page Back to the Previews Index Page