AMG (Arsenal Model Group) 1/48 Bf-109C
| KIT #: | 48716 |
| PRICE: | $44.00 SRP |
| DECALS: | Four options |
| REVIEWER: | Dale Owens |
| NOTES: | Limited Run. Decals used from HAD Models |
| HISTORY |
History and literature on
Messerschmitt’s most famous (and arguably Germany’s most famous) fighter plane
is so ridiculously long and complex, spanning over thirty-three thousand
airframes produced from 19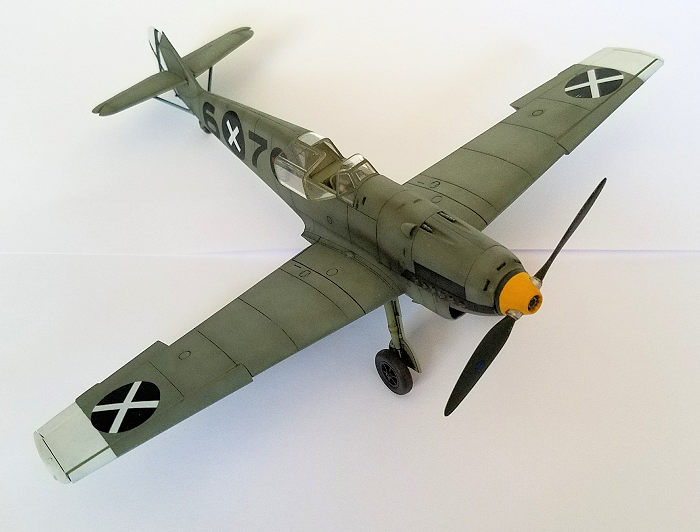 35 to 1965, there’s no possible way to cover it
completely in this review. However, I’ll briefly delve into the lesser known
involvement of the ‘109 during the Spanish Civil War.
35 to 1965, there’s no possible way to cover it
completely in this review. However, I’ll briefly delve into the lesser known
involvement of the ‘109 during the Spanish Civil War.
Germany rushed to the aid of the rebel, anti-Communist Nationalist armies and formed the Condor Legion – a group of volunteers from the young Luftwaffe. Adolf Hitler saw this as a two-fold benefit for the Third Reich, gaining valuable combat experience while preventing the civil war from devolving into a larger continental or world war for which he wasn’t yet prepared. During this time, the Condor Legion proved itself highly effective and was a major deciding factor in the Battle of Toledo in 1936.
The BF-109 A, B, C, and D models began to form the backbone of the Condor Legion, and thus the Luftwaffe’s air superiority forces, over the course of the war, and many famous fighter aces (Adolf Galland, Werner Molders, Hannes Trautloft, etc.) drew their first blood.
| THE KIT |
For ages I’ve longed for a ‘109 in Spanish Civil War markings to be the 1930’s ‘bookend’ to my collection of Messerschmitts. I happened to see this kit on Hannants’ new products list and I knew right away I had to have this one. This isn’t the first ‘109 A-D model in 1/48th scale by any means. There’s the old Hobbycraft/Academy kit, which suffers from incorrect cowl proportions, cowl vents and louvers in wrong sizes and places, and one cockpit wall that is completely incorrect for the early ‘109. There’s also the Classic Airframes kit, which is much more accurate. However, it requires advanced modeling skills due to it’s multi-media composition and limited run nature. I have one of these partially completed in my collection out of frustration with the cowl fit.
 Now comes the AMG (Arsenal
Models Group) kit. This is a new company for me, so after reading a couple of
favorable in-box reviews, I decided to take the plunge. I ended up purchasing it
on eBay along with another missing-link-in-the-collection kit from AMG, the
BF-109G-12 trainer. It seems I may have purchased both directly from the
manufacturer, as I was notified that there would be a delay on the G-12 because
he was still printing the decals!
Now comes the AMG (Arsenal
Models Group) kit. This is a new company for me, so after reading a couple of
favorable in-box reviews, I decided to take the plunge. I ended up purchasing it
on eBay along with another missing-link-in-the-collection kit from AMG, the
BF-109G-12 trainer. It seems I may have purchased both directly from the
manufacturer, as I was notified that there would be a delay on the G-12 because
he was still printing the decals!
Since there’s only so many ways to skin a cat, thus there’s only so many ways to break down a ‘109 in kit form, so there’s not many surprises in the box. There are a few interesting quirks, however. For instance, there’s quite a lot of engine in the kit, with the block being molded to the front of the fuselage halves, with separately molded front gear-reduction cover, top plate cover, oil pump, engine bearers and other bits. Sadly there’s no gun details and all detail stops in a flat wall at the outer paneling that would be over the gun breaches and loading mechanisms.
There’s two PE frets with various cockpit details, oleo strut braces, and a scribing template for the gun wing panels (more on this later), and vinyl tires.
 Since the ‘109 A through D
models were externally very similar, there’s a lot of commonality between AMG’s
boxings of this airframe. The main differences are engine cowling vents, exhaust
stub lengths, and the presence or absence of wing guns. C and D model ‘109s had
a gun in each wing like the E model; this added a panel to the upper wing and a
notch in the flaps, because the gun breach extended past the flap’s hinge line.
The panel had a trapezoidal extension that hung over this notch in the flap to
cover the breach. AMG elected to mold the wings with this extension, but without
the engraved panel lines to accommodate more variants with the same molds. This
is where the scribing template comes in… or at least it would, if the
instructions had called out this detail. At first glance the instructions seem
crude but adequate, but they prove to be incredibly lacking. If you’re a
stickler for detail and accuracy, be sure stock up on reference materials before
tackling this project.
Since the ‘109 A through D
models were externally very similar, there’s a lot of commonality between AMG’s
boxings of this airframe. The main differences are engine cowling vents, exhaust
stub lengths, and the presence or absence of wing guns. C and D model ‘109s had
a gun in each wing like the E model; this added a panel to the upper wing and a
notch in the flaps, because the gun breach extended past the flap’s hinge line.
The panel had a trapezoidal extension that hung over this notch in the flap to
cover the breach. AMG elected to mold the wings with this extension, but without
the engraved panel lines to accommodate more variants with the same molds. This
is where the scribing template comes in… or at least it would, if the
instructions had called out this detail. At first glance the instructions seem
crude but adequate, but they prove to be incredibly lacking. If you’re a
stickler for detail and accuracy, be sure stock up on reference materials before
tackling this project.
| CONSTRUCTION |
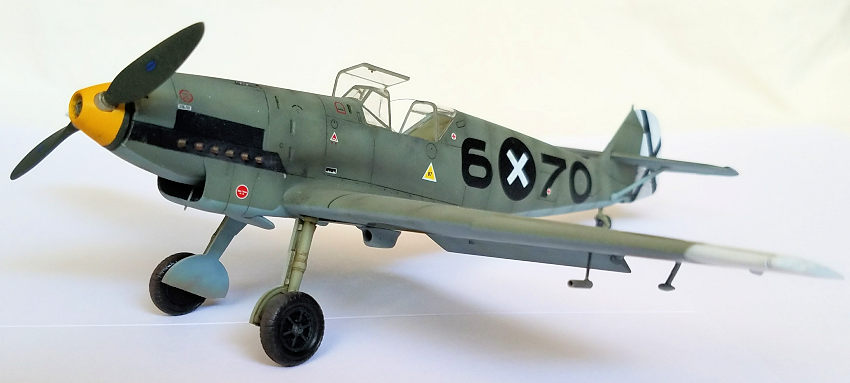
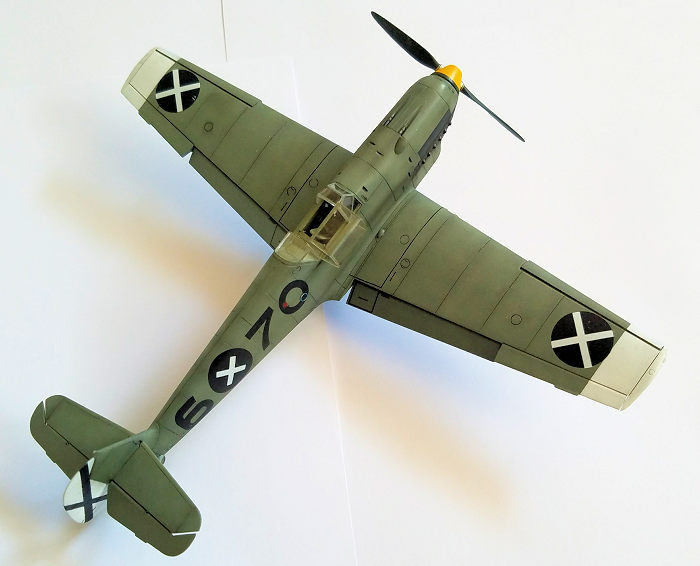
I really wanted my ‘109 in Condor Legion markings, but the only kit in stock when I ordered was the C-model, which only comes with standard Luftwaffe markings. No worries, I was able to dig through my decal collection and found a set for what looked to be a C, and set to work.
Construction, of course,
starts with the cockpit, and is usually the source of many headaches when it
comes to a short run kit. This kit turned out to be a pleasant surprise, and
test fitting showed that only minimal cleanup would be required to get the two
fuselage halves to join around the cockpit cleanly. I ended up going with RLM02
gray for the interior as I felt it would be the most likely to be accurate,
using Vallejo acr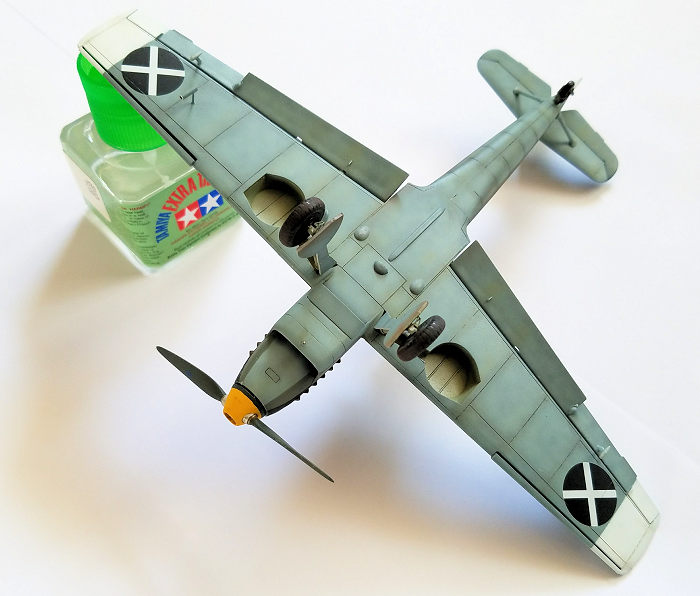 ylics and an oil wash. Once both halves were successfully
joined, I decided to leave all the parts off the engine to ensure that no fit
issues would occur. The cowling and exhaust shroud panels need minimal
block-sanding of the mating edges to square up, and the radiator faces were
painted aluminum in preparation for their installation.
ylics and an oil wash. Once both halves were successfully
joined, I decided to leave all the parts off the engine to ensure that no fit
issues would occur. The cowling and exhaust shroud panels need minimal
block-sanding of the mating edges to square up, and the radiator faces were
painted aluminum in preparation for their installation.
The wing and tail surfaces meet up with a minimum of fussing, but the flaps and ailerons are a bit of a different story. Careful sanding of the ends are required to clean up mold mis-match, and their attachment points are very delicate.
It was at this point that I started researching the markings I would use. My first choice in markings were for Adolf Galland’s bird. However, my decal sheet did not specify if his was a B or a C. A quick Google image search cleared that up, as his turned out to be a B – I had already glued on the longer exhaust stubs of the C model! I frantically started searching for other C model ‘109s and came across another photo of an airframe that was on my decal sheet. This was odd though, as comments on the photo said it was a C model, but clearly did not have the wing gun panels, but parts of the photo weren’t clear enough to tell if the exhausts were long or short. This was good enough for me, so I quickly sanded off the overhanging portion of the gun panel and tossed the scribing template to the side! It may not be 100% accurate, but it’s good enough for me.
The rest of the build went quickly and smoothly.
| COLORS & MARKINGS |
I’ve been in the process of
converting to Vallejo Model Air acrylics in order to reduce at least one form of
air pollution in the house. However, it’s not proven to prevent the air over my
workbench from turning blue, because I never get good adhesion with acrylics, no
matter how well I clean the surface or which acrylic primer I use. Since I
really didn’t want to screw this one up and I had loaded the gun up for another
project as well, I used Zero Paints automotive fill primer. This stuff reeks and
leaves a rough texture, but it’s sandable within 20 minutes of spraying. After
scrubbing 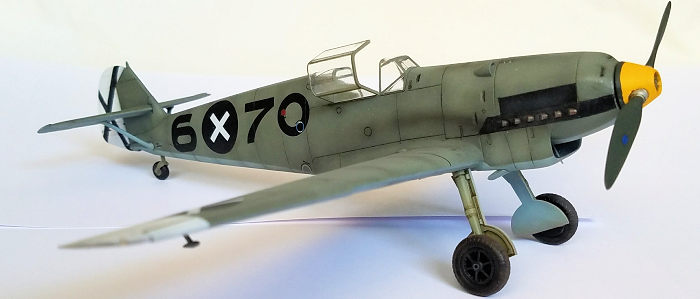 the surface smooth with a microfiber cloth, I switched over to my
Iwata Eclipse and started working my way up from darker to lighter shades of RLM
63 over RLM 65 using Vallejo Model Air, with small amounts of tire black and
insignia white. Just add a couple of drops of their Flow Improver and thinners,
and a drop or so of either tire black or white, and very lightly spray in
squiggle patterns within the panel lines, and a nice, subtle tonal difference
will slowly show up. The trick with this technique is if you can see the color
change as you spray it, you’re either too far off from the base color, you’re
spraying too thick, or both. Just hold the model up at an angle to the light and
watch for a ‘moist’ area to form where you’re spraying.
the surface smooth with a microfiber cloth, I switched over to my
Iwata Eclipse and started working my way up from darker to lighter shades of RLM
63 over RLM 65 using Vallejo Model Air, with small amounts of tire black and
insignia white. Just add a couple of drops of their Flow Improver and thinners,
and a drop or so of either tire black or white, and very lightly spray in
squiggle patterns within the panel lines, and a nice, subtle tonal difference
will slowly show up. The trick with this technique is if you can see the color
change as you spray it, you’re either too far off from the base color, you’re
spraying too thick, or both. Just hold the model up at an angle to the light and
watch for a ‘moist’ area to form where you’re spraying.
The rudder crosses were masked off and painted, and a healthy coat of Alclad II Aqua Gloss Clear applied, and we’re ready for decals.
The kit’s stencils went on without a fuss, though the HAD Models sheet tended to want to stay exactly where they were laid. Once the decals were complete, I scratchbuilt a new pitot-tube for the lower wing and laid down a coat of Vallejo matte clear, followed by a brief visit with pastels for exhaust staining and a silver colored marker for the occasional scratch.
| CONCLUSIONS |
Let’s be honest, odds are
you clicked this link as you thought, ‘oh great, yet another BF-109 review.’ The
industry must be reaching Messerschmitt saturation point if it hasn’t already,
but this kit is a gem and a gre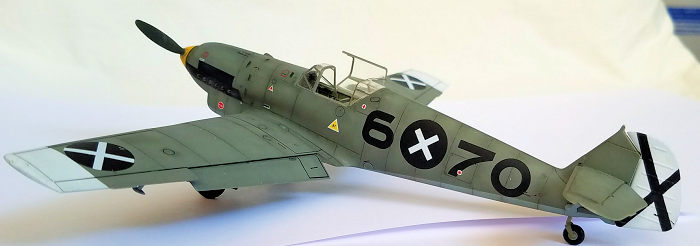 at first-step into limited run kits. There’s
plenty of research material, the end result is accurate and immediately
recognizable, and it provides just enough challenge to help develop skills
without overwhelming.
at first-step into limited run kits. There’s
plenty of research material, the end result is accurate and immediately
recognizable, and it provides just enough challenge to help develop skills
without overwhelming.
Like many modelers, I’ve fallen victim to the fallacy of ‘more details makes more better,’ as I gobbled up piles of aftermarket bits and ‘Wunderkits’ only to see them collect dust as the journey ahead seemed far too daunting. With this in mind, my New Year’s resolution this year was to finish 12 kits before December 31st by setting aside those tendencies and focusing solely on the key foundational skills – proper, careful assembly and prep work using tried and true methods and materials. This kit was exactly what I needed, and marks number 9 of my goal!
25 September 2017
Copyright ModelingMadness.com
If you would like your product reviewed fairly and fairly quickly, please contact the editor
or see other details in the
Note to
Contributors. Back to the Main Page
Back to the Review
Index Page
Back to the Previews Index Page