Hobby Boss 1/72 Bf-109G-6 (late)
| KIT: | Hobby Boss 1/72 Bf-109G-6 (late) |
| KIT #: | 80226 |
| PRICE: | $6.75 from www.rollmodels.com |
| DECALS: | Two Options |
| REVIEWER: | Peter Nolden |
| NOTES: |
| HISTORY |
The Messerschmitt Bf 109G-6 was a further development of the Gustav series. Produced in parallel with the G-5, it was essentially a non-pressurized version of the same aircraft. Sharing the same modifications throughout their production. They can look nearly identical. One quick way of telling them apart was to look for the fresh air intake scoops on either side of the windscreen on the G-6. It was soon realized that the G-5’s cockpit pressurization was of dubious value for combat operations. The G-5 was discontinued rather early and the G-6 continued on to develop further. Introduced into service in early 1943. The Bf 109G-6 in various forms, remained as a frontline service fighter through 1945.
There was a growing concern about
the ability of less experienced pilots achieving success with the lightly armed
Messerschmitt. Especially when tackling four-engine bombers. The G-5/G-6
series introduced the 13mm MG 131 heavy machine gun replacing the 7.92mm MG 17
mounted as a set in the upper forward fuselage. The single engine-mounted 20mm
MG 151 was 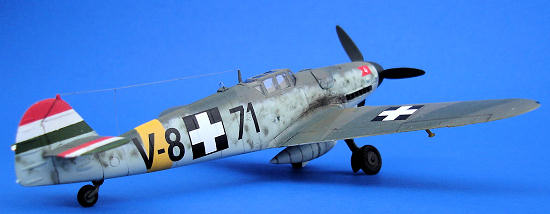 retained as on
previous models. Few G-6’s did receive the lethal 30mm MK 108 cannon in place
of the MG 151/20, as supplies permitted. This powerful weapon only required a
few hits to bring down even a heavy bomber. While the added firepower was a
welcome addition, it did not come without drawbacks. To make the MG131’s fit,
large covers over the breach blocks and cocking mechanisms were added. These
were soon to be known less affectionately as buele (bump). These ‘bumps’
were just one in a series of modifications that would further deteriorate the
Gustav’s already poor performance and handling traits even further.
retained as on
previous models. Few G-6’s did receive the lethal 30mm MK 108 cannon in place
of the MG 151/20, as supplies permitted. This powerful weapon only required a
few hits to bring down even a heavy bomber. While the added firepower was a
welcome addition, it did not come without drawbacks. To make the MG131’s fit,
large covers over the breach blocks and cocking mechanisms were added. These
were soon to be known less affectionately as buele (bump). These ‘bumps’
were just one in a series of modifications that would further deteriorate the
Gustav’s already poor performance and handling traits even further.
In an effort to meet different tactical situations, a series of Rustsatze or field conversion sets was offered. These allowed the Gustav to readily convert from role to role in the field. Often, these were added at the factory. Two of the more common Rustsatze were the R-3, 300-liter drop tank and the R-6, MG 151/20mm underwing gondolas. While all of these ‘field mods’ helped the Messerschmitt 109 in areas of firepower and increased operational radius, they had a negative effect on performance. Especially in the presence of fighter-escorts. Many were shot down before they were able to get into position to attack the bomber formations, which were now ranging over all parts of Germany and Europe.
The famous 101 ‘Puma’ Fighter Group
of the Royal Hungarian Air Force was reformed on May 1, 1944. This was brought
about by a reorganization of all Home defense fighter groups under one command.
Led by the 40-year-old Major Aladar Heppes, nicknamed the ‘old Puma’. With four
kills to his credit from 1943, he was still a very capable combat pilot despite
his age. The 101 FG mission was the air defense of Hungary. It had three
fighter squadrons of 12 Bf 109Gs. The 101/1 FS codename ‘Zongara’ (Piano),
101/2 FS codename ‘Retek’ (Radish) and 101/3 FS ‘Drotkefe’ (Wire Brush). Along
with the four aircraft of the Group Staffs,
 the 101FG had an overall
strength of 40 aircraft at any one time. This was more than twice what was
available for air defense just a year ago, but would be no match for what was
about to be encountered in the skies over Hungary. Massive bomber formations
numbering in the hundreds with fighter-escort.
the 101FG had an overall
strength of 40 aircraft at any one time. This was more than twice what was
available for air defense just a year ago, but would be no match for what was
about to be encountered in the skies over Hungary. Massive bomber formations
numbering in the hundreds with fighter-escort.
Their first mission occurred on May 24th, 1944. The 101/FS, led by Captain Stolz took off to intercept a large formation of B-24 Liberators flying west of the Danube on their way to oil refineries near Vienna. During the ensuing battle, three B-24s, one B-17 and a single P-51 were shot down for a loss of two Bf 109s and one pilot killed. As increasingly, more bomber formations ranged over Hungary, the ‘Puma’s’ rose to meet them and inflict casualties. All the while taking heavy losses themselves. Despite valiant efforts, the ‘Pumas’ like their German counterparts, were unable to deter the almost daily incursions into their country. All targets of strategic importance to the Allies was bombed at will, including the Bf 109 production facilities at Gyor. They were nearly wiped out by mid June if it were not for a lull in the fighting that allowed them to recoup their losses. From May until August of 1944, the 101 FG claimed 104 American aircraft shot down, for the loss of 18 pilots killed in combat. After which, they were pulled out of action until October to rest and re-equip. By November 7th, they ceased operations against the American formations, having to concentrate on countering the Soviets which had by now reached their borders.
| THE KIT |
Hobby Boss of China has come upon the market with a line up of easy to assemble 1/72nd-scale aircraft models of popular WWII aircraft and a few from the post-war era. These little kits can be assembled out of box in less than a day. Judging from the absence of the smaller detail bits found on regular models, these are most likely aimed at the youth oriented crowd. It was the low price and interesting decal options that got me to order up a few. I have recently returned to active modeling you see. So, I figured I could try some different techniques and experiments on these with little loss if things go wrong. I will use these as confidence builders before tackling my more expensive Hasegawa and Fine Molds kits.
The kit comes in a lift off box
top with a full color image of the painted kit in flight on the top. A model
brief telling kit dimensions,  number
of parts and decal options in the lower left-hand corner. It says total parts
as 29. I counted 35 if you include all the extra wheels and tail wheels. A
nice addition for my spares box. The instructions call out to use only 27
parts. Go figure? The rest of the box shows four additional photos of the
aircraft in flight and on the ground. They do a good job showing what you are
getting yourself into. The 35 parts (29 if you work at Hobby Boss) are divided
into five separate sprues and neatly secured in the black plastic tray.
number
of parts and decal options in the lower left-hand corner. It says total parts
as 29. I counted 35 if you include all the extra wheels and tail wheels. A
nice addition for my spares box. The instructions call out to use only 27
parts. Go figure? The rest of the box shows four additional photos of the
aircraft in flight and on the ground. They do a good job showing what you are
getting yourself into. The 35 parts (29 if you work at Hobby Boss) are divided
into five separate sprues and neatly secured in the black plastic tray.
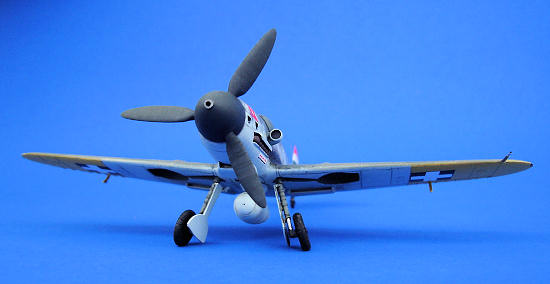
It is molded in light gray plastic that is very durable and easy to work with. Panel lines are nicely engraved. Some are missing, some are extra. Check your references closely. Some of the details on the control surfaces are overdone as well as the wingtip lights. I lightly sanded them down in an effort to de-emphasize them. These sprues seem to be shared by different models of the 109 that Hobby Boss offers, so you have a mix of various types. The clear plastic for the canopy is exceptionally clear and offers the option of a 3-piece open canopy or single closed version. There is a one-piece fuselage that includes the cockpit and single-piece wing section.
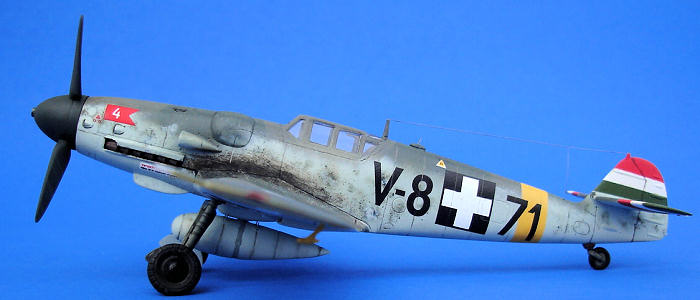
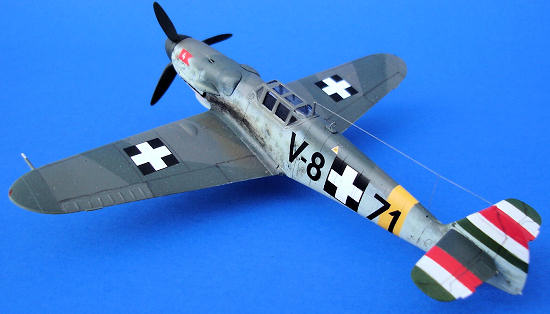
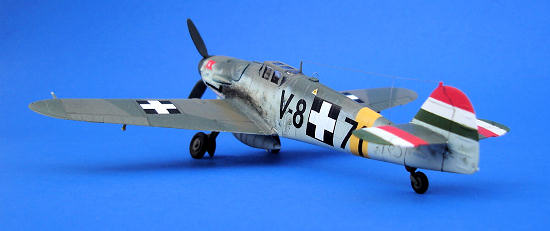
The rest are the smaller pieces that will be attached to these. The instruction manual has another picture of the box photo on the front page and folds open for the assembly instructions. They are simple and rather easy to follow. The painting and marking guide is on the last page. Gunze Sangyo paints are referenced. There are two options for markings. The first is White –7 of IV/JG51 based in Yugoslavia, 1943 and Black V-8 + 71 of the Royal Hungarian Air Force 1944. Both aircraft have a 74/75/76 paint scheme. The decals look clear and in register. There is no lower horizontal stabilizer decal for the Hungarian national colors or swastikas provided. That is not the only trouble with the decals but we will talk about that later.
| CONSTRUCTION |
An accurate G-6 cannot be built from this straight from the box. The parts have many details that pertain to other versions of the Bf 109. A common occurrence with sprues that are shared by multiple kits offered by the company. A good reference source will easily allow anyone to sort out the details and build this into a reasonable representation. Since this is such an easy build, I will lightly touch on construction and concentrate on what I added or fixed to make it more G-6 like. For a more detailed description of my modeling process, please refer to my review on the Hobby Boss Bf109E-3.
The construction of the model
itself posed no significant problems. The cockpit consists of a simple seat, a
control column that has no detail, and blank space for the instrument panel.
All molded into the one piece fuselage. The interior was painted Tamiyas
 German Grey to simulate the
RLM 66 color. A light weathering with shades of gray, earth and metallic gray
helped liven up the sparse cockpit. I added seatbelts made of paper and painted
Buff and Metallic Grey. I removed the top portion of the control column to add
a thinner handgrip with trigger switch made from stretched sprue. The
instruments were hand painted and given a drop of Future. The fuselage and wing
section fit it is very tight with only a bit of space where the wing section
meets the rear of the lower engine cover. Much better than the E-3 I had
previously built. I left that gap as is and filled in the seams that ran along
the lower fuselage and upper wing root. A little Squadron green putty and some
Tamiya surfacer was all that was needed.
German Grey to simulate the
RLM 66 color. A light weathering with shades of gray, earth and metallic gray
helped liven up the sparse cockpit. I added seatbelts made of paper and painted
Buff and Metallic Grey. I removed the top portion of the control column to add
a thinner handgrip with trigger switch made from stretched sprue. The
instruments were hand painted and given a drop of Future. The fuselage and wing
section fit it is very tight with only a bit of space where the wing section
meets the rear of the lower engine cover. Much better than the E-3 I had
previously built. I left that gap as is and filled in the seams that ran along
the lower fuselage and upper wing root. A little Squadron green putty and some
Tamiya surfacer was all that was needed.
Now it is time to go over the things I did to make it slightly more realistic. Starting from the front, the lower engine bulges are removed and sanded smooth. This was not a feature seen on G-6’s but later G-10’s and K’s. The exit ramp on the lower oil-cooler was missing, so I scribed it in and added a splitter-vein to the intake made from sheet styrene. The fuselage mounted gun troughs are very simple with no guns. I carved out the outlets to look more like the stamped opening found on later 109’s. Simple gun barrels made from stretched sprue are added. To the rear of the left gun trough, there is a little bump I made from a cross-section of thick stretched sprue. A little sanding and some Tamiya surfacer helped to round it off.
The panel lines around the gun troughs were re-scribed to better represent what the G-6’s were. On the right side Beule, there is a generator cooling scoop and a bulge for the larger oil pump as found on the tropical versions and later in production that I removed. The aircraft that I was modeling did not have this feature. Trim tabs made from sheet styrene were added to the ailerons and horizontal stabilizers. My model was not going to have the under-wing cannons mounted. I filled the mounting slots with sheet styrene and putty and sanded it smooth. The lower wing radiator intake ramps are missing. These were added using sheet styrene. The bulky kit DF loop antenna was replaced with one made of stretched sprue coiled around the tip of a pencil. More stretched sprue was used to make a taillight on the rudder and sway braces on the drop tank. A scratch-built Revi gunsight was attached to the front of the cockpit along with a rear armour plate scrounged from a failed Hobbycraft Bf109G-12. Aileron mass balances from the same kit were added toward the end of the build along with the radio antenna wire and DF loop antenna mentioned earlier.
| COLORS & MARKINGS |
I
wanted this model to represent an aircraft of the Hungarian Air Force. One of
the decal options provided with the kit are for an aircraft from the 101/3 FS
(Wire Brush). It features a basic 74/75/76 scheme with attractive national
colors on the tail surfaces and yellow recognition markings on the lower
wingtips and rear fuselage band. For starters, I sprayed the areas that were to
have the yellow markings and national colors with Tamiyas Flat White. Using
Gunze Sangyo’s Cream Yellow for the recognition markings, I
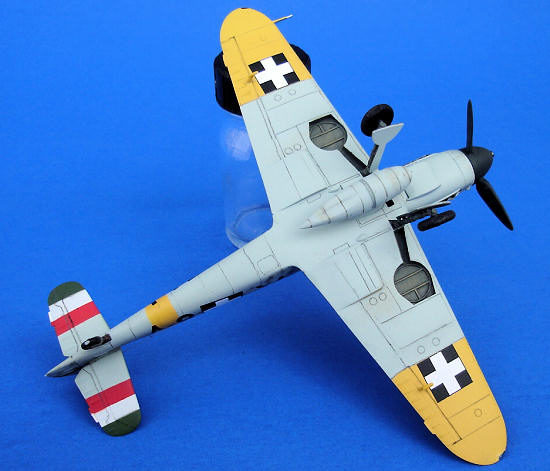 painted the lower wingtips
and the area around the rear fuselage. These areas were carefully masked off.
Next, I started on the national colors. Using the kit supplied decals and
photographs as a reference I taped the areas to be painted. I used Tamiyas flat
red and flat green mixed with a few drops of white to brighten them up a bit.
Just before starting on the first color, red. I noticed something was not
right. The kit decals for the horizontal tail surfaces had the red and green
reversed. I almost missed this for not a nagging feeling that just was not
coming across in my head. A quick adjustment of the masking tape and I was back
on track. This whole process painting one color, letting it dry and painting
the next added several more days of painting. The results were worth the
effort.
painted the lower wingtips
and the area around the rear fuselage. These areas were carefully masked off.
Next, I started on the national colors. Using the kit supplied decals and
photographs as a reference I taped the areas to be painted. I used Tamiyas flat
red and flat green mixed with a few drops of white to brighten them up a bit.
Just before starting on the first color, red. I noticed something was not
right. The kit decals for the horizontal tail surfaces had the red and green
reversed. I almost missed this for not a nagging feeling that just was not
coming across in my head. A quick adjustment of the masking tape and I was back
on track. This whole process painting one color, letting it dry and painting
the next added several more days of painting. The results were worth the
effort.
Painting the 74/75/76 paint scheme gave me an opportunity to try Aerohobby brand of acrylic paints. I had good luck in applying the 76 Light Blue. I had some trouble with paint lifting off when removing the masking tape for the other two. This required numerous touch ups. Things got much worse when I tried doing the mottling on the side of the aircraft. I just could not get the paint to flow properly and ended up with a lot of runs and splattering. This was a cause of much frustration and many bad words to emanate from the laundry/paint room. It took many attempts and touch ups to get it closer to the way I would have liked it to look. With all that said and done I still like the colors. I need to learn how to get them to work better. Last, I painted the prop and spinner Tamiya Black Green. Setting the model aside for a few days to dry. I gave it a coat of Future to get it ready for decals and let that dry for a day.
Despite Hobby Boss’s reputation with me as having wacky decal accuracy issues, the Hungarian decals for the most part are quite useable with the exception of the reversed national colors. They are durable and went on with no problems. Solvaset was used to help them snuggle down. The painting and marking guide shows the oil filler, oil cooler warning label, 87-octane fuel label, and the first aid location mark on both sides of the fuselage. They should only be on the left side. Letting the decals dry for a day or two, I gave the model another coat of Future to seal them in. I attached all the small bits that should be left off until the very end. The aircraft was given a light weathering and a heavier than usual amount of exhaust stains. I went light on the weathering to represent a newer aircraft. The attrition rate was fairly high at this time and the aircraft probably did not remain in service for long. The heavy exhaust stains were the result of constant high altitude interceptions. The very last job was to add the tiny hole for the inertia hand-starter. I forgot this earlier. It is located on the right side of the engine cowling just in front of the right buele. I have to say that I was little surprised when I looked around my desk and could not find anything else to attach to this little Messerschmitt. No more details that needed painting or touching up… The kit was finished.
| CONCLUSIONS |
 Despite the painting
difficulties, which can happen with me from time to time. It was a good build.
It just went by fast. By working on it a little bit each evening, I had it
completed in several weeks time. Average build time for me can be measured in
months. It builds into a reasonably good-looking Bf 109G-6. Something on par
with Hasegawa’s early Gustav. It looks very close to some 1/72nd
scale drawings I laid the parts against. The spinner does seem a little longer
and more pointed than it should. The fuselage looks a little thin too. Serious
modelers may have issues with this kit. I don’t really have a problem with it.
I think younger and less experienced modelers would enjoy building one of these
for it’s ease of assembly and reduced number of parts. I would recommend these
to modelers of all ages who like to try something a bit different from the
traditional models.
Despite the painting
difficulties, which can happen with me from time to time. It was a good build.
It just went by fast. By working on it a little bit each evening, I had it
completed in several weeks time. Average build time for me can be measured in
months. It builds into a reasonably good-looking Bf 109G-6. Something on par
with Hasegawa’s early Gustav. It looks very close to some 1/72nd
scale drawings I laid the parts against. The spinner does seem a little longer
and more pointed than it should. The fuselage looks a little thin too. Serious
modelers may have issues with this kit. I don’t really have a problem with it.
I think younger and less experienced modelers would enjoy building one of these
for it’s ease of assembly and reduced number of parts. I would recommend these
to modelers of all ages who like to try something a bit different from the
traditional models.
| REFERENCES |
Aero Detail 5 Messerschmitt Bf109G
Hungarian Aces of World War 2 by Gyorgy Punka
Hungarian Air Force by George Punka
The Official Monogram Painting Guide to German Aircraft 1935-1945 by Kenneth A. Merrick & Thomas H. Hitchcock
April 2008
If you would like your product reviewed fairly and quickly, please contact me or see other details in the Note to Contributors.