| KIT #: | 4702 |
| PRICE: | 88$ |
| DECALS: | Three options |
| REVIEWER: | Francisco Santoro |
| NOTES: | Reboxed Hasegawa kit. |
| HISTORY |
From the Hasegawa 1:48 Bf 109K-4 instructions:
"The Allied bombing campaign over the Third Reich intensified from Spring 1943.
In response to Luftwaffe demands for a fighter with perf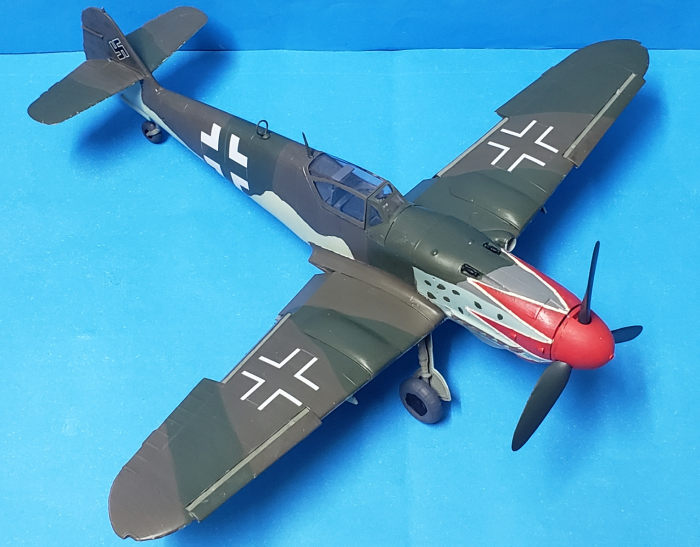 ormance
specs to counter the Allied high altitutde bombing threat, Messerschmitt
developed the Bf 109K, based on the Bf 109G model, as a fighter with excellent
high altitude capabilities. The K-4 model, which was the first production model
in the K series, was a fundamentally improvement on the Bf 109G-10 model. The
powerplant was either a DB 605DM or DB, and the propeller was the wide-bladed
VDM 9-1259 type. Armament consisted of one MK 108 30mm cannon firing through the
propeller hub, and two MG131 13mm machineguns mounted in the cowling. Changes in
the external appearance of the model, including fully enclosed landing gear
wells and retractable tailwheel, were the result of attempts to improve the
aerodynamic characteristics of the aircraft. Another change which brought about
dramatic improvement in aerodynamic performance was to replace the Bf 109G-10's
DB 605AS oil cooling intake with the Fo987 type. This change alone resulted in a
20km/h increase in top speed (from 690km/h to 710km/h at 7500m) using the same
powerplant. Although, in a sense, a development of the G-10, the K-4 actually
went into production ahead of its design predecessor in Spring 1944, and was
first put into service with 3/JG 27 in October of that year, eventually being
issued to nine fighter squadrons by war's end."
ormance
specs to counter the Allied high altitutde bombing threat, Messerschmitt
developed the Bf 109K, based on the Bf 109G model, as a fighter with excellent
high altitude capabilities. The K-4 model, which was the first production model
in the K series, was a fundamentally improvement on the Bf 109G-10 model. The
powerplant was either a DB 605DM or DB, and the propeller was the wide-bladed
VDM 9-1259 type. Armament consisted of one MK 108 30mm cannon firing through the
propeller hub, and two MG131 13mm machineguns mounted in the cowling. Changes in
the external appearance of the model, including fully enclosed landing gear
wells and retractable tailwheel, were the result of attempts to improve the
aerodynamic characteristics of the aircraft. Another change which brought about
dramatic improvement in aerodynamic performance was to replace the Bf 109G-10's
DB 605AS oil cooling intake with the Fo987 type. This change alone resulted in a
20km/h increase in top speed (from 690km/h to 710km/h at 7500m) using the same
powerplant. Although, in a sense, a development of the G-10, the K-4 actually
went into production ahead of its design predecessor in Spring 1944, and was
first put into service with 3/JG 27 in October of that year, eventually being
issued to nine fighter squadrons by war's end."
| THE KIT |
 Revell has a
thing for reboxing kits, some are from the 60s, and some are from the 2000s,
this kit is the latter. The base kit is the excellent Hasegawa Bf 109K-4 in
1:32. There're a total of six sprues, five in hard, light grey plastic, and a
clear sprue.
Revell has a
thing for reboxing kits, some are from the 60s, and some are from the 2000s,
this kit is the latter. The base kit is the excellent Hasegawa Bf 109K-4 in
1:32. There're a total of six sprues, five in hard, light grey plastic, and a
clear sprue.
Instructions are of the old Revell style booklet in black and white with 42 construction steps. Painting labels are given for Revell's own paint range, but the painting instructions are labelled with RLM numbers, so the modeller should find it easy to use other paints.
There're a total of three painting schemes, Red 7 from 12/JG27 painted in RLM 81/82/83/76, Adolf Borcher's Bf 109K-4 from the Stab of III/JG52 painted in RLM 75/82/76, and Black 15, from III/JG53, painted in RLM 75/83/76. Decals are of the typical Revell style, very well printed but a bit thick. They're also 14 years old (the kit was reboxed in 2007), but they worked very well further down the line.
| CONSTRUCTION |
I find myself doing more and more the smaller, more time consuming, steps before building the kit proper. This time I began with the propeller, whose nose cone was painted red and the propeller blades painted with Revell 40 Black Green (RLM 70). Once that was done, I went to work on the cockpit.
Hasegawa/Revell provides a basic but good
cockpit from the box. I painted all the parts in RLM 66 (Revell 78 Tank Grey)
with red and black details. To paint the finer areas of the cockpit, I bought a
very fine paintbrush. The trim wheel and rudder pedals were painted silver.
After everything was
 painted, I
glued all the parts together and set them aside to dry. Hasegawa tells you to
remove a tab on the right side of the cockpit sidewall to add the right cockpit
wall, but you won't be able to glue it to that side because there're raised
details, so I glued the sidewall to the cockpit floor.
painted, I
glued all the parts together and set them aside to dry. Hasegawa tells you to
remove a tab on the right side of the cockpit sidewall to add the right cockpit
wall, but you won't be able to glue it to that side because there're raised
details, so I glued the sidewall to the cockpit floor.
While the cockpit was drying, I painted the forward fuselage halves. I say forward because Hasegawa divided the rear part of the fuselage, so they could provide the correct several variants of the aircraft without changing many parts on the kit. Once the paint had dried, I glued the fuselage parts together, and then glued the cockpit from below alongside with the instrument panel. I then glued the wingspar to the centre section of the aircraft, which was subsequently glued in place. After that was done, I glued the oil cooler to the nose of the aircraft.
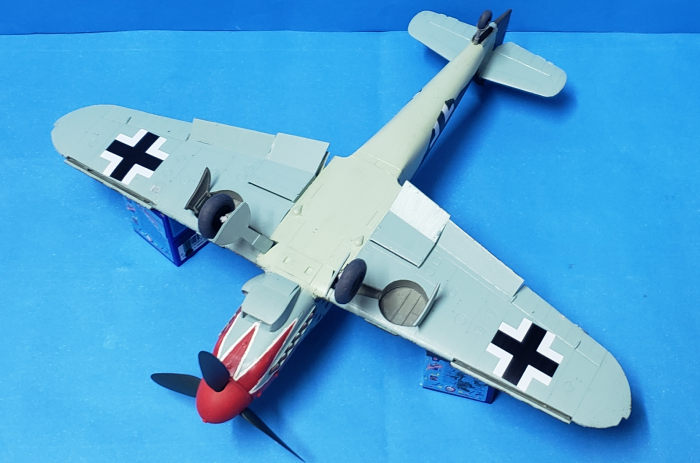
Wings were next. I first opened the holes for the wide wheel bulges so charateristic in late war 109Gs. These were glued and left some minutes to set. While that happened, I painted the radiator faces in black and glued them to the lower wings. The wheel wells were painted with Revell 45 (RLM 02). I also glued at this stage the flaps into place. Once the flaps were dry I glued the upper wing halves to the wingspar, and then did the same with the lower wings. The slats were also glued at this stage. I also glued the horizontal stabilizers (which interlock, giving you a perfect 90° angle). Once the wings were dry I glued into place the cowling and the exhausts.
| COLORS & MARKINGS |
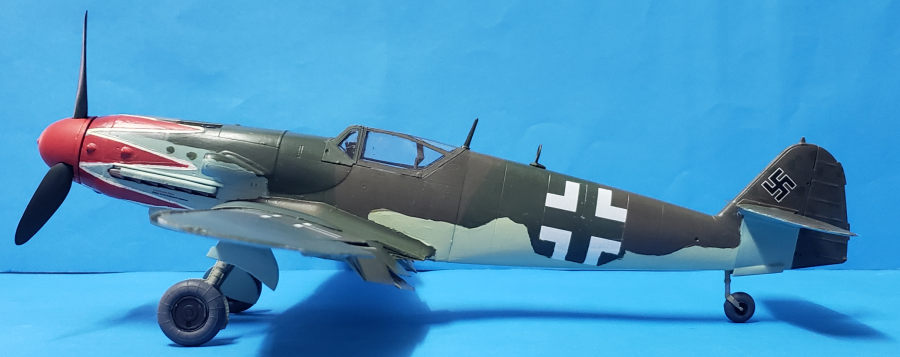
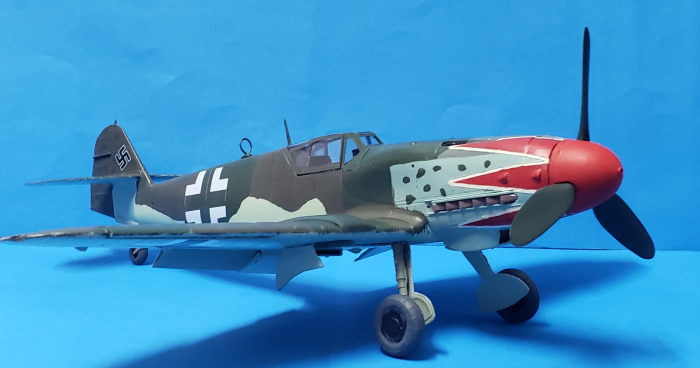
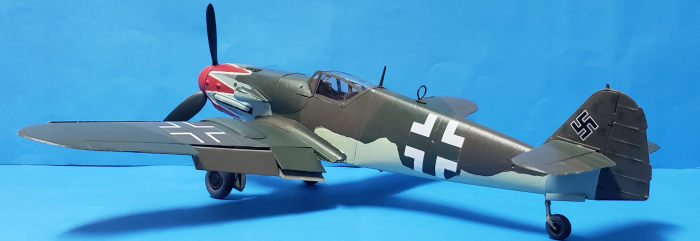
I decided I didn't want to paint the aircraft
as one of the box options, so I began lurking the internet for images of the Bf
109K-4. I stumbled upon a photo of a Bf 109K-4 with red tulips (ala Erich
Hartmann) and red nosecone. I also found the same aircraft from a profile for an
AIMS decal sheet, which showed the aircraft painted in RLM 81/82 fuselage, with
RLM 76 wings and RLM 84 fuselage. Armed with these information, I went and
painted the model. I first painted the nose in white, and then masked the white
areas wth thin strips of masking tape to form the areas for the red tulips. Once
that was done, I masked the tulips and painted the nose with Revell 47 Mouse
Grey (RLM 75) and 65 Bronze Green (RLM 82) that was done, I unmasked the nose,
and used a fine
 brush to
correct several areas where the colour had bled. I then painted first the RLM 82
on the fuselage and horizontal stablizers, and then the RLM 81 (Revell 46 NATO
Brown). I then painted the lower fuselage with the elusive RLM 84 (Revell 59
Duck Egg Blue). Once that was done, I painted the wings in RLM 81/82, and the
lower sides of the wings and the horizontal stabilizers were painted with Revell
49 Light Blue (RLM 76). The model was then glossed up with Revell's 01 Gloss
Varnish.
brush to
correct several areas where the colour had bled. I then painted first the RLM 82
on the fuselage and horizontal stablizers, and then the RLM 81 (Revell 46 NATO
Brown). I then painted the lower fuselage with the elusive RLM 84 (Revell 59
Duck Egg Blue). Once that was done, I painted the wings in RLM 81/82, and the
lower sides of the wings and the horizontal stabilizers were painted with Revell
49 Light Blue (RLM 76). The model was then glossed up with Revell's 01 Gloss
Varnish.
Since the decals were 14 years old, I was a bit afraid of using them. I tried first dipping in hot water one of the warning labels for the cowling. It didn't break, but it did take some time to move from the backing paper. I added the crosses to their correct position (and this time I made sure to place the fuselage crosses in their proper places). The kit doesn't come with swastikas, so I used the ones from a Tamiya 1:48 Me 262A-1a. Once the decals were added, I brushed some Microsol over them to make them sink into the panel lines. After letting the decals dry for some hours, I coated the entire model with Revell's 02 Matt Varnish.
The final stage was dedicated to painting and gluing the landing gear doors, wheels and clear parts to their respective areas of the plane.
| CONCLUSIONS |
I really enjoyed building this kit. Simple but with enough detail to please the average modeller. The fit was very good and no filler was needed.
8 July 2022
Copyright ModelingMadness.com. All rights reserved.
No reproduction in part or in whole without express permission. If you would like your product reviewed fairly and
fairly quickly, please
contact
the editor or see other details in the
Note to
Contributors.