Revell 1/32 Bf-109G-10 Erla
| KIT #: | 4888 |
| PRICE: | $109.00 |
| DECALS: | Two options |
| REVIEWER: | Francisco Santoro |
| NOTES: | Fragile tailwheel strut. Lessons learnt on the G-6 Late/Early were applied here. |
| HISTORY |
From the instructions: "The Bf 109G-10 was introduced from mid-1944 as a transition program from the G to the K series. As the Bf 109K was not yet ready for production, the airframe of the G-6 was modified to take the DB605D in order to ensure continuous mass production during the "Fighter Emergency Program." The leading role was undertaken by the Erla Works Ltd in Leipzig, which delivered this version from September 1944 onwards. All previuos modifications to the G series were to be combined into the G-10 and in-flight performance subsequently improved.
The new DB605D with larger turbocharger and the MG131 machineguns were
encased for the first time in an enlarged coaming without protrusions. Larger
oil and water radiators were included in the installation. The antenna mast was
excluded on most aircraft. Except for minor modifications the control surfaces
and 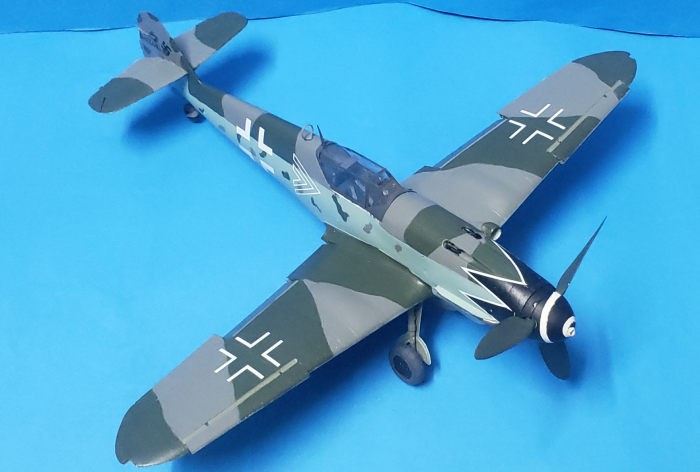 elevator
remained unchanged. To meet the increased maximum takeoff weight the aircraft
received wider wheels and for the first time elongated coamings on the upper
wing. The long tail wheel was retractable.
elevator
remained unchanged. To meet the increased maximum takeoff weight the aircraft
received wider wheels and for the first time elongated coamings on the upper
wing. The long tail wheel was retractable.
An MW50 container was installed behind the pilot's seat. Methano-water injection could be used for up to 10 minutes to the maximum pressure altitude (6800m/22300ft). When injected into the compressor the mixture gave a higher boost pressure. Fuel designated C3 with 96 octane had to be used. The MW50's 118 litre tank could also be used as an additional fuel tank. The GM1 system was activated to increase power above 8000m (26250ft) altitude.
The G-10 was fitted with a larger tail fin made of wood. The aircraft were equipped to carry an additional 300 litre drop tank and to drop bombs.
The Bf 109G-10 from the Erla Works differed in some details to aircraft off the production lines in Regensburg, Wiener Neustadt and the Diana factory Tisnov in Bohemia. These details were mainly the engine cowling, the transition to the hull side walls on the area of the cockpit and the shape of the oil cooler. All aircraft were equipped with the MG151/20 20mm motor-cannon. In the smaller nimbers of Bf 109G-10/U4 produced at the Wiener Neustadt and the Diana factories, the 30mm MK108 motor cannon and the short tail wheel were installed. Additionally, the Bf 109G-10/R6 with two MG151/20 in pods under the wings was still produced. The G-10 was the fastest version of the Gustav.
Up to April 1945 around 2000 Bf 109G-10s of all versions were delivered to fighter units of the Luftwaffe."
| THE KIT |
 Typical
of Revell, the kit comes in their famous side opening box with a very good
illustration of Erich Hartmann's last 109 fighting agains Il-2 Sturmoviks.
Typical
of Revell, the kit comes in their famous side opening box with a very good
illustration of Erich Hartmann's last 109 fighting agains Il-2 Sturmoviks.
Inside the box there're a total of 14 sprues in four separate plastic bags. Each bag is tightly packed, something that avoids pieces from breaking free of the sprue. A grand total of 12 sprues are in light grey plastic, and two sprues are clear.
The single decal sheet contains two marking options, both Erla machines. One is for Erich Hartmann's last 109, and the other one is for a Bf 109G-10 from JG300 found at Prague-Kbely airfield at the end of the war. For Hartmann's machine, tulips are included (divided in four parts), and for the JG300 version, Revell included the RVD band.
Instructions are of the old Revell style of black and white pictograms. The manual has a total of 77 construction steps.
| CONSTRUCTION |
I had already built the Bf 109G-6 Early/Late version from Revell earlier this year, so I knew more or less how to assemble and paint the model. All the cockpit parts were painted with Revell 78 Tank Grey (RLM 66). Smaller details of the cockpit, such as the fuel lines and Oxygen indicator were painted yellow and blue respectively. The rudder pedals and trim wheel were painted in Revell 91 Steel. The instrument panel was painted in RLM 66 with black dials, and when dry, it was given a drybrush with 91 Steel. The control stick was painted in RLM 66 with a black grip and brown base. The seat comes with molded on seatbelts, so those were picked in light grey with metallic handles. It was at this time that I glued the incorrect MK108 cannon instead of the MG151 cannon. Should have trusted the instructions (realised this while writing the review).
While I was working with the cockpit parts, I decided to paint and build the parts that take more time to assemble in the last stages of construction, the propeller and the landing gear. The propeller parts were painted white, masked, and then painted black. After taking off the tape, I was left with a nicely done (for myself) rendition of the spiral. The propeller blades were painted in RLM 70 (Revell Black Green 40), and glued into the propeller hub. Landing gear struts were painted in Revell 45 (RLM 02). Wheels were then painted with black hubs and RLM 66 tyres. Now that those parts were built up, I went back to the main assembly.
 The
cockpit was glued together and left to dry. While that was drying, I painted the
wingspar and wheelwells in RLM 02. I also separated the fuselage halves and
installed the tailwheel shaft. After that, I glued the wingspar to the lower
part of the cockpit, and glued it to the fuselage half. Before closing the
fuselage, you must add the exhausts and the nose radiator, they won't fit
otherwise if you try to attach them after gluing the fuselage halves. With the
exhausts and radiator in place, I cemented both fuselage halves. I also glued
the machineguns to the cowling, and cemented the cowling to the upper side of
the fuselage.
The
cockpit was glued together and left to dry. While that was drying, I painted the
wingspar and wheelwells in RLM 02. I also separated the fuselage halves and
installed the tailwheel shaft. After that, I glued the wingspar to the lower
part of the cockpit, and glued it to the fuselage half. Before closing the
fuselage, you must add the exhausts and the nose radiator, they won't fit
otherwise if you try to attach them after gluing the fuselage halves. With the
exhausts and radiator in place, I cemented both fuselage halves. I also glued
the machineguns to the cowling, and cemented the cowling to the upper side of
the fuselage.
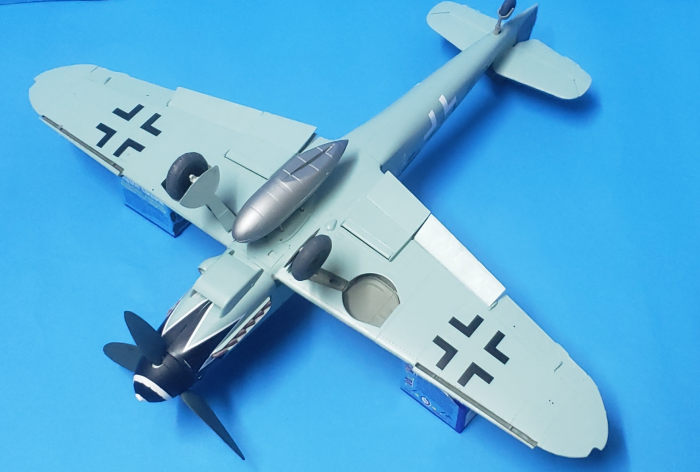
After completing the construction of the fuselage, you start building up the wings. These are a six part journey: The inner halves, lower halves, and upper halves. I began the construction of the wings as per the instructions. I glued the radiator faces to the recessed panels on the inner portions of the wings. I then glued them to the wingspar. After that, I built up the wheel wells. This step is a bit fiddly, by I followed the instructions and everything lined up properly. I then glued the lower halves of the wings to the inner wing halves, and left them to dry. At this point, I also glued the shell ejection chutes and the fuel tank rack holder. Revell doesn't mention (something done in their G-6) that you have to open the holes for the fuel tank rack. Said holes are on the lower side of either piece 185 or 99. Once the lower wing halves were dry, I glued the upper wing halves.
While the wings were drying, I built the empennage. Revell engineered this kit to have movable features (flaps, ailerons, rudder and horizontal stabilizers), something I didn't like, so all of them were glued either in the lowered position (flaps) or in the neutral position (stabilizers, airlerons and rudder). Slats were also glued at this time in the extended position.
| COLORS & MARKINGS |
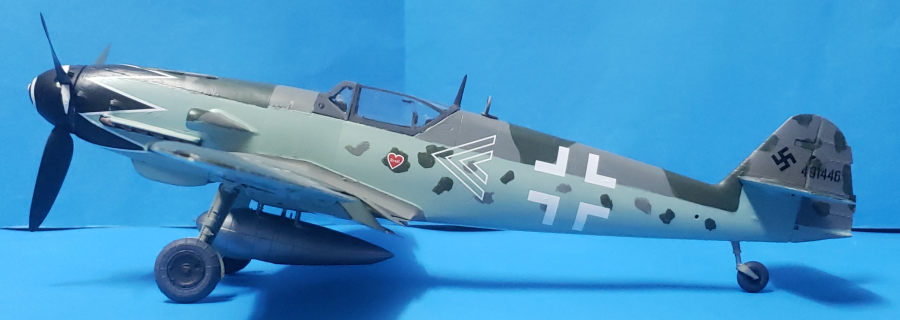
Erich Hartmann's G-10 was the chosen option before I even bought the kit.
The scheme given was of an aircraft painted in RLM 75/82/76. I first
painted the RLM 75 (Revell Mouse Grey 47) on the spine of the plane, and then
painted the RLM 82 patches (Revell 65 Bronze Green). The demarcation line
between the upper and lower fuselage colours was hard edged, but I didn't want
to use tape, I freehanded the RLM 76 (Revell 49 Light Blue) and corrected the
sections where I went a bit overboard with the light blue. The wings were then
entirely painted in RLM 75, and then I painted the RLM
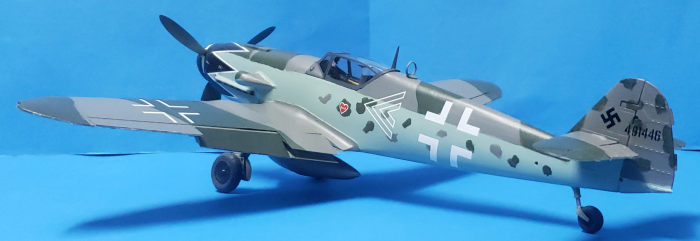 82. The
aircraft only had light mottling on the rudder and fuselage sides, so these were
painted with a mix of RLM 75/82. I then gave the model a clear gloss coat to
prepare it for the decals.
82. The
aircraft only had light mottling on the rudder and fuselage sides, so these were
painted with a mix of RLM 75/82. I then gave the model a clear gloss coat to
prepare it for the decals.
Decalling began with the application of the tulips. I knew that, if something went wrong with them, I could strip the paint and do the JG300 one. Luckily, the tulips behaved, but didn´t conform by themselves to the nose, so I applied Microsol, and waited for it to go off before continuing with the decalling. Since the kit came from Germany (no Swastikas rule), I scrounged two (which aren't the correct ones, in colour and scale). I then gave the model a flat coat and left it to dry.
I glued in place the landing gear struts, wheels and canopy. I also added the gunsight at this point. One of my main criticisms to this kit is the tailwheel assembly, which is very fragile. This time, it broke after I handled the aircraft a bit too much, but I reglued it with a mix of Revell Contacta and CA. The fuel tank was painted in Steel 91 from Revell and glued to its rack.
| CONCLUSIONS |
Revell's 1:32 Bf 109G-10 is a great competitor to the Hasegawa 109G, released in 2001. It has plenty more detail, but at the same time is fiddlier to build. The main advantage of this kit compared to the Hasegawa one is the price (at least in First World Countries). If you wish for a quick build, get the Hasegawa kit, but if you wish for a detailed (and cheaper) build, get the Revell kit.
15 February 2022
Copyright ModelingMadness.com. All rights reserved. No reproduction in
part or in whole without express permission.
If you would like your product reviewed fairly and fairly quickly, please contact the editor or see other details in the
Note to
Contributors.