
Revell 1/32 Bf-109G-6 Early/Late
| KIT #: | 4665 |
| PRICE: | $68.00 |
| DECALS: | Two options |
| REVIEWER: | Francisco Santoro |
| NOTES: | Fit issues described in the review were of my own making. |
| HISTORY |
 From the LET
LET book about the Bf 109G: "The Bf 109G "Gustav" was the most important variant
of the Bf 109. It was also built in the largest numbers, in particular during
the last years of the war. The Gustav was fitted with the new Daimler Benz DB605
engine, giving 1475hp.
From the LET
LET book about the Bf 109G: "The Bf 109G "Gustav" was the most important variant
of the Bf 109. It was also built in the largest numbers, in particular during
the last years of the war. The Gustav was fitted with the new Daimler Benz DB605
engine, giving 1475hp.
Externally the (early) Gustav was similar to the preceding "F" model. The most visible differences were the lack of the small triangular cockpit window and the addition of small air openings on each side of the nose.
The Bf 109G-6 was the most important Gustav version, and was built in the largest numbers. It could be fitted with a DB 605AM/AS or ASM engine. It was armed with two MG 131 machineguns in the nose and one MG 151/20 cannon firing through the propeller hub (this part wasn´t in the LET LET book). The Bf 109G-6/U4 was armed with a single MK 108 30mm cannon firing through the propeller hub, and had two MG 151/20 cannons fitted under the wings as the Bf 109G-6/R6.
This combination was regarded as the most suitable for daylight bomber interception, although it lacked the performances to meet Allied fighter escorts on even terms.
Like the Bf 109G-5, the G-6 could be fitted with WGr 21 mortar launchers under the wings."
| THE KIT |
 The kit
comes in the old Revell style of box, the side opening one. Inside, one is
greeted by 15 sprues nicely molded in light grey plastic. There was a bit of
flash on some of the parts, but nothing a sharp of a hobby knife can't solve.
The kit
comes in the old Revell style of box, the side opening one. Inside, one is
greeted by 15 sprues nicely molded in light grey plastic. There was a bit of
flash on some of the parts, but nothing a sharp of a hobby knife can't solve.
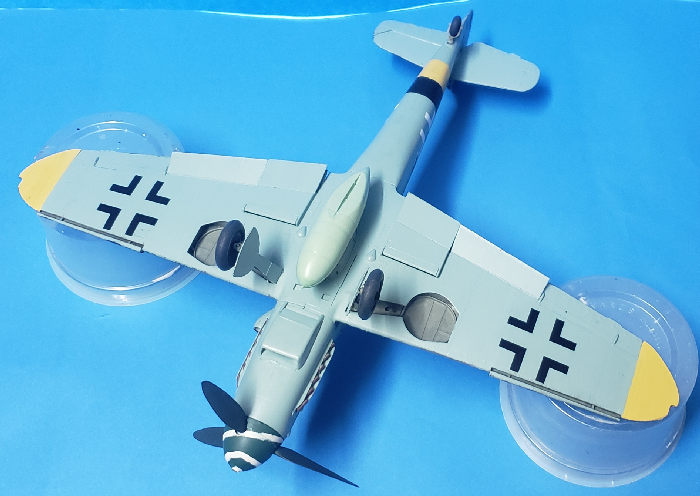
Instructions come in the shape of a booklet with 83 bulding steps, and have plenty of options to choose from: The early 109G-6 with the squared canopy and the late one with the Galland canopy.
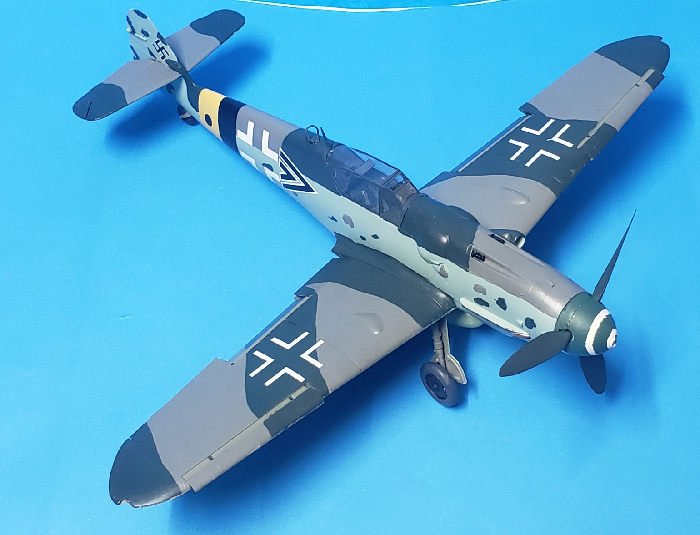
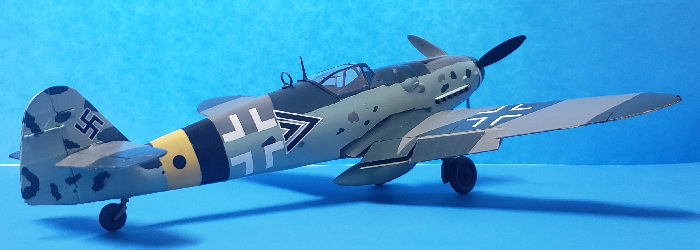
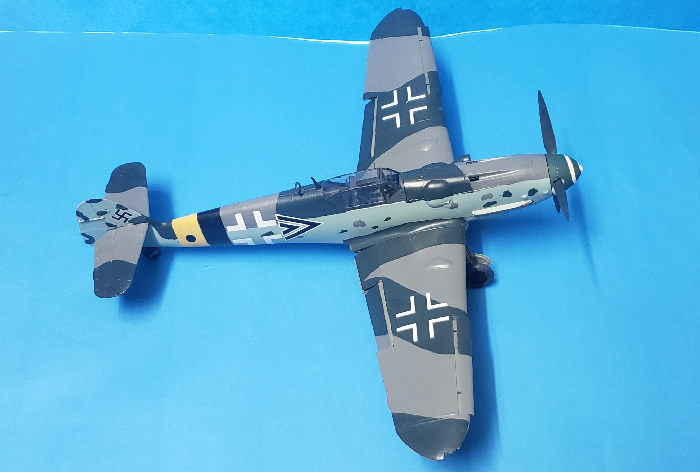
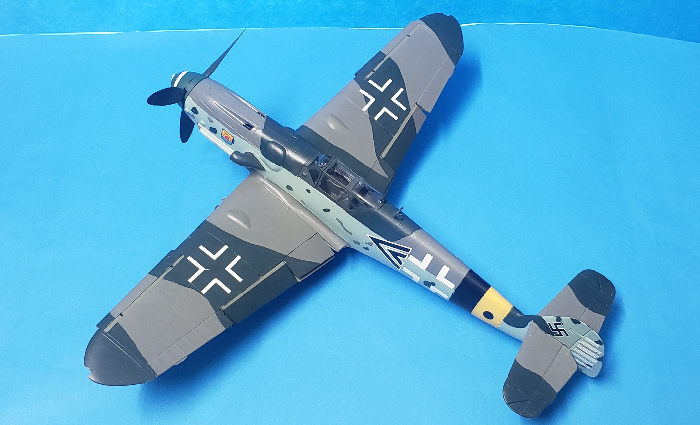
Decals, at first glance, appeared to have a very thick carrier film, which I though was inviting to silvering. I'd be later proved wrong, the decals wouldn't show any silvering. Two options are provided: Franz Dörr's Bf 109G-6 (with the tall tail and rudder and Galland canopy), stationed at Gossen in Norway, May 1945. The second option is for Karl Rammel's Bf 109G-6 (early, squared canopy and short tail and rudder). Both options show mottling, Dörr's machine having little in the way of it, and Rammelt's one having a heavy mottling application. Swastikas aren't included.
| CONSTRUCTION |
I had built Hasegawa's Bf 109G-6 in 32nd two months ago (at the point of this review), and wasn't very happy with my cockpit work, so I decided to make some effort and add more detail to this cockpit.
Before stating the construction, I painted all the parts that would have the same colour, such as the cockpit pieces, main wing spar, wheel wells, landing gear, etc... The cockpit got painted with Revell 78 Tank Grey (RLM 66).The rudder pedals were painted in Revell 91 Steel (instructions call for RLM 66, but I painted them this way to give the cockpit a bit more colour.
Early on, you have to decide which version to build, the Late or the Early one. I chose the Late version. Revell made a mistake at the very beginning of the instructions, showing the Mk.108 cannon breech going on the Early version, and the MG 151/20 breech going on the Late one. Once that small error was corrected, I glued the Late gun breech to the cockpit floor.
 Once I had
finished with the cockpit floor, I tackled the seat and sidewalls. These were
painted with Revell 78. I picked up the seatbelts in RLM 02 with Steel
fasteners. The fuel line which goes into the right sidewall was painted yellow
with blue details. Once the paint had dried, I glued the fuel lines to the right
sidewall. The trim wheel on the left sidewall was painted with Revell 91 Steel.
The instrument panel was painted in RLM 66 with black indicators, which were
then drybrushed with a metallic paint.
Once I had
finished with the cockpit floor, I tackled the seat and sidewalls. These were
painted with Revell 78. I picked up the seatbelts in RLM 02 with Steel
fasteners. The fuel line which goes into the right sidewall was painted yellow
with blue details. Once the paint had dried, I glued the fuel lines to the right
sidewall. The trim wheel on the left sidewall was painted with Revell 91 Steel.
The instrument panel was painted in RLM 66 with black indicators, which were
then drybrushed with a metallic paint.
After all the work on the cockpit parts was done, I glued the sidewalls and forward bulkhead to the cockpit floor. The instrument panel gets trapped between the two sidewalls.
While the glue on the cockpit was drying, I worked on the fuselage halves. Before closing them, you had to glue the tailwheel strut and the exhausts. The openings for the exhausts had some flash, which was removed with my hobby knife. I also glued the machineguns into the cowling. I wasn't paying much attention to that, so I glued parts 41 instead of 46. I'd later have to remove the already glued cowling to correct my error). Another mistake I made when working with the fuselage was to glue part 36 instead of 34 (again, concentration error. I should stop rushing to get the aircrat finished). I'd also have to open the fuselage to correct this mistake.
 With all the
mistakes corrected and the cockpit dried, I glued the wingspar to the cockpit's
floor, and glued the cockpit to the fuselage halves. The sidepanels of the nose
were then glued to the fuselage halves. I then glued several small pieces (such
as the air intake, cowling bulges, and the oil cooler). Once the work on the
fuselage was done, I set off to work on the wings.
With all the
mistakes corrected and the cockpit dried, I glued the wingspar to the cockpit's
floor, and glued the cockpit to the fuselage halves. The sidepanels of the nose
were then glued to the fuselage halves. I then glued several small pieces (such
as the air intake, cowling bulges, and the oil cooler). Once the work on the
fuselage was done, I set off to work on the wings.
The wings, unlike the ones on the Hasegawa 109s, come in several parts. One needs to build up the wheel wells and the radiators, and then glue the roots of the wings into the wingspar. This is a bit fiddly, but once hard, gives the wings strength. After letting the wingroots dry up, I glued the lower section of the wings. I gave this section curing time before gluing the outer parts of the wings.
After finishing building the major components of the airframe, I built the smaller parts, such as the tall tail and rudder, horizontal stabilizers, flaps (these were glued in the "extended" position), and slats (also glued extended).
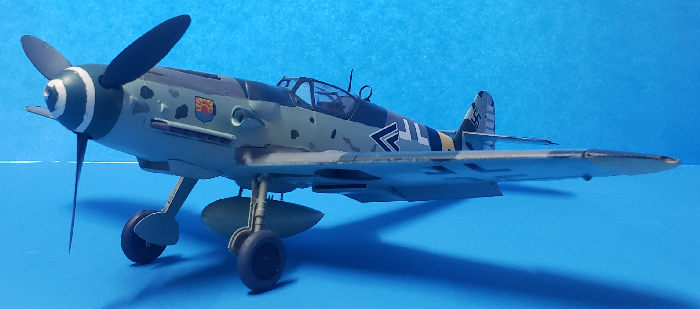
One of the most tedious parts on each build (at least on my builds), is to assemble the propeller and the landing gear. So, in order to speed up things, I painted the props in RLM 70 (Revell 40 Black Green). I also painted the nose cone in white, masked the spiral, and painted the unmasked areas with Revell 48 Sea Green. The landing gear was also built up (comes in three parts) and painted in RLM 02.
| COLORS & MARKINGS |
 I had decided
to paint my plane as Franz Dörr's aircraft. This machine had a very attractive
black and yellow RVD band, which established the aircraft's base of operations
in Norway. Not trusting the band for the decal, I painted it with Revell 08
(Matt Black) and Revell 15 (Matt Yellow). I was very pleased to discover the
paint hadn't seeped under the masking tape.
I had decided
to paint my plane as Franz Dörr's aircraft. This machine had a very attractive
black and yellow RVD band, which established the aircraft's base of operations
in Norway. Not trusting the band for the decal, I painted it with Revell 08
(Matt Black) and Revell 15 (Matt Yellow). I was very pleased to discover the
paint hadn't seeped under the masking tape.
Once finished with the RVD band, I painted the aircraft's spine in Revell 47 (RLM 75), and then I painted the areas which went in RLM 74 with Revell 69 Granite Grey. Revell made another mistake in the painting instructions, showing the RLM 74 areas as 75, and viceversa. The fuselage sides and tail were painted with Revell 49 Light Blue (a colour I use both as RLM 65 and 76). After the fuselage sides had cured, I lightly mottled them with a combination of RLM 74 and 75. The wings were then painted following Revell's instructions (but being careful of not mistaking the colours and Revell did). The lower wingtips of the aircraft were painted yellow. I then coated the aircraft with two coats of Revell's Gloss Varnish.
I was a bit apprehensive of the kit decals, but they came out of the backing paper after being sunk 10 seconds in hot water. Microsol was then brushed several times over them to get them to conform into the panel lines of the kit. For the Swastika, I had a set from Dukel Hobbies, so I chose the one closer to the photo of the aircraft I found online. The decals were then left to dry overnight, and then were matt coated with Revell's Matt Varnish.
| FINAL CONSTRUCTION |
 I glued the
tailwheel strut, together with its wheel. The main landing gear was then glued
with both Revell Contacta and some CA. It was then, while handling the model, I
accidentally broke the tailwheel. This was then reglued with Contacta and CA.
I glued the
tailwheel strut, together with its wheel. The main landing gear was then glued
with both Revell Contacta and some CA. It was then, while handling the model, I
accidentally broke the tailwheel. This was then reglued with Contacta and CA.
The canopy was painted first with the interior colour of RLM 66, and then in RLM 74.
The painting instructions of the kit indicated the fuel tank could have been in RLM 76, 84, or left in natural metal. Since I don't have many opportunities to use my RLM 84, I chose to paint the fuel tank in that colour. Revell didn't include any holes for the attachment of the circular antenna, the mast, nor for the fuel tank, so these holes were opened following the instructions as a guide.
| CONCLUSIONS |
I bought this kit with a 10% discount because I paid in cash. It made the building experience (in spite of my mistakes) much more entertaining. Certainly, the huge amounts of aftermarket decals would make lots of Luftwaffe nuts happy. This kit is highly recommended.
7 December 2021 Copyright ModelingMadness.com.
All rights reserved. No reproduction in part or in whole without express
permission. If you would like your product reviewed fairly and fairly quickly, please contact the editor or see other details in the
Note to
Contributors. Back to the Main Page
Back to the Review
Index Page
Back to the Previews Index Page