Eduard 1:48 Bf 109G-14
| KIT #: | 82118 |
| PRICE: | $39.00 |
| DECALS: | Five options |
| REVIEWER: | Francisco Santoro |
| NOTES: | Really sticky decals, have spares for the national markings at hand. |
| HISTORY |
The Bf 109G was the most numerous and important variant of the Bf 109. It was a highly effective fighter, especially with the addition of several armament types. Nevertheless, this capacity was obtained by installing an engine believed to be too powerful for the basic design, resulting in inferior handling charactericts when compared to the previous and lighter armed Bf 109F. This something Luftwaffe pilots were willing to pay at the beginning of 1942, because since mid 1941, the good maneuverability of the Bf 109F wasn´t as important as firepower, which would be obtained by sacrificing maneuverability.
 The
Bf 109G had been designed at the beginning of 1941, with the more powerful and
heavier Daimler Benz DB 605 engine in mind, as a replacement of the Bf 109F.
This additional weight requiered the aircraft to receive structural reinforcing,
which at the same time needed the addition of a heavier and stronger landing
gear.
The
Bf 109G had been designed at the beginning of 1941, with the more powerful and
heavier Daimler Benz DB 605 engine in mind, as a replacement of the Bf 109F.
This additional weight requiered the aircraft to receive structural reinforcing,
which at the same time needed the addition of a heavier and stronger landing
gear.
Erich Hartmann was born on April 19th, 1922 in Weissach, Germany. He joined the Luftwaffe in 1940 and finished his flight training in 1942. After being posted to JG 52, he began to gather victories, until reaching in 1944 the tally of 301 aircraft shot down, while also receiving the Knight´s Cross of the Iron Cross with Oak Leaves, Swords and Diamongs on August 25th of the same year. By the end of World War Two, Hartmann had gathered a total of 352 kills, 345 of them being Soviet aircraft, while the other 7 were Amercan aircraft.
After being imprisoned in the Soviet Union, he was released in 1955, and by 1956 he was back in Western Germany´s Luftwaffe, becoming Commander of JG 71 "Richtofen."
Hartmann died on September 20th, 1997, in Weil im Schönbuch, Germany.
| THE KIT |
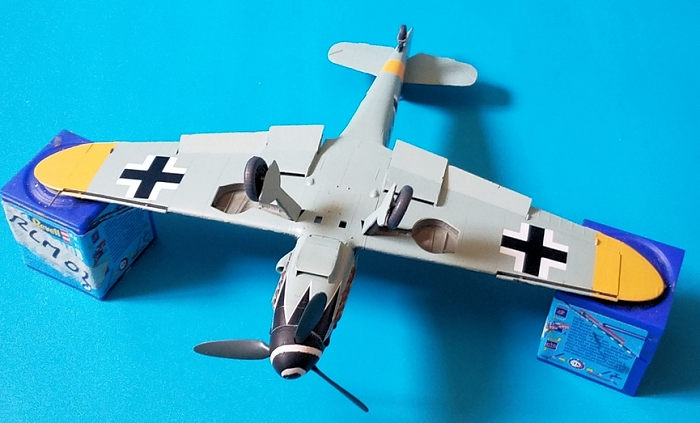
The Eduard kit is comes with three dark grey sprues and a single clear one, canopy masks and a fret of photoetch parts.
 The
grey plastic parts and really well done, with the fuselage and wing halves
having recessed panel lines and rivet detail. The fuselage halves don´t have
locating pin marks, but the cockpit and the propeller backing plate will be
enough to correctly align the halves. Slats and flaps are separate and molded
with tabs in the down position. There´s also the option for the short of tall
tail, depending on the decal option you choose.
The
grey plastic parts and really well done, with the fuselage and wing halves
having recessed panel lines and rivet detail. The fuselage halves don´t have
locating pin marks, but the cockpit and the propeller backing plate will be
enough to correctly align the halves. Slats and flaps are separate and molded
with tabs in the down position. There´s also the option for the short of tall
tail, depending on the decal option you choose.
The clear parts are, well, really clear, with clearly defined framing. The kit uses the Galland armed canopy, but there´re also parts for the earlier, heavier framed canopy.
Eduard provides plastic pieces to build the kit without using the photoetch parts.
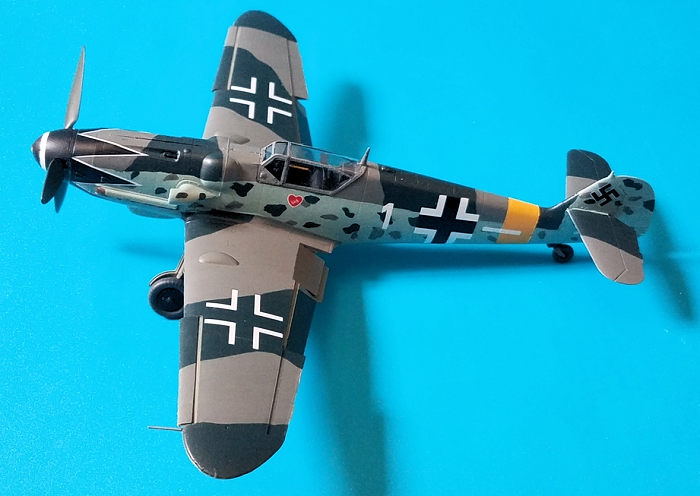
Decals are really well done, and have five options:
 1) Bf
109G-14 "White 1 and Bars," Erich Hartmann, JG 52, painted in RLM 74/75/76/04.
1) Bf
109G-14 "White 1 and Bars," Erich Hartmann, JG 52, painted in RLM 74/75/76/04.
2) Bf 109G-14/U4 "Blue 3," Horst Schlick, JG 77, painted in RLM 74/75/76/04.
3) Bf 109G-14 "Yellow 1," Mario Bellagambi, Aeronautica Nazzionale Republicana, painted in RLM 74/75/76/04 with the rudder in RLM 82/81.
4) Bf 109G-14 "Black 8," Rolf Schlegel, JG 4, painted in RLM 74/75/76/04.
5) Bf 109G-14 "Yellow 25 and Bars," EJG 2, painted in RLM 74/75/76/04.
The kit doesn´t provide any of the fuselage bands, so those will have to be painted. A full stenciling page is provided separate from the main decalling page.
| CONSTRUCTION |
I began by painting all the cockpit parts and fuselage halves in RLM 66, whereas the instrumet panel (the one with raised detail) was painted with flat black. When all of them were dry, I proceeded to glue the pieces one by one to the cockpit tub or to their proper location inside the fuselage. I also glued propeller backing plate to one fuselage half, and the exhaust stacks to each half. Before attaching the cockpit, I glued the instrument panel to the left fuselage half, and then I added the cockpit.
Before gluing the fuselage halves, I decided to check if they closed without issues, but I realised the cockpit assembly was spreading out the fuselage, something solved by applying a bit of pressure. With that in mind, I applied the glue, and when I was done, I used masking tape to let the glue have a good grip on the parts.
 While
the fuselage was drying, I moved on to the wings. The first step here is to
build the wells, which Eduard provides as a four piece assembly that is then
glued into the lower wing. With that out of the way, I decided to glue the
flaps, because I thought they´d harder to attach later when the wings would be
glued together. I added the upper flaps first, and then glued the lower ones on
the radiator intakes and let them dry. I then joined both wing halves together.
The radiators were then glued and painted flat black. The radiator intakes with
the lower flaps were added soon after. I completed the wing assembly by adding
the outer flaps and the ailerons.
While
the fuselage was drying, I moved on to the wings. The first step here is to
build the wells, which Eduard provides as a four piece assembly that is then
glued into the lower wing. With that out of the way, I decided to glue the
flaps, because I thought they´d harder to attach later when the wings would be
glued together. I added the upper flaps first, and then glued the lower ones on
the radiator intakes and let them dry. I then joined both wing halves together.
The radiators were then glued and painted flat black. The radiator intakes with
the lower flaps were added soon after. I completed the wing assembly by adding
the outer flaps and the ailerons.
At this point, the wheel wells were painted in RLM 02. I glued the fuselage halves and the wings together, and while they were drying, I did the same for the rudder and horizontal stabilisers. These pieces were then glued to the fuselage and set aside to dry, while I got to work with nose oil cooler. With the aircraft fully built, I outlined with a pencil the camouflage for the aircraft, and went to sleep.
| COLORS & MARKINGS |
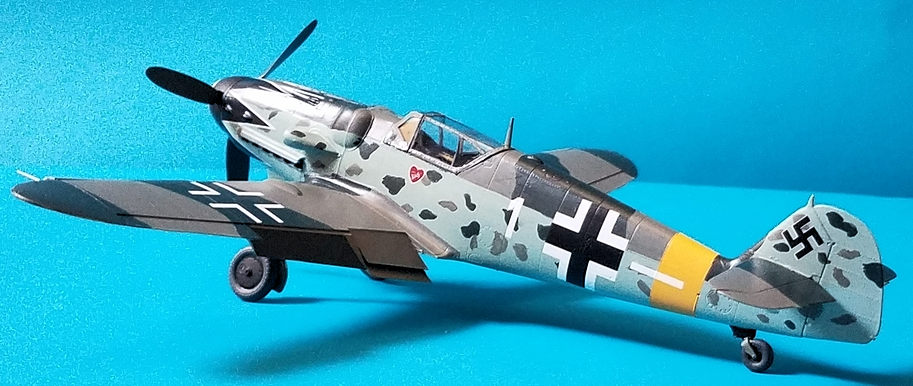
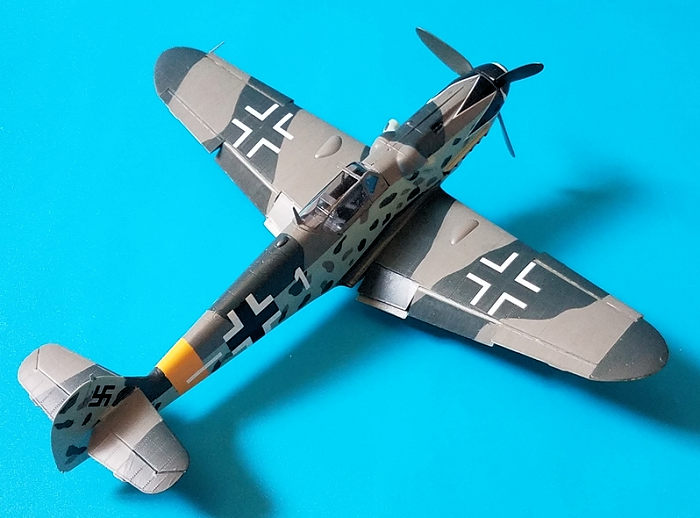
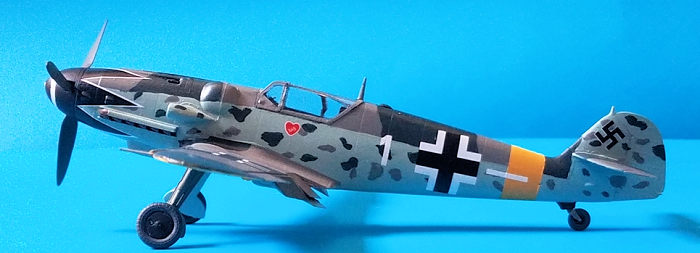
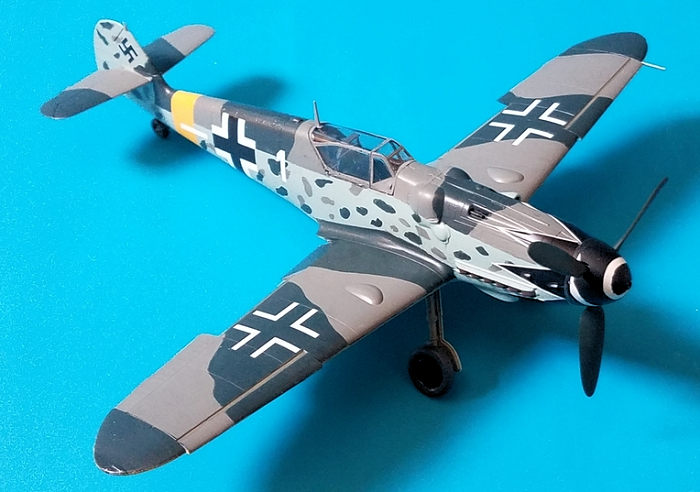
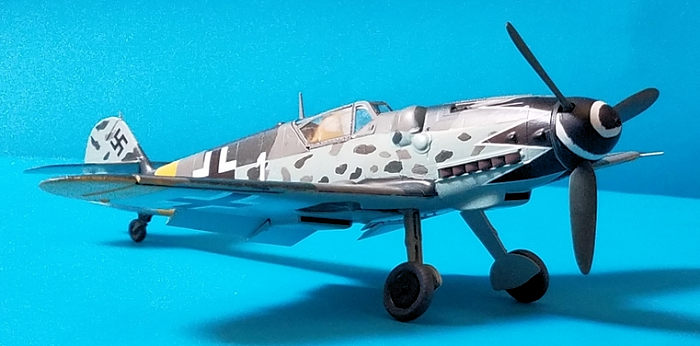
I had chosen to build this aircraft as Erich Hartmann´s black tulip nose aircraft, possibly the most famous fighter behind of the Red Baron´s Fokker Dr.I.
I
masked the fuselage spine and painted it first with RLM 75, and then adding the
RLM 74. The nose was painted with the free hand style also in RLM 74/75. When I
didn´t have any see-through effect and the paint was fully cured, I masked the
paint on the fuselage spine, and painted the RLM 76 with several thin coats. I
 painted the fuselage mottling at this time, trying to follow the painting
instructions. I then masked the wing roots and painted
the wings in RLM 74/75, the horizontal stabilisers were painted too in those
colours. With the wings fully painted, I masked the upper surfaces and painted
the lower surfaces in RLM 76. The wingtips and the fuselage band were masked and
painted yellow. I gave the aircraft two coats of gloss
varnish, and prepared myself for the decalling process.
painted the fuselage mottling at this time, trying to follow the painting
instructions. I then masked the wing roots and painted
the wings in RLM 74/75, the horizontal stabilisers were painted too in those
colours. With the wings fully painted, I masked the upper surfaces and painted
the lower surfaces in RLM 76. The wingtips and the fuselage band were masked and
painted yellow. I gave the aircraft two coats of gloss
varnish, and prepared myself for the decalling process.
I began by applying the black tulips that went over the engine scoops. These two need to be moved as little as possible and applied correctly on your first or second try. The first one wrinkled, but I persevered and placed on its position with minimal damage, I was luckier with the second one. The other tulips were then added without problems.
Then I tried to add the upper wing crosses, and
this is where the stickiness of the decals became apparent. I placed the first
one over a puddle of water, but it got stuck and wasn´t able to move it. Further
 attempts to place it correctly were futile, and I ended up with a mess, so that
decal was removed, and both replaced with spares from an Academy kit that came
with Cartograf decals. I had more luck with the fuselage and lower wing decals,
being able to place them without too much trouble. These decals were thin enough
to not need any softening solution. With the decalling
complete, I coated the model with a matt varnish twice, and left it to dry.
attempts to place it correctly were futile, and I ended up with a mess, so that
decal was removed, and both replaced with spares from an Academy kit that came
with Cartograf decals. I had more luck with the fuselage and lower wing decals,
being able to place them without too much trouble. These decals were thin enough
to not need any softening solution. With the decalling
complete, I coated the model with a matt varnish twice, and left it to dry.
I painted the landing gear in RLM 02, the landing gear doors in RLM 76 and RLM 02, and the wheels were painted in flat black with RLM 66 tyres. These parts were glued to the model and left to dry.
The clear parts were masked with Eduard´s canopy maskes, which were a blessing. I painted them with RLM 66 first, and the in RLM 75 for the surrounding fuselage colour. They were glued in the closed position, and the antenna mast was finally added.
| CONCLUSIONS |
While being a good fitting kit and coming with everything you may want to build a good replica of the Bf 109G-14, its main drawback are the decals, which stick solidly to the model´s surface even when said surface has been flooded with water. I´ll wait for Eduard to release the Tempest V Series 2 in February 2019, until then, I´ll stick to Revell/Hasegawa /Tamiya.
November 2018
Copyright ModelingMadness.com. Thanks to
for the review kit. You can find this kit at your favorite hobby shop
or on-line retailer. If you would like your product reviewed fairly and fairly quickly, please
contact
the editor or see other details in the
Note to
Contributors. Back to the Main Page
Back to the Review
Index Page
Back to the Previews Index Page