Revell 1/48 Bf-109G-10
| KIT #: | 3958 |
| PRICE: | $20.00 |
| DECALS: | One option |
| REVIEWER: | Francisco Santoro |
| NOTES: |
| HISTORY |
 The Bf
109G was the most numerous and important variant of the Bf 109. It was a
highly effective fighter, especially with the addition of several armament
types. Nevertheless, this capacity was obtained by installing an engine
believed to be too powerful for the basic design, resulting in inferior
handling characteristics when compared to the
previous and lighter armed Bf 109F. This something Luftwaffe pilots were
willing to pay at the beginning of 1942, because since mid 1941, the good
maneuverability of the Bf 109F wasn´t as important as firepower, which would
be obtained by sacrificing maneuverability.
The Bf
109G was the most numerous and important variant of the Bf 109. It was a
highly effective fighter, especially with the addition of several armament
types. Nevertheless, this capacity was obtained by installing an engine
believed to be too powerful for the basic design, resulting in inferior
handling characteristics when compared to the
previous and lighter armed Bf 109F. This something Luftwaffe pilots were
willing to pay at the beginning of 1942, because since mid 1941, the good
maneuverability of the Bf 109F wasn´t as important as firepower, which would
be obtained by sacrificing maneuverability.
The Bf 109G had been designed at the beginning of 1941, with the more powerful and heavier Daimler Benz DB 605 engine in mind, as a replacement of the Bf 109F. This additional weight required the aircraft to receive structural reinforcing, which at the same time needed the addition of a heavier and stronger landing gear.
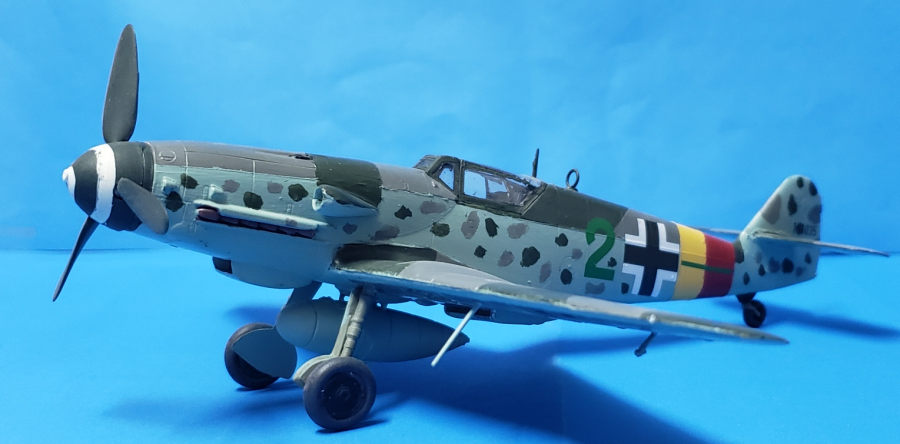
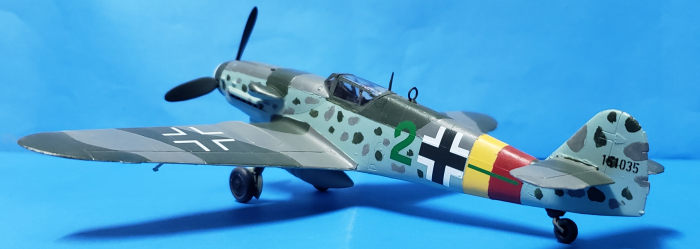
The Bf 109G-10 was the fastest version of all Bf 109G versions. It could fly at 7600m at 690km/h powered by a DB 605D engine with MW50 injector. Standard armament was of a single MG151/20 20mm cannon and two MG131 13mm machineguns.
| THE KIT |
Revell's 1:48 Bf 109G-10 in not a new kit. Originally released in 1978, it saw many re-releases, the only variation of the kit being the decals. This is the most recent release (2016), which comes with a single decal option for an aircraft found by the Allies at Stendal in 1945. Instructions are of the new Revell full colour style, a really welcome addition.
| CONSTRUCTION |
 I began by
painting the cockpit in RLM 66 (Revell 78) with black details, and while that
was drying, I glued the wings together. After gluing the wings, I glued the
exhausts to the fuselage halves, and left them to dry.
After the exhaust had dried, I glued the cockpit to one fuselage half, and glued
the other half. Next I glued the wings and the horizontal stabilizers to the
fuselage.
I began by
painting the cockpit in RLM 66 (Revell 78) with black details, and while that
was drying, I glued the wings together. After gluing the wings, I glued the
exhausts to the fuselage halves, and left them to dry.
After the exhaust had dried, I glued the cockpit to one fuselage half, and glued
the other half. Next I glued the wings and the horizontal stabilizers to the
fuselage.
The single decal option is for an aircraft found crashlanded by the Allies in Stendal in 1945. It was painted, according to the instructions, in RLM 75/82/76 with mottling. I painted the camouflage with Revell 47 Mouse Grey (RLM 75) and Revell 65 Bronze Green (RLM 82) with Revell 49 Light Blue (RLM 76/65). I then mottled the fuselage sides. After painting the entire aircraft, i gloss coated the model with Revell's gloss varnish, to prepare the surface for the decals.
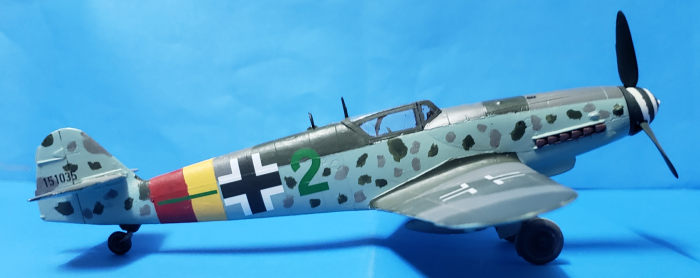 Decals were
difficult to work with, they took a long time to move from the backing sheet and
they were brittle (I broke the fuselage band and the 2s when trying to place
them properly). After decalling, I matt coated the aircraft and left it alone to
dry.
Decals were
difficult to work with, they took a long time to move from the backing sheet and
they were brittle (I broke the fuselage band and the 2s when trying to place
them properly). After decalling, I matt coated the aircraft and left it alone to
dry.
I painted the landing gear struts with RLM 02, the wheels, and canopy with the fuselage colour, and glued them in place. The propeller was painted in RLM 70 and the spinner was painted white and masked to form the spiral. If you're careful, you can make the propeller spin.
| CONCLUSIONS |
Although old and lacking details, this kit is still a good entry model for those who are looking to start scale modeling and for the veteran model who wants a quick build.
16 December 2021
Copyright ModelingMadness.com. All rights reserved. No reproduction in part or in whole without express permission.
If you would like your product reviewed fairly and fairly quickly, please contact the editor or see other details in the Note to Contributors.
Back to the Main Page Back to the Review Index Page Back to the Previews Index Page