Revell/Alley
Cat 1/32 Bf-109G-12
| KIT #: | /AC32041C |
| PRICE: | £20-00 plus £28-00 for the conversion |
| DECALS: | /Four options |
| REVIEWER: | Frank Reynolds |
| NOTES: | HGW seat belts 132002 £6-10. Top Notch fuselage mottle masks TNM32-G10, £12-00. |
| HISTORY |
The Messerschmitt Bf109 series is one of a handful of aircraft types that were in service before the first shots of World were 2 were fired, through to the last day of the war in Europe. It existed as ten distinct variants and a bewildering variety of sub-variants. No wonder it is a classic go-to subject for kit manufacturers.
 As the war
progressed and Germany was squeezed back to its homeland, fighter pilot training
standards deteriorated and a decision was made to convert G series Bf109
airframes to 2-seat operational conversion trainers. The result was an aircraft
based upon one that was tricky to take off and land by an experienced pilot
turning into one that was a nightmare to operate even for an expert. An
instructor pilot in the rear cockpit had no effective forward view over the long
nose. The legendary test pilot Captain Eric Brown of the Royal Navy tested a
captured example by flying solo from the rear seat. He said it was an experience
that he would not repeat.
As the war
progressed and Germany was squeezed back to its homeland, fighter pilot training
standards deteriorated and a decision was made to convert G series Bf109
airframes to 2-seat operational conversion trainers. The result was an aircraft
based upon one that was tricky to take off and land by an experienced pilot
turning into one that was a nightmare to operate even for an expert. An
instructor pilot in the rear cockpit had no effective forward view over the long
nose. The legendary test pilot Captain Eric Brown of the Royal Navy tested a
captured example by flying solo from the rear seat. He said it was an experience
that he would not repeat.
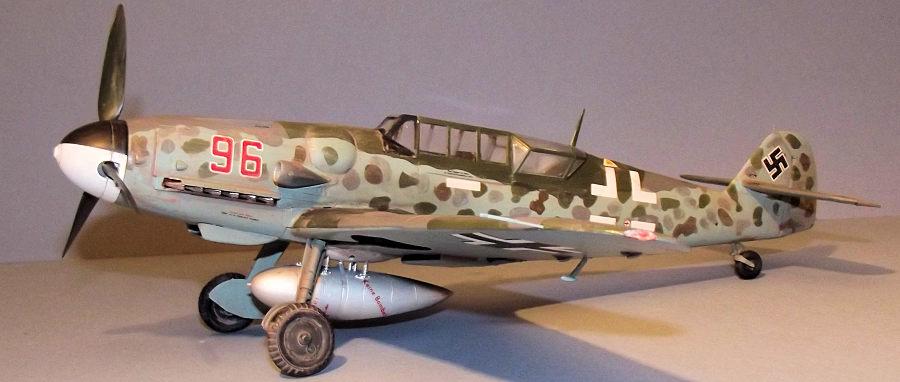
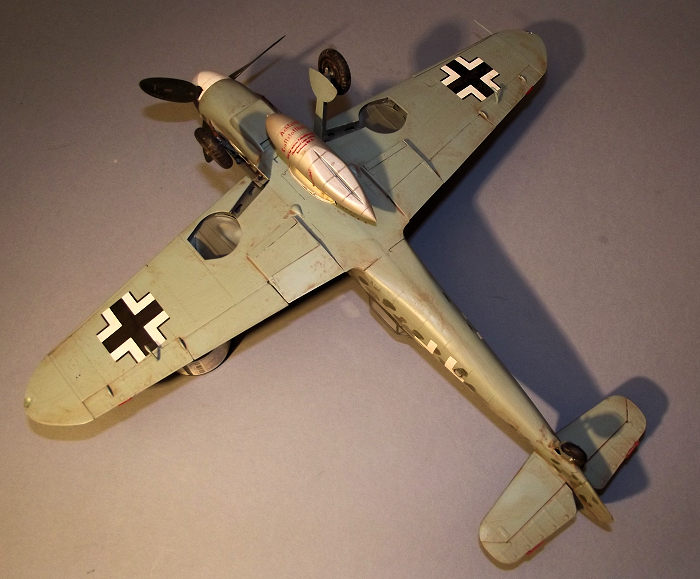
Of the 1000 conversions planned, barely 100 were completed and apparently issued to Luftwaffe units as operational conversion trainers. It was the simplest engineering solution possible within an existing airframe. The original single cockpit was retained and by re-arrangement of the internal equipment a second seat and duplicate flight controls were installed to the rear. A very distinctive form of extended cockpit hood gave a small measure of forward view to the rear seat occupant. A small spine fairing blended the rear hood into the taper of the rear fuselage.
| THE KIT |
The donor kit is Revell’s good quality Me109G-6 . There are fifteen parts frames in crisply moulded pale grey plastic and two of clear. A neat decal sheet gives a choice of two Luftwaffe aircraft from early 1944 and the Spring of 1945 – not relevant to this project but much of the stencilling could be used. Parts are crisply moulded with virtually no flash present and the whole package oozes a quality that belies the price asked.
 Alley Cat’s
conversion is offered in two varieties, one for a smooth cowl 109G, one
featuring the prominent cowl bulges – the one that I chose.
Alley Cat’s
conversion is offered in two varieties, one for a smooth cowl 109G, one
featuring the prominent cowl bulges – the one that I chose.
The first thing that I wanted to check was how Alley Cat had dealt with the critical canopy glazing and I was pleased to find that the new parts were cast in clear resin, rather than vacuform which is guaranteed to cause me stress. A small neat top hinged pizza-type box is packed with the conversion parts. Five pages of A4-sized instructions are included with photos to show the conversion parts and their installation. The format of the conversion requires sections of the Revell fuselage to be cut away and new parts fitted to the extended cockpit area combined with some of Revell’s originals. New glazing for the rear and centre of the cockpit opening is blended with Revell’s windscreen and front cockpit glazing.
Four decal options cover basically similar late war Luftwaffe colour schemes in RLM 74/75/76 colours. Fuselage codes and crosses and tail fin swastikas are included, the remaining decals are to be supplied from the donor kit.
| CONSTRUCTION |
Much of my modelling is influenced by shapes and colours. The built kit is the means to display a colour scheme and an interesting configuration. I do enjoy seeking out different paint schemes and often look to the aftermarket for the unusual or colourful. This is one such case. I find the G-12 to be an interesting subject since the conversion mimics real life. It was also an opportunity to try out the novelty of Top Notch masks for the fuselage mottle.
The resin parts were all cut from their casting blocks and cleaned up. This was a fairly simple matter of using straight saw cuts and a medium grade sanding stick. A dust mask is essential for safety. The parts were washed in a solution of water and mild detergent to remove any mould release and left overnight to dry.
 I
decided to dive straight in and complete the modifications to the fuselage
halves so that I could establish whether the interior parts would need much
fettling to fit inside. Alley Cat’s detailed notes and photos gave a clear guide
as to what plastic should be cut away to permit the new resin sections along the
cockpit opening to be fixed. It was a matter of making simple straight line cuts
with an X-acto saw blade. The new fuselage inserts are a butt joint to the cut
edges of the plastic. It is not possible to put any internal strengthening
strips behind the joint since the cockpit interior components need to lay snugly
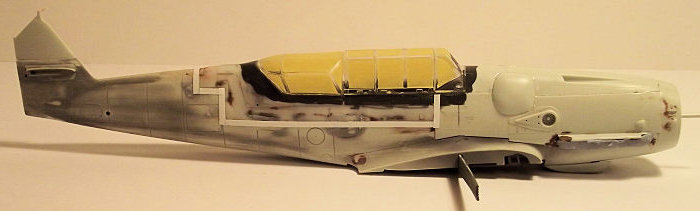
inside. I solved this by taping the parts in place with strips of Tamiya tape on
the outer surfaces and tacking the joints with cyano glue. When dry some
two-part epoxy filler was smoothed into the joints. Later, I temporarily marked
out the joint in White Tamiya tape to highlight it for photography purposes.
I
decided to dive straight in and complete the modifications to the fuselage
halves so that I could establish whether the interior parts would need much
fettling to fit inside. Alley Cat’s detailed notes and photos gave a clear guide
as to what plastic should be cut away to permit the new resin sections along the
cockpit opening to be fixed. It was a matter of making simple straight line cuts
with an X-acto saw blade. The new fuselage inserts are a butt joint to the cut
edges of the plastic. It is not possible to put any internal strengthening
strips behind the joint since the cockpit interior components need to lay snugly
inside. I solved this by taping the parts in place with strips of Tamiya tape on
the outer surfaces and tacking the joints with cyano glue. When dry some
two-part epoxy filler was smoothed into the joints. Later, I temporarily marked
out the joint in White Tamiya tape to highlight it for photography purposes.
A few sub-assemblies are always a good way to break up the build and attention switched to the propeller unit. The blades were sprayed in RLM 70 Schwarzgrun using Tamiya XF-27 Black Green. The unassembled propeller spinner and back plate were tacked together with Blu Tack putty, and painted with Tamiya Fine White Primer from a rattle can. This has good enough density to serve as a finished coat of paint. The White area on the spinner was masked out with Tamiya tape and the remainder airbrushed in Tamiya XF-1 Flat Black. The mask was removed and the assembly sealed with two brushed coats of Future/Klear floor polish then the spinner back plate carefully eased away using a fresh scalpel blade to slice through the joint. The propeller was then assembled with glued joints, trapping the blades in place.
 Next came
the undercarriage. The main gear legs are split in half vertically with the axle
unit added separately. A small pipe to the top of the leg and link arms to the
oleos completed the assembly, taking care to ensure that all of the joints were
sound by a careful application of liquid cement applied with a brush. When dry
they were painted RLM Grau 04 to the main legs, with the sliding sections in
Silver.
Next came
the undercarriage. The main gear legs are split in half vertically with the axle
unit added separately. A small pipe to the top of the leg and link arms to the
oleos completed the assembly, taking care to ensure that all of the joints were
sound by a careful application of liquid cement applied with a brush. When dry
they were painted RLM Grau 04 to the main legs, with the sliding sections in
Silver.
The main wheels consist of inner and outer halves with the inners having an inset hub. The inner hubs were painted in Schwarzgrau 66 and the tyres in Tamiya XF-85 Rubber Black. The tailwheel fork is a one piece moulding and the tail wheel simply clips into place. The leg and hub were painted Grau 02 and the tyre Rubber Black.
I could now return to the build of the airframe.
For the cockpit interior Alley Cat provides a full length floor, front, middle and rear bulkheads cast with the same style of detailing as the Revell parts. This enables the front cockpit to be completed with Revell’s seat, control stick, rudder pedals, instrument panels and cockpit side walls. The rear cockpit is furnished with closely matching resin cast components. Once painted it is not possible to tell which is which, such is the quality of the resin and results in well detailed cockpit side walls with throttle, trim wheels and separately moulded pipework and cables. Assembly was no more complicated than following the style of the Revell instructions with resin to resin and resin to plastic joints achieved with the use of cyano glue.
The seats have a representation of seat belts moulded in although I used a set of the excellent HGW models etch and fabric seat belts.
The basic colour of the cockpit interior was sprayed in Xtracrylix XA1203 RLM66 Schwarzgrau Matt. A touch of colour was introduced by picking out the pipes and wires to the side walls in yellow, silver and blue according to Revell’s call outs. The instrument panels were sprayed Schwarzgrau Matt and finished with the kit-supplied decal for the main instruments and a couple of decals from a generic sheet for the minimalist panel to the rear cockpit. The substantial wing spar was glued under the cockpit floor and the sub assembly set aside to harden.
The fuselage halves were prepared by installing the tailwheel support tube. The exhausts can only be fitted from inside the fuselage halves so they were painted Red-Brown and glued in place.
 The fuselage
halves were joined with the projecting wing spar under the cockpit tub slipped
through slots in the wing roots. At the same time the propeller shaft and inner
plate for the under cowl intake were slotted into place. The under-cowl intake
has moulded detail to the front and rear radiator faces which were painted
silver, then the intake lower fairing was added and the exit door glued in
place. The forward fuselage has an open framework to which the cowl panels are
attached. The top cowl was added next, followed by the large “beule” bulges that
cover the cannon breeches. The fuselage assembly was strapped up with sticky
tape and left for a few days to harden.
The fuselage
halves were joined with the projecting wing spar under the cockpit tub slipped
through slots in the wing roots. At the same time the propeller shaft and inner
plate for the under cowl intake were slotted into place. The under-cowl intake
has moulded detail to the front and rear radiator faces which were painted
silver, then the intake lower fairing was added and the exit door glued in
place. The forward fuselage has an open framework to which the cowl panels are
attached. The top cowl was added next, followed by the large “beule” bulges that
cover the cannon breeches. The fuselage assembly was strapped up with sticky
tape and left for a few days to harden.
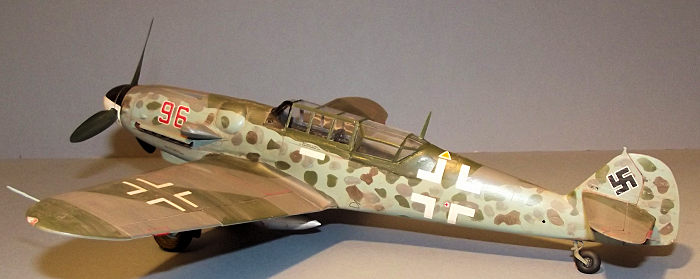
I had test fitted the cockpit glazing on a number of occasions during the build. The windscreen and front cockpit hood come from Revell parts. Alley Cat provides a choice of open or closed glazing and I settled for the closed option. The multi-faceted rear hood is cast in one piece and I was relieved to find that it had not distorted during manufacture and was a snug fit to the fuselage opening. This in spite of a warning in Alley Cat’s instructions that some of the glazing parts might need reshaping in warm water. A small section of additional resin glazing is supplied to link the front and rear cockpits. I elected to raid my spares box and cut a spare Revell main canopy section to fit since it had better clarity. The resin canopy parts were dipped in Future/Klear floor polish, which improved the clarity to a degree. The glazing was carefully installed using Humbrol Clearfix, masked off with Tamiya tape trimmed to fit with a fresh scalpel blade.
The completed fuselage assembly was primed and rubbed down at this stage since I wanted to deal with any imperfections caused by the double cockpit installation before the wing assembly got in the way. A few more smears of Squadron putty were needed before I was satisfied with the result.
The rest of the build mainly followed Revell’s standard kit instructions, although the supercharger intake to the left side of the cowl was set aside to be added later since it can get in the way of masking out the paintwork.
The inner panels of the upper wing were glued in place
first, sitting on the wing spar and butting up to the wing root. Radiator faces
and side walls to the wheel wells were added underneath to form a strong centre
se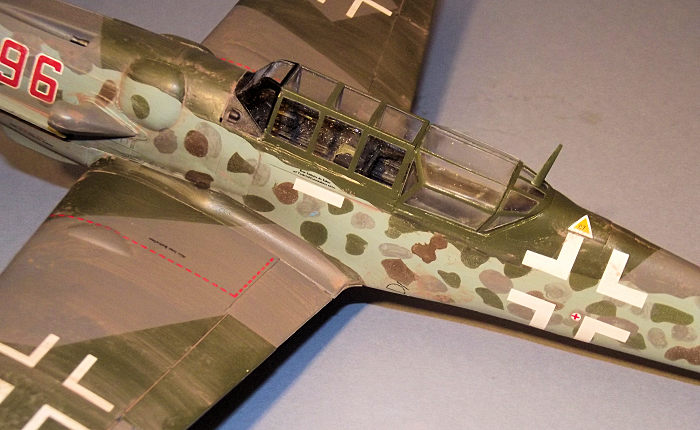 ction.
The lower wing panels are each in one piece from tip to centre line and thanks
to Revell’s good engineering slipped into place without fuss. The upper wing
outer panels were added to complete the basic wing structure, again highlighting
the need to deal with a joint along the panel line to the upper wing surface.
ction.
The lower wing panels are each in one piece from tip to centre line and thanks
to Revell’s good engineering slipped into place without fuss. The upper wing
outer panels were added to complete the basic wing structure, again highlighting
the need to deal with a joint along the panel line to the upper wing surface.
The horizontal tail sections were added to complete the basic airframe. Leading edge slats, elevators, ailerons, rudder and wing flaps are all separately moulded and could be posed deflected if required. I chose to fix them all closed up. The flaps need to be trimmed to fit in the closed position since they are moulded with prominent hinges for display in the deployed position.
The next sub-assembly was the belly fuel tank, nicely moulded by Revell and assembled without fuss onto the fuselage belly fairing with four small vertical support struts. It was set aside to be added at the end of the build. The drop tank was painted in dull aluminium to give some idea of a late-war component hurriedly supplied by a sub-contractor and pressed into service without being camouflage painted.
The exhausts were masked out with small strips of Tamiya tape and the airframe gently washed down with methylated spirits to remove any greasy finger prints before the intakes were plugged with small offcuts of plastic sponge and the airframe primed with Dark Grey auto primer applied from a rattle can.
| COLORS & MARKINGS |
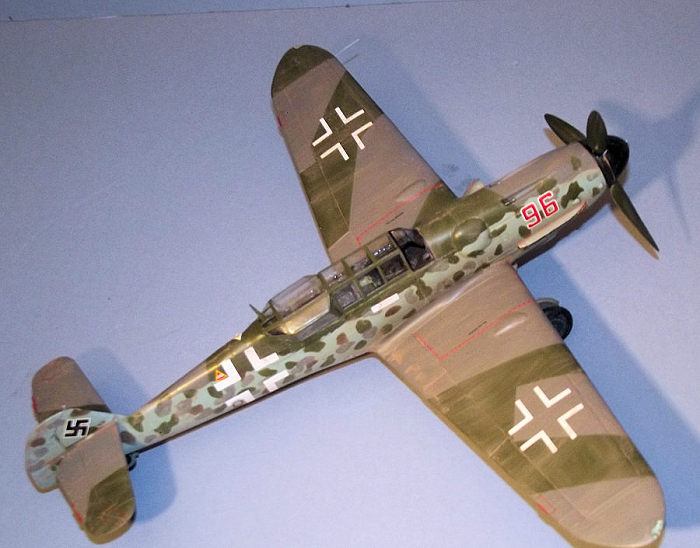
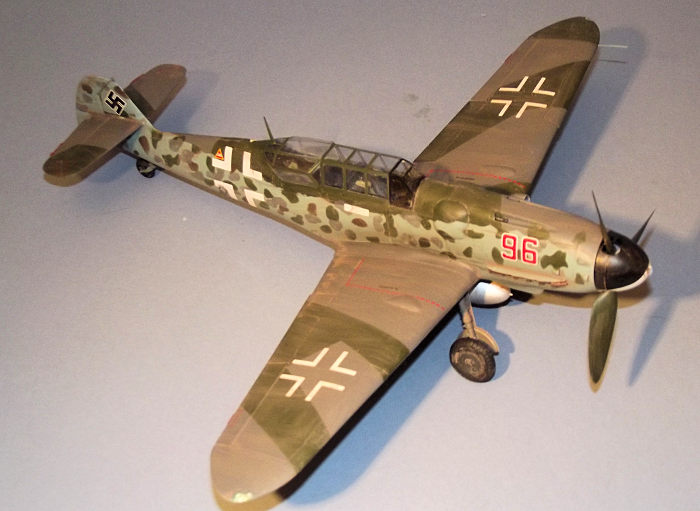
For the basic paint scheme I chose for the upper surfaces: Xtracrylix XA 1207 Grauviolett RLM 75 and Tamiya XF-13 for the RLM 74 Graugrun. The under surfaces and fuselage sides were painted Tamiya XF-23 for RLM Lichtblau 76, using my Iwata HP-C airbrush. The gear doors were painted at this point. The colour dividing line on the fuselage sides was defined by cutting a pattern of an irregular line onto a thin piece of card and taped in place along the fuselage sides. With the lower surface blue partially covered with this ragged-edged cardboard strip, the remaining areas were covered with Tamiya tape while the upper surfaces were painted RLM 75 Grauviolett. Once dry, and with more masking, the counter shading of RLM 74 was applied.
Most of the upper surface masking was stripped away so that the fuselage sides could be mottled. The Top Notch masks are supplied as a series of vinyl strips slightly larger than a fuselage half with a die cut pattern of mottle. Sections were roughly trimmed to shape and tacked onto the fuselage sides with their self-adhesive backing. Top Notch have got the die cutting just right and the masks stay mainly in one piece during handling and the removal of the backing sheet. The irregular mottle pattern sections can be picked up with the tip of a scalpel blade, removed with tweezers and returned to the backing sheet for future use if required.
 Using the
airbrush at 10psi, I sprayed patches of RLM 81 Braunviolett and 83 Dunkelgrun
over the masking sections keeping the airbrush about 10cm from the surface to
limit the possibility of ridges in the paintwork. The windscreen assembly was
masked out separately and received a quick blast of RLM66 Schwarzgrau.
Using the
airbrush at 10psi, I sprayed patches of RLM 81 Braunviolett and 83 Dunkelgrun
over the masking sections keeping the airbrush about 10cm from the surface to
limit the possibility of ridges in the paintwork. The windscreen assembly was
masked out separately and received a quick blast of RLM66 Schwarzgrau.
The airframe was then stripped of all masking except to the cockpit glazing and checked over for any small areas that needed to be touched in before the paint was sealed with two hand brushed coats of Future/Klear varnish to give a smooth base for the decals.
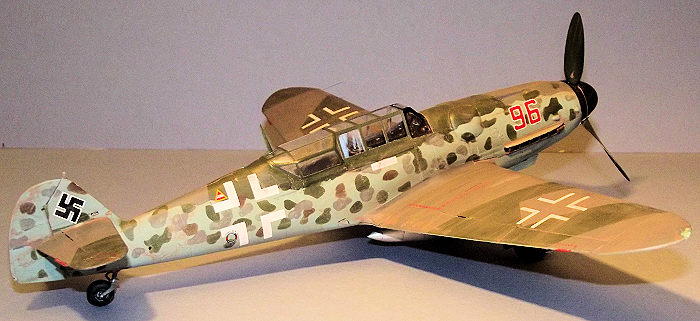
The Alley Cat decals provide a choice of four finishes, each with a different style of mottle and shading, all in standard 74/75/76 late war colours. The sheet provides the code letters and numerals for each subject and fuselage crosses. The version that I chose had an unusual code number on the nose and the Black painted windscreen assembly. Alley Cat offers no clue as to the identity of the operating unit. The decals went on easily without assistance from setting solutions. The rest of the national insignia and airframe stencilling came from the Revell sheet.
A last coat of Klear sealed the decals and the aircraft began to take shape with the installation of the cowl side intake, landing gear, drop tank, aileron mass balances and aerials. The propeller assembly was glued in place. A coating of Tamiya Smoke was airbrushed to lower cowl and fuselage sides to provide some exhaust stains.
The whole airframe was sprayed with Xtracrylix flat varnish, and then received a generous wash of hand-brushed Pro Modeller Earth Brown, most of which was wiped away with a damp sponge to leave just a trace of dirt. The canopy masking could finally be removed.
The final detail was to add the wing tip light covers.
| CONCLUSIONS |
Alley Cat has put together a good quality product that blends into the donor kit with a reasonable minimum of work. The decals are of reasonable quality and the choice of four airframes gives good options.
The mixed media canopy arrangement is not ideal. The resin parts lack the clarity and crispness of the Revell plastic items, but the result is fair enough. It is an essential subject for any representative ‘109 collection and Alley Cat should get the credit for bringing it to the market place.
The overall cost is not too bad for an unusual 1/32 scale subject. I enjoyed it and the G-12 fills an important niche in my collection of 109s.
| REFERENCES |
Messerschmitt Bf109 In Action, part 2. Squadron Signal Publications 1983
Alley Cat’s instructions and the Internet
16 April 2019
Project courtesy of my wallet.
If you would like your product reviewed fairly and fairly quickly, please contact the editor or see other details in the Note to Contributors.
Back to the Main Page Back to the Review Index Page Back to the Previews Index Page