
Hasegawa 1/32 Bf-109G-6
| KIT #: | St 17 |
| PRICE: | 32$ |
| DECALS: | Two options |
| REVIEWER: | Francisco Santoro |
| NOTES: |
| HISTORY |
From the instructions of the Revell 1:32 Bf 109G-6: “"By the Autumn of 1941, the Bf 109F had already been in service for half a year. Despite the good results that had been achieved through constant development, Messerschmitt was still aware of the need for further improvement of the aircraft. Average speeds and altitudes flown in aerial battles, particularly against the Western Allies had rapidly increased. The requirement for a pressurised high altitude variant of the fighter was on the list of demands for the G series right from the beginning. When development finally began a power unit that could perfectly fulfill this requirement was already available in the form of the Daimler Benz DB 605A. Based on the DB 601, the DB 605 had an increased displacement and a higher compression ratio whilst remaining identical in size to its predecessor. Installation into the Bf 109's airframe therefore proved to be relatively straighforward. The higher performance and greater engine torque however, required structural changes in the airframe, which increased the empty and takeoff weights of the aircraft. Together, the increase in weight and performance compared to the F series led to significantly poorer handling qualities, a disadvantage that had to be accepted in light of the apparently improved flight performance.
 Known as the
G-1, the new variant went into mass production from February 1942, but it still
had the armament of its predecessor. This was to change with the introduction of
the parallel developments Bf 109G-5 and G-6, both of which were delivered to
service units from March 1943 onwards. As on the G-1, the G-5/6 were fitted with
an MK 151/20 20mm cannon firing through the engine block. The MG 17s mounted
above the engine were replaced by two 13mm MG 131s. The belt-feed to the uprated
armament made a redesign of the aerodynamic engine cover necessary which gave
the aircraft its characteristic "bumps." Whilst the G-5 was still fitted with a
pressurised cabin, the G-6 was not (all other technical characteristics remained
the same). The price for the uprated armament was a further increase in curb
weight resulting in further reduction in flight performance. By default the two
new variants were fitted with the strengthened landing gear and larger wheels
introduced onto later aircraft of the G-3 and G-4 variants. This was evident by
the drop shaped bulges on the upper surface of the wings. The G-6 was used
extensively on all fronts from March 1943 until the end of the war. With a total
of 13000 machines, she was the most prolific of all Bf 109s, but at the time of
its introduction it had already passed the peak of its development. Improvements
included a revised head armour for the pilot (also called Galland Armour), a
shorter aerial mast, simplified MG cover plates and a new canopy from the Erla
machine factory. The Erla canopy (often mistakenly called Galland Canopy)
replaced the old canopy and fixed rear windows with a new, one piece design
which dramatically improved visibility to the rear. The tail was also modified
by increasing its size and fitting a rudder that was taller and larger in area.
Developed for the Bf 109G-10, this tail was incorporated into later production
batches of the G-6, and was intended to improve flight stability. In order to
compensate for the reduction in speed, later G-6s received the DB 605AM engine
and the so called MW-50 unit using a mixture of water and methanol. This could
be used to increase engine output to 1800hp for about 10 minutes through
injection to the intercooler. Most of these modifications and alterations were
built and fitted partly in Field Workshops, but were collectively adopted by
Messerschmitt and from August 1944 incorporated into the Bf 109G-14."
Known as the
G-1, the new variant went into mass production from February 1942, but it still
had the armament of its predecessor. This was to change with the introduction of
the parallel developments Bf 109G-5 and G-6, both of which were delivered to
service units from March 1943 onwards. As on the G-1, the G-5/6 were fitted with
an MK 151/20 20mm cannon firing through the engine block. The MG 17s mounted
above the engine were replaced by two 13mm MG 131s. The belt-feed to the uprated
armament made a redesign of the aerodynamic engine cover necessary which gave
the aircraft its characteristic "bumps." Whilst the G-5 was still fitted with a
pressurised cabin, the G-6 was not (all other technical characteristics remained
the same). The price for the uprated armament was a further increase in curb
weight resulting in further reduction in flight performance. By default the two
new variants were fitted with the strengthened landing gear and larger wheels
introduced onto later aircraft of the G-3 and G-4 variants. This was evident by
the drop shaped bulges on the upper surface of the wings. The G-6 was used
extensively on all fronts from March 1943 until the end of the war. With a total
of 13000 machines, she was the most prolific of all Bf 109s, but at the time of
its introduction it had already passed the peak of its development. Improvements
included a revised head armour for the pilot (also called Galland Armour), a
shorter aerial mast, simplified MG cover plates and a new canopy from the Erla
machine factory. The Erla canopy (often mistakenly called Galland Canopy)
replaced the old canopy and fixed rear windows with a new, one piece design
which dramatically improved visibility to the rear. The tail was also modified
by increasing its size and fitting a rudder that was taller and larger in area.
Developed for the Bf 109G-10, this tail was incorporated into later production
batches of the G-6, and was intended to improve flight stability. In order to
compensate for the reduction in speed, later G-6s received the DB 605AM engine
and the so called MW-50 unit using a mixture of water and methanol. This could
be used to increase engine output to 1800hp for about 10 minutes through
injection to the intercooler. Most of these modifications and alterations were
built and fitted partly in Field Workshops, but were collectively adopted by
Messerschmitt and from August 1944 incorporated into the Bf 109G-14."
| THE KIT |
 Hasegawa’s
big scale Bf 109G-6 was released as a new tool kit back in 2001 when I was 5
years old. The kit became a “must have” for me when I began doing 1:32 models,
and I finally got the chance to get it as a birthday gift in 2021.
Hasegawa’s
big scale Bf 109G-6 was released as a new tool kit back in 2001 when I was 5
years old. The kit became a “must have” for me when I began doing 1:32 models,
and I finally got the chance to get it as a birthday gift in 2021.
The model comes inside a top opening box with Shigeo Koike’s usual boxart. Inside, the parts are closed inside a single bag, perfect for the parts to break themselves loose if the box is handled roughly. Parts are molded in Hasegawa’s typical hard, light grey plastic, with instructions of the foldable type and a decal sheet containing two options, Erich Hartmann and Gerhard Barkhorn.
| CONSTRUCTION |
 I began
construction by painting the cockpit parts in RLM 66 (Revell 78 Tank Grey) and
the propeller assembly in RLM 70 (Revell 40 Black Green), with a nose cone 1/3
white and 2/3s black green. While these assemblies were drying, I glued to both
halves of the fuselage the empennage halves. The cockpit was then glued from
below the fuselage with the hefty wingspar and the belly.
I began
construction by painting the cockpit parts in RLM 66 (Revell 78 Tank Grey) and
the propeller assembly in RLM 70 (Revell 40 Black Green), with a nose cone 1/3
white and 2/3s black green. While these assemblies were drying, I glued to both
halves of the fuselage the empennage halves. The cockpit was then glued from
below the fuselage with the hefty wingspar and the belly.
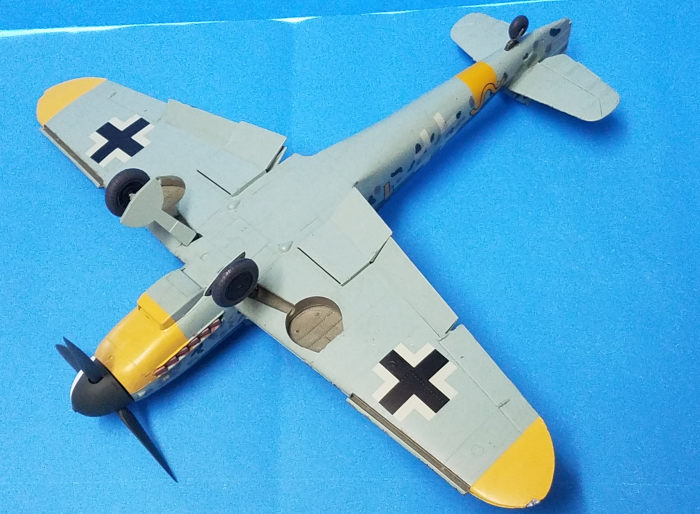
The wings were next, and opened the holes for the wing bulges first. I painted the radiator faces matt black and added the flaps and slats. I then glued the top halves of the wings to the wingspar, and added the lower wing halves. The Wheel bulges were then glued. After waiting for an hour, I glued the horizontal stabilizers, cowling with guns, bulges on the nose and supercharger intake (or whatever the intake on the left of the nose is called).
| COLORS & MARKINGS |
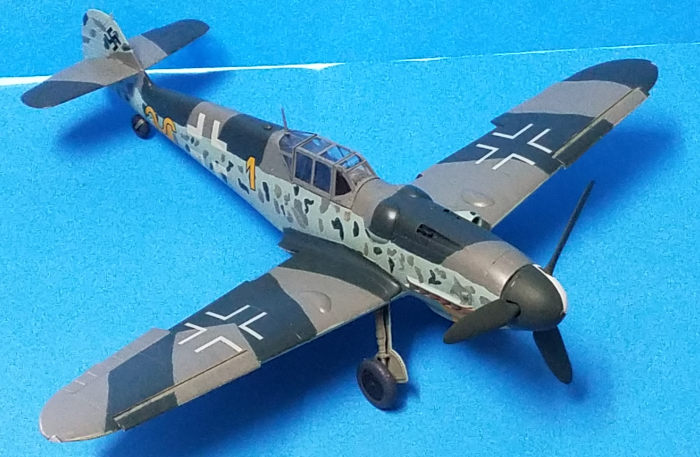
 I chose to
paint this kit as Hartmann’s machine. I followed Hasegawa’s painting
instructions. I used RLM 74/75 (Revell 47 Mouse Grey and 69 Granite Grey) and
covered the fuselage in RLM 76 (Revell 49 Light Blue Matt). The mottling was
liberally added with a mix of the camouflage colours and some RLM 02 (Revell 45
Matt Light Olive). I then masked the wingtips and nose and painted those áreas
yellow (Revell 15 Matt Yellow). The model was then glossed and the decals were
added. After waiting for more tan 6 hours, I matt coated the plane.
I chose to
paint this kit as Hartmann’s machine. I followed Hasegawa’s painting
instructions. I used RLM 74/75 (Revell 47 Mouse Grey and 69 Granite Grey) and
covered the fuselage in RLM 76 (Revell 49 Light Blue Matt). The mottling was
liberally added with a mix of the camouflage colours and some RLM 02 (Revell 45
Matt Light Olive). I then masked the wingtips and nose and painted those áreas
yellow (Revell 15 Matt Yellow). The model was then glossed and the decals were
added. After waiting for more tan 6 hours, I matt coated the plane.
The landing gear legs were painted in RLM 02, the wheels in matt black hubs and RLM 66 tyres, added the propeller, and then glued the clear parts in the cockpit position (Hasegawa provides the option for the open setting, but you’ll have too sand down the notch to make the central clear part fit.
| CONCLUSIONS |
A very fun build, and it’s a kit that should be picked up if you find it on sale, since the kit is currently oop.
| REFERENCES |
Revell´s 4665 kit instructions.
Francisco Santoro
1 August 2023 Copyright ModelingMadness.com. All rights reserved. No
reproduction in part or in whole without express permission from the editor.
If you would like your product reviewed fairly and fairly quickly, please
contact
the editor or see other details in the
Note to
Contributors.