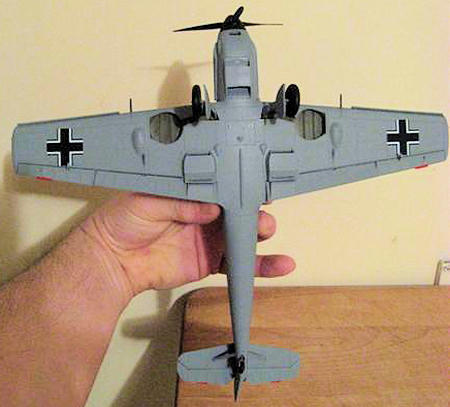
Eduard 1/32 Bf-109E-3
| KIT #: | 3002 |
| PRICE: | $74.95 MSRP |
| DECALS: | Five options |
| REVIEWER: | Lee Fogel |
| NOTES: |
Patience will net you a
very fine replica |
| HISTORY |
The Bf
109 needs no lengthy introduction on my part.
Regarded as one of the finest fighter aircraft of the early and middle
years of the Second World War this aircraft, in all of its’ versions, has a
devout following of admirers worldwide.
The E, or ‘Emil’ version, is arguably the most well-known version of this
fighter. From it’s early exploits
in
| THE KIT |
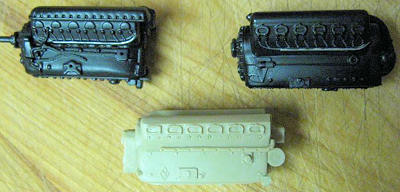
 Upon
opening the sturdy box you are greeted by six grey/green sprues with the parts (including
an engine and open cowling gun hatch) that have fine recessed panel lines,
very nice fidelity of detail and no flash.
There is also a drop tank and mount that are not applicable to the E-3
version (save this to dress up the old
Hasegawa kit!). However there
are the ever-prominent mold lines that seem to be in every Eduard kit.
So, a bit of clean up here will be necessary.
There are also a clear sprue with the 3-piece separate canopy, gun sight
and front windscreen armor plating (which is not used on this version), a canopy
mask set and a pair of small pre-colored PE frets along with a 17 page color
instruction booklet and two decal sheets (one
of stencils and the other being the national and airframe-specific markings).
There is quite a bit of plastic here and the potential certainly looks
very fulfilling.
Upon
opening the sturdy box you are greeted by six grey/green sprues with the parts (including
an engine and open cowling gun hatch) that have fine recessed panel lines,
very nice fidelity of detail and no flash.
There is also a drop tank and mount that are not applicable to the E-3
version (save this to dress up the old
Hasegawa kit!). However there
are the ever-prominent mold lines that seem to be in every Eduard kit.
So, a bit of clean up here will be necessary.
There are also a clear sprue with the 3-piece separate canopy, gun sight
and front windscreen armor plating (which is not used on this version), a canopy
mask set and a pair of small pre-colored PE frets along with a 17 page color
instruction booklet and two decal sheets (one
of stencils and the other being the national and airframe-specific markings).
There is quite a bit of plastic here and the potential certainly looks
very fulfilling.
| CONSTRUCTION |
The PE radiator screens are very delicate and
can bend easily so care is recommended when handling the.
I used Loc-Tite super glue to keep them in place and then painted the
inside of the radiator covers Model Master RLM 02.
PE parts 37 are a nightmare
 to place
inside of the covers and after multiple runs at it I gave up.
Minor cleanup around the leading edge seams was done and then the wings
were set aside. The tail planes
were also assembled and set aside at this time as well as the separate flaps and
slats with the underside of the slats being painted MM RLM 02.
to place
inside of the covers and after multiple runs at it I gave up.
Minor cleanup around the leading edge seams was done and then the wings
were set aside. The tail planes
were also assembled and set aside at this time as well as the separate flaps and
slats with the underside of the slats being painted MM RLM 02.
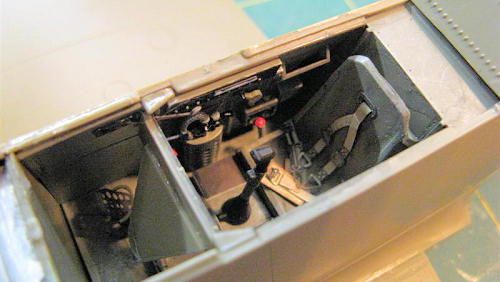 if you
choose to forgo the PE parts. I
went with the PE parts and used Crystal Clear for the gauge faces.
if you
choose to forgo the PE parts. I
went with the PE parts and used Crystal Clear for the gauge faces.
 be
compromised, making fitment a real chore.
Second, the fuselage, once assembled, tapers ever so slightly to an angle
thus throwing off the proper placement of the exhaust stubs in their respective
covers. This is very noticeable at
the backside of the exhaust section and looks wrong.
And if you try to favor the motor to one side or the other then it
becomes even worse. So, after all
of that work, I decided to close everything up and will use the engine in my
forthcoming Matchbox ‘109E build. I
did break off the exhaust stubs and mounted them onto the supplied strip and put
them into place in the exhaust ports.
These were painted MM Flat Black then dry brushed with MM Rust, Testors
Steel and MM Metalizer Burnt Iron. I
glued the firewall and gun cowling area into place, painted them MM RLM 02 and
the glued the fuselage halves together.
Fit here was alright, by and large.
There is some filling and sanding needed on the lower section of the
nose. I also deduced that my port
fuselage half was slightly warped.
This would become a hassle later on.
be
compromised, making fitment a real chore.
Second, the fuselage, once assembled, tapers ever so slightly to an angle
thus throwing off the proper placement of the exhaust stubs in their respective
covers. This is very noticeable at
the backside of the exhaust section and looks wrong.
And if you try to favor the motor to one side or the other then it
becomes even worse. So, after all
of that work, I decided to close everything up and will use the engine in my
forthcoming Matchbox ‘109E build. I
did break off the exhaust stubs and mounted them onto the supplied strip and put
them into place in the exhaust ports.
These were painted MM Flat Black then dry brushed with MM Rust, Testors
Steel and MM Metalizer Burnt Iron. I
glued the firewall and gun cowling area into place, painted them MM RLM 02 and
the glued the fuselage halves together.
Fit here was alright, by and large.
There is some filling and sanding needed on the lower section of the
nose. I also deduced that my port
fuselage half was slightly warped.
This would become a hassle later on.
| FINAL CONSTRUCTION |
 Remember
the warped port fuselage half?
Well, it created a small step at front of the wing root that I sanded down.
I then added the cowling and side panels at this time with the warp in
the fuselage throwing off the fit of the cowling.
Argh! And do you
recall the slight taper of the fuselage that I mentioned earlier in this build?
Well, this all conspires to make closing the front end up a real chore.
Should you choose to go this route take your time and sand/trim in small
increments. I had to sand the front
(i.e.
nose) of the cowling to get a flush
fit with the spinner. Before gluing
the cowling in place I glued the pair of cannon muzzle covers into their
respective ports. I then added the
gun barrel insert, painting it MM Metalizer Burnt Iron and the dry-brushing it
with Testors Silver. Also due to
the slight taper a spreader bar was mad from sprue and glued in place to widen
the backside of the cowling for a better fit.
Note that the port side panel will need to be trimmed along with the
lower portion of the fuselage where it mates to the panel.
The fit here is iffy and once you glue the supercharger intake in place
you will need to sand and trim to get a flush fit here.
I used Plastruct liquid cement to get everything to stay together and
still be able to manipulate it as need be.
Plus you’ll need it to fill the gaps between the panels.
After wrapping this up I went to glue the gun cowling into place and
promptly discovered that the gun tray would need to be completely torn out to do
this!
Are you kidding me?
The instructions clearly show that you mount the engine firewall and gun
tray into place. So, this snafu
I’ll kindly leave at Eduard’s feet.
Furthermore fit of the gun cover is very bad with the fuselage being just a hair
wider than the cover. So, some
trimming and s
Remember
the warped port fuselage half?
Well, it created a small step at front of the wing root that I sanded down.
I then added the cowling and side panels at this time with the warp in
the fuselage throwing off the fit of the cowling.
Argh! And do you
recall the slight taper of the fuselage that I mentioned earlier in this build?
Well, this all conspires to make closing the front end up a real chore.
Should you choose to go this route take your time and sand/trim in small
increments. I had to sand the front
(i.e.
nose) of the cowling to get a flush
fit with the spinner. Before gluing
the cowling in place I glued the pair of cannon muzzle covers into their
respective ports. I then added the
gun barrel insert, painting it MM Metalizer Burnt Iron and the dry-brushing it
with Testors Silver. Also due to
the slight taper a spreader bar was mad from sprue and glued in place to widen
the backside of the cowling for a better fit.
Note that the port side panel will need to be trimmed along with the
lower portion of the fuselage where it mates to the panel.
The fit here is iffy and once you glue the supercharger intake in place
you will need to sand and trim to get a flush fit here.
I used Plastruct liquid cement to get everything to stay together and
still be able to manipulate it as need be.
Plus you’ll need it to fill the gaps between the panels.
After wrapping this up I went to glue the gun cowling into place and
promptly discovered that the gun tray would need to be completely torn out to do
this!
Are you kidding me?
The instructions clearly show that you mount the engine firewall and gun
tray into place. So, this snafu
I’ll kindly leave at Eduard’s feet.
Furthermore fit of the gun cover is very bad with the fuselage being just a hair
wider than the cover. So, some
trimming and s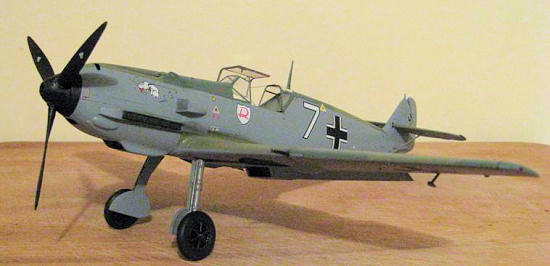 uper
glue go this into place. Eduard may
give you the option of buttoning things up but it’s just not a simple thing to
do.
uper
glue go this into place. Eduard may
give you the option of buttoning things up but it’s just not a simple thing to
do.
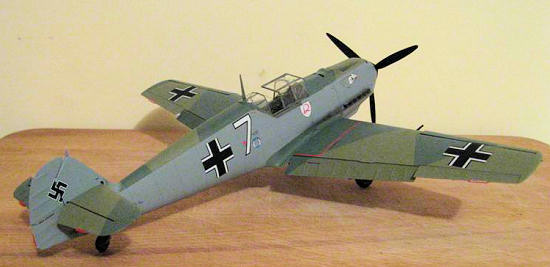
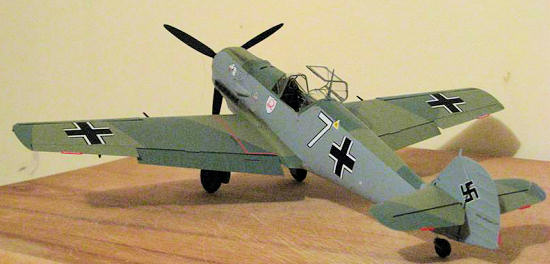
| COLORS & MARKINGS |
 Being 220
miles away from my LHS I reverted to mixing up a batch to match the MM color.
I used an approximate 65/25/10 mix of MM RLM 78, MM RLM 80, and MM German
Uniform Feldgrau. Suitably pleased
with this I sprayed it on and let the paint dry overnight.
The following day I used Testors Gloss Coat to get a smooth surface for
the decals. Eduard’s decals are
thin with excellent registry and opacity.
They also can withstand a decent amount of movement and abuse for those
of us that are a bit ham-fisted. I
used Solveset to snuggle them down with no adverse affects.
The wing walk stripes are a real hassle to line up though and my port
side decal suffered from my frustration.
It’s as lined up as I could get it!
Anyhow, once the decals had dried I painted the gear bays Floquil RLM 02
and the trim tabs with Testors Flat Red.
To wrap up this section I used Testors Flat Coat to seal the decals and
give a proper finish.
Being 220
miles away from my LHS I reverted to mixing up a batch to match the MM color.
I used an approximate 65/25/10 mix of MM RLM 78, MM RLM 80, and MM German
Uniform Feldgrau. Suitably pleased
with this I sprayed it on and let the paint dry overnight.
The following day I used Testors Gloss Coat to get a smooth surface for
the decals. Eduard’s decals are
thin with excellent registry and opacity.
They also can withstand a decent amount of movement and abuse for those
of us that are a bit ham-fisted. I
used Solveset to snuggle them down with no adverse affects.
The wing walk stripes are a real hassle to line up though and my port
side decal suffered from my frustration.
It’s as lined up as I could get it!
Anyhow, once the decals had dried I painted the gear bays Floquil RLM 02
and the trim tabs with Testors Flat Red.
To wrap up this section I used Testors Flat Coat to seal the decals and
give a proper finish.
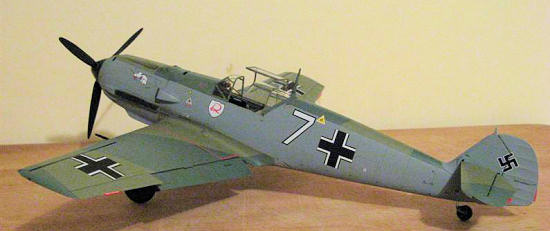
 slats,
rudder PE rudder actuators. The
tail wheel/landing gear was glued into place but the fit on the main gear is a
bit loose. It’s best to use a
liquid cement to make sure that they are set at the proper angle and I would let
the aircraft sit overnight (as I did)
to make sure you have a strong bond.
The main wheels were weathered with pastels and glued to the main gear.
The prop/spinner was tacked into place with a small amount of Blu-Tac.
slats,
rudder PE rudder actuators. The
tail wheel/landing gear was glued into place but the fit on the main gear is a
bit loose. It’s best to use a
liquid cement to make sure that they are set at the proper angle and I would let
the aircraft sit overnight (as I did)
to make sure you have a strong bond.
The main wheels were weathered with pastels and glued to the main gear.
The prop/spinner was tacked into place with a small amount of Blu-Tac.
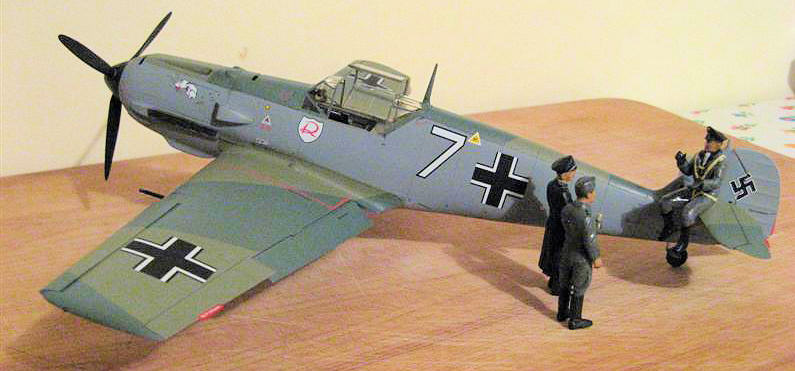
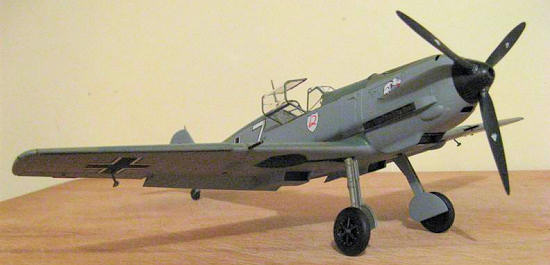
| CONCLUSIONS |
This kit is, without a doubt, the finest Bf 109
‘Emil’ to date. The older Hasegawa
and Matchbox ‘Emil’s are certainly capable of being built very nicely…with
much aftermarket help. The
Eduard kit, while lacking detail in the engine assembly, is a complete model
that requires no additional parts to be “brought up to snuff”.
The five decal choices and PE sets just add to the value.
However, it does suffer from a few issues.
Where the kit does fall short is in both the fit and a lack of complete
fidelity/accuracy in the engine assembly.
The instructions are not entirely correct with regards to building the
cowling and gun areas closed. A
select few of the PE pieces are either hard to properly place or are really not
even needed. And the fit of the
canopy is not very good in either the open or closed position.
These issues can be remedied though by the competent and patient modeler.
In doing so a good model may become an outstanding model.
I highly recommend this model for both a moderate and experienced
modeler.
| REFERENCES |
 Modeling
the Messerschmitt Bf 109B/C/D/E;
Green, Brett, Osprey Publishing, 2006.
ISBN: 1-84176-940-1, pp 4-6, 10-19, 43-47.
Modeling
the Messerschmitt Bf 109B/C/D/E;
Green, Brett, Osprey Publishing, 2006.
ISBN: 1-84176-940-1, pp 4-6, 10-19, 43-47.
Warplanes of the Third Reich;
Green, William, Doubleday, 1970. Catalog card number 88-29673, pp 540-547.
German Aircraft Cockpits 1911-1970,
Cohausz, Peter W., Schiffer Publishing, 2003. ISBN: 0-7643-1873-X, pp 236-241.
Osprey Masterclass:
World War 2 Luftwaffe Fighter Modeling,
Coughlin, Geoff, Osprey Publishing, 2000. ISBN: 1-84176-060-9
The Great Book of World War II Airplanes,
Grinsell, Robert, Zokeisha Publications, 1984. ISBN: 0-517-459930, pp 444,
445.
February 2010
If you would like your product reviewed fairly and quickly, please contact me or see other details in the Note to Contributors.