Hasegawa 1/32 Messerschmitt Bf-109F-2
| KIT #: | St 31 |
| PRICE: | £39-00 |
| DECALS: | Three options |
| REVIEWER: | Frank Reynolds |
| NOTES: | Eagle Cals No 32136. Bf109F-2s part 2. Price £17-50 |
| HISTORY |
 Sleek and sophisticated, the BF109F series was
state of the art in the battlespace of 1941-42. Six years after the first flight
of the Bf109, a major revision of the airframe saw a more streamlined shape in a
closer cowled engine and close fitting under wing radiators. The tail was
strengthened to allow the support struts to be eliminated and rounded wing tips
improved handling. A more powerful Daimler Benz 601E engine of 1350hp was
installed. Agile and powerful, the 109F is arguably the peak of development of
the breed.
Sleek and sophisticated, the BF109F series was
state of the art in the battlespace of 1941-42. Six years after the first flight
of the Bf109, a major revision of the airframe saw a more streamlined shape in a
closer cowled engine and close fitting under wing radiators. The tail was
strengthened to allow the support struts to be eliminated and rounded wing tips
improved handling. A more powerful Daimler Benz 601E engine of 1350hp was
installed. Agile and powerful, the 109F is arguably the peak of development of
the breed.
| THE KIT |
Twelve grey coloured parts frames from Hasegawa’s range of mouldings for their 109 series are packed with one of clear, a small fret of poly caps and a small bag of self-adhesive straps for the rear fuselage. Instructions consist of one large multi-fold sheet to A4 size, offering eight pages although just six provide 15 stages of pictograms and exploded views underlining just how simple the Hasegawa kits are in concept. The dark grey plastic parts were cleanly moulded with no signs of flash.
The kit decal sheet would only provide stencils and an instrument panel for this project although seat belts are also offered in decal form.
 The Eagle Cal pack offers a choice of four
Luftwaffe 109F-2s from Operation Barbarossa, the invasion of the USSR in 1941
and they illustrate an intriguing period in Luftwaffe camouflage and markings
when standard camo schemes were modified at unit level. Each illustrates an
aircraft that was originally showing plain Light Blue RLM76 to the fuselage
sides and under surfaces with upper surfaces of RLM 74 Green and RLM 75
Grauviolet. Large bands of Yellow to the nose, rear fuselage and wingtips are
typical of the early war period when the Luftwaffe had grown used to pushing its
opposition aside in short sharp campaigns and could happily display garish
warpaint. The complex campaign in the USSR forced a rethink that saw the
colouring toned down and each subject on the sheet is different, one has a
pattern similar to reptile scales on the fuselage , two have mottled blotches
and one has smoke rings of RLM70 to the fuselage and areas of the same colour
overlaid on the upper wing paintwork.
The Eagle Cal pack offers a choice of four
Luftwaffe 109F-2s from Operation Barbarossa, the invasion of the USSR in 1941
and they illustrate an intriguing period in Luftwaffe camouflage and markings
when standard camo schemes were modified at unit level. Each illustrates an
aircraft that was originally showing plain Light Blue RLM76 to the fuselage
sides and under surfaces with upper surfaces of RLM 74 Green and RLM 75
Grauviolet. Large bands of Yellow to the nose, rear fuselage and wingtips are
typical of the early war period when the Luftwaffe had grown used to pushing its
opposition aside in short sharp campaigns and could happily display garish
warpaint. The complex campaign in the USSR forced a rethink that saw the
colouring toned down and each subject on the sheet is different, one has a
pattern similar to reptile scales on the fuselage , two have mottled blotches
and one has smoke rings of RLM70 to the fuselage and areas of the same colour
overlaid on the upper wing paintwork.
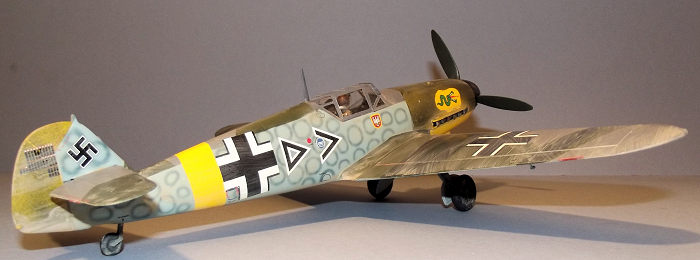
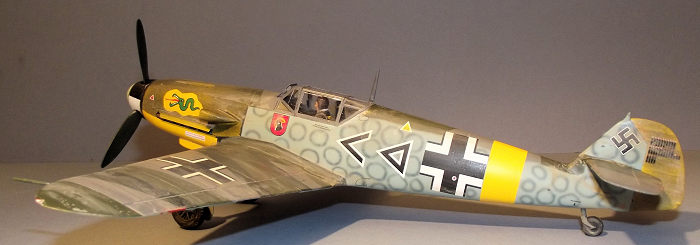
Eagle Cal provide all unit badges and insignia, national insignia for two aircraft and a separate sheet of smoke rings for the fuselage sides of one aircraft.
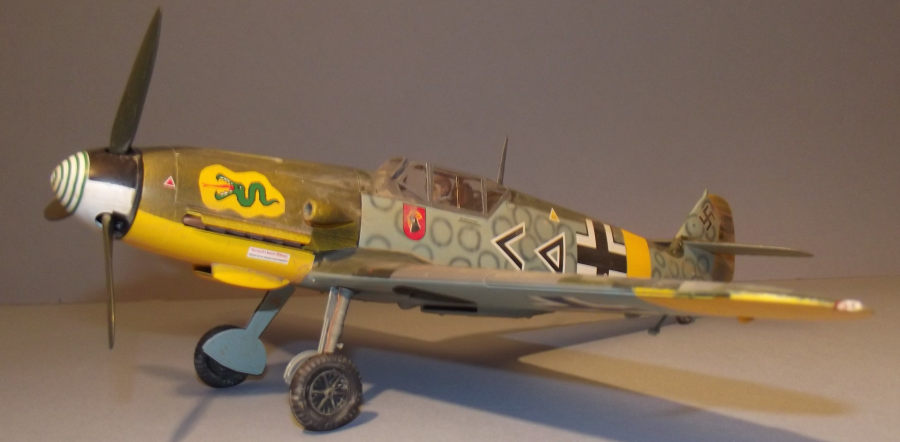
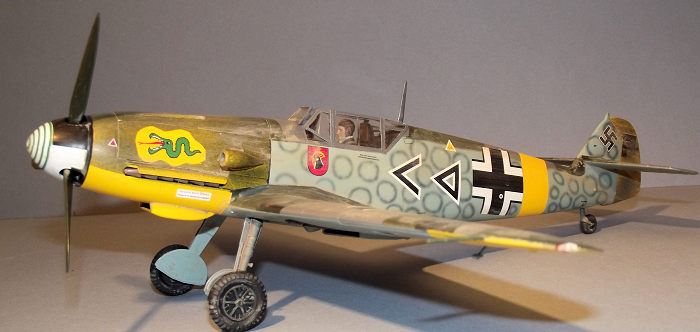
My chosen scheme was that of Hptmn. Hans von Hahn of Stab 1/JG.3 July 1941.
| CONSTRUCTION |
The plan was to provide an example of the sleek 109F to fit into my collection, with a eye on a colourful paint scheme.
I found the sort of decals that I needed but could not locate a boxing of a 109F-2 anywhere on the web and having heard that Trumpeter’s offering is not what it claims to be, I settled for Hasegawa’s proven Bf109F-4 trop and resolved to backdate it to the earlier version.
Everything depended on whether I could backdate the Hasegawa kit. The fuselage side intake for the supercharger must be much slimmer and flatter than the tropicalised variant and the undercowl oil cooler intake is shallower. The lower intake one piece moulding was suitably ground down on a sheet of wet and dry abrasive paper, reducing the joining face by a little over 1.5m until it seemed to match the drawings that I have in various publications. The side intake required more work. It had a noticeably curved and bulged profile that needed to be flattened and it was clear that this would cut right through the side walls. Before the halves were joined the interior was packed out with offcuts of solid plastic scrap from the sprue frames, glued in and left to harden for a week. The two halves were joined, then carefully sanded down to a flatter, slimmer, profile. The intake was carefully opened out with a drill. After a few sessions of fettling I was satisfied that the modified parts looked about right. Unscientific but, hey, that’s modelling.
 The next possible deal breaker was the propeller.
My chosen smoke ring colour scheme had a complicated colour pattern to the
spinner. The propeller spinner, back plate and blades were first sprayed White
using Tamiya Ultra Fine White primer from a rattle can. The forward quarter of
the spinner and half of the main spinner were masked off with kabuki tape and
sprayed Black. The tricky part was in positioning the masking to accommodate the
two-part decal of closely spaced green rings around the nose of the spinner. If
the decals did not fit, or if one broke up, I would have had to switch to
another finishing option. Thankfully they went on fine with the assistance of
some Micro Set and Micro Sol.
The next possible deal breaker was the propeller.
My chosen smoke ring colour scheme had a complicated colour pattern to the
spinner. The propeller spinner, back plate and blades were first sprayed White
using Tamiya Ultra Fine White primer from a rattle can. The forward quarter of
the spinner and half of the main spinner were masked off with kabuki tape and
sprayed Black. The tricky part was in positioning the masking to accommodate the
two-part decal of closely spaced green rings around the nose of the spinner. If
the decals did not fit, or if one broke up, I would have had to switch to
another finishing option. Thankfully they went on fine with the assistance of
some Micro Set and Micro Sol.
The propeller blades, painted in Tamiya XF-27 Black Green, almost clicked into place on the spinner backplate, then a touch of glue secured the spinner to complete the propeller assembly which was set aside for the end of the build.
Hasegawa provides a cockpit interior that is simple but effective. A one piece floor and rear half bulkhead are mated to a front half bulkhead to form the basic structure. The rear breech section of the hub centre cannon was glued to its floor box, followed by installation of the rudder pedals, control column, seat pan and a pair of trim wheels. Hasegawa includes a seated pilot figure with a parachute backpack and harness moulded in. I went for the radical on this build and actually installed a pilot. So far as I can remember the last time that I committed such a radical act on an aircraft build was in the early 1960s. The figure has separate arms and legs and a choice of three heads, I settled for the version with a flying helmet and no oxygen mask. The overalls were brush painted with a home brew mix of dark Blue-Grey, with Black to represent a leather flying jacket and the pilot’s boots gloves and flying helmet painted Dark Brown. The moulded in parachute harness and seat belts were picked out in a pale hemp colour and the face received a splash of Tamiya flesh colour.
Rather than provide a cockpit tub, Hasegawa has moulded some cockpit detail onto the inside of the fuselage halves as a simplified representation of the various boxes and pipework to which a couple of switch boxes and levers are added. I elected to assemble all of these parts first and when dry they were airbrushed in Xtracrylix XA1203 RLM 66 Schwarzgrau, the same colour being applied to the cockpit floor and bulkhead assembly. While the airbrush was charged with RLM 66 the wheel hubs were painted, along with the instrument panel. An instrument panel decal is provided and this settled onto the raised detail of the panel with the assistance of a little decal softening solution.
Once the fuselage halves are joined, a frame of paired stub wing spars can be glued to the inside of the wing centre section and the whole box structure locked in place under the cockpit.
The wings are simple structures consisting of
upper and lower halves that are designed to slip onto the spars. Small radiator
grilles are buried in the wing structure and I painted them aluminium silver
before installation. The upper and lower wing halves can be joined without fuss
although care should be taken to ensure that there is no unwanted glue in the
slots that will house the wing spars – at least until you are ready to glue the
wings on. A large plug is installed in the fuselage nose to support the
propeller assembly and the upper and side cowl panels glued in place. The kit is
designed to allow the exhaust pipes and shrouds to be added from the
 outside so
they can be added at the end of the build and this avoids the need for awkward
masking. The supercharger intake was also set aside to be added at the finishing
stage.
outside so
they can be added at the end of the build and this avoids the need for awkward
masking. The supercharger intake was also set aside to be added at the finishing
stage.
While the main structure was settling the simple landing gear mouldings were dealt with. The one piece main legs and tailwheel fork were hand painted in RLM Grau 02 (Tamiya XF-22) and the tyres in XF-85 Rubber Black.
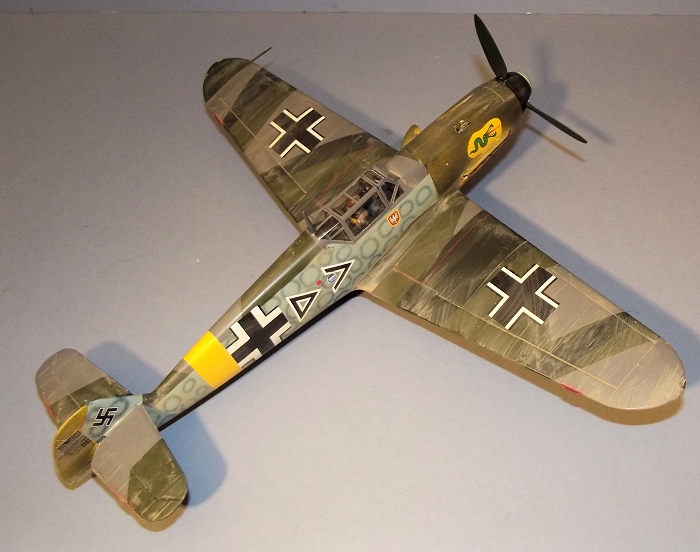
The main airframe was completed with the installation of one piece tailplane and elevator units to each side of the tail fin. The oil cooler intake was fixed to the lower engine cowl. Flaps to the rear edge of the wings are moulded with inset hinges so that they can be displayed open. This is at odds with the fixed ailerons, elevators and rudder which are moulded integrally with the adjacent flying surfaces, so the hinges were trimmed away and the flap assemblies cemented closed up. Similarly the leading edge slats were trimmed and cemented closed.
The cockpit area was completed by the installation of the gunsight and armoured headrest inside the hood, both painted Black to match the cockpit interior. The hood was secured with Humbrol Clearfix cement and the clear glazed areas masked with Tamiya tape trimmed with a fresh scalpel blade.
The airframe was checked over for any dings and scratches, and then sprayed overall with Grey auto primer dispensed from a rattle can. This has the bonus of providing a grey interior to the canopy glazing.
| COLORS & MARKINGS |
The finished scheme was intended to illustrate an
airframe that had standard camouflage and tactical markings that were
overpainted later. The whole airframe was first sprayed with Tamiya’s Fine White
Primer from a rattle can. When dry the Yellow areas to the whole nose, rudder,
rear fuselage band and underwing tips were airbrushed with Tamiya XF-3 Flat
Yellow. The Yellow areas were masked out and the undersides and fuselage sides
airbrushed with Tamiya XF-23 for the RLM 76 Blue. Careful masking was required
to ensure that the demarcation line along the fuselage spine was in the correct
position to allow for applying the smokescreen decals. I got around this by
scanning the decal sheet and printing off a paper copy that would enable me to
juggle around cut out paper patterns to ensure that everything would fit. The
upper surfaces were finished in RLM 74 (Tamiya XF-13) and RLM 75 (Xtracrylix
XA1207). This gave me a basic camouflage finish that could be modified. More
careful masking was needed to allow an overspray of RLM 70 Black green to areas
of the upper wing pattern and a misted overspray to tone down the Yellow of the
upper cowl and rudder. The cowl needed one a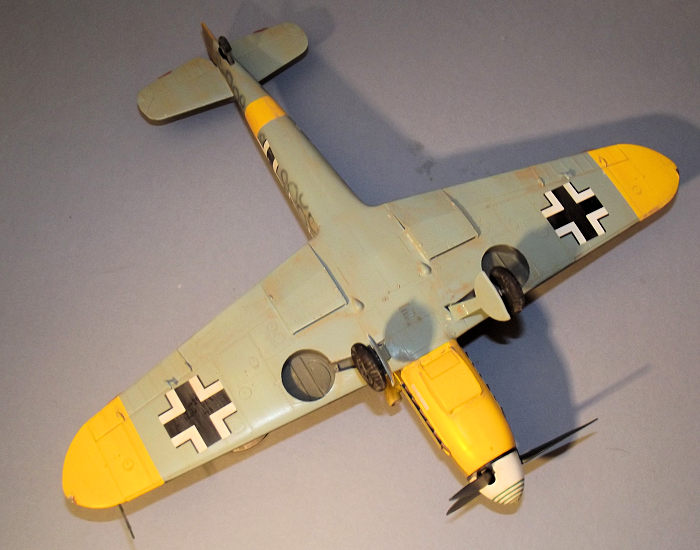 rea around the serpent insignia to
remain bright Yellow and this was achieved by a cut out pattern from the scanned
decal sheet.
rea around the serpent insignia to
remain bright Yellow and this was achieved by a cut out pattern from the scanned
decal sheet.
The layers of masking were stripped away and the airframe received two hand brushed coats of Future/Klear floor polish to provide a gloss finish for the decals. I decided to tackle the smoke rings first, the four part decals for each side were cut into smaller sections to allow for some juggling but they went on without fuss.
Left to settle for a couple of days, they were sealed in with another coat of Klear then the more conventional decals were applied.
The previously painted supercharger intake was glued to the side of the cowl, and the exhausts, painted red-brown were added. The whole airframe was sprayed with Xtracrylix flat varnish, and then received a generous wash of hand-brushed Pro Modeller Earth Brown, which was gently wiped away with a damp sponge to leave a healthy layer of streaked dirt. I tried to follow the direction of the airflow over the aircraft with the weathering. With my builds this is the last layer of finish. Not being varnished over, this water-based layer of paint can be washed away further at any time if I decide that the effect is overdone. The canopy masking could finally be removed.
Installation of the landing gear and propeller brought the project to life. The gear legs have good positive location pegs so there is no worry about correct alignment. The final detail was the addition of the wing tip light covers and fixing the external armour to the windscreen.
| CONCLUSIONS |
 Hasegawa’s 1/32 scale 109 are not the cheapest in
the market place but they are good and provide a nice straightforward project.
The parts count and design are little different from that found in a 1/72 scale
kit. They make a simple, pleasurable build. Having decals for the fuselage camouflage is
something of a novelty
Hasegawa’s 1/32 scale 109 are not the cheapest in
the market place but they are good and provide a nice straightforward project.
The parts count and design are little different from that found in a 1/72 scale
kit. They make a simple, pleasurable build. Having decals for the fuselage camouflage is
something of a novelty
I achieved what I set out to do in creating a colourful 109F for my collection, so I am reasonably pleased with the result.
| REFERNCES |
Eagle Cal’s instructions.
Messerschmitt Bf109 in Action, part 2, by John R. Beaman Jr., Squadron/Signal Publications 1983.
The Messerschmitt Bf109F, Profile Publications No 184, published 1971.
8 April 2019
Copyright ModelingMadness.com
If you would like your product reviewed fairly and fairly quickly, please contact the editor or see other details in the Note to Contributors.
Back to the Main Page Back to the Review Index Page Back to the Previews Index Page