| KIT #: | 5120 |
| PRICE: | $21.00 |
| DECALS: | Three options |
| REVIEWER: | Francisco Santoro |
| NOTES: | Parts for every important Bf 109E variant. |
| HISTORY |
Adolf Galland was a German WW2 ace and general, who served in the Luftwaffe since the times of the Condor Legion in Spain. He was born on March 19th 1912 in Westerholt, Westphalia. He became a glider pilot in 1929, and became a pilot in 1932 after graduating from the German Commercial School. He then applied to join the Reichswehr of the Weimar Republic, was accepted, but didn´t join in the end.
 Galland was
transferred to the Luftwaffe in 1934, and volunteered in 1938 to join the Condor
Legion to fly ground attack missions in support of the Nationalists in Spain.
During the invasion of Poland in 1939, Galland flew again ground attack
missions. His superiors allowed him to fly as a fighter pilot in early 1940.
Galland was
transferred to the Luftwaffe in 1934, and volunteered in 1938 to join the Condor
Legion to fly ground attack missions in support of the Nationalists in Spain.
During the invasion of Poland in 1939, Galland flew again ground attack
missions. His superiors allowed him to fly as a fighter pilot in early 1940.
During the Battle of France and Britain, Adolf Galland flew Messerschmitt Bf 109s. He had accumulated 57 kills by the end of 1940. During 1941, he stayed in France to combat the RAF and, by the November of the year, his tally had risen to 96. Also in November of 1941, because of the death of General der Jagdflieger (General of Fighters) Werner Mölders, Galland was appointed to this position until January 1945. As General der Jagdflieger, he was forbidden from flying combat.
Between January and February of 1942, Galland designed the Luftwaffe´s air cover for the Kriegsmarine´s Operation Cerverus, with a resounding success. For this he was awarded the Knight´s Cross of the Iron Cross with Oak Leaves, Swords and Diamonds.
 Over the
years, Galland´s relationship with Reichmarschall Hermann Göring deteriorated
because of their differences on how to handle Germany´s air defense and the
Luftwaffe. In 1944, and with the Allied bombing
offensive in full force, Göring blamed Galland for the Luftwaffe´s inability to
counter the bombings, and was relieved of his command in January 1945 because of
his constant criticism over the Luftwaffe´s leadership. Galland was placed under
house arrest after the Fighter Pilot´s Revolt. In
March 1945, Galland was allowed to fly again, and to form Jagdverband 44, and
all jet fighter unit, and flew with it until the end of the war.
Over the
years, Galland´s relationship with Reichmarschall Hermann Göring deteriorated
because of their differences on how to handle Germany´s air defense and the
Luftwaffe. In 1944, and with the Allied bombing
offensive in full force, Göring blamed Galland for the Luftwaffe´s inability to
counter the bombings, and was relieved of his command in January 1945 because of
his constant criticism over the Luftwaffe´s leadership. Galland was placed under
house arrest after the Fighter Pilot´s Revolt. In
March 1945, Galland was allowed to fly again, and to form Jagdverband 44, and
all jet fighter unit, and flew with it until the end of the war.
After WW2, Galland travelled to Argentina, acting as a consultant for the Argentinian Air Force. He returned to Germany later to manage his own business. He also befriended RAF aces Robert Stanford Tuck and Douglas Bader. Adolf Galland died in Oberwinter, Rhineland-Palatinate, on February 9th of 1996.
| THE KIT |
The
kit comes in Airfix´s tradition red top opening box, with a really great boxart
showing Adolf Galland battling Spitfire Mk.I DWoK over the skies of the British
countryside. Inside the box there were three sprues
(two grey and one clear) in a single sealed bag, with the clear parts sealed in
their own bag. The plastic inside is joined to the sprues with some fairly large
sprue gates for the big parts, and small sprue gates for the smaller parts. The
grey plastic has a pebbly surface to it and deep panel lines, perfect for those
who brush paint. The greatest thing about this kit (and for the price), is that
it comes with all the parts you may need to build your favourite Bf 109E
variant, from the E-1, going through the Jabo aircraft, to the E-7 and E-7/Trop
(4x50kg bombs, 1xSC250 bomb, three types of spinners, fuel tank, tropical filtre,
and ea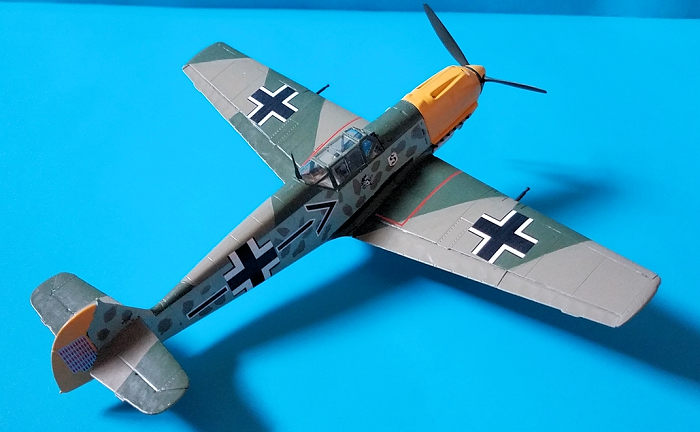 rly/late
canopy options). The clear parts are protected in their own bag, and the sprue
gates for those parts are rather hard to cut, so you have to be extra careful to
not break the parts. Painting instructions came in a single foldable sheet of
glossy paper, with the part listing on the back of it.
rly/late
canopy options). The clear parts are protected in their own bag, and the sprue
gates for those parts are rather hard to cut, so you have to be extra careful to
not break the parts. Painting instructions came in a single foldable sheet of
glossy paper, with the part listing on the back of it.
There are three decal options included:
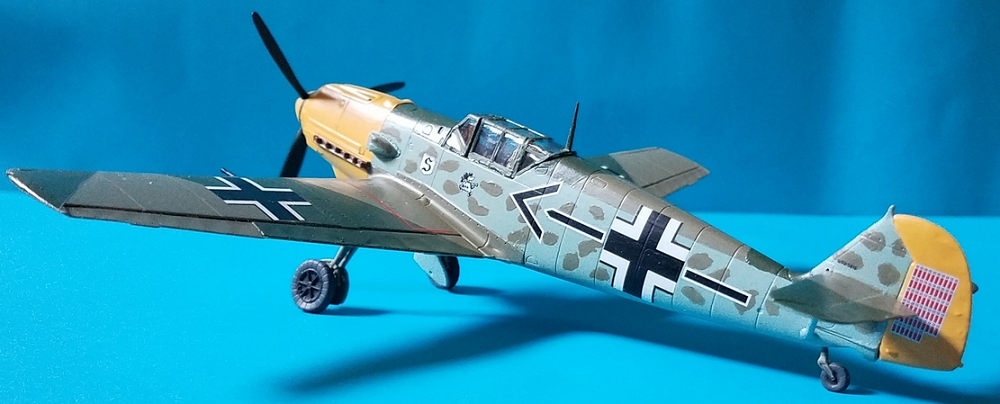
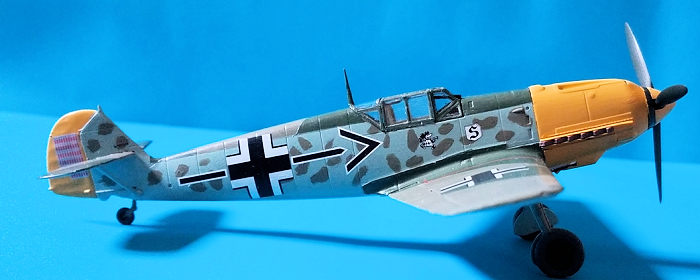
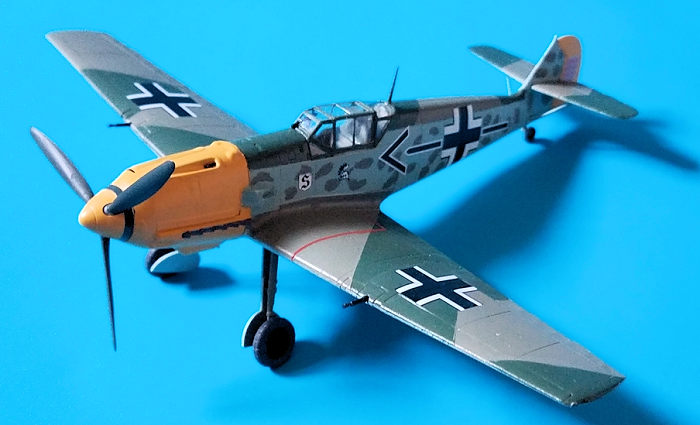
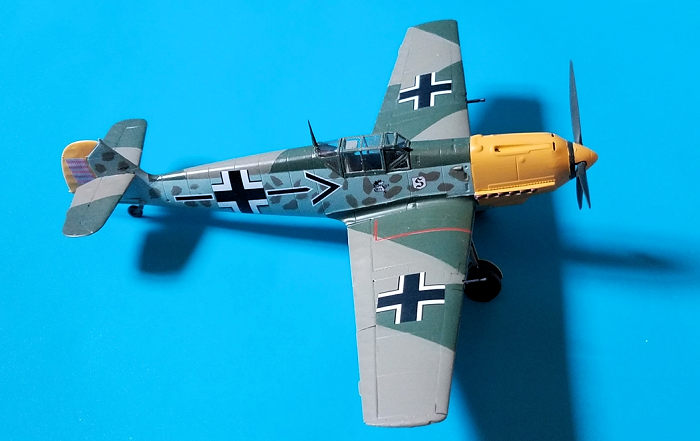
1) Adolf Galland´s JG26 Bf 109E-4/N with telescopic sight. Painted in RLM 04/02/71/65, with heavy RLM 71/02 mottling on the fuselage sides and yellow cowling and rudder.
2) Bf 109E-3 White 4, 4/JG51. Painted in RLM 02/65/71 with RLM 02 mottling.
3) Bf 109E-1 , Schlactgeschwader/Lehrgeschwader 2, painted in RLM 02/71/65 and with and RLM 71 cross-shaped camouflage pattern.
Other options of the kit are the separate flaps, slats, ailerons and elevators. Flaps and slats are keyed to be placed in the extended position. Should you want to raise them, you´ll have to cut the tabs and trim those pieces slightly, since they were designed to be glued extended. The sltas also have really thin plastic, so if you want to place them in the retracted postion, make sure to use CA glue instead of regular plastic glue, to avoid unwanted damage to the plastic.
| CONSTRUCTION |
Before opening this kit, I had tried my luck with Revell´s reboxed kit from ICM P-51C Mustang III in 1:48. Lack of locating holes and warped fuselage parts made me put the kit in my spare parts box, with lots of frustration. After that, and not wanting to clear my table, I decided to finally open this kit.
I
began with the cockpit. I painted all the parts with Revell 45, while also
painting the smaller ones such as the trim wheel and the control stick in silver
and black with a brown base. While that was drying, and cut the fuselage halves
from their sprue and glued two small pieces to each side, while also painting
the cockpit openings in Revell 45. Before gluing the cockpit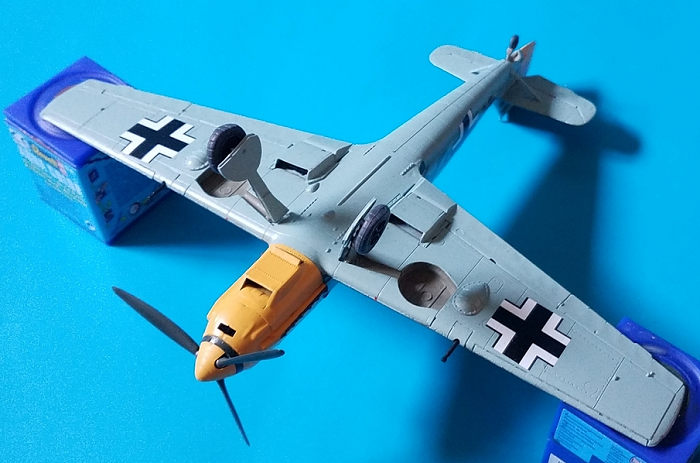 ,
I test fitted the fuselage halves, and they were a perfect fit. Due to the big
locating pegs, you can basically join the fuselage halves without glue.
,
I test fitted the fuselage halves, and they were a perfect fit. Due to the big
locating pegs, you can basically join the fuselage halves without glue.
With the cockpit dried, I glued it to one of the fuselage halves and left it drying, while I cut the propeller shaft and its backing plate, and glued them together while also taking care to have them aligned, and have a spinning propeller. After that was dry, the fuselage halves were glued together, and the propeller shaft was still spinning freely.
While the fuselage was drying, I cut the engine cowling, trimmed it a bit, and glued it to the fuselage assembly. I also built the nose radiator assembly and painted it in black. The piece that serves as a base for the radiator needs to be trimmed a lot, it won´t fit onto its opening otherwise. The fuselage was then completed after gluing the air intake to the left fuselage half.
With the fuselage complete, I took my attention to the wings. These are a simple single lower wing/two upper wings. Because I chose to built my plane as an E-4 model from the Battle of Britain, I opened the holes for the lower wing bulges that gave space to the MG/FF 20mm cannons. I glued the wings after that, and then glued the bulges. To make way for the 20mm cannons, you have to glue two inserts onto the wings. I test fitted one, and saw it didn´t have the greatest of fits, so I trimmed its locating point, and had a better fit (I repeated that for the other side).
With
the wings dry, I glued them to the fuselage, with a really nice fit between
both. I also glued the
 horizontal
stabilizers and the tailplane struts to the fuselage. The elevators were glued
in the neutral position.
horizontal
stabilizers and the tailplane struts to the fuselage. The elevators were glued
in the neutral position.
It was also at this time that I had to choose on gluing the slats and flaps in the extended or retracted position. I chose retracted, so I had to remove the locating tabs from both of them. I glued the flaps into their opening, but had to trim both to make them fit. Next came the slats, and I removed a chunk of one while I was removing the mounting peg from it. The slats were superglued into place, while also fixing the broken slat with superglue. The ailerons were glued last in the neutral position. There´s a lesson here, glue the slats and flaps in the extended position, it´ll save you a lot of trimming time.
| COLORS & MARKINGS |
The kit was simple to paint, RLM 02/71 on the upper surfaces, RLM 65 on the fuselage sides and lower surfaces, and yellow for the rudder and cowling. Due to the pebbly surface mentioned above, I didn´t need to brush many coats of paint, since the plastic had a good grip on them.
I masked the fuselage first, and painted it with Revell 45 (RLM 02) and Revell 39 (RLM 71). I next maske the fuselage spine and painted the fuselage with Revell 49 (RLM 65). The mottling was also painted at this time, not my best job, but I´m happy with it.
The wings and horizontal stabilizers were next. They were masked and painted too with Revell 45 (RLM 02) and Revell 39 (RLM 71). The undersides of the wings were painted in Revell 49 after the upper surfaces were dry.
 Before
painting the yellow bits, I made sure to sand the raised paint ridges of the
masking tape and the brush painting. I did this before the paint had time to
thoroughly dry, so I removed some paint while sanding. Lesson: Let the paint dry
properly before sanding. After that setback, and with the paint ridges mostly
gone, I touched up the areas where paint had lifted, and went on to paint the
yellow. Yellow areas were masked and painted
accordingly. These included the rudder, cowling, and propeller nose cone.
With the model fully dried, I brushed two coats of Revell´s clear varnish
and let it set.
Before
painting the yellow bits, I made sure to sand the raised paint ridges of the
masking tape and the brush painting. I did this before the paint had time to
thoroughly dry, so I removed some paint while sanding. Lesson: Let the paint dry
properly before sanding. After that setback, and with the paint ridges mostly
gone, I touched up the areas where paint had lifted, and went on to paint the
yellow. Yellow areas were masked and painted
accordingly. These included the rudder, cowling, and propeller nose cone.
With the model fully dried, I brushed two coats of Revell´s clear varnish
and let it set.
Decaling started soon after. I applied first the wing crosses, and watched with delight as I saw them conforming to the panel lines almost instantly. The fuselage decals came next, first the crosses, and then the bars and chevrons. The kill marks were also applied to the rudder. Next came the lower wing crosses, and with those dry, the walking area decals. The last decals to be added were the serial numbers on the vertical stabilizer. All the decals were given a coat of decal softener, which was left to dry, before the excess being wiped out by brushing water over it.
| FINAL CONSTRUCTION |
The landing gear legs were painted Revell 45 (RLM 02) and glued into their sockets. They have a really positive fit, and leave no room for error when trying to get the "109 stance" right. The landing gear covers were painted Revell 45 on the inside, Revell 49 (RLM 65 on the outside), and then glued into the struts.
 The cannons
were painted black, and glued into their openings (while almost losing both of
them). They´re a tight fit, you´ll have to make some pressure to make them fit.
The propeller was painted Revell 40 (RLM 70) and glued in place. With it
dry, I added the spinner (painted in yellow).
The cannons
were painted black, and glued into their openings (while almost losing both of
them). They´re a tight fit, you´ll have to make some pressure to make them fit.
The propeller was painted Revell 40 (RLM 70) and glued in place. With it
dry, I added the spinner (painted in yellow).
The hardest part was the canopy, the pieces were fragile and had to be removed very carefully from their sprue. Having big sprue attachment points for them didn´t help either. I masked and painted the three pieces, glued with clear glue Galland´s gunsight to the windscreen, removed the pegs for the open canopy on the central piece while also gluing the headrest. I tested the three pieces into the cockpit opening, and found they didn´t fit really well, so I trimmed the central part as much as I could to get a more or less decent fit. The clear pieces were then glued, and the model was finished.
| CONCLUSIONS |
A great model with a great price and great fit (excepting the canopy parts). No matter which version you choose, you´ll be left with plenty of spare parts for your next Bf 109E in 1:48, whether they´ll fit or not onto other company´s E models is another story.
The model was recently re-released by Airfix, so make sure to buy it!
| REFERENCES |
https://en.wikipedia.org/wiki/Adolf_Galland
25 October 2018
Copyright ModelingMadness.com
Thanks to
for the review kit. You can find this kit at your favorite hobby shop or on-line
retailer. If you would like your product reviewed fairly and
fairly quickly, please
contact
the editor or see other details in the
Note to
Contributors. Back to the Main Page
Back to the Review
Index Page
Back to the Previews Index Page