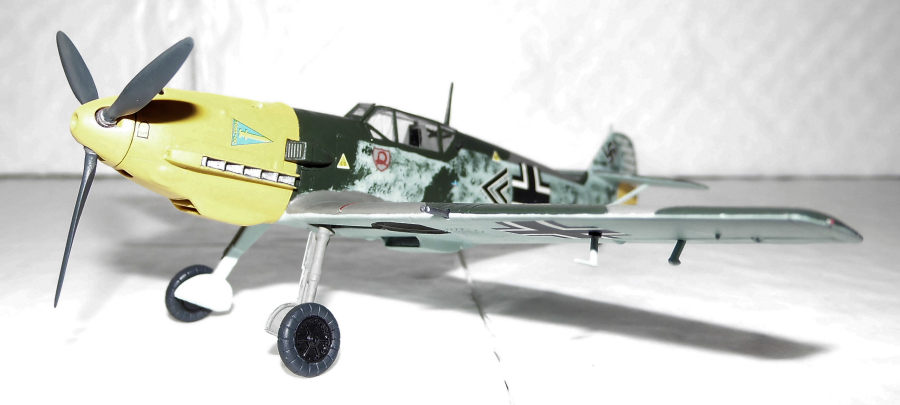
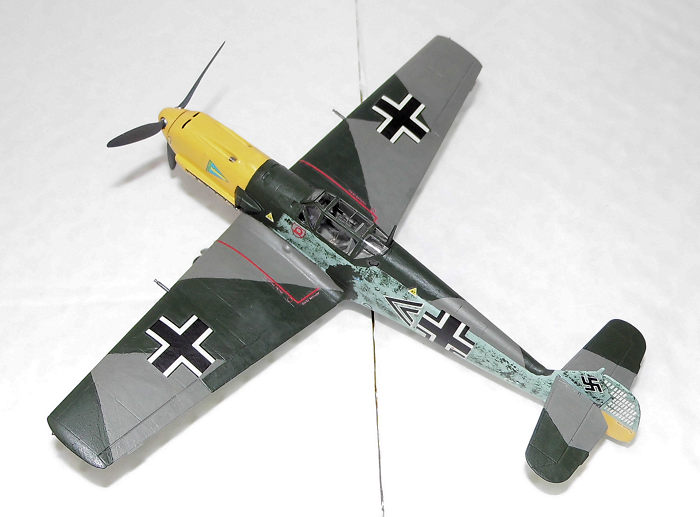
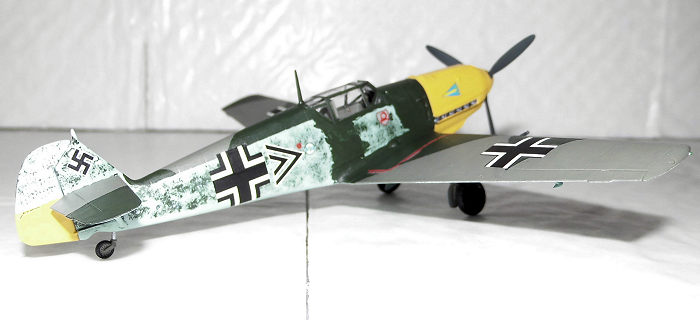
Tamiya 1/72 Bf-109E-4
| KIT #: | 60755 |
| PRICE: | 250 DKK SRP |
| DECALS: | Three options |
| REVIEWER: | Nicolai Plesberg |
| NOTES: | Advanta |
| HISTORY |
Entering production in late 1938 the Bf109E was essentially a more powerful variant of the former Bf109 variants; the DB601A replacing the Jumo 210, and requiring more cooling, the radiators were redesigned and moved to the inner rear section of the wings. The two-bladed propeller on the 109B/C/D was replaced by a VDM three-bladed propeller to absorb the greater power from the more powerful engine. 20mm cannons were also employed to improve the firepower over the earlier 109s, which typically only had four 7,92mm MG17s. This in contrary to the future opposing Spitfires and Hurricanes of RAF Fighter Command, which at this time only had eight cal .303 Browning machine guns and no cannon armament.
Some of the
first Bf109E’s were just evaluated during the final stages of the Spanish Civil
War before that conflict ended in March 1939. It was the Luftwaffe’s premier
fighter aircraft at the beginning of World War II; through the campaigns in
Poland, Denmark, Norway, the Benelux countries and France where it posed as a
serious opponent and literally wiped out any opposition. In the Battle of
Britain its weakness was suddenly clear; it had insufficient range to provide an
effective air cover for the bombers and the Spitfire of the RAF proved to be
superior, at least when flown by a pilot, who knew what he was doing. But some
of the Luftwaffe pilots wer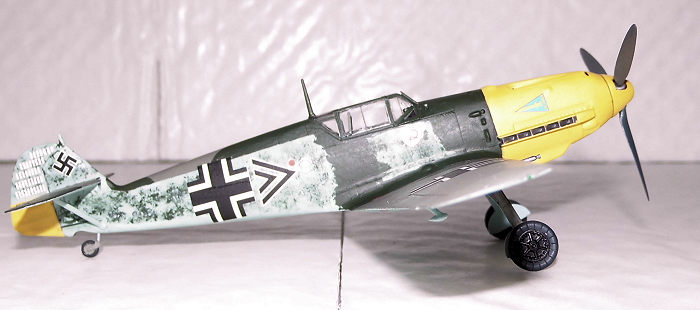 e veterans from the Spanish Civil War and a few were
aces, so they knew something of air to air combat, which the British pilots were
about to learn. The Spitfire Mk I and the Bf109E-3/4 was as such in technical
terms pretty equal – it was all about pilot ability that decided an outcome of a
dogfight between the two. In the end the RAF overcame the Luftwaffe onslaught
because of a tactical error made by the Germans; instead of upholding the
pressure on the RAF by continuously attacking its airfields the Germans instead
began attacking the cities giving the RAF time replacing their lost aircraft and
train new pilots not to mention of repairing their airfields. Because of this
game change the British succeeded to increase the losses on the German side to
such a level, that the Germans had no choice but to abandon their conquest plans
for Britain.
e veterans from the Spanish Civil War and a few were
aces, so they knew something of air to air combat, which the British pilots were
about to learn. The Spitfire Mk I and the Bf109E-3/4 was as such in technical
terms pretty equal – it was all about pilot ability that decided an outcome of a
dogfight between the two. In the end the RAF overcame the Luftwaffe onslaught
because of a tactical error made by the Germans; instead of upholding the
pressure on the RAF by continuously attacking its airfields the Germans instead
began attacking the cities giving the RAF time replacing their lost aircraft and
train new pilots not to mention of repairing their airfields. Because of this
game change the British succeeded to increase the losses on the German side to
such a level, that the Germans had no choice but to abandon their conquest plans
for Britain.
After this defeat the Bf109E remained in service although it was supplanted by the Bf109F from early 1941, but remained in production until it was tapering off at the end of 1941 after more than 4000 aircraft had been built. The Bf109F, was a refined variant with a more streamlined cowling, radiators, rounded wingtips, unbraced tail planes and a more powerful DB601N engine. Its only vice was that the armament consisted of only two cowling mounted MG 17s plus an engine mounted cannon – no guns were mounted in the wings. Willy Messerschmitt himself considered the F as an interim model (perhaps the reason for that it was only being produced in 2200 examples) as the ultimate version, the Bf109G, serving from May 1942 and to the end of the war produced in 23500 examples the most numerous variant, with dozens of subvariants build, and making the Bf109 one of the most produced warplanes of World War II.
| THE KIT |
 This is again an
example of Tamiya taking their 1/48 scale kit and shrinking it to the smaller
1/72 size. The engineering is, in large parts, more or less the same, but of
course the difference in size reflecting the necessity in making some
simplifications without compromising accuracy. Molded in grey plastic and
consisting of 46 parts with four in clear it features three different spinners,
bomb rack plus bomb (not used for any of the decal options included in this
boxing though), drop tank and alternate tropical filter for the supercharger
intake. Three decal options are given; first a plane from 7/JG 26 with yellow
cowling and rudder (and featuring the drop tank which identifies this as an E-7
subtype). Also featuring is a considerable number of kill marks on the rudder,
but unfortunately no pilot name is given. The second option is “black 8” from
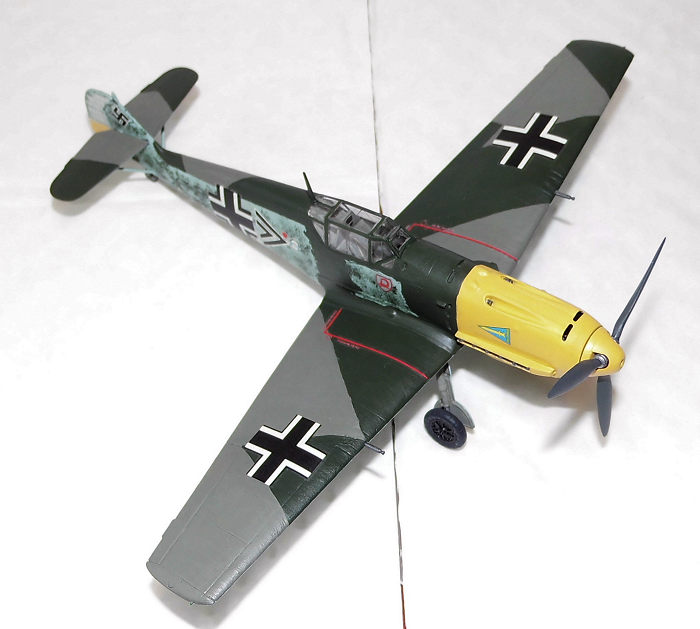
2/JG 27, which is the tropical variant given. The third option is from JG 2 and
flown by Major Helmut Wick – the option which I chose to build.
This is again an
example of Tamiya taking their 1/48 scale kit and shrinking it to the smaller
1/72 size. The engineering is, in large parts, more or less the same, but of
course the difference in size reflecting the necessity in making some
simplifications without compromising accuracy. Molded in grey plastic and
consisting of 46 parts with four in clear it features three different spinners,
bomb rack plus bomb (not used for any of the decal options included in this
boxing though), drop tank and alternate tropical filter for the supercharger
intake. Three decal options are given; first a plane from 7/JG 26 with yellow
cowling and rudder (and featuring the drop tank which identifies this as an E-7
subtype). Also featuring is a considerable number of kill marks on the rudder,
but unfortunately no pilot name is given. The second option is “black 8” from
2/JG 27, which is the tropical variant given. The third option is from JG 2 and
flown by Major Helmut Wick – the option which I chose to build.
| CONSTRUCTION |
I started by removing the larger parts (fuselage and wings) from the sprues and removing the spruegates. I then removed the interior parts though with “handles” in shape of a piece of the sprue gates to have a possibility to hold on while cleaning them (removing mold lines etc) before painting could commence. The head armorplate was cut as advised in the instructions for my chosen variant and the stick was glued to the floor. I added the seat adjustment lever, which was missing, since it was apparently too small to be shrunk from the 1/48 kit, but I wanted it in my cockpit, so that was done and it was glued to the seat.
The radiator
grilles were painted silver, while the rest of the interior of the radiators
went RLM 65 Light Blue. Then the
 wing pieces were joined. Parts of the interior
went RLM 66 Black Grey, while the rest was painted RLM 02 Grey together with the
gear and gear bays plus the inner side of doors. Some detail painting in the
cockpit was next once the RLM 02 had set; silver (together with the oleos),
black and red was utilised to do the job. The outer side of gear doors was
painted RLM 65.
wing pieces were joined. Parts of the interior
went RLM 66 Black Grey, while the rest was painted RLM 02 Grey together with the
gear and gear bays plus the inner side of doors. Some detail painting in the
cockpit was next once the RLM 02 had set; silver (together with the oleos),
black and red was utilised to do the job. The outer side of gear doors was
painted RLM 65.
As all this had dried the instrument panel was glued to the interior and glossed to accept the instrument decals. The seat was also glossed so the decal seat belts could be used. The decals were then applied, but unfortunately the lower panel decal (decal no 37) went into several pieces so it was omitted; I was not going to try and save it, as it was impossible. When dry they were sealed with gloss varnish; when dry given flat varnish as a final coat. Then the seat was glued to the floor and the gun sight to the instrument panel and the finished interior sat aside to dry completely through. I inserted one poly cap into the holder which then was carefully glued to the right fuselage half; so was the cockpit interior and the fuselage halves were joined.
When the fuselage had set I rubbed the seam with grain 1200 wet and dry sandpaper. Very seldom have I encountered such a great fit without any use of filler on the fuselage seam! I then attached the head armorplate in the canopy using clear gloss. The next subassemblies I dealt with were the carburettor air intake plus the propeller. Some silver was painted on the grille in the air intake as was the propeller hub. The hole through the hub was painted gun metal (the muzzle of the engine mounted cannon). The propeller blades went RLM 70 Black Green. With very few exceptions this is the color for German WWII propeller blades, so why Tamiya advises satin black in the instructions to do this is a bit of a mystery. Some touch up of the RLM 66 and RLM 02 colors in the cockpit was also done and while the cap for the RLM 02 tin was off, I also gave the canopy / windscreen frames a turn with a very fine brush!
The engine cowling piece was then glued to the fuselage. The parts for the carburettor intake, the lower part of the rudder plus the spinner were then given several coats of RLM 04 Yellow. With that success home I glued the wings and tail planes, to the fuselage. The model, now taking shape, I painted the wheel hubs satin black.
The next order was to assemble the carburettor intake and attach it to the fuselage just about completing the airframe. The propeller / spinner was assembled, as was the main gears (including doors) and the tires painted tire black. At this stage I dealt with the seams on the airframe and the only place that needed filler was at the wing / rear fuselage seam. It’s rather impressive, but this is probably the best fitting 1/72 kit that I have ever build – that little filler must be something of a rarity among 72nd scale kits! As the airframe was complete except for the canopy, tail plane bracing struts and rudder – the latter items was saved to ease painting of the tail section. But the canopy and the antenna mast for that matter was glued on using clear gloss. As soon as the seams / gaps had been dealt with the complete airframe was cleaned thoroughly before it went to the paint shop. To facilitate painting I tried a new approach; instead of mounting the gear, as I usually do, I used wooden toothpicks to act as temporary gear until painting had been done. Their ends were cut and adapted especially to fit the slots intended for the gear and it worked admirably. To get an extra tight fit I moistened the ends so the wood would expand and be even more firm in the slots.
| COLORS & MARKINGS |
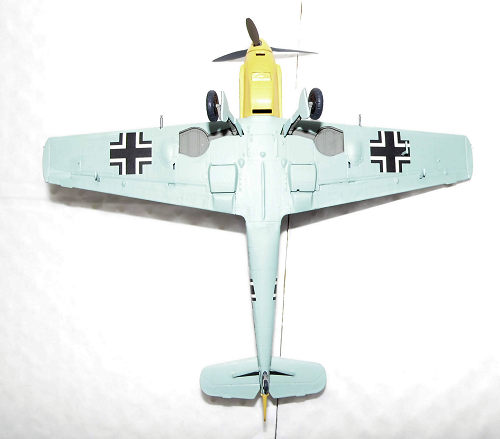
 The under
surfaces went RLM 65 Light Blue and needed two coats to cover perfectly. I then
did some masking and painted the RLM 02 Grey part of the camouflage scheme. Two
coats were also here necessary to get a perfect coverage. The masking tape was
removed immediately after the second coat had been applied. Then the rest of the
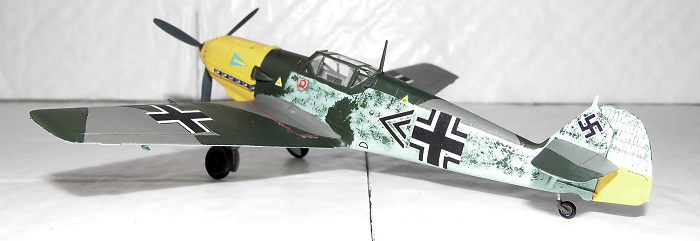
upper surfaces was painted RLM 71 Green; the permanent areas of wings, tail
planes and the upper fuselage needed two coats, while the mottle on the fuselage
sides were applied once using a beat up brush I specially keep for such paint
jobs. Then it was up for some touch up, especially the yellow areas needed it,
but as soon as it was done together with the last detail painting the rudder was
glued to the fin. After the obligatory glossing the markings went on. They
worked okay although they silvered a bit. They also appeared to be a bit stiff
so making them to conform to the surface was bit of a challenge. Setter /
softener would probably have helped here, but I have experienced mixed results
using those products.
The under
surfaces went RLM 65 Light Blue and needed two coats to cover perfectly. I then
did some masking and painted the RLM 02 Grey part of the camouflage scheme. Two
coats were also here necessary to get a perfect coverage. The masking tape was
removed immediately after the second coat had been applied. Then the rest of the
upper surfaces was painted RLM 71 Green; the permanent areas of wings, tail
planes and the upper fuselage needed two coats, while the mottle on the fuselage
sides were applied once using a beat up brush I specially keep for such paint
jobs. Then it was up for some touch up, especially the yellow areas needed it,
but as soon as it was done together with the last detail painting the rudder was
glued to the fin. After the obligatory glossing the markings went on. They
worked okay although they silvered a bit. They also appeared to be a bit stiff
so making them to conform to the surface was bit of a challenge. Setter /
softener would probably have helped here, but I have experienced mixed results
using those products.
When the decals had dried and wiped with an antistatic cloth they were sealed in with gloss clear, to reduce the silvering, though not all the silvering disappeared, before giving them the final flat coat. When the gear and the final parts had been attached and painted the last step was to squeeze the propeller in place and my Tamiya 1/72 scale Bf109E-4 was finished.
| CONCLUSIONS |
 Well, this is
probably the least filler demanding kit that I’ve ever build and the fit is
excellent. It also is pretty accurate, but all this comes with a price. So if
you’re ready to pay that then you’ll have a very enjoyable modeling experience.
I have not build the new tool Bf109E that Airfix released a few years ago, but
it, with certainty, can be obtained for a fraction of the price of the Tamiya
kit. Regarding accuracy the finished kit measures up good, even though I’m aware
that the general perception of the Tamiya kit, is, that the rear fuselage is a
bit too short. However, after having checked the dimensions, I must say that
Tamiya got it right in every way; the total length of the fuselage, from the
rudder’s trailing edge to the spinner tip stems accurately when calculating from
data of the real aircraft. The placement of the cockpit also seems to be spot
on, so why some folks say that the rear fuselage is too short is a bit of a
mystery. Perhaps if their perception is based on an incorrect drawing it’s
understandable, but no excuse in my view. As a reviewer of model kits, one has a
responsibility to communicate a true and correct conclusion of a kit’s given
accuracy. If a drawing is not to be trusted, then there is really only one way;
to check the dimensions oneself. It’s in fact not that hard to do; a ruler and
objects with straight and perpendicular edges is all that’s needed!
Well, this is
probably the least filler demanding kit that I’ve ever build and the fit is
excellent. It also is pretty accurate, but all this comes with a price. So if
you’re ready to pay that then you’ll have a very enjoyable modeling experience.
I have not build the new tool Bf109E that Airfix released a few years ago, but
it, with certainty, can be obtained for a fraction of the price of the Tamiya
kit. Regarding accuracy the finished kit measures up good, even though I’m aware
that the general perception of the Tamiya kit, is, that the rear fuselage is a
bit too short. However, after having checked the dimensions, I must say that
Tamiya got it right in every way; the total length of the fuselage, from the
rudder’s trailing edge to the spinner tip stems accurately when calculating from
data of the real aircraft. The placement of the cockpit also seems to be spot
on, so why some folks say that the rear fuselage is too short is a bit of a
mystery. Perhaps if their perception is based on an incorrect drawing it’s
understandable, but no excuse in my view. As a reviewer of model kits, one has a
responsibility to communicate a true and correct conclusion of a kit’s given
accuracy. If a drawing is not to be trusted, then there is really only one way;
to check the dimensions oneself. It’s in fact not that hard to do; a ruler and
objects with straight and perpendicular edges is all that’s needed!
This kit is recommended to anyone interested in the Bf109 presumed that their economy allows it!
| REFERNCES |
The Illustrated Encyclopedia of Combat Aircraft of World War II by Bill Gunston, Tiger Books International PLC, London 1990. ISBN 1-85501-096-8
Aircraft of World War II by Chris Chant, Friedman/Fairfax Publishers © 1999 Amber Books Ltd. ISBN 1-58663-303-1
14 December 2020
Copyright ModelingMadness.com
If you would like your product reviewed fairly and fairly quickly, please contact the editor or see other details in the Note to Contributors.
Back to the Main Page Back to the Review Index Page Back to the Previews Index Page