
Hasegawa 1/48 Bf-109E-4/7
| KIT #: | J2 |
| PRICE: | $10 “special offer” in 2005 |
| DECALS: | Seven options |
| REVIEWER: | Spiros Pendedekas |
| NOTES: |
| HISTORY |
 Peter-Paul
Steindl was an Austrian pilot born on 12th May 1914. He was the Staffelkapitän
of 5./JG 26 from 7th April 1943 until 1st May 1943 and of 11./JG 26 from 20th
June 1943 until 3rd November 1943 when he was shot down by P-47s and injured,
his Bf 109 coming down east of Friesland. On 9th January 1945 he was killed when
his Fw 190 D-9, WNr. 210 983, "Blaue 10" crashed southeast of Fürstenau airfield
during a test flight after a repair, the place of his burial being the Fürstenau
cemetery.
Peter-Paul
Steindl was an Austrian pilot born on 12th May 1914. He was the Staffelkapitän
of 5./JG 26 from 7th April 1943 until 1st May 1943 and of 11./JG 26 from 20th
June 1943 until 3rd November 1943 when he was shot down by P-47s and injured,
his Bf 109 coming down east of Friesland. On 9th January 1945 he was killed when
his Fw 190 D-9, WNr. 210 983, "Blaue 10" crashed southeast of Fürstenau airfield
during a test flight after a repair, the place of his burial being the Fürstenau
cemetery.
Steindl was married to Hedy Steindl, born Schmidt. According to his death notice
his name was Paul-Ernst, deeming somewhat strange the fact that he is always
called Peter-Paul or Paul. His claims, listed all as a Hauptmann, included one
Spitfire, two LaGG-3s, one La-5, three Il-2s, one Mosquito and one B-17.
| THE KIT |
 This is one
of the four initial “E” series versions of the Bf 109 that Hasegawa came with in
1988. Nonetheless a promising kit series, state of the art back then, but flawed
by few inaccuracies, the main being a thinner rear fuselage and a wrong shaped
cowling. Though not too prominent for a number of modelers, Hasegawa wasted no
time fixing those two inaccuracies by shaving off some material from the
existing molds and releasing a new, “corrected” “E” series, carrying the prefix
"Jt", instead of the previous "J".
This is one
of the four initial “E” series versions of the Bf 109 that Hasegawa came with in
1988. Nonetheless a promising kit series, state of the art back then, but flawed
by few inaccuracies, the main being a thinner rear fuselage and a wrong shaped
cowling. Though not too prominent for a number of modelers, Hasegawa wasted no
time fixing those two inaccuracies by shaving off some material from the
existing molds and releasing a new, “corrected” “E” series, carrying the prefix
"Jt", instead of the previous "J".
Whereas the aforementioned inaccuracies not only are noticeable by the Experten,
but also by the casual viewer (particularly in a side by side comparison with a
“correct” kit), they might not be too obvious to a number of us when glancing at
the completed kit, meaning that getting one of those otherwise good kits at
typically very low prices and building them for your showcase might not be such
a negative of an idea.
The specific kit was bought from an Athens hobby shop back in the mid 2000s, together with the equally “wrong” initial release E-3. For a more detailed look at the kit’s contents, together with a short history of the type, you may read the preview found at the MM archives.
| CONSTRUCTION |
I started by assembling
the cockpit and then sandwiching it between the fuselage halves, together with
the PE oil cooler intake grill (to which the styrene splitter flap had been
previously attached). The base cockpit and oil cooler intake color was Hu31 (for
the RLM02), while the dashboard, various consoles and boxes were painted black,
then silver dry-brushed and had some "knobs" painted red. The seat's molded-on
seat belts were painted khaki with silver buckles. The stick boot was painted
“leather” and the stick grip black with steel top, as seen in images available
on the web.
Moving to the wings, I affixed the wing mounted radiator grilles in place,
securing them with the very cleverly designed styrene pieces that make up the
radiator housings. While instructions typically call for attaching the upper
wing halves to the lower half and then attaching the assembled wing under the
fuselage, I used a somewhat improvised method to minimize the possibility of ga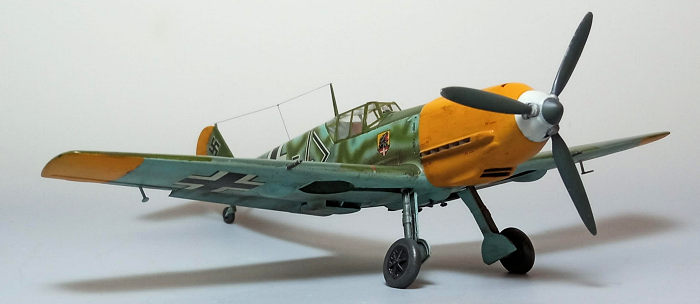 ps
in the root area: first removing all locator pins, I attached the lower half of
the wing to the assembled fuselage. I then glued the upper halves only at the
roots (opting for a gap-less joint there), then essentially let them rest on the
bottom half (this was where the removal of locator pins helped) and secured the
joints by using the capillary action of water thin styrene glue.
ps
in the root area: first removing all locator pins, I attached the lower half of
the wing to the assembled fuselage. I then glued the upper halves only at the
roots (opting for a gap-less joint there), then essentially let them rest on the
bottom half (this was where the removal of locator pins helped) and secured the
joints by using the capillary action of water thin styrene glue.
I left the flaps off to pose them "down," but attached the slats "retracted," as
this was a common "Emil" posture. I also decided to give the elevators some
extra life by separating them from the horizontal stabilizers, running the back
side of my hobby knife through the borders, in order to pose them drooped. The
“remaining” horizontal stabilizers were then attached to the fuselage sides.
Hasegawa provides the spinner’s rear base as a separate piece that is to "trap"
the prop shaft inserted from the inside of the nose before attaching the upper
cowling: this is to accommodate for rotating, with the rest of the prop able to
be attached to the plate in later stages. While not a bad approach, the seam
between the base plate and the spinner will have to somehow be addressed upon
attaching the prop, something that a number of us will not find too easy with
the prop mounted to the nose at those late stages.
My method was to secure the shaft in place by judiciously gluing styrene bits at
the nose innards in such a way that the shaft could spin freely but could not be
pushed back. This way, instead of attaching the rear plate to the shaft, I could
assemble it with the prop and easily treat all seams, with the complete prop
itself affixed in position at the end stages.
To make painting easier, I did not attach the tail planes' supporting struts or
cowling mounted guns and also removed the molded-on wing guns to make sanding
the leading edges easier. The nicely molded 2-piece supercharger air intake was
then attached, followed by the centerline bomb rack. After some minimal filling
and sanding (fit was mostly excellent), I took the Emil to the paint shop!
| COLORS & MARKINGS |
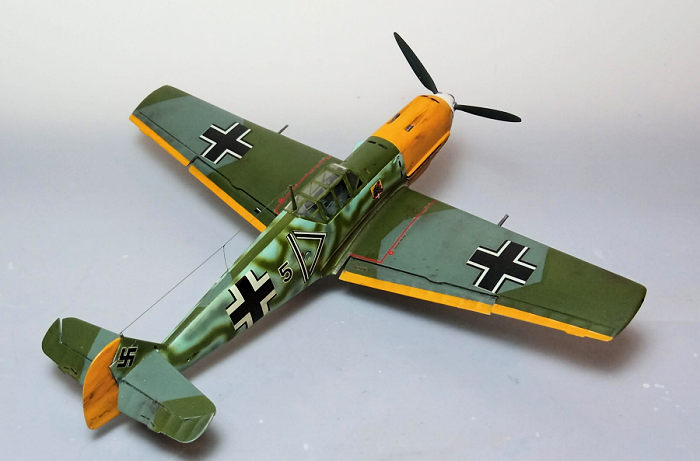
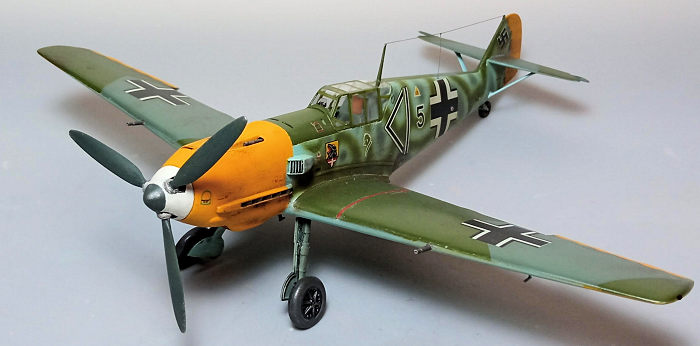
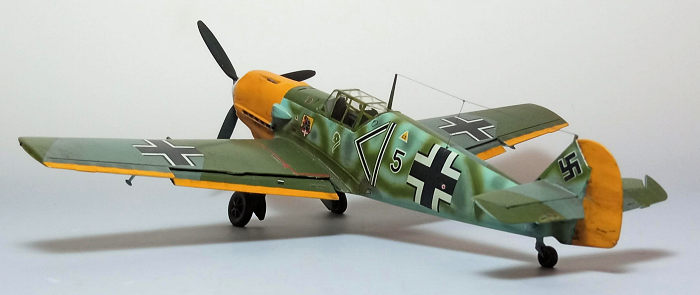
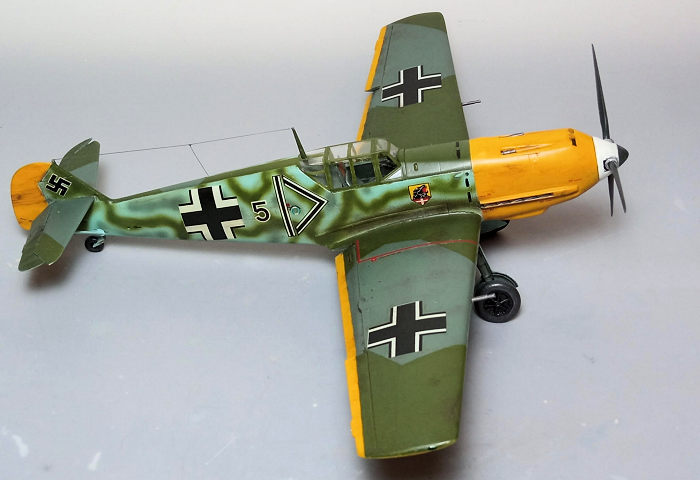
The specific Steidl’s
E-4/7 was an unmistakably painted machine: it featured the classic early topside
splinter RLM02/RLM71 pattern with RLM65 undersides. While RLM65 extended well
over the fuselage sides, it was “field-covered” with RLM71 streaks mostly
connected to each other, with the remaining areas mottled with RLM02. The nose,
rudder and wingtip undersides were done in RLM04 yellow, with the same color
used to paint a narrow band over the flaps and ailerons trailing edges topsides:
an extremely eye-catching scheme indeed!
 To replicate
it, I first applied a coat of Hu117 green (for the RLM71) on all topsides, then
masked it off, followed by Hu31 (for the RLM02) which was also masked off: this
completed the topsides splinter camo. The yellow RLM04 areas were next painted,
for which I used Hu154. After also being masked, I applied Hu65 (for the RLM65)
at all remaining sectors. This completed the basic camo.
To replicate
it, I first applied a coat of Hu117 green (for the RLM71) on all topsides, then
masked it off, followed by Hu31 (for the RLM02) which was also masked off: this
completed the topsides splinter camo. The yellow RLM04 areas were next painted,
for which I used Hu154. After also being masked, I applied Hu65 (for the RLM65)
at all remaining sectors. This completed the basic camo.
The distinctive sides painting was done by first freehanding RLM71 at more or
less the pattern indicated by the instructions, followed by mottling the
remaining areas with RLM02. For this, my airbrush was at “fine” settings, paint
was somehow thinned and pressure somehow lowered compared to my “normal”
settings. Upon removing the masks, I performed the inevitable (for Yours Truly)
touch ups, then gave the bird a coat of Future and headed to the decal shop.
With the exception of some minor yellowing that disappeared once applied and the
“old times Hasegawa ivorizing white” that did not bother me, the kit decals
performed exceptionally well, easily detaching from their backing paper and
snuggling down to every detail, without the need for decal softening whatsoever!
I applied all the stenciling that was lavishly provided by Hasegawa but the
fuselage station numbers, since I deemed they were over sprayed by the
distinctive side pattern, the personnel not bothering reapplying them. A coat of
Future sealed all decals.
| CONSTRUCTION CONTINUES |
The gunsight, along with
the seat and stick, were fixed in the cockpit (the gunsight had its base painted
black), then the cowling mounted guns (painted gunmetal) were attached in the
proper location after lightly drilling their barrels. The tailplane support
struts were painted RLM65 and attached at this point, as well.
Attaching the main legs and the wheels is always an exciting moment at Bf 109
models. By consulting both the instructions and the opulently given internet
images, the particular angles at which each of the aforementioned is installed
were figured out. Upon glue curing, the gear doors were fixed in place after
being bent by hand so they would have the recognizable "curvy" appearance when
viewed from the front (they are already curved as provided by the kit, but, to
my view, they would look more correct if curved a tad more).
 RLM02 was
applied to the gear legs, bays, and door innards. Brake lines were fabricated
from stretched sprue and were routed as seen in online pictures (with the
distinctive and recognizable "looping" at the oleo location). The wheels were
tad filed to look weighted. Oleo boots, brake lines and wheel rims were painted
black, whereas tires were painted a dark gray Including the tiny rear one.
RLM02 was
applied to the gear legs, bays, and door innards. Brake lines were fabricated
from stretched sprue and were routed as seen in online pictures (with the
distinctive and recognizable "looping" at the oleo location). The wheels were
tad filed to look weighted. Oleo boots, brake lines and wheel rims were painted
black, whereas tires were painted a dark gray Including the tiny rear one.
I attached the flaps and elevators in the appropriate "down" and "drooped"
positions respectively. The delicate wing guns had their barrels lightly
drilled, painted gunmetal and attached. The prop had its spinner and backplate
attached, then sanded smooth. After being painted RLM70 with the rear part of
its spinner white and the blade bearings that attach to the hub "steel", it was
glued in position. The exhausts were carefully painted Testors Burned Metal, as
were the two bomb sway braces, wu=hich were subsequently attached.
It was then time for some weathering. First, I applied a black wash all over,
which accentuated all engraved detail and gave areas like the wheel bays or
moving surfaces’ hinges an oily look. I continued by applying dry pastels at all
places where soot, dirt, grime and the like would accumulate. A final almost
matt coat gave the bird its final finish.
I carefully attached the 2-piece PE canopy inner frame that doubles as a head
rest: it was painted RLM02 with “leather” head cushion. All transparencies then
had their frames hand painted and attached, with their fit being very good.
The aerial mast was attached on top of the rear transparency, with thin
stretched sprue run from its top to the fin and a smaller piece run from roughly
the middle of the wire towards a suitably opened hole to the fuselage. Finally,
two mini blobs of red and green clear paint were applied at the wing tips to
represent the navigation lights, before calling Steidl’s distinctive looking
bird done!
| CONCLUSIONS |
If you want a highly
accurate Bf 109, this “initial release” is definitely not the kit to go for, as
the thinner rear fuselage and flat top cowling will definitely stand in the way.
Hasegawa itself nevertheless quickly corrected these molds, thus dooming these
initial releases.
 Be that as it
may, if you are either not willing to take a ruler and measure the kit’s
proportions, or not planning to place it near a dimensionally correct one, you
will most probably find the kit’s looks acceptable. That said, the kit is
otherwise very good and can hold its own even today, if not somehow in the
shadow of the more recent Wunder kits. Molding is crisp and fit is excellent, as
are the details provided, the key areas (cockpit, bays and so on) included.
Instructions are super and the decals, catering for many interesting schemes,
are well printed and still usable. It is a kit that the novice modeler can
easily tackle and come up with a most charming result.
Be that as it
may, if you are either not willing to take a ruler and measure the kit’s
proportions, or not planning to place it near a dimensionally correct one, you
will most probably find the kit’s looks acceptable. That said, the kit is
otherwise very good and can hold its own even today, if not somehow in the
shadow of the more recent Wunder kits. Molding is crisp and fit is excellent, as
are the details provided, the key areas (cockpit, bays and so on) included.
Instructions are super and the decals, catering for many interesting schemes,
are well printed and still usable. It is a kit that the novice modeler can
easily tackle and come up with a most charming result.
To my understanding, this kit (and the other three “wrong” editions) are not
anymore too easy to find, let alone at the very low prices they were offered
upon Hasegawa’s release of the “corrected” ones. They are gradually becoming
collectors’ items, their prices escalating beyond any logic other than
collectability: it is very interesting to see the kit that no one wanted (and
thus offered at very low price), becoming a not-cheap-any-more) collector’s
item!
Nevertheless, if you own one or get your hands on one and are thinking of
building it, by all means do so! You will have a wonderful time putting it
together and the final result will unmistakably be a beautiful E-4/7!
Happy modeling!
Spiros Pendedekas
2 March 2023
Copyright ModelingMadness.com. All rights reserved. No reproduction in part or in whole without express permission.
If you would like your product reviewed fairly and fairly quickly, please contact the editor or see other details in the Note to Contributors.