| KIT #: | J1 |
| PRICE: | $10 on offer in 2005 |
| DECALS: | Six options |
| REVIEWER: | Spiros Pendedekas |
| NOTES: | Initial 'uncorrected' release |
| HISTORY |
Otto “Otsch” Bertram was
born on 30 April 1916 at Wilhelmshaven and joined the Luftwaffe in 1935. He was
sent to Spain in 1938, where, belonging to the Condor Legion, he claimed nine
victories flying with 1./J 88, becoming one of the most successful fighter
pilots in that conflict. In October 1938 he was shot down by an I-15, bailed out
and taken prisoner. He was awarded the Spanien “Kreuz in Gold mit Brillanten''
for his accomplishments.
 In October
1939, Bertram was appointed Staffelkapitän of 1./JG 2, claiming four victories
during the Battle of France. In May 1940 he was shot down and
crash-landed, but he made it to his unit unhurt. During the opening phases of
the Battle of Britain, “Otsch” claimed seven victories in five days between 2
September and 6 September 1940 with the unit, all RAF fighters. On 26 September
1940 he was appointed Gruppenkommandeur of III./JG 2, where he claimed two
further victories with the unit and on 28 October 1940 he was awarded the
Ritterkreuz for 13 victories in World War 2.
In October
1939, Bertram was appointed Staffelkapitän of 1./JG 2, claiming four victories
during the Battle of France. In May 1940 he was shot down and
crash-landed, but he made it to his unit unhurt. During the opening phases of
the Battle of Britain, “Otsch” claimed seven victories in five days between 2
September and 6 September 1940 with the unit, all RAF fighters. On 26 September
1940 he was appointed Gruppenkommandeur of III./JG 2, where he claimed two
further victories with the unit and on 28 October 1940 he was awarded the
Ritterkreuz for 13 victories in World War 2.
Betram was one of three brothers serving in the Luftwaffe, so, when the other
two were killed in action, the order to cease combat flying and return to
Germany came as no surprise. Prohibited from further combat duty, he was to
spend the remainder of the war in administrative posts or training units. He
served at the JG5 at Wien-Schwechat during 1940/1941 and was Kommodore of JG 101
from January 1943 to April 1944. From February 1945, Major Bertram was appointed
Gruppenkommandeur of I./JG 6, a position he held until the end of the war.
In total, the talented “Otsch'' Bertram shot down 22 enemy aircraft. He survived
the war and died on 8 February 1987 at Freiburg.
| THE KIT |
When Hasegawa came
in 1988 with their state of the art 1/48 Bf 109E series, the initial reaction of
the modeling world was no less than purely enthusiastic: the kits looked superb
in the box and built nicely. This enthusiasm was somewhat cut back soon after,
upon realizing that some dimensional inaccuracies existed, mainly a thinner rear
fuselage and a wrong shaped cowling.
 Whereas
those inaccuracies might not have been too obvious at first glance, they were
relatively easily correctable by merely removing some material from the existing
molds. Hasegawa did not lose time correcting those molds, with the “corrected”
kits hitting the market soon after.
Whereas
those inaccuracies might not have been too obvious at first glance, they were
relatively easily correctable by merely removing some material from the existing
molds. Hasegawa did not lose time correcting those molds, with the “corrected”
kits hitting the market soon after.
Practically obsolete, the older, “uncorrected” kits slowly found their own way
to the market, typically offered at very low prices. Such was the case with this
kit, discovered at an Athens hobby shop back in the mid 2000s, priced very low
and including five main camo Molak enamel tins, deeming it not a bad offer, so I
grabbed one!
It has to be stated that, apart from the said inaccuracies, this is for the rest
a good kit, even for today's standards. For a more detailed look at its
contents, together with a short history of the type, you may refer to the
preview here.
Patiently residing in my Shelf of Doom, the kit was pulled out in 2022 upon a
decision made with a Dutch fellow modeler and good friend to build our quarter
scale 109s simultaneously (he would build his Tamiya E4/7). Off to the bench
then!
| CONSTRUCTION |
I typically started by
putting the cockpit together, then trapped it between the fuselage halves. The
nice looking PE oil cooler inlet mesh that had the styrene splitter attached
onto it and equally trapped . Basic cockpit and oil cooler innard color was Hu31
(for the RLM02). The instrument panel, various consoles and boxes were painted
black, dry brushed with silver and had a few “kno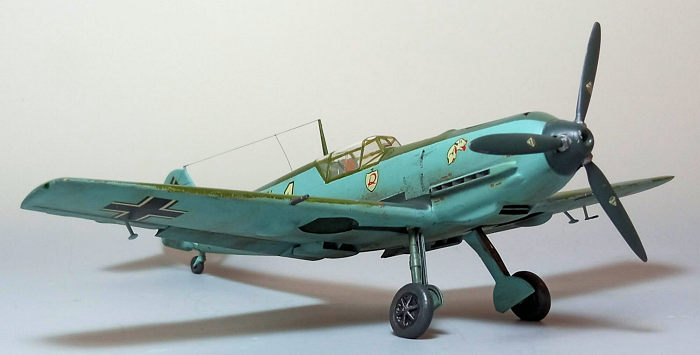 bs”
done with red paint. The seat had its molded on seat belts painted khaki with
silver buckles. The stick boot was painted “leather”, whereas its grip was
painted black with steel top, as witnessed at net available pics. The seat and
stick were left out, to be attached at later stages.
bs”
done with red paint. The seat had its molded on seat belts painted khaki with
silver buckles. The stick boot was painted “leather”, whereas its grip was
painted black with steel top, as witnessed at net available pics. The seat and
stick were left out, to be attached at later stages.
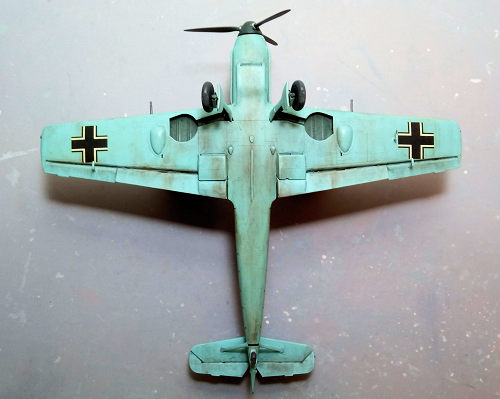
Moving to the wings, I first affixed the PE radiator outlet meshes and “secured”
them in position with the very cleverly designed styrene parts that formulate
the radiator housing. Whereas instructions typically called for attaching the
upper wing halves to the lower wing half and then attach the complete wing under
the fuselage, I went with a somehow improvised method, in order to minimize the
chances of gaps emerging at the root areas: having removed all locator pins
beforehand, I attached the lower wing half underneath the fuselage, followed by
gluing the upper halves only at the root area, paying attention in obtaining a
good fit there. Only then I essentially let the top halves “rest” to the lower
half, securing them on it with water thin styrene glue by capillary action: this
way, gap free wing root joints were ensured (not that the very good Hasegawa kit
would exhibit a bad fit there, but I took no chances).
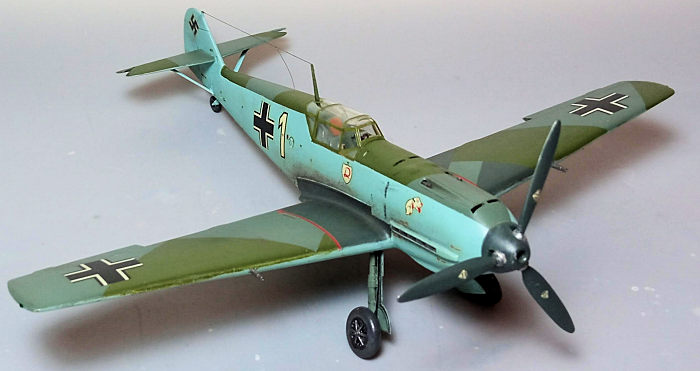
I decided to leave the flaps off, in order to pose them “down” and to attach the
slats “retracted”, as this was a common “Emil” posture. I also went on breathing
some extra life and separated the elevators from the horizontal stabilizers (by
running a few times my hobby knife’s back side through the hinge areas), in
order to pose them drooped. The horizontal stabilizers were then attached in
position.
In order to cater for a rotating prop, Hasegawa provides the hub’s rear base
plate as a separate piec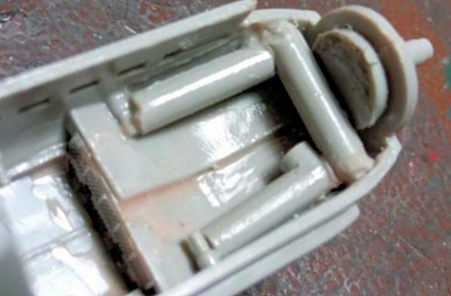 e
that has to be “secured” with the styrene shaft inserted from the inside of the
nose, then attach the upper cowling. The prop can then be mounted onto the plate
at your convenience. This is not a bad approach, however addressing the seam
between the prop plate and spinner will not be too easy with the prop mounted to
the nose. What I did was to secure the shaft in position by judiciously gluing
styrene bits at the nose innards in such a way that the shaft would spin freely,
yet it would not be possible to be pushed back. This way, I did not have to
attach the rear plate onto the shaft, but assemble it with the prop and treat
all seams easily, the prop itself being affixed in position at end stages.
e
that has to be “secured” with the styrene shaft inserted from the inside of the
nose, then attach the upper cowling. The prop can then be mounted onto the plate
at your convenience. This is not a bad approach, however addressing the seam
between the prop plate and spinner will not be too easy with the prop mounted to
the nose. What I did was to secure the shaft in position by judiciously gluing
styrene bits at the nose innards in such a way that the shaft would spin freely,
yet it would not be possible to be pushed back. This way, I did not have to
attach the rear plate onto the shaft, but assemble it with the prop and treat
all seams easily, the prop itself being affixed in position at end stages.
 I neither
attached the tail planes’ supporting struts nor the cowling mounted guns, in
order to facilitate painting. I also cut off the molded on wing guns, in order
to facilitate the leading edges sanding. Regarding the cowling mounted guns,
please note that they are molded together at a common base and with the correct
posture (one extends further than the other), but they will have to be cut off
and separately attached after cowling installation. The nicely molded 2-piece
supercharger air intake was also attached at this time.
I neither
attached the tail planes’ supporting struts nor the cowling mounted guns, in
order to facilitate painting. I also cut off the molded on wing guns, in order
to facilitate the leading edges sanding. Regarding the cowling mounted guns,
please note that they are molded together at a common base and with the correct
posture (one extends further than the other), but they will have to be cut off
and separately attached after cowling installation. The nicely molded 2-piece
supercharger air intake was also attached at this time.
After some filling and sanding (not that much really, since fit was very good), I took the Emil to the paint shop!
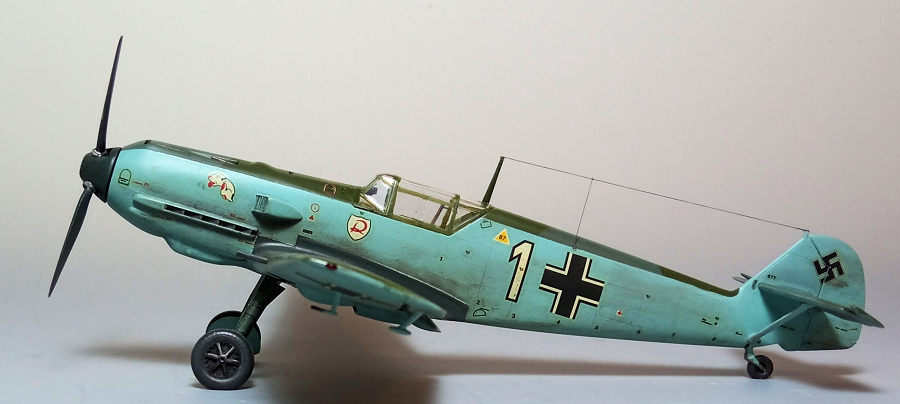
| COLORS & MARKINGS |
Otto Bertram’s
particular machine featured the classic camo of RLM65 undersides, extending up
to the fuselage sides and fin, whereas topsides were in RLM02/RLM71 splinter,
but with the area roughly around the wing roots done in RLM70, also in splinter
fashion. Quite interesting!
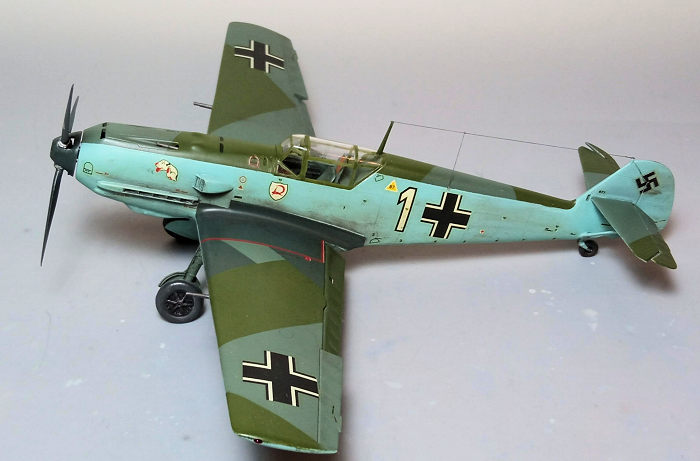 To replicate
it, I first sprayed the RLM70 (for which I used Hu91), then masked it off. Hu117
was then sprayed for the RLM71, also masked off afterwards, followed by the
RLM02 (for which I used Hu31) which was also masked. All remaining unmasked
areas were finally sprayed with Hu65 (for the RLM65). So, I completely reversed
all painting “rules”, by spraying from darker to lighter shades. Upon removing
the masks, I applied a coat of Future and took the bird to the decal shop.
To replicate
it, I first sprayed the RLM70 (for which I used Hu91), then masked it off. Hu117
was then sprayed for the RLM71, also masked off afterwards, followed by the
RLM02 (for which I used Hu31) which was also masked. All remaining unmasked
areas were finally sprayed with Hu65 (for the RLM65). So, I completely reversed
all painting “rules”, by spraying from darker to lighter shades. Upon removing
the masks, I applied a coat of Future and took the bird to the decal shop.
I used the kit decals, which, apart from some yellowing that did not show once
applied and the inevitable “old times Hasegawa” ivorizing white, behaved really
well: they detached easily from their backing paper and snuggled down to every
detail with no need for decal softener. A vast amount of stenciling was provided
(including fuselage station numbers) and all of it was applied, since I figured
no field applied painting would have covered them at those early war stages. A
coat of Future sealed everything.
| CONSTRUCTION CONTINUES |
The seat and stick were attached in the cockpit, (the stick pushed forward to compensate for the "drooped" elevators) together with the gunsight (a quite well made transparent part that had its base painted black). After slightly drilling their barrels, I attached the cowling mounted guns (painted gunmetal) at the correct position, then attached the tailplanes support struts, which I hand painted RLM65.
Moving onto the landing gear, I attached the main
legs, followed by the wheels. The distinctive angles that each of the above are
mounted were determined by consulting the Hasegawa drawings and the lavishly
provided net pics (especially the head-on ones). The gear doors were brutally
bent by hand, in order to exhibit more prominently the distinctive “curvy” looks
when viewed head-on, then attached in position.
 Gear legs,
bays and door innards were painted RLM02. The gear legs had their boots painted
black and received equally black painted brake lines from stretched sprue, which
were routed as witnessed at net pics (with the distinctive spiral “looping” at
the oleo area). The wheels were filed to look weighted. They had black rims and
dark gray tires. I attached the flaps and elevators “down” and “drooped”
respectively, then went on and carefully painted the exhausts’ area with Testors
Burned Metal.
Gear legs,
bays and door innards were painted RLM02. The gear legs had their boots painted
black and received equally black painted brake lines from stretched sprue, which
were routed as witnessed at net pics (with the distinctive spiral “looping” at
the oleo area). The wheels were filed to look weighted. They had black rims and
dark gray tires. I attached the flaps and elevators “down” and “drooped”
respectively, then went on and carefully painted the exhausts’ area with Testors
Burned Metal.
It was then time for some weathering. First, I applied a black wash all over,
which accentuated all engraved detail and gave areas like the wheel bays or
moving surfaces hinges an oily look. I continued by applying dry pastels at all
places where soot, dirt or grime would accumulate. A final almost matt coat gave
the bird its final finish.
The delicate wing guns had their barrels lightly drilled, painted gunmetal and
attached. The prop had its spinner and backplate attached and was sanded smooth.
After being painted RLM70 and having its blade tag decals applied (something
probably correct for these early times), it was glued in position.
The main canopy’s inner frame and head rest are provided as PE: after being
painted RLM02 with “leather” head cushion, they were carefully attached from the
inside of the canopy. All transparencies then had their frames hand painted and
attached, with their fit being very good.
The aerial mast was attached on top of the rear transparency and thin stretched
sprue was run from its top to the fin, with a smaller piece run from roughly the
middle of the wire towards a suitably opened hole to the fuselage. The wingtip
lights were represented by tiny blobs of red and green clear paint, before
calling “Otsch” ‘s machine done!
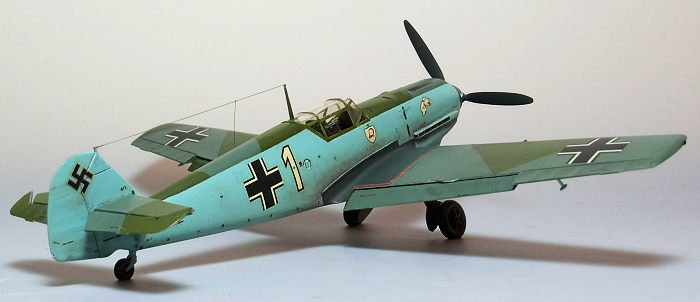
| CONCLUSIONS |
Dimensional inaccuracies aside (which are not too
obvious to the casual viewer), this is a fine kit of the iconic fighter. It is
well molded with good fit, offering above average detailing at all areas.
Construction is uncomplex and the PE parts are not too challenging to implement.
Instructions are great and decals, apart from the white being represented as
ivory and the inevitable yellowing, are in good condition and cater for many
interesting schemes with the tons of maintenance stenciling being the icing on
the cake.
The fact that Hasegawa urged to correct the two main dimensional inaccuracies
was the kiss of death for this and the three other initial releases of the kit,
which were systematically sold from then on at typically much lower prices.
Should you somehow get your hands on this kit, building it is not a bad idea,
since the final result will definitely look like a detailed Emil, even if not an
“accurate” one.
Happy modeling!
Spiros Pendedekas
February 2023
Copyright ModelingMadness.com. All rights reserved. No reproduction in part or in whole without express permission from the editor.
If you would like your product reviewed fairly and fairly quickly, please contact the editor or see other details in the Note to Contributors.