Eduard 1/48 Bf-109E-1
| KIT #: | 84158 |
| PRICE: | $20.00 on sale |
| DECALS: | Two options |
| REVIEWER: | Spiros Pendedekas |
| NOTES: | Weekend editon |
| HISTORY |
The German invasion
of The Netherlands was part of “Fall Gelb”, the Nazi German invasion of the
Low Countries and France during World War II. The invasion of the
Netherlands saw some of the earliest mass paratroop drops to occupy tactical
points and assist the advance of ground troops. The Luftwaffe used
paratroopers in the capture of several airfields in the vicinity of
Rotterdam and Den Haag, helping to quickly overrun the country and
immobilize enemy forces.
 After the
devastating bombing of Rotterdam by the Luftwaffe on 14 May, the Germans
threatened to bomb other Dutch cities if the Dutch forces refused to
surrender. The General Staff knew it could not stop the bombers and ordered
the Royal Netherlands Army to cease hostilities.
After the
devastating bombing of Rotterdam by the Luftwaffe on 14 May, the Germans
threatened to bomb other Dutch cities if the Dutch forces refused to
surrender. The General Staff knew it could not stop the bombers and ordered
the Royal Netherlands Army to cease hostilities.
The main battle lasted from 10 to 14 May 1940, with the surrender of the
main Dutch forces, but Dutch troops in the province of Zeeland continued to
resist the Wehrmacht until 17 May, when Germany completed its occupation of
the whole country. The last occupied parts of the Netherlands were liberated
in 1945.
Lt. Wolfgang Ludewig was one of the III./JG26 pilots whose mission during
the first day of the invasion of The Netherlands was to provide a clear sky
for the Ju 52 paratrooping operations. After his Bf 109 was hit by ground
fire, he performed an emergency landing near Den Haag and was taken POW, to
be released after the armistice. During WWI he was credited with one aerial
victory, surviving the war with the rank of Hauptmann commanding 2./JG 1,
equipped with He 162s.
| THE KIT |
| CONSTRUCTION |
 Not
changing the habits of a lifetime, I deviated from the instructions and,
skipping the cockpit assembly, started by first joining the fuselage halves,
then continued by assembling the oil cooler inner ducting and attaching it
at the fuselage innards. Since the fuselage was already assembled, I felt
more comfortable when aligning the ducting than by having it attached at one
side and then joining the fuselage halves. Whereas the lack of the Profipack
front oil cooler face is practically not noticeable through the splitter
flap, its bland exit is, so I added a fine piece of mesh, to simulate the
exit radiator grills. All innards were painted Hu31 (for the RLM02), with
the rear mesh painted “steel”.
Not
changing the habits of a lifetime, I deviated from the instructions and,
skipping the cockpit assembly, started by first joining the fuselage halves,
then continued by assembling the oil cooler inner ducting and attaching it
at the fuselage innards. Since the fuselage was already assembled, I felt
more comfortable when aligning the ducting than by having it attached at one
side and then joining the fuselage halves. Whereas the lack of the Profipack
front oil cooler face is practically not noticeable through the splitter
flap, its bland exit is, so I added a fine piece of mesh, to simulate the
exit radiator grills. All innards were painted Hu31 (for the RLM02), with
the rear mesh painted “steel”.
Next step was to assemble the cockpit and carefully insert it in place, securing
it with water thin glue. This way I also obtained nice alignment and good fit,
especially at the area where the aft inclined rear plate attaches to the
fuselage innards. Basic cockpit color was Hu31 with the stick grip and gaiter
painted black. Though instructions stated RLM02 for the oxygen regulator cover,
I could not resist and painted it “steel” with blue hose and black grip. I
decided to use the very nice instrument decals for the instrument panel and side
consoles and I also used the equally nice seat belt decals, since their
two-dimensional effect will practically pass unnoticeable through my go-to
closed canopy. The seat and stick were left off, to be attached at end stages.
The main wing was next, where I chose to first attach the one piece lower half
to the fuselage and then, after gluing the very nice sidewall bays to the upper
halves, I attached them onto the lower half, gluing the roots first (thus
obtaining a good fit there), then letting the upper halves “rest” onto the lower
half and securing them in place with water thin glue. All good. The ailerons
were attached “neutral”, the slats “retracted” and the two piece flaps were left
off, to be attached fully deployed, as this was a relatively common sight of
those birds at the field.
 The wing
mounted radiators also had bland faces (missing the Profi Pack PEs), so I
attached suitable pieces of fine mesh, to represent their grid looks, then
attached their fairings. I decided to detach the elevators by carefully running
the back side of my hobby knife onto the stabilizers’ hinge lines, in order to
pose them “drooped” for more dynamic looks. The separate rudder was attached
neutral, while the tailplane support struts were not attached , to facilitate
painting.
The wing
mounted radiators also had bland faces (missing the Profi Pack PEs), so I
attached suitable pieces of fine mesh, to represent their grid looks, then
attached their fairings. I decided to detach the elevators by carefully running
the back side of my hobby knife onto the stabilizers’ hinge lines, in order to
pose them “drooped” for more dynamic looks. The separate rudder was attached
neutral, while the tailplane support struts were not attached , to facilitate
painting.
Moving to the front, I opted for a closed cowling and decided to totally skip
the nice engine (maybe keeping it for a future mini engine project) and try to
figure out a way to attach the prop and exhausts at end stages. Prior to
attaching all top cowling covers and filets, I glued two sprue pieces at each of
the fuselage exhaust openings, so the individually provided exhausts would have
something to grab onto, since the engine would not be there. This and,
consequently, the skipping of the engine, proved to be a bad decision, as the
exhaust tubes had to be cut-off, in order to fit, let alone the fact that the
prop’s affixation was seriously compromised, meaning that the engine is better
to be assembled and attached even if it is not going to be displayed.
Attaching the cowlings and filets concluded basic assembly, with overall fit
being nice and positive, only needing minor amounts of filling and sanding here
and there.
I was about ready to take the bird to the paint shop, when (typically for Yours
Truly) something came to my attention not being too right: to my dismay, I had
managed to attach the extra supercharger intake that Eduard provides for other
versions to the starboard side of the fuselage, facing backwards (...). Luckily
the offending part could be removed without too much drama and the correct cover
was attached in position, filled and sanded smooth. Doing the radical act of
reading the instructions would have helped. Nevertheless, after this mini
adventure, the Emil found its way to the paint shop!
| COLORS & MARKINGS |
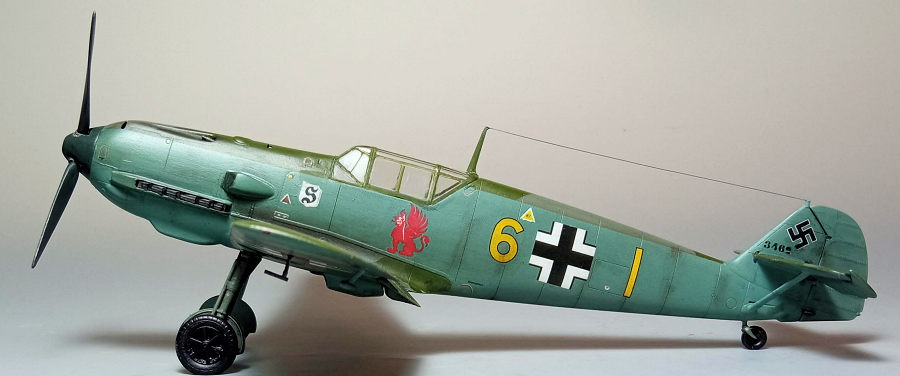
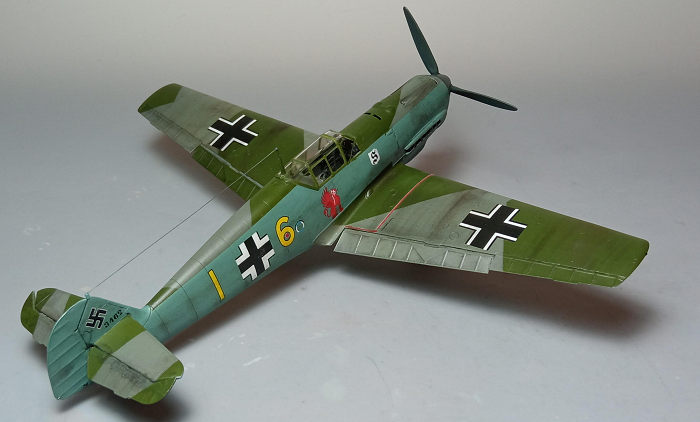
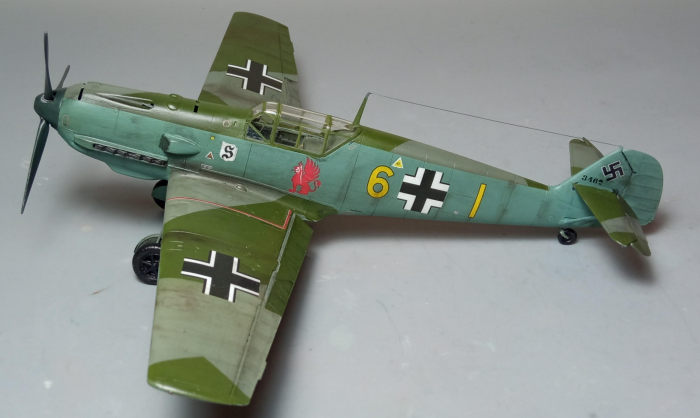
This early Emil
featured the typical for the era RLM02/RLM71 splinter topsides over RLM65
undersides, with the RLM65 extending to the fuselage sides and fin, practically
to all vertical surfaces. To render this camo, I first gave all undersides,
fuselage sides and fin a coat of Humbrol HT-2 “Underside Blue” (discontinued,
but very close to Hu65, slightly darker and more “grayish”). The gear doors were
painted at this time, as well. After masking it off, I gave the topsides a coat
of Hu117 green (for the RLM71), masked the splinter pattern and applied to the
remaining areas the RL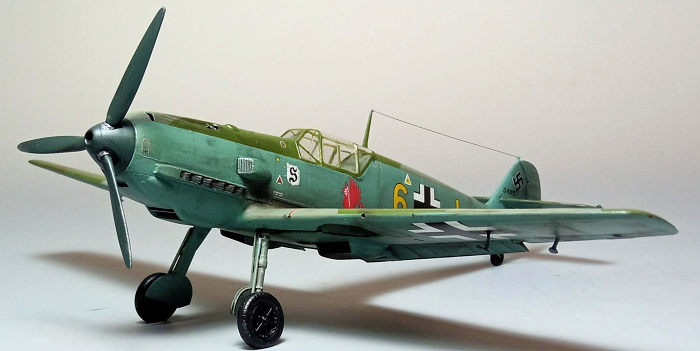 M02,
for which I used Hu31. The above shades by no means claim color accuracy, it is
just my “close enough” interpretation, heavily influenced from what shades I had
already in stock. Upon removing the masks, a coat of Future prepared the bird
for decaling
M02,
for which I used Hu31. The above shades by no means claim color accuracy, it is
just my “close enough” interpretation, heavily influenced from what shades I had
already in stock. Upon removing the masks, a coat of Future prepared the bird
for decaling
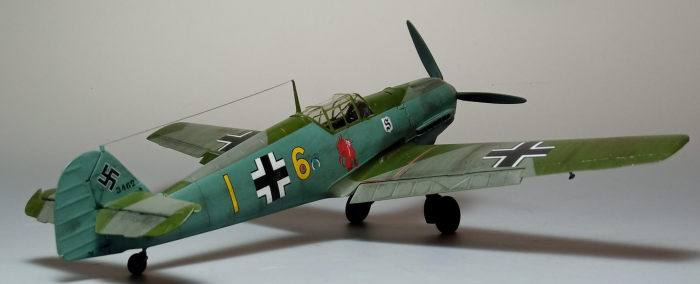
I used the kit decals, in order to represent Ludewig’s machine, as it stood in
Essen-Mühlheim in May 1940, during the Battle of The Netherlands. The decals
behaved beautifully, easily detaching from the backing paper and nicely reacting
to decal softening solution, with no silvering noticed. Being pretty thin, they
are prone to folding over themselves if (mis)handled too much, so better get
them right first time and reposition them as little as you can. Being lazy, I
decided to apply only the basic stenciling (for example, I left the fuselage
section numbering off), hoping that the smaller stencils would have been quickly
overpainted in the field.
After sealing the decals with a coat of Future, I was ready to declare the
painting/decaling session done, when I noticed (again) that something was not
right; this time (and a pattern starts to be formulated here) I had managed to
set the front demarcation line higher than it should, so another masking and
painting round took place, from which the port located Devil’s Dog (Höllenhund -
the staffel’s emblem) decal donated its feet and part of its wings to the
masking tape, with the inevitable and not particularly successful retouch taking
place soon after…
| FINAL CONSTRUCTION |
The landing gear was assembled and
attached in position, with the bird proudly standing on its feet (the head-on
and side views provided by Eduard were really helpful, in order to obtain the
distinctive angles the legs and wheels stand at). The rear wheel that had not
been installed before closing the fuselage halves had its inner attachment lugs
cut off (in order to be able to slide into the housing) and secured" with glue
at the front housing opening at the correct height.
Basic landing gear, wheel wells and door innards color was RLM02 with "chrome"
oleos (done with a fine tip silver pen). The main wheels were filed to look
weighted (they were filed at an angle, since they do not sit perpendicular to
the ground). All wheels had black rims and tires (I resisted the temptation to
give the tires a gray "synthetic rubber" shade, as I figured "normal" rubber was
still used by the Luftwaffe at those relatively early war stages.
 Time to
attach the exhausts, where my aforementioned decision to skip the engine
installation and instead glue styrene chunks at the fuselage innards (in order
for the individual tubes to grab onto) proved a “miss”, as the tubes were
sitting far outward and needed to be shortened, something that compromised their
looks. Nevertheless, I twisted and twerked them in position to at least provide
a somewhat passable result. They were painted Testors Burned Metal.
Time to
attach the exhausts, where my aforementioned decision to skip the engine
installation and instead glue styrene chunks at the fuselage innards (in order
for the individual tubes to grab onto) proved a “miss”, as the tubes were
sitting far outward and needed to be shortened, something that compromised their
looks. Nevertheless, I twisted and twerked them in position to at least provide
a somewhat passable result. They were painted Testors Burned Metal.
The flaps were next attached "extended" and the elevators "drooped". The tail
plane support struts were then attached and painted underside blue, followed by
the seat and stick, the latter pushed forward, to compensate for the elevators'
positioning).
Assuming that this early bird had nonetheless been intensively used before being
shot down, I decided to apply some amount of weathering. I started with a black
wash, which not only accentuated all engraved detail, but also gave all landing
gear areas, hinges and radiator grilles a used and at places oily look, followed
by application of dark brown and black dry pastels, to simulate dirt, grime, gun
smokes and even engine staining at all probable places. A final satin coat
sealed everything.
The transparencies had their well defined frames hand painted and, after
attaching the gunsight on the dashboard, were placed in position, with fit being
really good. The antenna mast was attached, with thin stretched sprue run from
it towards the fin, to represent the aerial wire. The sensitive aileron mass
balances and pitot were attached, followed by the nose gun barrels, which were
essentially cut-off from the very nice kit provided guns and placed in position
according to reference pics. Mass balances and pitot body were painted per the
surrounding colors, whereas guns and the pitot tube were painted Testors Burned
metal.Tiny blobs of red and green clear paint depicted the wingtip lights before
calling this early Emil done!
| CONCLUSIONS |
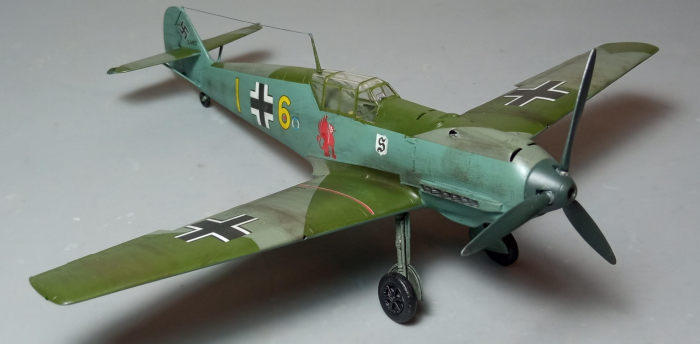
 This is
definitely an excellent kit for the iconic Emil: overall shape looks spot on (I
will leave the rivet counting to the Experten), panel lines are finely recessed,
molding is great, detail at all places is more than sufficient for most of us,
fit is near perfect, transparencies are nice and clear, instructions shine and
decals, with the two offered schemes, are really nice and work unproblematically.
Out of the box a very nice representation of an early Emil can emerge, with the
ease of construction deeming the kit suitable even for less experienced
modelers.
This is
definitely an excellent kit for the iconic Emil: overall shape looks spot on (I
will leave the rivet counting to the Experten), panel lines are finely recessed,
molding is great, detail at all places is more than sufficient for most of us,
fit is near perfect, transparencies are nice and clear, instructions shine and
decals, with the two offered schemes, are really nice and work unproblematically.
Out of the box a very nice representation of an early Emil can emerge, with the
ease of construction deeming the kit suitable even for less experienced
modelers.
True, the kit does not contain the extras that are included in the higher priced
ProfiPack editions (PE, masks, more schemes, among, possibly, others), but what
you get here is really outstanding for the price, let alone the fact that PE is
not to everyone’s taste (one note, though, the bombs included in the kit cannot
be used because they need parts from the PE fret). So, the modeler has clear and
solid choices here.
If you fancy building an accurate early Emil and opt for a pleasant,
uncomplicated build, by all means this kit is for you.
Happy Modeling!
Back to the Previews Index Page
Back to the Previews Index Page