Hasegawa 1/32 Bf-109E-3
| KIT #: | 08051 |
| PRICE: | $10-30.00 'used' |
| DECALS: | various |
| REVIEWER: | Christopher Campbell |
| NOTES: |
| HISTORY |
Having already noted in a previous Bf.109 review that recounting its history to most readers at this point is largely unnecessary and as redundant as well known South Park catchphrase, I will parody it by very cheekily starting with “Oh, My God! They built the Messerschmitt! Those fascists!”
Love it or hate it, as that tends to be the way of it with the Messerschmitt, it was a brilliant design when it debuted and at the cutting edge of fighter technology when it entered service in 1937. Aircraft such as the Curtiss P-36, Morane Ms.406, Hawker Hurricane, and Polikarpov I-16, while excellent, modern aircraft, were no longer quite quite so modern, or first rate. In many respects, every other nation was suddenly playing catchup.
France built the Dewoitine D.520, which was a superb machine, in its own right. Unfortunately, the numbers were not there, or at least not significant enough by the time of the Battle of France In the United States the P-39 and P-40 were initially thought to be the equalizers, with the later proving its mettle against the 109 in the desert and Mediterranean. Better designs were definitely to come. It would be a harder slog in the Soviet Union, with Lagg-3 and MiG-3 initially being far from a match. The Yak-1 and Yak-3 were a different story though. As for the British, the Spitfire was its natural enemy, and in many ways, its downfall.
Still, the Bf.109 was the terror of the European skies from its debut in Spain with the Condor Legion well into World War II. Its dominance in the Polish campaign and the Battle of France would elevate it to almost mythic status for a time, though it would be taken down a few notches after facing the tenacious and skilled pilots of the R.A.F. in the Battle of Britain. Regardless, the Messerschmitt Bf.109 would be one of the very few aircraft to be in combat from the first day of the war to the last. Throughout, it would remain a formidable opponent.
Some Luftwaffe boffins will argue that the Focke-Wulf Fw.190, generally intended as its replacement was the better aircraft. In truth, there are valid arguments on both sides of that debate. There is no denying that the Fw.190 was yet another German designed game changer. In many ways, this is apples and oranges. More accurately, I have sometimes likened the Bf.109 to a scalpel, but the Fw.190, in its radial engine form, being more of a cleaver. Pun intended, they both make the cut, though do so very differently.
 The
history of the Bf.109E in the Royal Yugoslav Air Force is interesting. Many a
nation coveted the Bf.109 in the pre-War period. A fair number would acquire it,
including Spain (Mostly Civil War leftovers), Bulgaria, Romania, Switzerland,
and depending on the source, Hungary. Also, the Royal Yugoslav Air Force would
receive sixty-one Messerschmitt Bf-109E-3’s in early 1941, making itthe most
numerous fighter in that service.
The
history of the Bf.109E in the Royal Yugoslav Air Force is interesting. Many a
nation coveted the Bf.109 in the pre-War period. A fair number would acquire it,
including Spain (Mostly Civil War leftovers), Bulgaria, Romania, Switzerland,
and depending on the source, Hungary. Also, the Royal Yugoslav Air Force would
receive sixty-one Messerschmitt Bf-109E-3’s in early 1941, making itthe most
numerous fighter in that service.
These would join an somewhat bizarre amalgamation of fighters in the Yugoslav air arm which, quite ironically, included more than forty Hawker Hurricane Mk.I’s, rapidly antiquating Hawker Fury Biplanes, as well as indigenously produced, though dated, Ikarus Ik-2 monoplane fighters, and equally new Rogozarski IK-3’s. This last aircraft, while largely forgotten, compared quite favorably with both the 109 and the Hurricane, exceeding each in certain areas of performance.
On paper, the Royal Yugoslav Air Force looked impressive, with more than 100 modern fighters and an even more modern bombers, mainly being Dornier Do.17’s, Savoia Sm.79’s, and Bristol Blenheims. There were also numerous seaplanes, trainers, liaison, and reconnaissance types. This came with its own problems, though.
There were twenty-seven different types of aircraft being operated. These came from five different countries, several of which were, or would soon be at odds with each other, if not already at war. The supply and maintenance problems that this would create are obvious.
As World War II began amid already rising tensions in the Balkans, Yugoslavia was under ever increasing pressure to acquiesce to the Axis. In March of 1941 they agreed to join the Tripartite Pact, though a coup d’état would ostensibly end this days later. This was effectively throwing down the gauntlet in defiance of the Axis. There is no doubt that they fought the good fight while they could, but neither numbers nor luck would be on their side in the end.
The Royal Yugoslav Air Force was in action through May of 1941, seeing action in bombing raids against the Axis. In defiance Italian claims to Yugoslav territory and their subsequent incursion in their campaign to take Greece and grab Dalmatia in the bargain, Yugoslavs stood fast gave as well as they got in many cases. While holding their own for a time, intemperate weather impaired operations and limited their effectiveness. Once Germany joined the fray, the die was cast. In less than two weeks Yugoslavia would be effectively overrun.
Surviving aircraft would be folded into the newly formed Croatian Air Force, operating essentially as an Axis puppet through much of World War II. That did not mean that Yugoslavia was ever truly under full Axis control, however.
Partisans would operate continue to carry on the fight against all odds. Well supported by British and U.S. O.S.S. operatives, Yugoslavia would become the thorn in the side of the Axis that would become a festering wound that would not heal. While unquestionably heling the war effort, this had the most unfortunate consequence vicious reprisals against the Yugoslav people and turned life there into hell on Earth.
None can fault the Yugoslavs for their defiance. Thrust into and unwanted war and brutal occupation, they gave that hell right back to their invaders at every opportunity. A mere two years after their initial subjugation, Yugoslav partisans were even fielding their own aircraft, captured from the fascists, many of the Bf.109’s, though by then later models.
The post-War era would continue to be emblematic of this staunch independence and defiant temperament that had characterized their wartime struggle. While ostensibly communist, the government of Marshall Tito would for many years maintain pro-Western ties, to include operating N.A.T.O. type aircraft in preference to Soviet types well into the 1960’s.
| THE KIT |
1972: The Apollo Moon program is winding down. Richard Nixon has just been elected to his second term as President of the United States and famously visited China in an attempt normalize relations. Also, quite infamously, the Watergate break-in occurred, in which he would later be implicated, ultimately resulting his resignation.
Also, in that year the Space Shuttle program was authorized. The Godfather was released and would be the motion picture event of the year. Gasoline cost around 36 cents a gallon. A Cadillac El Dorado costs as little as $7,400.
Squadron Mail Order, then known mainly as The Squadron Shop had only been around for four years. I started the first grade and was in my second year of modeling, having started with a 1/72 Airfix Bf.109 and a lot of help from my father two years earlier.
 That
year Hasegawa would release this iconic kit, their 1/32 Messerschmitt Bf.109E, a
halo kit in their burgeoning 1/32 scale line. To my knowledge, it has never been
out of production and is still currently available. It has been through numerous
boxings and special offerings. Usually molded in either dark green or grey
plastic, the kit was cutting edge in its day.
That
year Hasegawa would release this iconic kit, their 1/32 Messerschmitt Bf.109E, a
halo kit in their burgeoning 1/32 scale line. To my knowledge, it has never been
out of production and is still currently available. It has been through numerous
boxings and special offerings. Usually molded in either dark green or grey
plastic, the kit was cutting edge in its day.
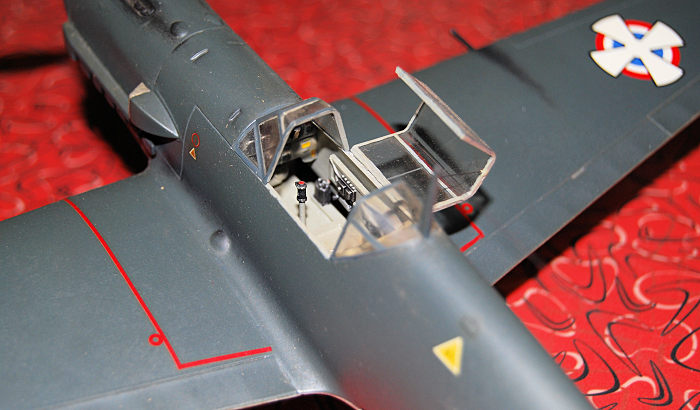
The general shape is well represented with nice, mostly raised surface detail that typical of Hasegawa kits neither excessive nor inaccurate. The fabric control surface relief is noticeably overdone, but can be toned down easily with a little sanding. The cockpit is somewhat lacking by current standards. This is easily remedied by aftermarket resin or photo etch, or the adept scratchbuilder.
Other than the E-1, which did not feature cannon, it builds up into almost any variant of the Emil out of the box. It includes a drop tank as well as optional bomb armament to be mounted on the centerline.
Most decal sheets offered with the kit through into the 1990’s included multiple different Luftwaffe markings for aircraft ranging from the Battle of Britain through the campaigns in North Africa. More recent releases tend to be focused on a specific aircraft. This was one of the releases from the 1980’s with multiple Luftwaffe markings.
Now upstaged by more detailed kits from Eduard, Trumpeter, and Dragon, this venerable first-generation Hasegawa 1/32 offering is still definitely worth building.
| CONSTRUCTION |
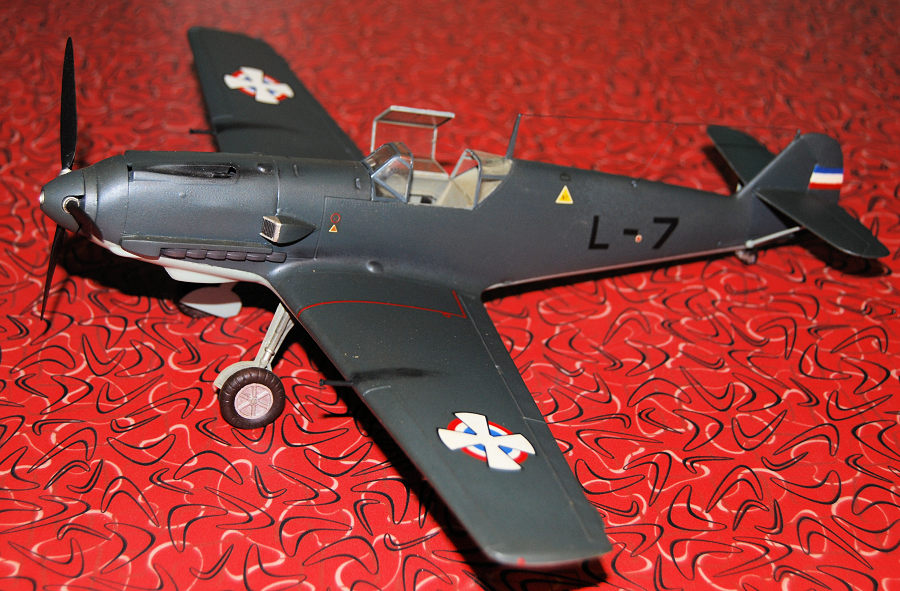
I am not quite certain how many times that I have built this kit over the years. This would at least be number four or five, though. I had just built the rather forgotten and now unicorn rare 1/48 Classic Resin Airframes Rogozarski IK-3 kit and had suddenly taken an interest in Royal Yugoslav aircraft with their unique insignia of a roundel combined with a Kosovo cross.
When I discovered images of these on the Wings Palette website, my interest was piqued, and I resolved to build one. Also being during a lengthy run of 1/32 Hurricanes and Spitfires, a 1/32 Bf.109E seemed a logical choice as a break from these. At that point, the Hasegawa kit was still the only game in town, not that it is a bad choice.
This time I would be building it straight from the box as a Yugoslav Bf.109E-3.
To that end, construction of this kit is essentially simple and easy. It should
be a simple matter for any modeler with a little experience.
Things started in the cockpit with everything being painted in Testors RLM 02 Grey, as well as the insides of the fuselage, cowl, and wing radiator housings. The instrument faces were then painted Tamiya Flat Black. Various details in the cockpit and on the instrument panel were picked out using black, red, Yellow, and rubber.
I had not yet taken to making my own tape seatbelts. So, for this one, I went with the molded-on seat belts, painting them Model Master Buff. The buckles were painted in Testor’s Steel.
The cockpit and internal fuel tank were all assembled and some general dry brushing was given to it with Testor’s Silver and Flat Black to give the look of wear and use in the cockpit. Washes of based on Tamiya Flat Black and Smoke were also used throughout.
 The
wing radiators in Model Master Burnt Iron and installed in place in their wing
housings. I had no intention of displaying the engine with the cowl off, so I
assembled it, painted it in Model Master Flat Black and prepared for its
installation.
The
wing radiators in Model Master Burnt Iron and installed in place in their wing
housings. I had no intention of displaying the engine with the cowl off, so I
assembled it, painted it in Model Master Flat Black and prepared for its
installation.
The everything was glued in place in the fuselage with CA glue. Then it was then glued together using Testor’s tube glue. Heavy rubber bands were used to assure a tight fit. The same was done with the to assemble the wings. Seeing that I had few or very minimal gaps and my rubber bands were all tight, I did the same thing with the wings.
I prefer to wait to install wing guns until after the model has generally been finished, and I am fitting the other small and fragile pieces such as the mass balances in order to avoid damaging or breaking them.
Since the cowl guns had be installed prior to closing
off the cowl, these were fitted at this time. (I will note that to date, I have
never had a problem breaking one of the machine guns during the remainder of
assembly, so I do not consider this problem point.) The cowl itself was fitted
during this portion of the assembly and secured in place with the CA glue. The
fit of all of these parts is usually good and was on this kit. I must have
gotten everything as close to “right” as I ever had with this one, as I did very
little filling and sanding.
There are three spots that pop up at that do almost invariably require some
filling and sanding. I have always had to fill the seam under the oil cooler
housing. The nose cap, cowl, and forward fuselage represent a three-piece joint
and is probably never going to come out perfectly, though it is also never a
significant problem. On this build, I probably got it the closest that I ever
have. While I also got a fairly clean wing join, the area aft of the trailing
edge where it mates with fuselage almost always requires some minor filling and
sanding. I used gap filling CA glue for that with good results.
The horizontal stabilizers were installed and went on cleanly. As with the cannon and mass balances, I prefer to paint install stabilizer support braces once the main painting has been completed. They fit well and I have never had an issue doing this. Now it was time to just that: paint.
| COLORS & MARKINGS |
The first thing with this one was to spray the landing gear bays and the interior of the gear covers with Model Master RLM 02 Grey. While this was drying, I worked on the wheels and landing gear. The tires were sprayed in Testor’s Rubber and left to dry as well. Meanwhile, the gear struts were painted in Model Master Dark Anodonic Grey. Testor’s Silver was used for the compressible oleos. The wheels themselves were painted in Anodonic Grey as well, while Testor’s Rust was used for the brake drums subsequently drybrushed with Model Master Burnt Iron.
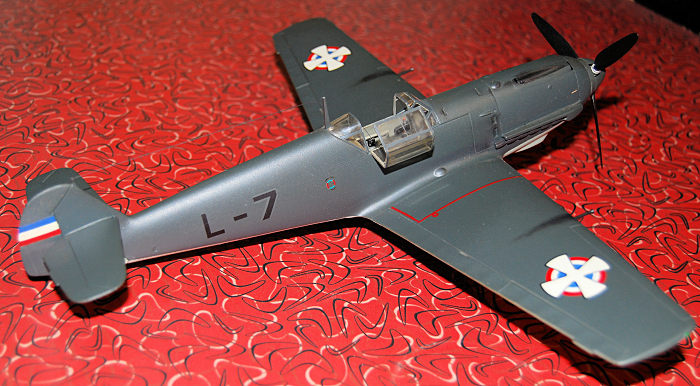
With the landing gear bays dry, this was now stuffed with bits of damp paper towels along with the cockpit. The underside was then sprayed with Model Master RLM 65 HellBlau (Bright Blue). Before painting the upper surfaces, though, there was something else to be done. Since I did not have an appropriate fin flash decal on hand, this was created by painting it on in Model Master Flat White followed by Insignia Red and Insignia Blue. Once complete and dry, this somewhat diminutive flash was masked off and the upper surface was then sprayed in Model Master RLM 70 Schwarzgrun (Black Green) along with the propeller spinner and base. Once dry, masking was removed and happily there had been no bleed over into the sky color.
The landing gear was now completed and installed. Also added were the previously mentioned stabilizer braces which had been while I was spraying the upper surface in grey. Now the exhausts were hand painted in Testors rust and heavily drybrushed in Model Master Burnt Iron and Exhaust. Satisfied with the results, the whole thing was given a coat of Model Master Gloss.
 The
decals were something of a gamble. While Lift Here Decals would subsequently
release excellent decals for Royal Yugoslav Air Force Messerschmitts in scale
from massive 1/24 scale down, that was not an option at this point, as they were
not yet available. However, I had recently build a Smer Re:2000 from a newer
release and took a chance on the decals which actually looked pretty good on the
sheet. I happened to have their relict Savoia SM.79 kit from a newer release,
the Classic Airframes and Trumpeter kits not yet having been released, or at
least still very new and I had to have a larger scale Savoia for my Spanish
Civil War collection (It still languishes, unloved, in my stash, possibly to
fossilize there. I note that I have given thoughts to converting it to a
Brazilian version.)
The
decals were something of a gamble. While Lift Here Decals would subsequently
release excellent decals for Royal Yugoslav Air Force Messerschmitts in scale
from massive 1/24 scale down, that was not an option at this point, as they were
not yet available. However, I had recently build a Smer Re:2000 from a newer
release and took a chance on the decals which actually looked pretty good on the
sheet. I happened to have their relict Savoia SM.79 kit from a newer release,
the Classic Airframes and Trumpeter kits not yet having been released, or at
least still very new and I had to have a larger scale Savoia for my Spanish
Civil War collection (It still languishes, unloved, in my stash, possibly to
fossilize there. I note that I have given thoughts to converting it to a
Brazilian version.)
The decal sheet that came with the Savoia also looked reasonably well printed and a far cry from those nasty, thick, yellowed, crunchy, usually out of register sheets seen in Smer kits when they first appeared on the U.S. scene in the late 1980’s. If I wanted Yugoslav cross-roundels the right size, it was going to be this or nothing.
Knowing that I had no spares or replacements if I messed one up, I was as careful with these as I had been with any decals to date. I tested another decal from the sheet in lukewarm water and it seemed to perform well. The wing insignia were just as cooperative and went on with no trouble, settling down as nicely as any that I had used with a little MicroSol.
The only trouble was aligning them. In that there is not a straight line on the whole insignia, but with a definite up-down, left-right, they are actually a little trickier to align than one might expect. The remaining decals were taken from some miscellaneous spares in the decal stash, some of which were from another Hasegawa Emil. Once thoroughly dry, everything was lightly sprayed with Model Master Gloss follow Model Master Dullcoat.
| FINAL CONSTRUCTION |
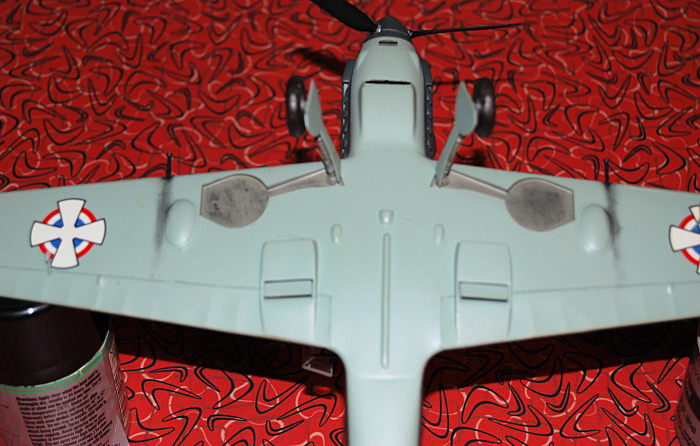
 Weathering
was applied in the form of gun blast and exhaust stains using dry-brushed Tamiya
Flay Black. A wash of Tamiya Flat black in denatured alcohol was flowed into the
wheel wells to give them an appropriately grimy look.
Weathering
was applied in the form of gun blast and exhaust stains using dry-brushed Tamiya
Flay Black. A wash of Tamiya Flat black in denatured alcohol was flowed into the
wheel wells to give them an appropriately grimy look.
Some other weathering was applied in various places by dry brushing Testor’s Aluminum and Tamiya Flat Black to give the look of general use and wear and tear in the field. The propeller painted with Testors Flat Black was fitted and lightly weathered on the edges. Once it seemed to look right, everything was given a light coat of Dullcoat.
While this dried the canopy framing was hand painted with the same interior and exterior colors. The gunsight was painted and glued in place followed by the canopy with CA glue carefully applied at the edges with a toothpick. A piece of thin stretched sprue was used to represent the canopy retaining cable and painted in Dark Anodonic Grey. Stretched sprue was also used for the radio aerial and painted in the same color. Running lights were added with a Testor’s Gloss Red and Gloss green, and it was done. Here was a bird not often seen, a pre-war Yugoslav Bf.109E-1 in 1/32 scale. To date, it is the only one that I have personally seen built up in this scale.
| CONCLUSIONS |
When this kit was built, the Eduard kit had been announced and had not yet hit the shelves. The only other choice in 1/32 was the rather unsatisfactory Matchbox kit (I will admit to having seen it built up quite well. Still, it would be my last choice in 1/32.) Now there are more offerings to choose from. I have been considering building the Eduard kit as an Adolf Galland Battle of Britain aircraft, and I probably will. I will bet that this is not my last Hasegawa Emil, though.
Still, I have few complaints about this Hasegawa classic. This and their classic Mk.V Spitfire are two of the very few 1/32 that I can say that I have built up from start to finish with quality results over a weekend. That speaks well for its ease, though not necesasirly a modern level of detail.
I will always recommend this kit to anyone wanting a 1/32 Bf.109E. It continues to be readily available at moderate prices and can be easily handled by modelers of the mast basic intermediate skill. While the work required is a little more than blowing the dust off the box and shaking it, it is more likely to please than to frustrate. This one is an easy kit to have fun building and still produce a great looking model.
| REFERENCES |
Warplanes of the Third Reich, by William Green, Galahad Books, 1990
Warplanes of the Luftwaffe, Editor David Donald, Aerospace Publishing, 1994
Hitler’s Luftwaffe, by Tony Wood & Bill Gunston, Salamander Books, 1977
German War Birds, by Kenneth Munson, Robert Rogers House, 1986
The Great Book of World War II Airplanes, Wing & Anchor Press 1988
Messerschmitt BF.109 in action Part 1, Aircraft No. 44, by John R. Beaman, Jr. & Jerry L. Campbell, Squadron Signal Publications, 1980
https://en.wikipedia.org/wiki/Royal_Yugoslav_Air_Force
8 May 2023 Copyright ModelingMadness.com. All rights reserved. No
reproduction in part or in whole without express permission. If you would like your product reviewed fairly and
fairly quickly, please
contact
the editor or see other details in the
Note to
Contributors.