Hasegawa 1/32 Bf-109E
| KIT #: | 08051 |
| PRICE: | $35.00 |
| DECALS: | several options |
| REVIEWER: | Christopher Campbell |
| NOTES: |
| HISTORY |
Is there anyone reading this who does not already know that the Messerschmitt Bf.109 was: A.) A German-built fighter plane; B.) Was the most produced fighter aircraft both of W.W.II and all time; C.) was in production for a little over nine years, until the German surrender in 1945; D.) made its combat debut in the Spanish Civil War with the Condor Legion; E.) went through numerous sub variants and upgrades, especially in its E and G versions; F.) equipped the fighter arms of all European Axis partners at some point during the war; F.) would be produced by Avia and Hispano postwar; G.) was operated postwar in one form or another by Czechoslovakia, Finland, Israel, Spain, and probably a few other countries for a time? Nope? Good. I thought so.
Basic history being done, albeit highly compressed and a bit tongue in cheek; as it relates to this build, the Messerschmitt Bf.109 first entered combat in the Spanish Civil War early in the game, a several late prototypes would find their way there and even some of the early, what were in essence, pre-production A models. Serving with the Condor Legion, these immediately were a game-changer, being a significant improvement over the Heinkel He.51 and Arado Ar.68 biplanes and equal to or superior to anything that the Republican forces were fielding, including the newest Polikarpov I-16 monoplanes. While there was no doubt that the I-16’s and even earlier I-15’s could out maneuver in close combat, the 109 was a more modern design and superior in speed, climb, diving, and altitude, with comparable firepower in the A through D models.
The first aircraft to be deployed in real numbers were the Junkers Jumo 210 engined B models with fixed pitch wooden propellers. These were soon joined by C and D models featuring metal variable pitch props and various improvements, many of which were based on field and combat experience from Spain. The D model was the ultimate refinement of Schmitt with still bearing a two-blade propeller and the powerful, but quite torquey Jumo powerplant.
 One
notable disadvantage of this engine, especially when coupled to with the
two-blade propeller was that it could have a very nasty torque swing if the
throttle was mishandled, most noticeable on takeoff or landing. It could still
be a problem in skilled, veteran hands. This, coupled with the notoriously
narrow undercarriage of the 109 resulted in more than a few mishaps, ground
loops, rollovers, and write-offs.
One
notable disadvantage of this engine, especially when coupled to with the
two-blade propeller was that it could have a very nasty torque swing if the
throttle was mishandled, most noticeable on takeoff or landing. It could still
be a problem in skilled, veteran hands. This, coupled with the notoriously
narrow undercarriage of the 109 resulted in more than a few mishaps, ground
loops, rollovers, and write-offs.
A footnote to this is that, the final Messerschmitt variant produced with German designed engines, the Avia S-199 would use a close descendent of this same powerplant, the Jumo 211 inverted V-12 and would also be known for severe torque problems, doubtless amplified by the wide, triple paddle blades with which it was now fitted.
Late in the Spanish conflict a new version of the Messerschmitt would be blooded, the Bf-109E, or Emil, as it was often called. This was a significant redesign of the aircraft and would be primary mount that Luftwaffe fighter pilots would take to war in 1939 and 1940.
Now fitted with the larger and superior Daimler-Benz DB-601, a new arrangement for cooling was needed. Instead of enlarging the chin radiator into something rather P-40-ish, twin slimline radiators were fitted to the wings aft of the landing gear. This improved both cooling and balance. The oil cooler was relocated to an equally slim fairing in the nose. This would, in essence be the planform for the powerplant and associated support systems for the remainder of the production and service life of the 109, even through significant design evolution to come.
Now with over 1,000 horsepower, the aircraft was driven by a variable pitch, three-blade metal propeller. Armament consisted of four guns. This would always include twin 7.92mm machine guns in the cowl, synchronized to fire through the propeller as before. Wing guns could be either two more of the same type or twin 20mm cannon.
The principal difference between the Bf.109E-0/E-1 versions and the Bf-109E-3 would be the armament. E-0/E-1 variants would mount machine guns in the wings. E-3 and all subsequent Emil variants would carry 20mm cannon. This gave the 109 a heavier punch than most other aircraft then in service throughout Europe.
Emils, both E-0/1 and E-3 versions, could be found in Spain in 1939 and certainly had their time in combat. However, by this point the war had generally turned in favor of the Nationalists, both in the air and on ground. Running increasingly short of supplies and surviving experienced pilots, the Republican air force had little hope of wresting any semblance of air superiority back.
Much of their equipment had been outdated at the start of the war. The newer and better aircraft, principally supplied by the Soviets in the form of Polikarpov fighters and Tupolev SB-2 bombers, were growing war weary from constant use. All of these factors combined with the improvements in this newest version of the Bf.109 made for a very deadly sky indeed during the last year of the war.
Aside from being a hideous, bloody conflict, Spain had been a proving ground for German, Italian, and Soviet equipment in particular and amounted to a rehearsal for the war to come. One thing that was clearly evidenced was that the Messerschmitt outclassed virtually everything that could be thrown against it, often as overwhelmingly as a tsunami. It would ride the crest of that wave into Poland, the Low Countries, and France; sweeping the opposition from the air wherever they were met. Things would not go quite so well over Britain, though. However, that is another story for another time, though.
| THE KIT |
 Dating all the way back to 1972, this was part of Hasegawa’s original series of
1/32 scale kits. To my knowledge, it has never been out of production and is
still currently available. It has been through numerous boxings and special
offerings. Usually molded in either dark green or grey plastic, the kit was
cutting edge in its day.
Dating all the way back to 1972, this was part of Hasegawa’s original series of
1/32 scale kits. To my knowledge, it has never been out of production and is
still currently available. It has been through numerous boxings and special
offerings. Usually molded in either dark green or grey plastic, the kit was
cutting edge in its day.
The general shape is well represented with nice, mostly raised surface detail. The fabric control surface relief is noticeably overdone, but can be toned down easily with a little sanding. The cockpit is somewhat sparse by today’s standards, but can be detailed out nicely with aftermarket resin or photo etch, or the skills of a deft scratchbuilder.
As originally released, it builds up into almost any variant of the Emil except for the E-1 out of the box. It includes a drop tank as well as optional bomb armament to be mounted on the centerline.
Most decal sheets offered with the kit through into the 1990’s included multiple different Luftwaffe markings for aircraft ranging from the Battle of Britain through the campaigns in North Africa. More recent releases tend to be focused on a specific aircraft. This particular kit featured markings for legendary ace Adolf Galland, and there have been numerous special boxings such as this.
While superseded in many respects by more detailed kits from Eduard, Trumpeter, and Dragon, this kit still builds up into a very presentable model out of the box.
| CONSTRUCTION |
One could say that this kit and I are old friends. I built my first one of these sometime when I was in fourth or fifth grade. I next build a pair when I was in college, around the time that my obsession with the Spanish Civil War kicked into high gear.
At that time, I got a pair of the kits from the early 1970’s from a close friend who had lost interest in them at the time. Having also obtained the Accu-Scale Horizon vacuform conversion kit allowing for an earlier B/C/D version to be built as well their 1/32 Spanish Nationalist decals, I according went to town on them. The result was a beautiful Bf.109E-1, the cannon bulges having been removed from the wings to depict the machine gun armament, and a nicely converted Bf.109D both in Condor Legion markings.
I generally regard these as the zenith of my modeling work during this period and would be proud to have them in my collection today, had they not been collected by the Great Shelf Crash of 1992, when some of those adjustable bracket shelves went down. This got the 109’s, a Finnish Buffalo converted from the Tamiya kit, a Fujimi 1/48 Bf.109G built as Hartmann’s aircraft, a Matchbox 1/32 Spitfire Mk.24, and an ESCI Skyraider backdated to a Korean War AD-4. All in all, it was bad day for all concerned.
 A few
years ago, I picked up another of these kits on a vendor table at a model show,
from the onset intending to build it as a Spanish Civil War Emil, no longer
having one in my collection in 1/32. Given the numerous other aircraft that I
had built from this conflict in various scales, that just felt wrong somehow. At
the very least, it seemed incomplete.
A few
years ago, I picked up another of these kits on a vendor table at a model show,
from the onset intending to build it as a Spanish Civil War Emil, no longer
having one in my collection in 1/32. Given the numerous other aircraft that I
had built from this conflict in various scales, that just felt wrong somehow. At
the very least, it seemed incomplete.
My recent most previous build of this kit had been in pre-War Yugoslav markings a decade before. It presented no surprises, and came out quite nicely. Now it was time to revisit the Spanish Civil War once again, which also should not be much of surprise to many reading this.
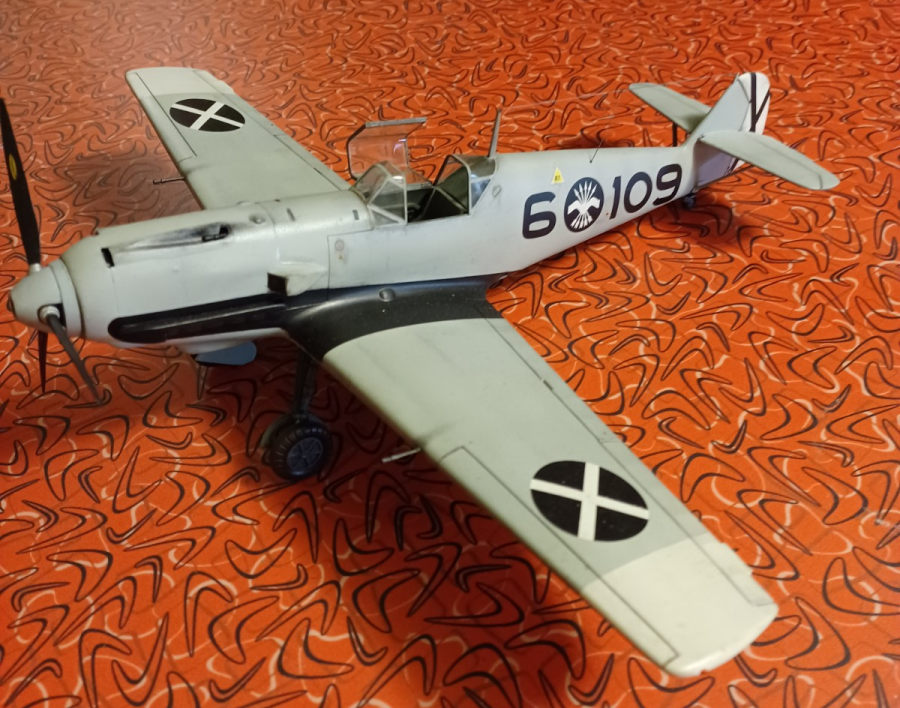
This time I would be building it straight from the box as a Condor Legion Bf.109E-3. That is not to say that I do not plan to build and E-1 as well, quite possibly in this scale. Simply put though, this was not yet that time.
Construction of this kit is very straight forward and it should not prove difficult for any modeler with a little experience. Things started in the cockpit with everything being painted in Testors RLM 02 Grey, as well as the insides of the fuselage, cowl, and wing radiator housings. The instrument faces were then painted Tamiya Flat Black. Additional details throughout the cockpit and instrument panel were picked out with black, red, yellow, and green in places.
Typically in most of my builds in more recent years I have taken to making my own tape seatbelts and often buckles for music wire or bits in the spares box. However, for this one, I went with the molded-on seat belts, painting them Model Master Middlestone as a generic tan color. The buckles were painted in Testor’s Steel.
The cockpit and internal fuel tank were all assembled an some general dry brushing was given to with Testor’s Silver and Flat Black to give the look of wear and use in the cockpit. Washes of based on Tamiya Flat Black and Smoke were also used throughout.
At this point I painted the radiators in Model Master Burnt Iron and once dry glued them in place in the lower wings. While this set, I went to work on the engine. The engine is quite well represented for a kit of this era, though could definitely benefit from modern detail parts. I have never wanted to display this kit with the cowl off and the engine visible, though I would say that it would make for rather a nice diorama piece if one wanted to do so. In this case, I simply assembled the engine and sprayed it in Testor’s Gloss Black so as to proceed with the assembly.
Everything was test fitted. Then satisfied with the fit, I glued everything up with gap filling CA glue for strength. Then, making certain that I had a good seal, I did the same thing with the wings.
I will note that I did not install the cannon barrels in the wings at this point, though the cowl guns were installed. The cowl itself was fitted during this portion of the assembly and secured in place with the same glue. The fit of all of these parts is reasonably good. I have built five or six of these kits over the years and never had a problem with the wings. If care is taken when closing the fuselage, a clean join requiring very minimal filling and sanding can be achieved.
There are a few minor trouble spots that had to be
addressed in every one of these models that I have built. There will, in my
experience, invariably be some minor gap when attempting close the oil cooler
housing and some minor fill needed. The nose cap, cowl, and fuselage represent
the mating of three parts. No matter what you do, it is not going to be perfect,
so at least some sanding is going to be required there. Also, there is going to
be a seam at angled panel at the back of the cockpit, so be prepared to sand it
smooth. All in I, this is nothing that should particularly deter any modeler.
The if a small amount of test fitting and trimming and
sanding is done, a very clean wing joint can be achieved. A small amount of
sanding is generally needed on the upper surfaces where the wings meet the sides
of the fuselage. Additional minor filling is generally required underneath, but
nothing very labor intensive and can usually be smoothed out in one session.
With that done the horizontal stabilizers were installed and required minimal filling and sanding. The instructions would have you attach the support struts at this point. However as in most Bf.109E and earlier Messerschmitt variants, like the mass balances and the pitot, these are best left for the end. I have never had the problem of breaking off one of the tail supports, at least not in this scale. However, having them in place, does make the painting much more difficult when masking. Speaking of, it was now time to paint.
| COLORS & MARKINGS |
The first thing with this one was to spray the landing gear bays and the interior of the gear covers with Model Master RLM 02 Grey. While this was drying, I worked on the wheels and landing gear. The tires were sprayed in Testor’s Rubber and left to dry as well. Meanwhile, the gear struts were painted in Model Master Dark Anodonic Grey. Testor’s Silver was used for the compressible oleos. The wheels themselves were painted in Anodonic Grey as well, while Testor’s Rust was used for the brake drums subsequently drybrushed with Model Master Burnt Iron.
 With the landing gear bays dry, this was now stuffed with bits of damp paper
towels along with the cockpit. The rudder was then sprayed in Tamiya Flat Black
and the panel lines were given a good, general pre-shading with same.
With the landing gear bays dry, this was now stuffed with bits of damp paper
towels along with the cockpit. The rudder was then sprayed in Tamiya Flat Black
and the panel lines were given a good, general pre-shading with same.
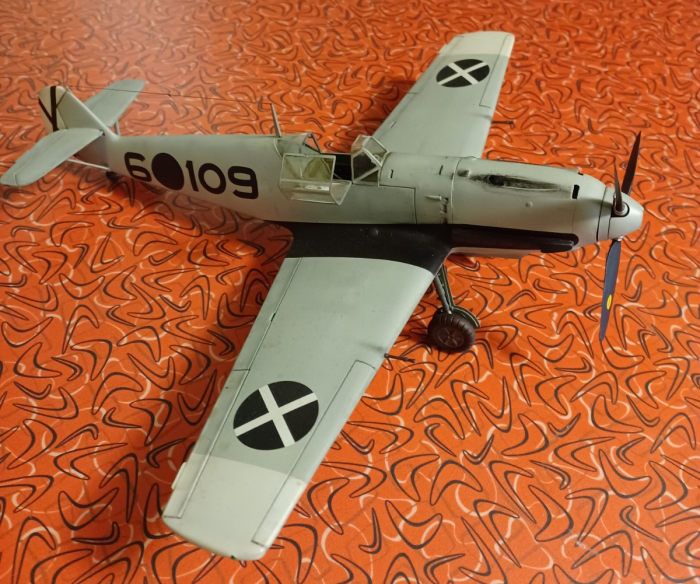
On 1/32 scale kits, and sometimes 1/48, I generally find it preferable to paint the Cross of St. Andrew marking on the tail rather than rely on a decal. Thus, some simple strips of think Tamiya tape, trimmed to the appropriate width using metal ruler and No.11 X-acto were cut and applied.
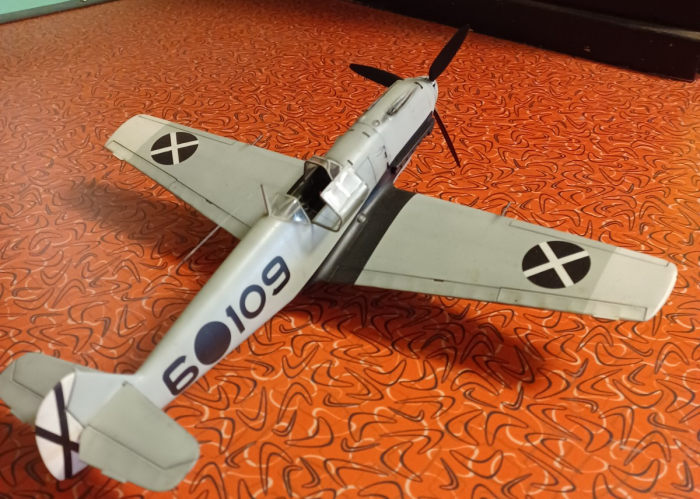
Tamiya Flat White was then applied to the rudder and the wingtips as well. They would in turn be masked off along with the rudder using wide Tamiya tape. The underside and outer surfaces of the gear covers would then be painted with Tamiya XF-23 Flat Light Blue.
The actual specific upper and lower surface colors of Condor Legion as well as other Spanish Civil War aircraft is subject to some debate. There are precious few color photographs, and like W.W.I subjects, color seems to be to some degree a matter of interpretation. Many assert that the colors were exclusively Luftwaffe, though photographs seem to indicate at least some variation. In particular, I have noticed this on various aircraft that were painted grey. Some of this can no doubt be attributed to lighting, the film used, and general weathering and sun fading, still, tones seem to show several different shades, in my opinion.
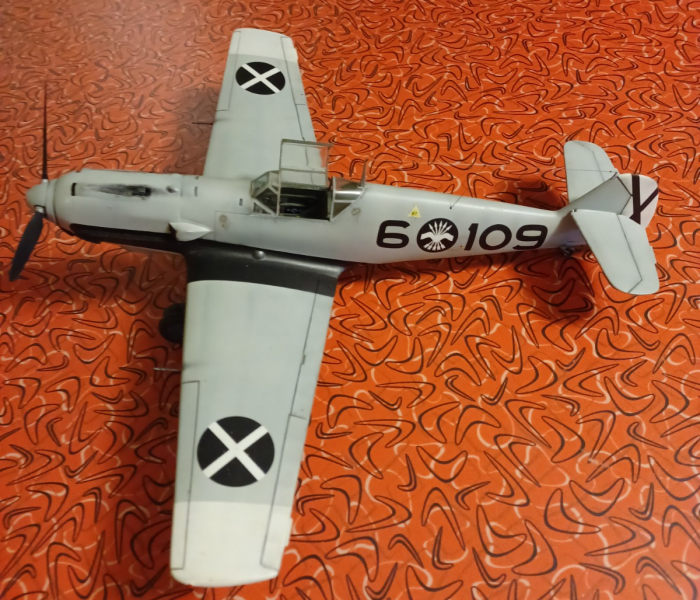
RLM 02 Interior Grey was unquestionably used on some, as well as RLM 63 Lichtgrau. I have used both of these colors in the past, as well as a few others. However, after seeing a number of models that were painted in Tamiya XF-66 Flat Light Grey, this has increasing become my paint of choice, especially for Bf.109’s in the Condor Legion. To me, the tone just has the right look and feel to it.
After the underside was masked off, this was sprayed over all of the upper surfaces. Once this had dried, I went about masking things off to spray the large black panel that was seen on the sides and some inner wing areas of all Spanish Emils. On previous builds of Spanish E models I had painted this first, then masked it off before painting any of the other colors. That always proved somewhat awkward. As I looked the illusrations prior to painting, I had decided to paint it last this time.
While seemingly the reverse of the logical course, it actually proved much easier this way. Tamiya tape worked well for this and I added some wide strips of 3M blue low tack painter’s tape on the outer edges of this to eliminate the possibility of overspray. When the masking was removed, the overall effect was exactly what I had hoped for. There were virtually no touchups needed.
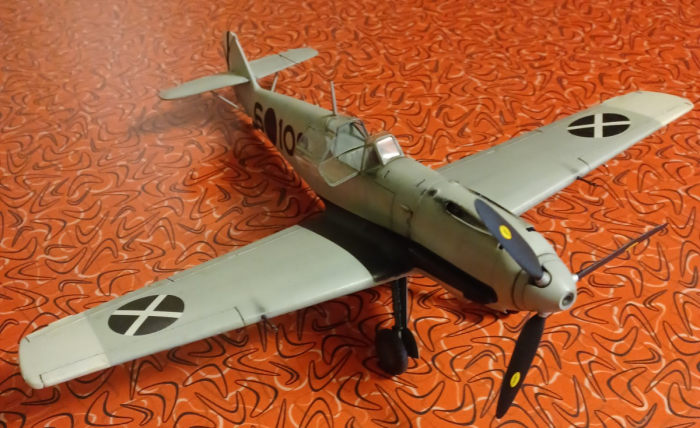
The landing gear was now completed and installed. Also added were the previously mentioned stabilizer braces which had been while I was spraying the upper surface in grey. Now the exhausts were hand painted in Testors rust and heavily drybrushed in Model Master Burnt Iron and Exhaust. Satisfied with the results, the whole thing was given a coat of Model Master Gloss.
The decals were from Rising Decals, sheet # 32004- Unusual Emils Part 1. All the decals needed were on this sheet. This even included the propeller emblems, and item rarely seen on Messerschmitt decal sheets, whether kit offerings or aftermarket.
These went on perfectly, being thin enough to conform nicely, but not so thin as to be especially fragile. I used Solvaset setting fluid, though somewhat cautiously, as this my first experience with decals from this company and was concerned that it might attack it. For those inexperienced with this decal fluid, I have favored it, as it will usually soften even very thick decals. However, it can be too harsh for some thin or fragile decals.
Decals had been applied at the end of an evening modeling session, so model was allowed to cure and thoroughly dry until the following evening. Then it was given a coat of Model Master Semi-Gloss which was followed by a dusting of Dullcoat
| FINAL CONSTRUCTION |
Weathering was applied in the form of gun blast stains using dry-brushed Tamiya Flay Black. A mix the same color along with some XF-75 Kure Arsenal Japanese Navy Grey was used to simulate exhaust staining, also dry-brushed. An acrylic wash of Tamiya Smoke in denatured alcohol was lightly applied to the wheel wells and used to streak the underside some, notably around the radiators and oil cooler.
 The
mass balances and pitot were painted and installed, along with the tailplane
support struts/braces. Additionally, the wing cannon barrels were drilled out
using a fine bit in a pinvise. These were then painted in Tamiya Flat Black,
drybrushed with Testor’s Gunmetal and glued in place with CA Glue.
The
mass balances and pitot were painted and installed, along with the tailplane
support struts/braces. Additionally, the wing cannon barrels were drilled out
using a fine bit in a pinvise. These were then painted in Tamiya Flat Black,
drybrushed with Testor’s Gunmetal and glued in place with CA Glue.
Some other weathering was applied here and there by dry brushing Testor’s Aluminum and Tamiya Flat Black to give the look of general use and wear and tear in the field This included a little more simulated gunblast staining near cannons. The propeller was fitted and weathered on the edges lightly. Once it seemed to look right, everything was given a light coat of Dulcoat.
While this dried the canopy framing was hand painted with the same interior and exterior colors. The gunsight was painted and glued in place followed by the canopy with CA glue carefully applied at the edges with a toothpick. A piece of thin stretched sprue was used to represent the canopy retaining cable and painted in Testor’s steel. Lastly, rigging was done with “thick” E-Z line to represent the radio aerial. Running lights were added with Tamiya Clear red and Clear Green.
Finally, it was done. This was an E-3 rather than an E-1 variant, yet it looked very much as though I had somehow resurrected my long lost Emil from college my days. I could hardly have been more pleased with.
| CONCLUSIONS |
I have always found the E model, or Emil to be the most attractive of the Bf.109 series. At this point it was at is most agile with the cleanest lines and an effective armament suite. I would liken it to a middleweight boxer in his prime, turning into a light heavyweight when the F model came and a genuine heavyweight in the plethora of G versions.
My well known fixation with the Spanish Civil War aside, I think that the pale grey scheme worn by the Emils serving in Spain may have been the most attractive paint ever put on the aircraft. It was simple, understated and was a low visibility paint scheme for its day. In that respect, combined with the game-changing nature of its introduction in some respects made it the original air superiority fighter. It unquestionably was such in that time and place.
The Hasegawa Bf.109E kit is an oldie but a goodie to be certain. It builds easily and lends itself well to detailing if desired. Even straight from the box, despite some dated surface features, it can be a standout model. I highly recommend it for those who want a good looking 1/32 Bf.109E without having to deal with triple digit part counts. It also would make and ideal 1/32 kit for the junior modeler looking get into the “big stuff” and expand their skills. As always, have fun and happy modeling.
| REFERENCES |
Warplanes of the Third Reich, by William Green, Galahad Books, 1990
Warplanes of the Luftwaffe, Editor David Donald, Aerospace Publishing, 1994
Hitler’s Luftwaffe, by Tony Wood & Bill Gunston, Salamander Books, 1977
German War Birds, by Kenneth Munson, Robert Rogers House, 1986
Aircraft of the Spanish Civil War:1936-1939, By Gerald Howson, Putnam Books, 1990
The Great Book of World War II Airplanes, Wing & Anchor Press 1988
Condor: The Luftwaffe in Spain: 1936-1939, by Patrick Laureau,
Hikoki Publications, Ltd., 2000
The Legion Condor, by Karl Ries & Hans Ring, Schiffer Publishing, 1992
Messerschmitt BF.109 in action Part 1, Aircraft No. 44, by John R. Beaman, Jr. & Jerry L. Campbell, Squadron Signal Publications, 1980
1 May 2023 Copyright ModelingMadness.com. All rights reserved. No
reproduction in part or in whole without express permission. If you would like your product reviewed fairly and fairly quickly, please
contact
the editor or see other details in the
Note to
Contributors.