| KIT #: | 12225 |
| PRICE: | $20.00 |
| DECALS: | Two options |
| REVIEWER: | Shanee Cowland |
| NOTES: |
Pros: Reasonably simple kit, inexpensive. Cons: Butt joined resin wing-tips are fiddly to attach correctly and no pilot. |
| HISTORY |
In 1936, construction began on what was planned to be one of two aircraft carriers for the Kriegsmarine. Named the Graf Zeppelin, the ship was launched in 1938 but never saw service and was eventually scuttled to prevent her capture in March 1945. The aircraft designed to be launched from the Graf Zeplin were given the Designation BF 109 T. Initially, seventy T-1’s were ordered. These were modified 109-E’s with longer wings, more powerful engines, arrester hooks and other aircraft carrier requirements. Due to the cancellation of the project, only seven of the seventy were built with the T-1 specifications. The rest were built as T-2’s without the catapult equipment.
| THE KIT |
 The Academy T-2 kit is effectively a conversion of the
Academy 109-E 3 and was released in 2010. It is one of three 109 T1/T2’s
available in 1/48th, the other
being the
Hasegawa conversion and the
MPM
(both reviewed here). This is a relatively old tooling that started life as a
Hobbycraft 109-E 3 from the early nineties. In addition to the
plastic is a single resin block containing extended wing tips and air intake.
The three sprues are, unusually, colored in teal but are quite well detailed
with engraved panel lines and little to no flash. The canopy is molded in one
piece on the small clear sprue so having an open cockpit is challenging and will
require some delicate plastic surgery or an aftermarket addition. There is also
no pilot figure included in the kit which is something I tend to include in my
builds if possible.
The Academy T-2 kit is effectively a conversion of the
Academy 109-E 3 and was released in 2010. It is one of three 109 T1/T2’s
available in 1/48th, the other
being the
Hasegawa conversion and the
MPM
(both reviewed here). This is a relatively old tooling that started life as a
Hobbycraft 109-E 3 from the early nineties. In addition to the
plastic is a single resin block containing extended wing tips and air intake.
The three sprues are, unusually, colored in teal but are quite well detailed
with engraved panel lines and little to no flash. The canopy is molded in one
piece on the small clear sprue so having an open cockpit is challenging and will
require some delicate plastic surgery or an aftermarket addition. There is also
no pilot figure included in the kit which is something I tend to include in my
builds if possible.
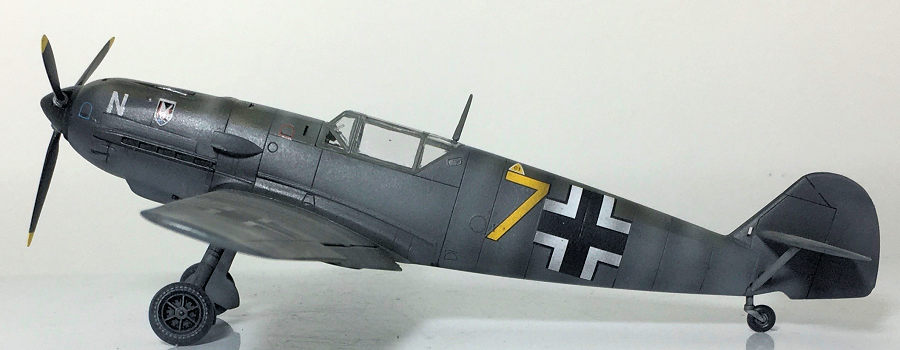
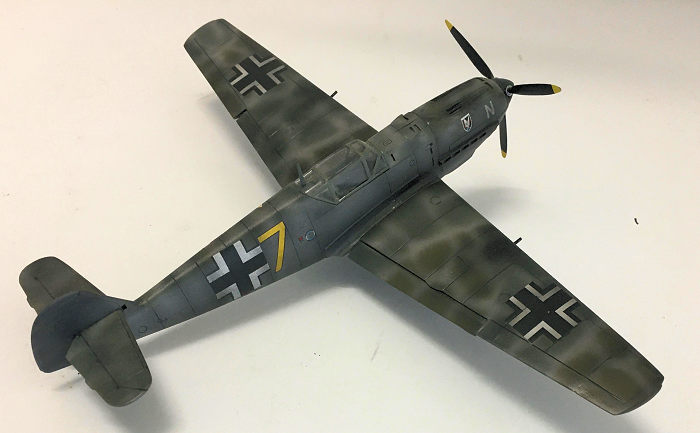
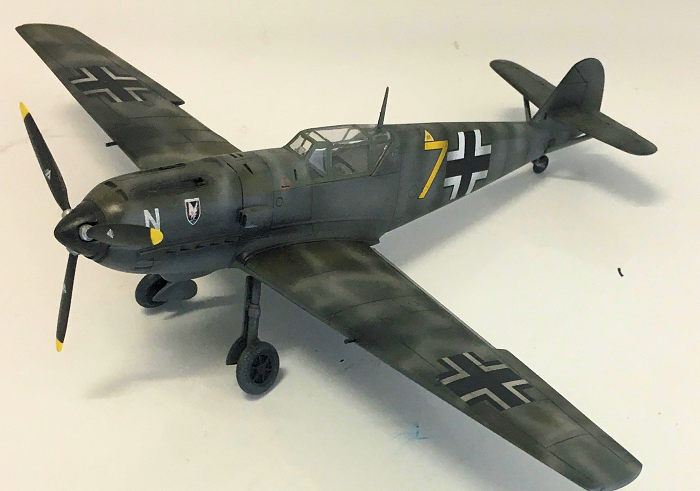
Two versions of markings by Cartograph are provided: NJG 101, Manuchin Germany 1943 and Oblt. Herbert Christmann. JG11, Norway 1944. All decals were in good condition, in register, with vivid color. Instructions were provided in a detailed black and white fold-out booklet that was clear and thorough. Paint references were provided for Aqueous Color, Mr. Color, Life Color, Humbrol and Testors. Annoyingly (for me), no reference was made to Tamiya Acrylics or to the WW II Luftwaffe color palette so much of my color scheme was experimentation to reach something similar to what was shown on the box art. Ulitmately, I referred to instructions from the Tamiya 109-E3 for most of the color palette.
| CONSTRUCTION |
 The most challenging aspect
of this build was always going to be the removal of the plastic wing tips and
the addition of the replacement resin extensions. Academy designed these to
butt-join at the last panel line reducing the opportunity for obvious and
visible mistakes. Unfortunately, my cutting skills are far from perfect and one
of the wingtips had a huge (at least half a millimeter) gap to one side that
required some considerable filling. If I were to build this model again, I would
have added some structure to support the wing tip so that there would be some
more strength in the join.
The most challenging aspect
of this build was always going to be the removal of the plastic wing tips and
the addition of the replacement resin extensions. Academy designed these to
butt-join at the last panel line reducing the opportunity for obvious and
visible mistakes. Unfortunately, my cutting skills are far from perfect and one
of the wingtips had a huge (at least half a millimeter) gap to one side that
required some considerable filling. If I were to build this model again, I would
have added some structure to support the wing tip so that there would be some
more strength in the join.
To align the wingtips, I clamped a pair of popsicle sticks over and under the wing and attached the wingtip to the wing between them with CA. This assured that the end of the wing was vertically aligned and not at an angle with the rest of the wing but it took several attempts to align the leading and trailing edges correctly. Most of the panel lines worked out pretty well but for some reason the panel lines on the underside of one of the wingtips just did not align and required filling and re-scribing. Once wing tips were attached I spent a good deal of time filling, sanding and re-scribing panel lines again to reduce the visibility of the join. In the midst of this work, one of the wing tips broke off and I needed to begin again.
Once the wingtips were
attached, I went through the build in the typical order – cockpit, fuselage, sub
assemblies etc. They went together without too many issues and quite a few of
t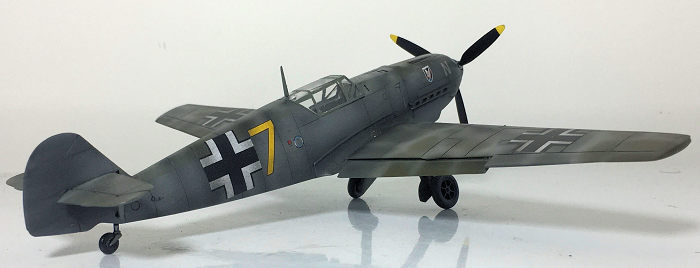 he details were molded into the main parts. At some point I lost one of the
stabilizer supports to the carpet monster and used some Evergreen Sprue to
replace it.
he details were molded into the main parts. At some point I lost one of the
stabilizer supports to the carpet monster and used some Evergreen Sprue to
replace it.
As I was approaching the end of this build construction took a turn towards the dark side. First I was examining the model and fumbled, dropping it and breaking off a stabilizer and the wings. This turned out to be a pretty simple fix.
Then when doing a ‘correction’ to the weathering, I completely ruined the paintwork on the wing. In trying to repair this damage, I broke off the wingtip for a second time. This was hugely frustrating and nearly resulted in this aircraft’s maiden voyage being into the trash. Eventually I was able to salvage and repair the plane, although as I look at it I see small issues due to this major rework.
| COLORS & MARKINGS |
My marking scheme was a modified version of those on the box art but inspired by a T-2 model found online (link below). The upper pattern is a typical 109 E splinter camouflage with an overlay of random freehand shapes outlined in the same grey as the underside of the aircraft.
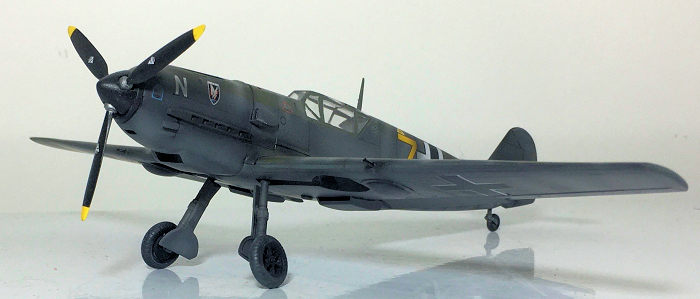 The geometric splinter
camouflage on the tops of the wings and fuselage was RLM Grey (XF-22) and 1 to 1
ratio of Olive Drab (XF-62) and Khaki (XF-49). I used Sky Grey (XF-19) for the
base, underside and the wavy top pattern (over the splinter camouflage). On top
of this I added weathering and post shading using a mix of Smoke (X19) and Flat
Black (XF1) in a 3 to 1 ratio mix and finished with a black Tamiya Panel Line
Wash.
The geometric splinter
camouflage on the tops of the wings and fuselage was RLM Grey (XF-22) and 1 to 1
ratio of Olive Drab (XF-62) and Khaki (XF-49). I used Sky Grey (XF-19) for the
base, underside and the wavy top pattern (over the splinter camouflage). On top
of this I added weathering and post shading using a mix of Smoke (X19) and Flat
Black (XF1) in a 3 to 1 ratio mix and finished with a black Tamiya Panel Line
Wash.
Most of the decals were original Cartograph decals but in repainting the wing, I was forced to look into the spares box for other equivalents. I ended up using leftover decals for a Tamiya BF 109 E-3 (also by Cartograph). All the decals were vivid, clear and in register – if a little on the thick side. Micro Set and Micro Sol helped position and conform the decals to their panels and they blended nicely.
| CONCLUSIONS |
 Other than the wing
extensions this is a pretty straightforward build (I would estimate more than
ninety percent of my time went into the wing modifications and their repairs).
The camouflage pattern was challenging but really interesting and it was one of
the things that interested me about this particular model. The kit goes together
reasonably well and while it is not as detailed as some more recent 109
offerings, the recessed panel lines and good fit make an enjoyable build and
satisfying end result.
Other than the wing
extensions this is a pretty straightforward build (I would estimate more than
ninety percent of my time went into the wing modifications and their repairs).
The camouflage pattern was challenging but really interesting and it was one of
the things that interested me about this particular model. The kit goes together
reasonably well and while it is not as detailed as some more recent 109
offerings, the recessed panel lines and good fit make an enjoyable build and
satisfying end result.
| REFERENCES |
https://en.wikipedia.org/wiki/Messerschmitt_Bf_109_variants
https://www.scalemates.com/kits/academy-12225-messerschmitt-bf109t-2--107297
https://modelingmadness.com/scott/axis/luft/me/109/109et.htm
https://modelingmadness.com/review/axis/luft/choy109t.htm
https://www.nevingtonwarmuseum.com/me-109-t.html
https://uamf.org.uk/viewtopic.php?f=19&t=3481
19 January 2021
Copyright ModelingMadness.com. All rights reserved.
If you would like your product reviewed fairly and fairly quickly, please contact the editor or see other details in the Note to Contributors.
Back to the Main Page Back to the Review Index Page Back to the Previews Index Page