Heller 1/72 Bf-109B
| KIT #: | 80238 |
| PRICE: | $5-20.00 'used' |
| DECALS: | Two options |
| REVIEWER: | Christopher Campbell |
| NOTES: | Basic, easy to build kit. |
| HISTORY |
At this point, rehashing the history of the Messerschmitt BF.109 is becoming almost as redundant as the running gag of South Park’s “Oh, My God! The Killed Kenny!” This will be kept brief and related principally as it pertains to the aircraft being modeled, as most reading this will doubtless already be reasonably to very familiar with this legendary German fighter.
The winner of the design competition for a new, high performance monoplane fighter for the burgeoning Luftwaffe, the Messerschmitt Bf.109 came along just in time to see action in the Spanish Civil war. Aircraft from advanced prototypes through E-1 and E-3 variants would see action there with over 140 in total seeing service with the Condor Legion by the end of the war.
 While there was an A version produced in limited numbers, the B variant was the
first true production model. All the Jumo powered versions of the early 109
would see action in Spain with B and D variants being most numerous.
While there was an A version produced in limited numbers, the B variant was the
first true production model. All the Jumo powered versions of the early 109
would see action in Spain with B and D variants being most numerous.
Most featured twin cowl mounted 7.92mm machine guns. However, some also were fitted with a third, though notoriously unreliable, gun firing through the center hub, foreshadowing things to come when the much later F model would introduce the infamous centerline cannon.
Debuting in Spain in 1937 and initially countering the Polikarpov I-15 and I-16 fighters being fielded by Spanish Republican Forces quite successfully, it was soon overshadowed by the improved C and to a greater degree D models, both of which featured variable pitch metal propellers rather than the wooden fixed pitch variety in use on the B. Ultimately, all were joined by the Daimler-Benz engine powered E models that would be the definitive early model of the 109. B variants still in service were mostly relegated to ground attack sorties even before the close of hostilities in 1939.
Many of the Messerschmitts sent to Spain during the conflict would remain there, including B, C, and D versions, serving into the late 1940’s in some cases. C/D type variable pitch propellers would usually be retrofitted to those formerly carrying the fixed wooden props, making them less visually distinguishable from their brethren as time went by.
| THE KIT |
First released in 1978, this was the first injection molded kit of a pre-Emile (E Model 109). It is rather basic though generally accurate. As such, it is rather typical of Heller kits of this era.
I would rate it a little better than their Heinkel He.112 kit that released
around two years later. That kit had no boxed in or molded in wheel wells, nor
did it have a positionable canopy. While the wheel wells are also “open” on this
kit, it does not have the fault of an open cannon port to give it an odd por thole
sort of look when viewing it from the front. It makes it less obvious and more
forgivable given that it was quit ethe order of the day when this kit was
released. Also, the canopy can be built either open or closed to display the
cockpit.
thole
sort of look when viewing it from the front. It makes it less obvious and more
forgivable given that it was quit ethe order of the day when this kit was
released. Also, the canopy can be built either open or closed to display the
cockpit.
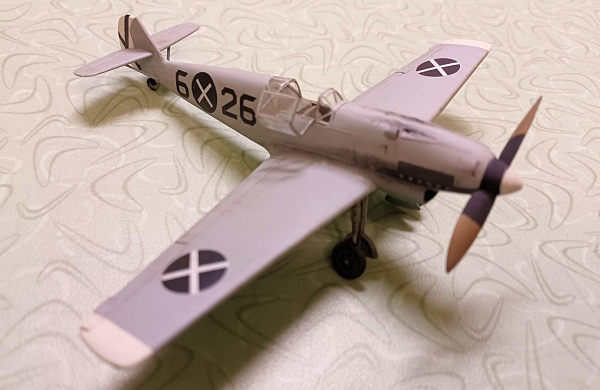
Every example that I have seen has been molded in grey and included markings for the Spanish Nationalist/Condor legion machine on the box cover as well as a Luftwaffe machine. Moldings are fairly clean overall, requiring only a little cleanup and fit is decent.
Released again in 1993 and 2015, it is still not too difficult to find. However, like a number of kits in fairly recent release, can sometimes trade for what would seem to be inordinately high prices.
There are some newer 1/72 kits of Jumo engine Bf-109’s (A-D series) some of which I have looked at and are an improvement on this earlier kit. That may be the route one chooses to go. Still, this is a nice little kit that builds quickly and easily.
| CONSTRUCTION |
 Work started in the cockpit, painting everything in Model Master RLM 02 Grey.
The instrument panel was painted Testors Flat Black and details picked out by
drybrushing with Testors Aluminum and a few bits in red or yellow here and
there. The cockpit is better detailed than the the option of displaying it with
the canopy open. No doubt it could benefit from a resin upgrade. Still, in this
scale, it looks okay; not great, but okay.
Work started in the cockpit, painting everything in Model Master RLM 02 Grey.
The instrument panel was painted Testors Flat Black and details picked out by
drybrushing with Testors Aluminum and a few bits in red or yellow here and
there. The cockpit is better detailed than the the option of displaying it with
the canopy open. No doubt it could benefit from a resin upgrade. Still, in this
scale, it looks okay; not great, but okay.
Once this one done, it was glued in place and the fuselage closed up with Plastruct Liquid Cement. This gave a fairly clean glue joint and reduced the amount of sanding needed to mainly some touchup with 400 grit and a little finishing with 0000 steel wool.
The interior of the wings was also painted with the same RLM 02 and then glued together in the same manner. This again produced nice results and a minimum of sanding. However. I elected to bond the wings to the fuselage with Gap Filling Ca glue applied with a toothpick since this stays liquid for a little longer, allowing for some positioning to make certain that they were properly aligned. The joint proved to be good, and again, minimum cleanup and sanding.
The horizontal stabilizers were added with liquid cement and fit well. A little attention was needed in the are of the chin radiator exhaust, but nothing significant. Wow! It was ready to paint already.
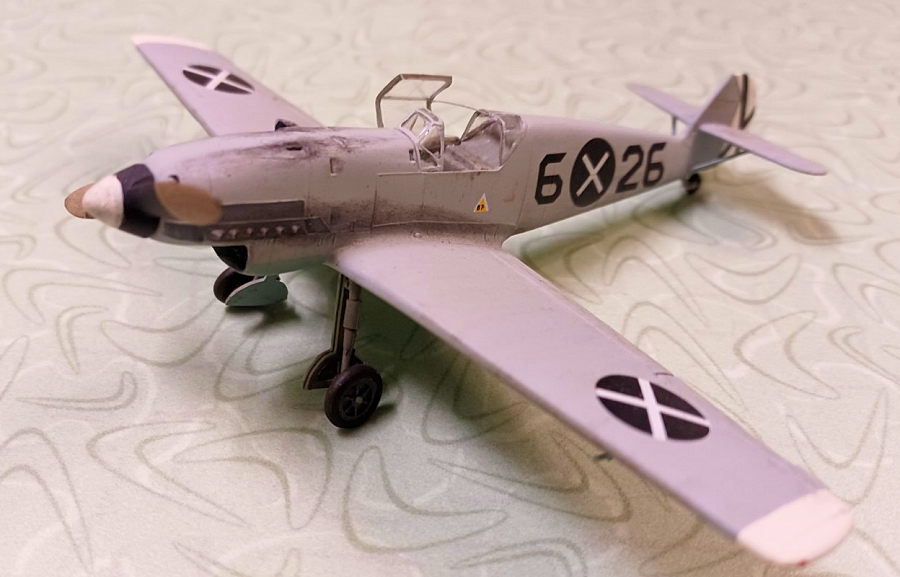
| COLORS & MARKINGS |
 Painting
began with spraying the wheel wells and interior gear doors in Model Master RLM
02 Grey. The former was then stuffed with damp paper towel bits along with the
cockpit and the real painting began. This would be the wingtips painted Tamiya
Fly White, along with the rudder. These were in turn masked off with Tamiya tape
and the underside sprayed with Tamiya XF-23 light blue.
Painting
began with spraying the wheel wells and interior gear doors in Model Master RLM
02 Grey. The former was then stuffed with damp paper towel bits along with the
cockpit and the real painting began. This would be the wingtips painted Tamiya
Fly White, along with the rudder. These were in turn masked off with Tamiya tape
and the underside sprayed with Tamiya XF-23 light blue.
While this was drying I painted the wheels, with the tires being painted in Testor’s Rubber. Testor’s Steel was used for the wheels themselves with the brake drums being painted in Testor’s Rust, then dry-brushed with Model Master Burnt Iron.
Satisfied that the underside was dry enough to mask, this was done with Tamiya tape and then the upper surfaces were sprayed in Tamiya XF-66 Flat Light Grey.
Once dry, the masking was removed and the landing gear was assembled and glued into place. It was then given a light coat of Testor’s spray Gloss. Once this had dried, the decals from the kit were applied for the Spanish Nationalist aircraft. This particular example was from the 1993 release, making the decals in the neighborhood of fourteen years old when built. However, these were reasonably well printed and transferred without any problems, needing just a little setting fluid to conform. This may have been the best experience that I have had with Heller kit decals to date. While I normally paint the St. Andrew’s Cross tail markings, in this scale I elected to use the kit decals and they went on just fine.
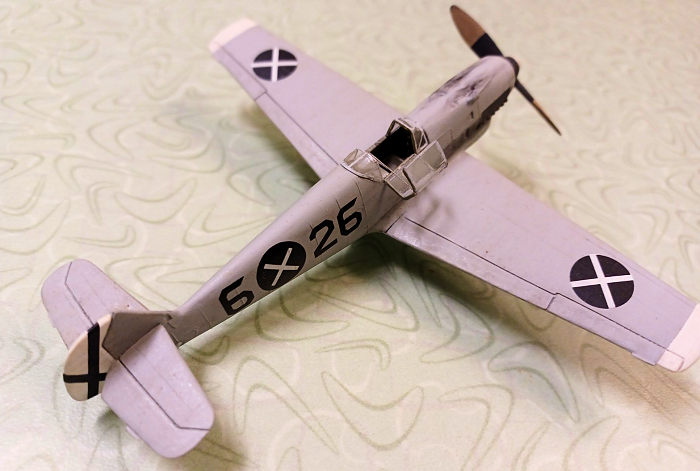
| FINAL CONSTRUCTION |
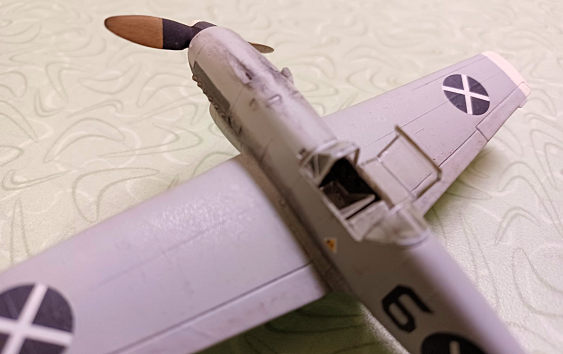
 Now it was time to attack the propeller. This would be the wooden propeller,
making it along with the spinner a one piece affair. To tip of the spinner
was painted in Tamiya Flat White. While the rest was painted in Tamiya Flat
Black.
Now it was time to attack the propeller. This would be the wooden propeller,
making it along with the spinner a one piece affair. To tip of the spinner
was painted in Tamiya Flat White. While the rest was painted in Tamiya Flat
Black.
The outer sections of the blades were to be in unpainted wood. This was represented Testor’s Wood with dry brushing in various brown and black paints to create a reasonable appearance of wood grain in this scale. With this glued in place, the horizontal stabilizer supports were also glued in place and painted appropriately. The exhausts and surrounding area were painted in Model Master Dark Anodonic Grey, then weathered in Testor’s Rust with exhaust streaking and, in the gun troughs, powder streaking added by dry-brushing with Tamiya Flat Black.
The entire model was now given a light spray of Testor’s Glosscote, followed once dry by a slightly heavier spray of Dullcote. Now, to the canopy.
Here the framing was painted in the same Tamiya XF-66 grey and glued in place with CA glue applied with a toothpick. The canopy was posed open with very fine bit of stretched sprue being attached to represent the retainer cable. The tiny mass balances were glue in place beneath the wings and painted to match (by far the most difficult part of this build, as they are hard to handle and hold onto without sending them flying………well……somewhere.) A tiny drops of Tamiya clear red and green clear paint would represent the running lights on the wingtips. And thus, it was done!
| CONCLUSIONS |
The Heller Messerschmitt Bf.109B is simple and easy to assemble, presenting very few problems. I managed to build this in one day over a weekend. I think that I only spent around 3 hours on it, at the most. I was very pleased with the results, too.
It is true that there is no shortage of 109 kits out there for any modeler. However, this one is a simple, easy, build easily done in a day if one chooses. It can be a little hard to find, but is usually not that expense. Recommended for a relaxing weekend and any modeler capable of handling models in this scale, young or old, novice or veteran.
| REFERENCES |
Warplanes of the Third Reich, by William Green, Galahad Books, 1990
Warplanes of the Luftwaffe, Editor David Donald, Aerospace Publishing, 1994
Hitler’s Luftwaffe, by Tony Wood & Bill Gunston, Salamander Books, 1977
German War Birds, by Kenneth Munson, Robert Rogers House, 1986
Aircraft of the Spanish Civil War:1936-1939, By Gerald Howson, Putnam Books, 1990
The Great Book of World War II Airplanes, Wing & Anchor Press 1988
Condor: The Luftwaffe in Spain: 1936-1939, by Patrick Laureau,
Hikoki Publications, Ltd., 2000
The Legion Condor, by Karl Ries & Hans Ring, Schiffer Publishing, 1992
Messerschmitt BF.109 in action Part 1, Aircraft No. 44, bY John R. Beaman, Jr. & Jerry L. Campbell, Squadron Signal Publications, 1980
27 April 2023 Copyright ModelingMadness.com. All rights reserved.
No reproduction in part or in whole without express permission. If you would like your product reviewed fairly and fairly quickly, please
contact
the editor or see other details in the
Note to
Contributors.