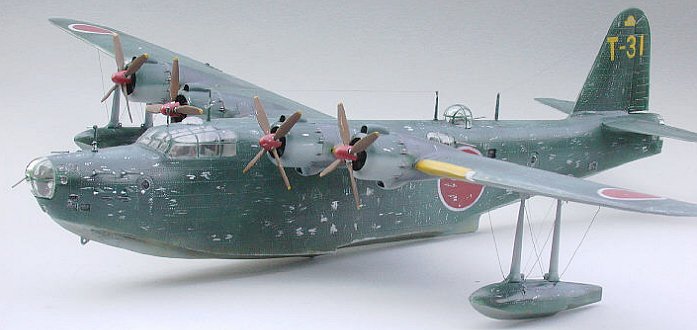
Hasegawa 1/72 H8K2 'Emily'
|
KIT # |
QP 17 |
|
PRICE: |
@$28.00 |
|
DECALS: |
Three aircraft |
|
REVIEWER: |
Frank Spahr |
|
NOTES: |
1991 boxing |
„Emily“ – a slacker´s diary
|
BACKGROUND |
For more info on the kit and a brief history, please visit the preview.
|
CONSTRUCTION |
Essentials: The model cost me @ 28 $ in 1996; I started building it on 4 July and finished it on 3 August, having in between started a 1:72 Vosper torpedo boat. I´d estimate the total building time at 25-35 hours. No aftermarket stuff was used.
I started building this one immediately after writing the preview, on a day off work with poor weather. So I set about things with more energy than usual: I removed the major parts from their sprues, cleaned them up and started on several fronts:
 I futured all the clear parts and
set them aside. Then I assembled what cockpit there is, sprayed it a
medium light grey, brushpainting the control panels black. After drying
time, I drybrushed the panels with Model Master (MM) aluminum, painted
the seats (I had filled the ejector pin marks on the seats with wax) MM
siena and the controls silver/siena and Revell 57 – purely conjectural.
The cockpit assembly was then glued to the starboard fuselage half, just
like the ominous bottom „keel“ part that should be mounted much later per
instructions. I secured that one with hot glue first, then added normal
glue. After the future had dried, I mounted the various clear parts. They
are very thick and had to be dremeled, partly even disassembled to
I futured all the clear parts and
set them aside. Then I assembled what cockpit there is, sprayed it a
medium light grey, brushpainting the control panels black. After drying
time, I drybrushed the panels with Model Master (MM) aluminum, painted
the seats (I had filled the ejector pin marks on the seats with wax) MM
siena and the controls silver/siena and Revell 57 – purely conjectural.
The cockpit assembly was then glued to the starboard fuselage half, just
like the ominous bottom „keel“ part that should be mounted much later per
instructions. I secured that one with hot glue first, then added normal
glue. After the future had dried, I mounted the various clear parts. They
are very thick and had to be dremeled, partly even disassembled to
 fit. Scalewise they probably
equal a battleship´s main armament. They were mounted with ordinary
modeling glue. I had made sure that all the turrets could be attached
after mating the fuselage halves. I glued the bottom of the dorsal turret
to one fuselage half, intending to mount the clear part with the gun
afterwards.
fit. Scalewise they probably
equal a battleship´s main armament. They were mounted with ordinary
modeling glue. I had made sure that all the turrets could be attached
after mating the fuselage halves. I glued the bottom of the dorsal turret
to one fuselage half, intending to mount the clear part with the gun
afterwards.
The engine parts were sprayed MM exhaust metal and drybrushed MM aluminum, some bits and pieces picked out black and medium grey. The cowlings were cleaned up, the „exhausts“ were opened a little with a hot waxing instrument, the intakes were dremeled out a little. I made sure the propeller shafts could be mounted after everything else was finished.
 The tail fin and stabilizers were
cleaned up quite a bit to fit, then assembled and left to dry. I chose
not even to try to make anything workable. Same applied to the double
flaps on the wings. They were glued in the closed position. After that
the wings could be assembled and left to dry.
The tail fin and stabilizers were
cleaned up quite a bit to fit, then assembled and left to dry. I chose
not even to try to make anything workable. Same applied to the double
flaps on the wings. They were glued in the closed position. After that
the wings could be assembled and left to dry.
The floats were assembled and left to dry, their mounts were cleaned up and the holes for the rigging cleared. I experimented with single strands of model railroading copper wire in this case. It was fiddly work, but in the end strong enough and really rather thin and good for the purpose.
Finally I assembled the fuselage halves and set them aside to dry.
So, at the end of day one I had quite a lot of plastic moved. The fit in all was better than expected, apart from the bottom inset which fit poorly. I managed to come away without major blunders so far, hopefully.
I did some more later in the evening after switching to another host for my uploaded pics. I cleaned and sprayed the props and spinners, undercoating with MM aluminum and adding maroon and red respectively. Also checked the fuselage seam for glue deficits and amended them. Now the engines are nearly ready, I just have to spray the cowlings. maybe I can attach them after spraying the camo, should make things easier.
Day 2
I began by tackling the props, as I´ve always managed to skip this work for a long time (just as the undercarriages), leading to delays in construction. So I painted the hubs MM aluminum and the tips yellow. I had to respray some parts of the maroon color afterwards, but that didn´t matter much.
 Next were the 20 mm guns. They are
so basic even I couldn´t leave them as is. So I cut off the barrels and
replaced them by pieces of hypodermic syringes. A few pieces of wire and
styrene made the body of the gun a bit more lively, and they were painted
MM exhaust metal with some aluminum. I then turned to the fuselage and
filled the gaps, mostly with hot wax, but at some places with Tamiya
putty, clearing the excess
Next were the 20 mm guns. They are
so basic even I couldn´t leave them as is. So I cut off the barrels and
replaced them by pieces of hypodermic syringes. A few pieces of wire and
styrene made the body of the gun a bit more lively, and they were painted
MM exhaust metal with some aluminum. I then turned to the fuselage and
filled the gaps, mostly with hot wax, but at some places with Tamiya
putty, clearing the excess
 with Q-tips and nail polish remover. The big
tail fin was mounted and the joint filled at this point, too. Loking
through the sprues, I checked for stuff to do at this stage and found the
ordnance. The torpedoes and bomb were cleaned and mounted on pins (I
usually mount small parts on heated pins put into the mounting holes and
attach the whole to laundry clamps). They then were sprayed Revell
anthracite. The cowlings were sprayed first MM aluminum, then Revell
flat black tinged with blue and set to dry. Later on I resprayed them in
green and grey after looking into what references I had. I added the fine
copper wire to the other float mount and will next clean up the float and
will next complete this subassembly including the paint job.
with Q-tips and nail polish remover. The big
tail fin was mounted and the joint filled at this point, too. Loking
through the sprues, I checked for stuff to do at this stage and found the
ordnance. The torpedoes and bomb were cleaned and mounted on pins (I
usually mount small parts on heated pins put into the mounting holes and
attach the whole to laundry clamps). They then were sprayed Revell
anthracite. The cowlings were sprayed first MM aluminum, then Revell
flat black tinged with blue and set to dry. Later on I resprayed them in
green and grey after looking into what references I had. I added the fine
copper wire to the other float mount and will next clean up the float and
will next complete this subassembly including the paint job.
So now it´s for cleaning up the seams on the fuselage and wings, then mount the wings, add clear parts or close openings, and then up for spraying. A bold approach that steers clear from references and scratchbuilding ... Total time so far @ 7 hours.
Next came work on the floats; I
cleaned them up, filled and cleaned again, glued the mounts, saw that the
seams cracked upon the pressure of the mounts and did it all over again.
Next I sprayed them flat grey preparatory to the metalizer. I don´t do
this always, but tend to do it
 more generally as I
assume it gives better adherence. Next came fitting the canopy; the fit
was good, and I plan to use plastic glue. Gaps will be filled with white
glue. Before gluing the canopy, I cleaned up the seam below it and
painted the area anthracite.
more generally as I
assume it gives better adherence. Next came fitting the canopy; the fit
was good, and I plan to use plastic glue. Gaps will be filled with white
glue. Before gluing the canopy, I cleaned up the seam below it and
painted the area anthracite.
Day 3
I had my first fit of anger today. Only a slight one yet, but ...
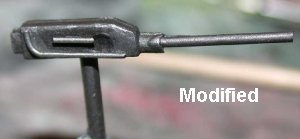
Well, I found some more flaws I had overlooked on all seams, so it was a business of filling, regluing and sanding along the fuselage, I have not tackled the wings yet. But now I can at least state that apart from those nasty &()/&()/ blisters aft of the wings, I have attached all clear parts. Those blisters are meant to house one of the guns each, and attaching the gun to the place inside the fuselage and placing the blister over it is tough. I chickened out and shortened the gun mount so to mount it solely to the blister. That is now left to dry. Next will be attaching the blisters and then cleaning up the seams around the clear parts. I always attach all clear parts before painting, so to get an even joint with the paint. Some of the smaller windows stick out, others are recessed due to por fit.
Would I paint first and attach then, my paint would always look different in shade/texture/sheen, so I do it this way. After finishing that, it´ll be masking hell. Literally, there are a small zillion of glass panels to be masked, and there are four gun barrels protruding out of them. Yuck. Then it´ll be spraing base coat, aluminum and so on. Not to mention the wings. Oh well, I also attached the stabilizers today. Lackluster fit. I´ve already used copious amounts of wax on this bird.
Day ?
 I´ve had my
usual setbacks. Most important is unwillingness to sand and mask
canopies. Hrrm. In the meantime, the following has happened: I´ve sanded
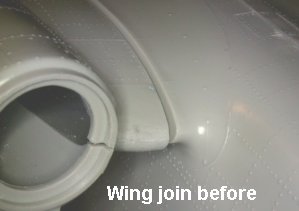
the subassemblies (fuselage and wings, aux. floats). Have dremeled the
mounting tabs of the wings considerably to achieve some fit which they
effectively prevented. You can see the difference in the pics; with the
tabs, no fit could be achieved. Afterwards things brightened up, and I
was left with gaps that could easily be waxed. I attached the wings with
hot glue into the fuselag
I´ve had my
usual setbacks. Most important is unwillingness to sand and mask
canopies. Hrrm. In the meantime, the following has happened: I´ve sanded
the subassemblies (fuselage and wings, aux. floats). Have dremeled the
mounting tabs of the wings considerably to achieve some fit which they
effectively prevented. You can see the difference in the pics; with the
tabs, no fit could be achieved. Afterwards things brightened up, and I
was left with gaps that could easily be waxed. I attached the wings with
hot glue into the fuselag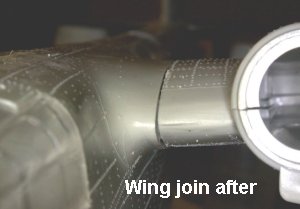 e
boxes where the tabs are meant to go plus modeling glue over the actual
joints. After considerable setting time, I waxed and sanded and finished
the joints.
e
boxes where the tabs are meant to go plus modeling glue over the actual
joints. After considerable setting time, I waxed and sanded and finished
the joints.
In front of the cockpit, a lot of
rivets were lost. I tried my best and made little holes with a hot needle
in order to produce surrogate rivets. In the end, it worked somehow. The
paint filled the little depression, and so a raised structure was
produced. I managed to attach the blisters with white glue; all the gun
barrels were removed carefully to be reattached finally with cyano
acrylate. Now it´s just, er masking all them canopies and addressing a
more toylike mounting for the aux. floats bracings as shown in the pic.
They´ll have to be cut off, and I´m planning on ins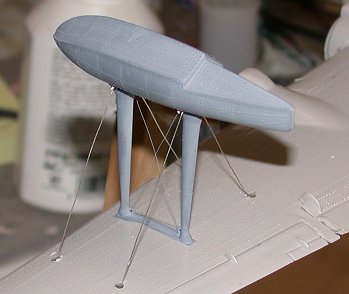 erting
brass tubes to receive the wiring. Moreover, I´ve built a mount that
reaches with two 5 mm cylindrical wood sticks into the outboard engine
mounts and will hold the plane for the next construction steps.
erting
brass tubes to receive the wiring. Moreover, I´ve built a mount that
reaches with two 5 mm cylindrical wood sticks into the outboard engine
mounts and will hold the plane for the next construction steps.
Day ? – a week later
Well, placing Emily on her mount made sense. I can access her well enough and have attached the aux. floats using 0.3 mm silver-coated copper wire that was fiddled from one opening in the wing to the other and then led through the float. The ends were twisted tight , placed inside one of the wing openings and then those were sealed with white glue.
The main canopy was masked with Parafilm M, the other gun blister etc. were painted free hand and corrected with a toothpick – that implies recoating with future. They were then sealed with parafilm prior to painting. Now it´s up to painting and weathering. I have decided to also spray the markings as that gives me better opportunities in weathering.
|
CAMOUFLAGE & MARKINGS |
Much later ...
 Well, modeling slump has finally
got me, and I evaded writing down what I did and also paused a while. Now
having finished the model, I´m sitting back and try to fiddle together
what I did.
Well, modeling slump has finally
got me, and I evaded writing down what I did and also paused a while. Now
having finished the model, I´m sitting back and try to fiddle together
what I did.
Well, in the end I should have gone the extra mile in masking all the turrets with Parafilm, too, which I slumped. Now they´re looking worse than the canopy itself, and I know of no foolproof way of changing it. So be it. Well, when all was masked (I even put Parafilm on them after the painting, yikes ) I sprayed the model first overalll grey and then Testor´s aluminum metalizer, which cost me nearly a bottle due to the size of the beast. Then I polished the metalizer a bit with a paper cloth and coated it with Future in order to make it more scratch-resistant in weathering. This turned out to be a good idea, as it worked. Then came the spraying of the two tones of the camo, plus some pre- and postshading and also using lightened colors on the upper parts to make the whole affair a bit more believable and realistic. Demarcations were done using Parafilm, Maskol and masking tape.
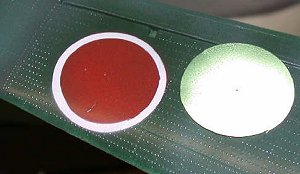 After the preshading
and the two tones I sprayed the markings, masking the whole affair with
Parafilm, stronger adhesive clear plastic and Maskol as needed. The
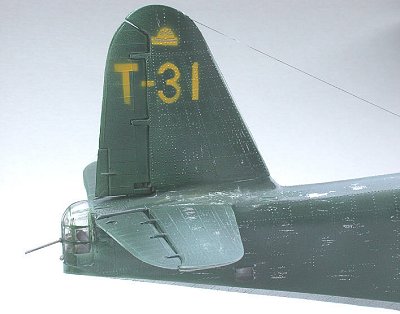
Hinomarus were cut with a cheap circle cutter, the tail markings were
traced and cut through the printout of an aircraft profile brought to
appropriate size. The little stripes inside the symbol over the ID number
were traced with a toothpick into the wet paint. The Hinomarus were
sprayed directly red on the camo, as I wanted them toned down a bit, and
spraying white first as usual for bright markings in yellow and red
didn´t make sense to me. Masking with two different circles for the red
and the white didn´t work without problems, but with some corrections I
had a result that I could live with.
After the preshading
and the two tones I sprayed the markings, masking the whole affair with
Parafilm, stronger adhesive clear plastic and Maskol as needed. The
Hinomarus were cut with a cheap circle cutter, the tail markings were
traced and cut through the printout of an aircraft profile brought to
appropriate size. The little stripes inside the symbol over the ID number
were traced with a toothpick into the wet paint. The Hinomarus were
sprayed directly red on the camo, as I wanted them toned down a bit, and
spraying white first as usual for bright markings in yellow and red
didn´t make sense to me. Masking with two different circles for the red
and the white didn´t work without problems, but with some corrections I
had a result that I could live with.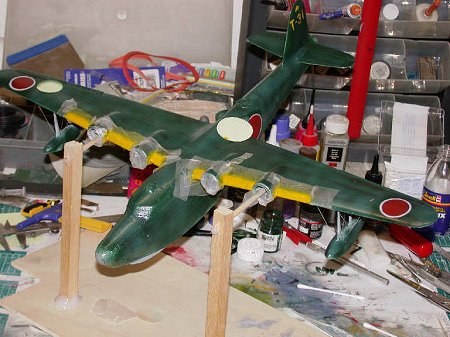
It would have been wiser to spray the yellow stripes on the wings beforehand, and masking them over. Well, I simply forgot it and had some more work, but it was done pretty fast, just about an hour and a half ...
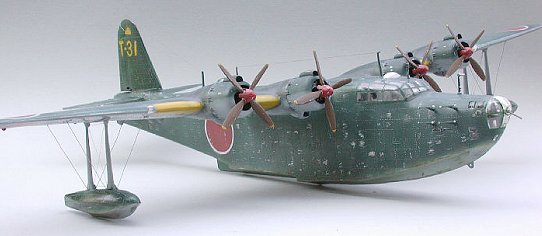
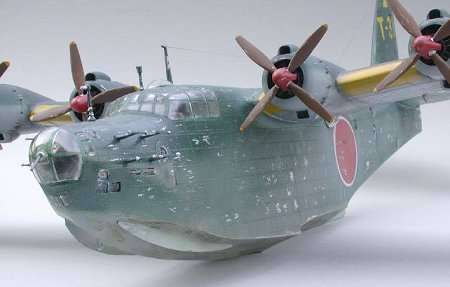
Using the Modelmaster IJN green and grey, which is gloss, necessitated a flat coat. I let that dry thoroughly and then set out on a lucky day after burning some incense and started scraping paint off.
That took some time until I had the feeling I shouldn´t go farther, but I still can. I used a dental Le Cron knife for this process. Then came the exhaust marks; these were sprayed with various shades of grey; the area behind the engines also received a grey wash. The engines were painted in various shades of metalizer, the cowlings received the same treatment as the fuselage. As the props and spinners had also been sprayed aluminum metalizer prior to painting, I could give them signs of wear easily. When the engines were attached I found that I could still use the mount, which was really fine given the limited space in my hobby den.
 The underwater part of the craft
and especially the waterline was weathered with shades of olive drab,
sand and some metalizers. I also used pastel chalk in various greys and
ochres. My idea was that where the aircraft sat in the water, some salt
and algae would surely show their signs, as well as some scruffing by
use.
The underwater part of the craft
and especially the waterline was weathered with shades of olive drab,
sand and some metalizers. I also used pastel chalk in various greys and
ochres. My idea was that where the aircraft sat in the water, some salt
and algae would surely show their signs, as well as some scruffing by
use.
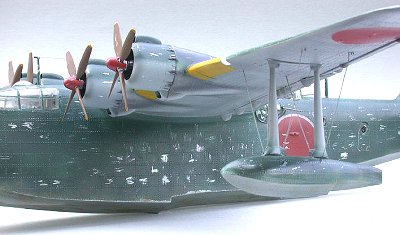
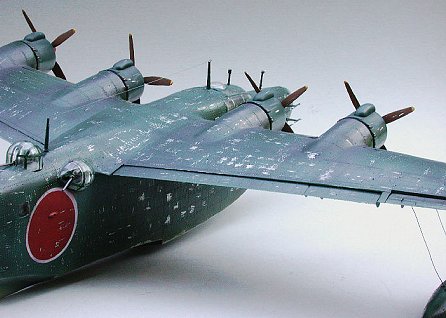
When all seemed OK, I gave the entire plane an uneven flat coat, waited and removed the maskings. I corrected various windows with Future to give them gloss, then set upon the various antennas. I used them „as is“, although they seem rather oversize. The yagi-style radar antennas, eight of them on the bow, were mounted and painted green with silver tips (I´ve no idea why and whether that was justified, but I didn´t like the all-silver antennas I had seen in the pic of a model), the other antennas were also painted green and weathered slightly.
The rigging was done with stretched sprue which was painted exhaust metalizer afterwards. In the end, I omitted the exterior armament as that was done rather blobbily, especially the racks. I also chose to omit the beaching gear and the tow tractor. I feel happy with my Emily on a recon mission and don´t miss the stuff at all.
|
CONCLUSIONS |
Now this is a big nice kit, needing a bit of work but able to produce a nice model, and for the more ambitious folks it should be a good base to start upon.
The fit is inferior to current „standards“, but it can be built without too much hassle.
 I also like the external structure:
The rivets make the plane seem big and heavy and slow, somehow fitting
for such a lumbering monster. Even if they´re not to scale, they make it
look right to me. Sometimes you have to exaggerate things to make them
look right; I first realized that in a map by National Geographic. The
legend stated that the vertical scale (the elevations and depressions)
was exaggerated tenfold to make it look right. So this is yet another
case of our willingness to be deceived, for our own sake to make things
look right...
I also like the external structure:
The rivets make the plane seem big and heavy and slow, somehow fitting
for such a lumbering monster. Even if they´re not to scale, they make it
look right to me. Sometimes you have to exaggerate things to make them
look right; I first realized that in a map by National Geographic. The
legend stated that the vertical scale (the elevations and depressions)
was exaggerated tenfold to make it look right. So this is yet another
case of our willingness to be deceived, for our own sake to make things
look right...
Having seen a documentary on flying boats recently which included footage of two Martin Mars serving as water bombers off Vancouver Island, I got a feeling of the mass of these beasts, and they still awe me. I especially liked scraping off the paint and playing with colors around the waterline, and the idea of building a dio itches ever more. I saw one in a German modeling magazine recently of a Bv 222 flying boat replenishing two German e-boats off a coast somewhere in North Africa, hauling a torpedo from the flying boat to the stern of one of the e-boats with lots of figures and a bit of coastline with palm trees. I just have no idea where to put such a thing ...
September 2003
Copyright ModelingMadness.com. All rights reserved. No reproduction in part or in whole without express permission.
If you would like your product reviewed fairly and fairly quickly, please contact the editor or see other details in the Note to Contributors.