
|
KIT: |
UPC 1/72 Kawanishi E15K 'Norm' |
|
KIT # |
8007-50 |
|
PRICE: |
$4-15 |
|
DECALS: |
generic Japanese |
|
REVIEW & |
Seth Lorinczi |
|
NOTES: |
` |
|
HISTORY |
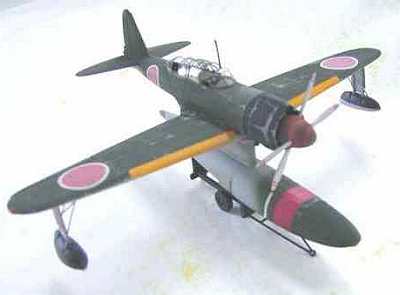 E15K Shiun ("Norm" to the Allies) was an interesting, if botched
attempt to create a reconnaissance seaplane capable of outrunning enemy
fighters. The idea was to match a powerful engine fitted with two
contra-rotating propellers with a novel float system. When not in use, the
wingtip floats, the undersurfaces of which were rubberized fabric and collapsible, would retract into the wings. In an emergency, the central float
could be jettisoned to further increase speed. Ditching the aircraft would have
been another matter entirely, but as it turned out the opportunity never arose.
E15K Shiun ("Norm" to the Allies) was an interesting, if botched
attempt to create a reconnaissance seaplane capable of outrunning enemy
fighters. The idea was to match a powerful engine fitted with two
contra-rotating propellers with a novel float system. When not in use, the
wingtip floats, the undersurfaces of which were rubberized fabric and collapsible, would retract into the wings. In an emergency, the central float
could be jettisoned to further increase speed. Ditching the aircraft would have
been another matter entirely, but as it turned out the opportunity never arose.
Various technical problems, especially with the inflatable wingtip floats, delayed the project, and only 15 production machines were built in 1943-44. By that time, the novel wingtip floats had been exchanged for conventional fixed types. In any event, all the E15Ks were shot down. No one had bothered to test the jettisonable central floats. Apparently, none functioned as intended, and this unconventional aircraft design went the way of the dodo.
|
THE KIT |
I don't have any information on the kit, but I'm assuming it was released sometime in the late '60s or early '70s. All panel lines are raised, there's no interior detail other than a couple of crew figures, and the ailerons are designed to be moveable. Not the most promising looking kit, but with only a couple of modifications it built into quite a handsome little model. (Your editor has the sneaking suspicion that this is an old Aoshima kit, and if so, gives only a bare minimum of a kit to start with. Makes many Merlin kits looks state of the art!)
|
CONSTRUCTION |
First off, I had to decide whether or not to sand down the raised panel lines and re-etch them. Though this sounded like a great deal of fun, I elected to stick with what I had, and I don't regret my decision in the least. The only question was how to replace lines lost to sanding and filling, but gluing sections of stretched sprue in their place was a quick and easy fix.
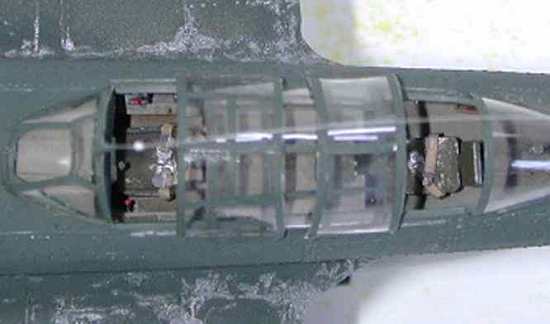 I wanted to build a complete interior, which meant replacing the thick and
distorted kit canopy. I cut the piece into five sections, then smash-formed
copies using Squadron's Thermaform plastic. (I recommend using an electric
toaster or oven for this, as flames tend to smudge up the plastic.)
I wanted to build a complete interior, which meant replacing the thick and
distorted kit canopy. I cut the piece into five sections, then smash-formed
copies using Squadron's Thermaform plastic. (I recommend using an electric
toaster or oven for this, as flames tend to smudge up the plastic.)
Next came the interior itself. I sanded the thick fuselage interiors and added formers and stringers from Evergreen strip stock, layered so that the formers (the vertical ribs) were twice as thick as the longitudinal stringers. I built a simple floor from sheet stock, and added vaguely appropriate seats, radios, levers, control quadrants, switches and whatever else I had the patience to stuff in there.
I painted the fuselage interior with an aotake mix of green, blue and silver. The floor, seats and instruments got various shades of pale green or gunmetal, depending on whatever seemed most appropriate.
The wingtip floats were modified from the kit components, which depicted the later fixed-float design. I cut off the struts and constructed new ones from plastic rod and sheet, adding retraction arms from thin strip stock. To depict the float bays, I cut out sections of the lower wing and added a couple of structural components, and only then noted that the two cutouts didn't match from wing to wing. Note to self: "Take measurements before cutting plastic!"
Back to the airplane. There was a good bit of sanding and filling at the wing root, but nothing outrageous. The engine is barely visible behind the large spinner, but I added a row of cylinders just to be safe. As for those kiddie-style ailerons, I reduced the hinges to a more realistic width and filled in the slots on the ailerons themselves accordingly.
I took a break here to construct an entirely fictitious beaching dolly, using the clear stand provided in the kit as a starting point. I added spare wheels and a tow bar, and painted the whole thing a dirty gunmetal-grey. In any case, it's not too visible underneath the airplane. The rest of the construction was taken up with replacing those pesky raised panel lines and preparing for paint.
|
PAINT & DECALS |
 I trolled the Internet (and the message boards at www.j-aircraft.com)
for references, but in the end I all I had was Rene Francillon's "Japanese
Aircraft of the Pacific War" book, which provided one dark photograph and a
three-view diagram of the airplane. Unsurprisingly, the week after I finished
the kit I found several useful and high-quality images of the aircraft on www.ijnafpics.com.
So much for my thorough research.
I trolled the Internet (and the message boards at www.j-aircraft.com)
for references, but in the end I all I had was Rene Francillon's "Japanese
Aircraft of the Pacific War" book, which provided one dark photograph and a
three-view diagram of the airplane. Unsurprisingly, the week after I finished
the kit I found several useful and high-quality images of the aircraft on www.ijnafpics.com.
So much for my thorough research.
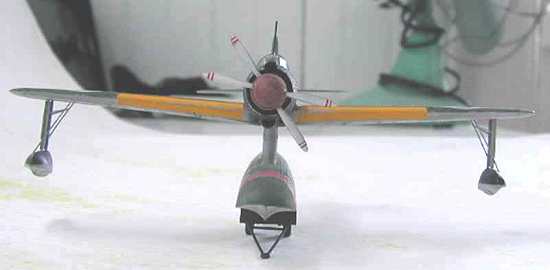
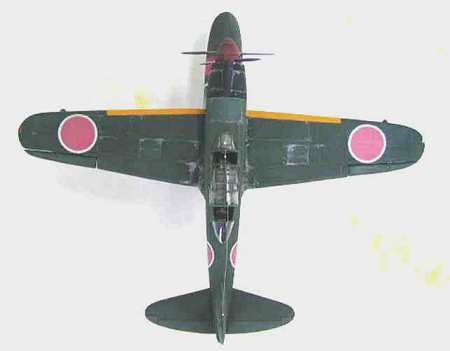
Appearing to have no choice, I chose the standard "generic IJN green over IJN grey" scheme. After priming the entire aircraft with light grey and checking for cracks, I painted two shades of IJN grey and three of generic IJN green, masking off a couple of panels and spraying the lightened or darkened color to break up the otherwise monotonous paint job.
The engine cowling got AeroMaster's "Mitsubishi Blue-Black," the wing leading edges got yellow-orange and the spinner got a rusty brown. The central float got a broad propeller-warning stripe with a faded red similar to the hinomarus. Speaking of which, the kit-supplied versions were yellowed and cracked, so I filched new ones from derelict kits and oversprayed a little light grey to simulate weathering and salt spray.
Weathering:
 I tend to overweather Japanese airplanes, but figuring that few of the
aircraft got much use before they were shot down, I tried to keep it to a
minimum.
I tend to overweather Japanese airplanes, but figuring that few of the
aircraft got much use before they were shot down, I tried to keep it to a
minimum.
The undersides of the fuselage, wings and floats got a couple of dark smears to simulate the muck that tends to leak out of the bottoms of aircraft, particularly seaplanes.
There were no recessed panel lines to highlight with a wash, so instead I edged them with a silver pencil, more so topsides than on the bottom of the aircraft. High-use areas, like wing roots, inspection panels and the engine cowling, got heavier doses of silver, usually Testors' Aluminum Metallizer applied with a fine brush.
|
CONCLUSIONS |
Considering the kit's age it wasn't nearly as excruciating as it could have been. Needless to say, it requires a little more patience than more recent kits, but builds into a handsome model.
The only other 1/72 E15Ks I'm aware of are made by Aoshima (some suggest that it may in fact be a reboxing of the UPC kit) and Aviation USK, who produce a vacuformed version. (Editor's note, the Av Usk kit is in fact a limited run injected kit)
|
REFERENCES |
Francillon: "Japanese Aircraft of the Pacific War" (Putnam Aeronautical series [unnumbered]; Putnam [UK], 1970; 570 pages; US$45)
If you would like your product reviewed fairly and quickly by a site that averages over 2,800 visits a day, please contact me or see other details in the Note to Contributors.