Academy 1/72 A6M5c Zero
|
KIT #: |
2176 |
|
PRICE: |
$9.99 SRP
|
|
DECALS: |
Two Options |
|
REVIEWER: |
Nathan Stevens |
|
NOTES: |
|

The Zero Fighter (Reisen or Zero-Sen)
was the Imperial Japanese Navy’s first single-seat and single-engined shipboard
fighter 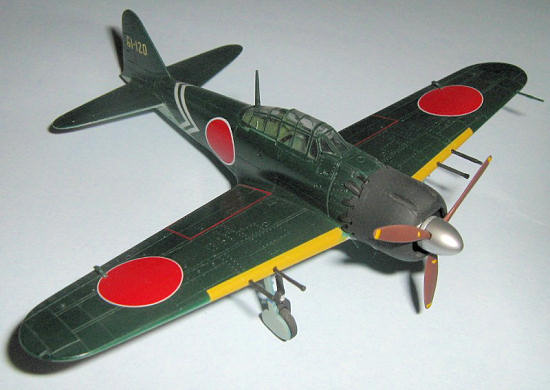 with the retractable undercarriage.
It was the most produced types of all Japanese combat aircraft of World
War II.
Designed in the 1937
specifications, the Zuisei-powered prototype flew in the spring of 1939, but the
most more successful Sakae-powered prototype was adopted as the Zero type 11,
and two squadrons with 15 aircraft were sent to
China
in July 1940 for trials under operational conditions.
More than 400 had been delivered by the time the type 21 and type 32
appeared at
Pearl Harbor.
with the retractable undercarriage.
It was the most produced types of all Japanese combat aircraft of World
War II.
Designed in the 1937
specifications, the Zuisei-powered prototype flew in the spring of 1939, but the
most more successful Sakae-powered prototype was adopted as the Zero type 11,
and two squadrons with 15 aircraft were sent to
China
in July 1940 for trials under operational conditions.
More than 400 had been delivered by the time the type 21 and type 32
appeared at
Pearl Harbor.
After the battle of Midway the Allies slowly
gained the ascendancy, and the Zero found itself outclassed by the F4U Corsair
and the F6F Hellcat.
Mitsubishi
urgently tried to devise improved versions and type 52 (A6M5) was built in
quantities far greater than any other Japanese combat aircraft.
To satisfy front line demands for increased fire power and pilot
protection, most of the changes were made in these areas under the designation
type 52c (A6M5c).
Especially,
armament was increased to and additional 13mm machine gun mounted in each wing
just outboard the 20mm cannon and underwing bomb rack for 30kg bomb.
Total production amounted to 10,937, of which 6,217 were built by
Nakajima Hikoki and another ones were built by Mitsubishi Jukogyo.
In late of war, hundred of Zeros of many sub-types and young pilots were
converted for reckless suicide attacks; Kamikaze.
This kit is one of the staples of the 1/72
Academy catalog.
Being on par with
their other WWII aircraft, the fit is excellent, the engraved panel lines are
fine and crisp and the level of detail is perfect for an out of box build in the
scale.
The down side of t hese kits
is equally unanimous.
There seems
to be at least one shape or detail flaw in nearly every release.
In this case I keep hearing about issues with the shape of the cowling
being off one way or another.
I
don’t see it and thus I don’t care.
hese kits
is equally unanimous.
There seems
to be at least one shape or detail flaw in nearly every release.
In this case I keep hearing about issues with the shape of the cowling
being off one way or another.
I
don’t see it and thus I don’t care.
In the box are 3 sprues of gray
plastic and 1 clear.
The clear
sprue contains a gunsight and a 3 piece canopy allowing the sliding portion to
be displayed open.
The plastic is
molded smooth and there is no flash.
Ejector pins and sink marks are very minimal.
The instructions are laid out in 8 easy to read steps.
Options include a centerline drop tank and underwing rockets.
Color callouts are very generic such as semi gloss black for the cowl and
metallic green for the interior.
Apparently close enough is the name of the game.
There are 2 decals choices, both in
the uninspired IJN green over light gray scheme.
Of note here, Academy calls for mixing 80% leaf green with 20% black to
achieve IJN green.
Helpful I know.
The first scheme is the popular mount of Takeo Tanimizu of the 203rd
FG in
Kagoshima,
June 1945.
The other is more
generic from the 302nd FG at Atsugi in July 1945.
In the office are 5 parts: floor,
seat, rear bulkhead, stick and instrument panel.
There’s plenty of sidewall detail molded in to the fuselage sides so the
end result here is far in excess of what’s included in the Hasegawa kit.
The engine is 2 parts with a prop socket that fits in between allowing
the prop to be added later.
The rear engine half is molded to a disc which fits the rear of the cowl.
Detail again is sufficient for the scale as the engine will be all but
invisible in it’s tightly jacketed cowl.
The 3 part cowling
 was painted a custom mix of flat black with a touch of Testors dark blue.
The cockpit was
sprayed in Model Master French khaki if I remember right.
I tend to use all sorts of light to medium greens for my Japanese
aircraft interiors assuming eventually one has to be ‘right’.
was painted a custom mix of flat black with a touch of Testors dark blue.
The cockpit was
sprayed in Model Master French khaki if I remember right.
I tend to use all sorts of light to medium greens for my Japanese
aircraft interiors assuming eventually one has to be ‘right’.
Assembly was pretty straightforward throughout.
Since these are builds I completed over 2 years ago I’m working from
memory but as I recall the worst fit of the entire build was under the fuselage
at the wing join.
This is a pretty
common area for filler in any build and on an A6M, it’s an easy fix.
Usually my biggest hurdle is in the upper wing join and in this case, the
fit was so good no filler was needed.
If using the drop tank, the premarked holes will need drilled out in the
lower wing half.
The rocket rails
are molded in so surgery is required if you want a cleaner wing.
The tail planes were next and fit was excellent here as well.
Next came the most tedious part of
the build, masking the canopy.
The
wheel wells inner gear doors were sprayed in MM Aotake and later stuffed with a
silly putty mask.
Having two kits I was left
unenthused by my options for markings.
I had a couple of the Hasegawa kits in the stash and one provided
markings for the Planes of Fame A6M5.
That’ll do!
I started by
spraying the wing leading edges in MM Deep Yellow.
Once dry these were masked and lower surfaces were covered in MM IJA
gray.
In hindsight, the wrong
choice but at the time all my Japanese aircraft were receiving this color.
Once dry, the edges were masked with more silly putty and the uppers were
sprayed in MM IJN green.
For
whatever reason, this color is glossy and requires several coats to get even
coverage.
It’s not
 Model Master’s
best paint to be sure but I like the color itself.
One aircraft received a far lighter coverage to give the appearance of
faded paint.
Model Master’s
best paint to be sure but I like the color itself.
One aircraft received a far lighter coverage to give the appearance of
faded paint.
Once dry, the entire airframe was
sprayed with Future.
The IJN green
yields enough shine to decal directly over it but it tends to remain tacky.
The Future makes for easier handling.
Kit decals went on without a hitch over the faded aircraft but the
Hasegawa decals required far more care, as usual.
The usual cracking and resistance to light solvents tried my patience.
Heavier solvents often make a mess of Hasegawa decals so I said good
enough is good enough.
The worn out aircraft was given a
good dose of Dullcoat through the airbrush while the other was given a couple
more coats of Future.
Detailing involved spraying the
gear legs black, the props and one spinner in a mix of Testors brown and Model
Master Rust, and the other spinner in Alclad aluminum sprayed directly over the
plastic.
Wheel hubs were painted
aluminum while the tires, gun barrels and the molded-on exhaust stubs were
painted black.
 The canopy was added and fit is
quite good.
Nowadays I tend to
install the canopy before paint to make up for any fit issues but in this case
it worked out well enough waiting until after paint.
Gear leg oleos were wrapped in Bare Metal Foil chrome and the exhaust
stubs received a dusting of Marmo Magic brown pastels.
The tiny little tail wheel was carefully picked out in flat black, the
prop slid together, gear legs attached, gun barrels, etc.
The fit of the 3 piece gear doors is fiddly having no attachment points
so care is need here.
Otherwise,
everything fit quite well.
The only
further weathering was a very light lengthwise dusting of dark gray on the
undersurfaces and behind the exhaust.
The canopy was added and fit is
quite good.
Nowadays I tend to
install the canopy before paint to make up for any fit issues but in this case
it worked out well enough waiting until after paint.
Gear leg oleos were wrapped in Bare Metal Foil chrome and the exhaust
stubs received a dusting of Marmo Magic brown pastels.
The tiny little tail wheel was carefully picked out in flat black, the
prop slid together, gear legs attached, gun barrels, etc.
The fit of the 3 piece gear doors is fiddly having no attachment points
so care is need here.
Otherwise,
everything fit quite well.
The only
further weathering was a very light lengthwise dusting of dark gray on the
undersurfaces and behind the exhaust.
It’s another fine 1/72 warbird from
Academy.
It’s too bad that most of
the better Academy kits have hard competition from the likes of Hasegawa, Revell
Germany and so forth.
That said,
the price is certainly right, availability is far from concern, ease of assembly
is first rate, and the final product sits proud on the shelf alongside far more
expensive kits.
Highly recommended!
Kit Instructions
Nathan
Stevens
June 2011
My thanks to
www.dragonmodelsusa.com for the review kit. Get yours at your favorite shop
or ask them to order it for you.
If you would like your product reviewed fairly and fairly quickly, please contact the editor or see other details in the
Note to
Contributors.
Back to the Main Page
Back to the Reviews Index Page