Nichimo 1/48 Aichi E13A1b “Jake”
| KIT #: | 4803 |
| PRICE: | $32.00 |
| DECALS: | Basic markings |
| REVIEWER: | Dale Rannals |
| NOTES: | Recently reissued with stickers. |
| HISTORY |
 meant long
range patrols by aircraft.
And more times than not, that meant seaplanes.
Whether they alighted from bases or ships, these
unsung heroes did patrol after endless patrol, searching millions of square
miles of ocean for any tiny specks that could be a fleet.
And in finding that fleet, feel the mind numbing
boredom turn to frantic terror in an instant.
Work out your position, hope it’s correct (this
square mile of ocean looks pretty much like the last, or next), estimate the
enemy’s size, speed, and course and start sending it off to base before that
fleets’ protecting fighters blow you out of the sky.
Oh yeah, and hope your radio actually works.
meant long
range patrols by aircraft.
And more times than not, that meant seaplanes.
Whether they alighted from bases or ships, these
unsung heroes did patrol after endless patrol, searching millions of square
miles of ocean for any tiny specks that could be a fleet.
And in finding that fleet, feel the mind numbing
boredom turn to frantic terror in an instant.
Work out your position, hope it’s correct (this
square mile of ocean looks pretty much like the last, or next), estimate the
enemy’s size, speed, and course and start sending it off to base before that
fleets’ protecting fighters blow you out of the sky.
Oh yeah, and hope your radio actually works.
So this brings us to the
Aichi E13A, Allied
code name "Jake".
The Jake was a quite sleek looking, long-range
reconnaissance seaplane used by the Imperial Japanese Navy (IJN) from 1941 to
1945. Power was produced by a 1080hp Mitsubishi Kinsei 43 14-cylinder radial
giving a range of about 1300 miles.
This meant up to 15 hour patrols.
They were popular with their crews and were used
everywhere in the Pacific conflict.
Mechanical difficulties prevented them from
influencing the Battle of Midway, but on
The IJN designation was "Type-0 Reconnaissance Seaplane".
| THE KIT |
I love seaplanes. I have always figured, if you are going to fly over the ocean, it might be a good idea to be able to land on it. Nichimos’ 1/48 Aichi E13A1b “Jake” comes in 84 pieces of grey and clear (2pcs) plastic. I do believe it is the only Jake in 1/48th scale offered. It dates from the late 70’s and has raised detail, but since this aircraft pre-dates flush riveting I think this is more accurate here. From what I have read about this kit, detail and outline are quite well represented. It also has toy-like features in the form of moveable flaps and control surfaces and folding wings. The wing fold mechanism is very well done; a sliding hinge setup, so no fears of breaking it after a couple wing-fold attempts. It does not, however, make any attempts at accuracy, so if that bothers you, you can always glue the wings deployed.
 The kit is
designed to incorporate an electric motor and battery to spin the propeller.
My kit did not come with one, nor do I believe the
currant re-issue has one.
The instructions and box sides still show it though.
For this reason the cockpit detail is squashed.
Well, let me rephrase that.
There is no cockpit detail to speak of.
What you get is a gun mount ring, an aerial mast
bulkhead, a facsimile of a navigation table, and three scrunched up, smallish
figures to stick in there to hide the lack of everything else.
No sidewalls, no instrument panel, no seats, no
nothing!
Ah, Grasshopper, there is ying and yang in everything.
If doing cockpit detail just isn’t your thing, this
kit is great!!
And truthfully, the figures are fairly well
detailed, so they would do a good job of giving the impression that there is
“something there.”
Also, because of the electric motor design, the
engine is little more than a flat plate.
I do believe there are resin engines available, but
you are out of luck for cockpits, though a Val cockpit may be coerced to fit and
since both aircraft are from Aichi, it may be fairly accurate.
Also
included in the kit is a beaching dolly.
The kit is
designed to incorporate an electric motor and battery to spin the propeller.
My kit did not come with one, nor do I believe the
currant re-issue has one.
The instructions and box sides still show it though.
For this reason the cockpit detail is squashed.
Well, let me rephrase that.
There is no cockpit detail to speak of.
What you get is a gun mount ring, an aerial mast
bulkhead, a facsimile of a navigation table, and three scrunched up, smallish
figures to stick in there to hide the lack of everything else.
No sidewalls, no instrument panel, no seats, no
nothing!
Ah, Grasshopper, there is ying and yang in everything.
If doing cockpit detail just isn’t your thing, this
kit is great!!
And truthfully, the figures are fairly well
detailed, so they would do a good job of giving the impression that there is
“something there.”
Also, because of the electric motor design, the
engine is little more than a flat plate.
I do believe there are resin engines available, but
you are out of luck for cockpits, though a Val cockpit may be coerced to fit and
since both aircraft are from Aichi, it may be fairly accurate.
Also
included in the kit is a beaching dolly.
The instructions are adequate, a fold out affair, with well done assembly drawings. This is good because even though there is a lot of text instructions on the paper, they are all in Japanese. The instructions also include a numbered sprue/parts drawing…this helps in finding the parts since the sprue layout is anything but logical. There is a two view drawing and a picture of the completed model showing color callouts and decal placement, though again, all the color text is Greek to me (well, Japanese) so you better have other references or go by the nicely done box cover art.
The decals in my kit, well, weren’t decals. At first I wasn’t sure what they were. A very thick, glossy sheet of basic markings. But they were not decals. Nor were they dry transfers. Took me a while to figure out, but they were stickers. One big sticker, actually. Apparently you cut out each one separately. They were well unusable; being so very thick they would never conform to any detail.
| CONSTRUCTION |
Assembly begins with the cowling/propeller. The cowl is in two vertical halves but mate up nicely. The engine fascia sandwiches inside the halves. They would have you attach the propeller here, but I left mine off till the very last….much less chance for breakage. The fuselage goes together next, this consists of a rudder captured between the fuselage halves. Onto this goes the cockpit insert. It is one piece, but is a bit narrower than the fuselage. I made up two spacers of cut sprue to widen the insert out at the bottom, this helped out a lot but I still needed much putty in this area. And of course all that sanding tends to destroy the raised detail. I minimized this by taping over as much of the detail as possible. Once this was completed I moved on to the cockpit pieces.
 If you don’t count the cockpit insert itself and the
three crew members, then the total remaining cockpit parts count is 6.
You get a navigation table, an aerial mast bulkhead,
a three part gun mount, and a machine gun.
I assembled all this and then painted the nav table
a brown, the front hood black, and the rest a dark green.
I opted against a lighter Aotake type color because
the dark green also helps hide the fact that there really isn’t anything there.
If you don’t count the cockpit insert itself and the
three crew members, then the total remaining cockpit parts count is 6.
You get a navigation table, an aerial mast bulkhead,
a three part gun mount, and a machine gun.
I assembled all this and then painted the nav table
a brown, the front hood black, and the rest a dark green.
I opted against a lighter Aotake type color because
the dark green also helps hide the fact that there really isn’t anything there.
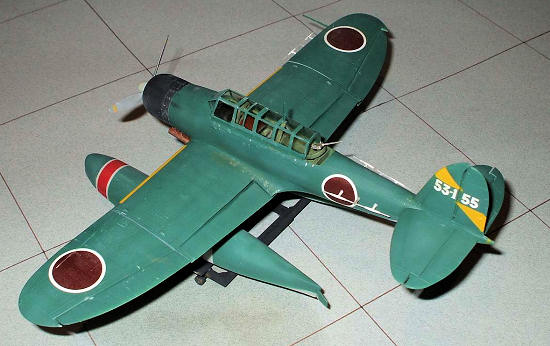
The horizontal stabilizer comes next; nothing major here. The elevators get captured by a top and bottom. The hinges are sturdy so breakage isn’t an issue. This one assembly then slides into a slot in the fuselage. Onto the wings. The outer wings fold, and the fold mechanism is a simple, sturdy piece of engineering. It is a sliding pivot that allows the outer wing to be pulled out from the inner wing, and then pivoted upwards. Also, there are locating tabs on the outer wing that fit into the inner portion that assures a positive no-droop deployed stance. I like the wing fold; it saves space in my display case. No, it is by no means accurate, but with the wings folded you don’t see much of the mechanism anyway.
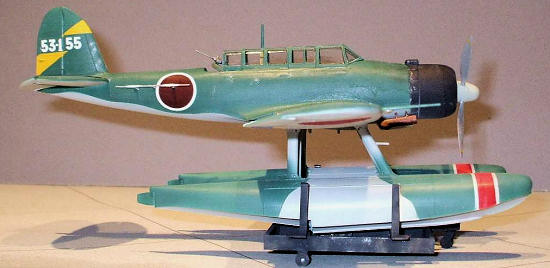
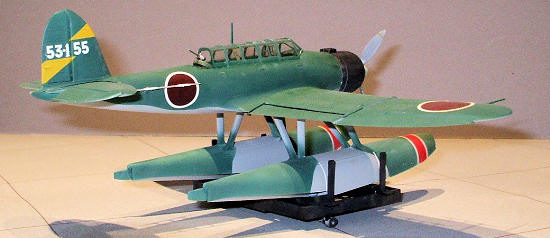
The floats come next, each one being a
seven part affair.
Two halves with a nose cap and rudder and three
strut pieces.
I added plenty of weight to the floats to assure a proper
stance when done.
There is a pronounced step at the nose cap junction,
so be ready for more putty sessions.
The floats then fit snuggly into slots in the
fuselage bottom.
| COLORS & MARKINGS |
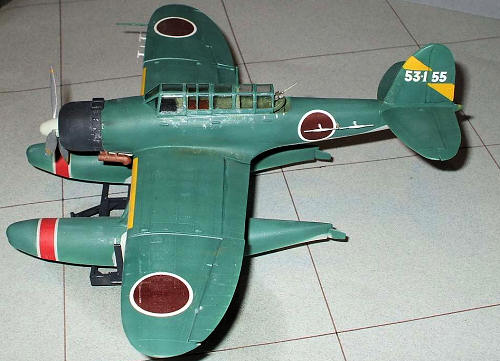 .
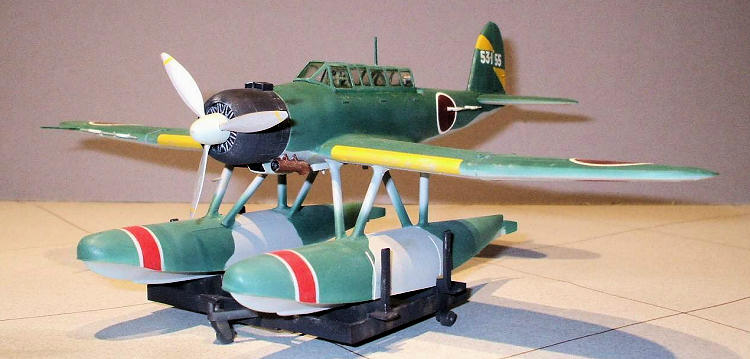
I then sprayed the top IJN Green and proceeded to
highlight panel lines with a darker mix of each and panel centers with a lighter
shade to try to break up the monotony of the color.
The
cowling was painted
with a
very very dark grey with just a touch of dark blue in it.
I tried chipping some well worn areas with silver
and scuffing and smudging up area with pastels.
Turned out okay methinks.
The Jake was then shot with a coat of Future to prep
it for decals.
.
I then sprayed the top IJN Green and proceeded to
highlight panel lines with a darker mix of each and panel centers with a lighter
shade to try to break up the monotony of the color.
The
cowling was painted
with a
very very dark grey with just a touch of dark blue in it.
I tried chipping some well worn areas with silver
and scuffing and smudging up area with pastels.
Turned out okay methinks.
The Jake was then shot with a coat of Future to prep
it for decals.
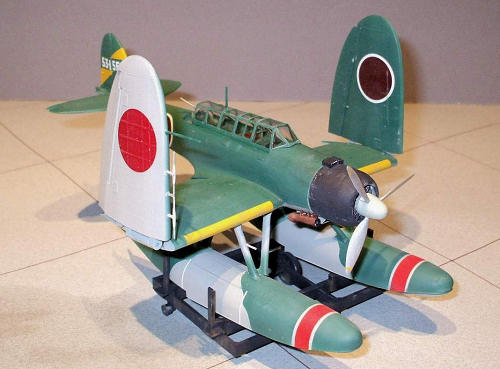
Since I was not going to use the stickers I looked in the decal dungeon for suitable replacements. I found some hinomarus from an old Otaki set and a spare set of rudder numbers from a Hasagawa Myrt.
The hinomarus went down fine considering there age but were very transparent, and hence came out very dark when placed over the green. In hindsight I should have masked off and painted a grey disk to place the decal on, or just mask off and paint the hinomarus themselves. Oh well. Everything settled down with Micro Set and Sol. I then sprayed a coat of Future/Tamiya flat mix to matte things out.
I dipped the canopy in Future and after it dried put it in place. It almost fits. There is a gap of about a 1/16th along both sides. I used white glue to fill in the gaps; let it dry then painted the area to match the fuselage. This worked out quite well. The white glue fills gaps and levels out nicely. The gunners’ canopy at the back I just threw away. There was no way it was going to fit in there, so I didn’t bother.
 We're not done yet though.
Final assembly step is the beaching dolly.
A simple construct of nine parts.
I painted this my “almost black” dark grey and
weathered it with a rusty brown.
Not sure if that is right, as I don’t know if these
were metal or wood?
We're not done yet though.
Final assembly step is the beaching dolly.
A simple construct of nine parts.
I painted this my “almost black” dark grey and
weathered it with a rusty brown.
Not sure if that is right, as I don’t know if these
were metal or wood?
| CONCLUSIONS |
So here we
have Nichimo's Jake.
It sort of lives in that realm between accurate
model and toy.
The movable control surfaces and even the wing fold
do not detract from its good outline and nice detail.
The cockpit area, though, leaves much to be desired.
Would be great to see an aftermarket cockpit set,
but I wouldn’t hold your breath.
Just build it and enjoy it and have something
not-often-seen in you collection.
| REFERENCES |
Box art
Wikipedia
Axis Aircraft of World War Two (ISBN: 1-85152-966-7)
October 2008
Copyright ModelingMadness.com. All rights reserved.
If you would like your product reviewed fairly and fairly quickly, please contact the editor or see other details in the Note to Contributors.
Back to the Review Index Page 2021