
| KIT #: | Q1 |
| PRICE: | $10.00 in part of a lot |
| DECALS: | Several options |
| REVIEWER: | Jonathan Prestidge |
| NOTES: | Eduard p.e. belts |
| HISTORY |
From the kit instructions: “The Aichi Navy type 99 carrier
dive bomber, known to the Allies as ‘Val’, was, along with the A6M2 Zero and the
Nakajima B5N type 97 carrier attack bomber ‘Kate’, one of the primary attackers
at Pearl Harbor. The Val was roughly comparable to the German Ju-87 Stuka, and
like it, was obsolescent by the time Japan began the Pacific war in December
1941. Despite this, the Val achieved spectacular success during the first ten
months of the war, and eventually sank more war ships than any other Axis plane.
 70
which coincidentally had influenced the design of the Supermarine Spitfire a
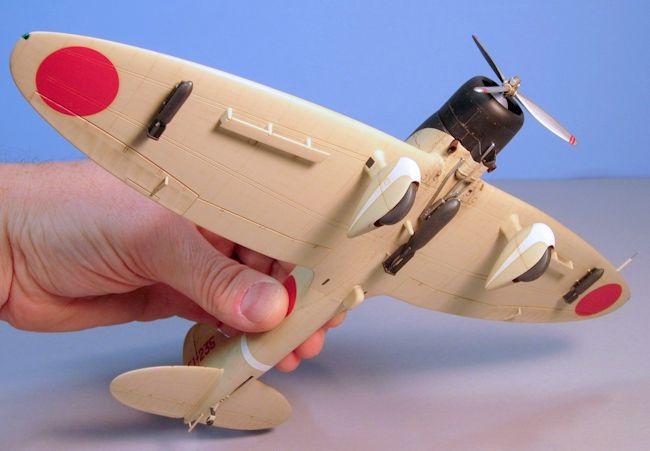
year before this. The fixed undercarriage was selected after the designers
decided that the slightly reduced drag of a retractable undercarriage could not
justify the added weight and complexity. It displayed many features common to
dive bomber types which were in vogue during the ‘30s such as: underwing dive
brakes, a trapeze type bomb carriage under the belly to prevent the centerline
bomb from entering the propeller arc while the plane was in a dive and a
rearward firing gun which allowed the radio operator to protect the tail during
a bomb run.
70
which coincidentally had influenced the design of the Supermarine Spitfire a
year before this. The fixed undercarriage was selected after the designers
decided that the slightly reduced drag of a retractable undercarriage could not
justify the added weight and complexity. It displayed many features common to
dive bomber types which were in vogue during the ‘30s such as: underwing dive
brakes, a trapeze type bomb carriage under the belly to prevent the centerline
bomb from entering the propeller arc while the plane was in a dive and a
rearward firing gun which allowed the radio operator to protect the tail during
a bomb run.
By early 1943 the Val was being replaced on Japanese carriers by the faster and more modern Yokosuka D4Y ‘Judy’. The Val was then relegated to land based units and small aircraft carriers which could not handle the Judy because of its high landing speed. By late in the war the Val had all but disappeared from front line units. However this was not to be the end of its combat career as, in the final desperate months of the war, these planes were used for ‘Kamikaze’ suicide missions. Because of the Val’s lack of speed and the overwhelming Allied air superiority, these planes rarely gained their targets, and their young pilots were futilely spent in a bitter contrast to their glorious victories of a few years before.”
| THE KIT |
 I believe
this kit originated in the early 1980s. The kit came in a top opening box with
stunning artwork done by master painter Shigeo Koike. Released by Fujimi when
they were a serious contender in the 1/48th scale aircraft market,
the D3-A1 was a product of its time. It had a very basic interior, three figures
(two seated, one standing), a thick canopy that can only be accurately posed in
the fully closed position, a simple engine and rather crude details. Its’ one
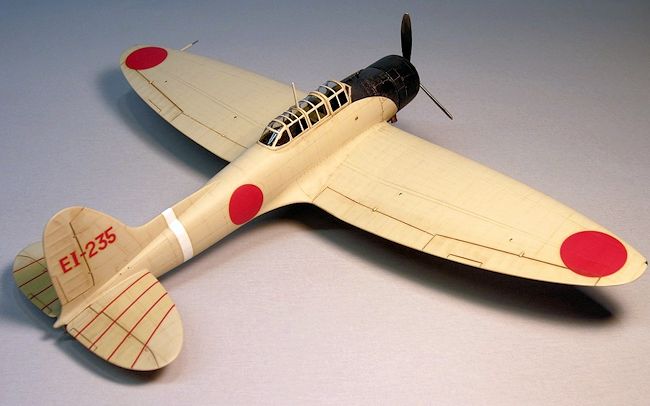
saving grace was the petite raised rivet surface detailing. The surface
detailing was so fine that it remains impressive even today. The kit decals were
too old to use so I pirated some from a Testors/Fujimi Val I had in the stash.
My goal in building this kit was to turn out a respectable model, improving the
kits lack of detail with some simple scratch-building.
I believe
this kit originated in the early 1980s. The kit came in a top opening box with
stunning artwork done by master painter Shigeo Koike. Released by Fujimi when
they were a serious contender in the 1/48th scale aircraft market,
the D3-A1 was a product of its time. It had a very basic interior, three figures
(two seated, one standing), a thick canopy that can only be accurately posed in
the fully closed position, a simple engine and rather crude details. Its’ one
saving grace was the petite raised rivet surface detailing. The surface
detailing was so fine that it remains impressive even today. The kit decals were
too old to use so I pirated some from a Testors/Fujimi Val I had in the stash.
My goal in building this kit was to turn out a respectable model, improving the
kits lack of detail with some simple scratch-building.
| CONSTRUCTION |
 closed up
the fuselage and added the wings, tail, and landing gear. I was extra careful
with construction because I did not want to sand off the beautiful raised detail
while cleaning up the seams. I assembled and painted the engine but left it off
until after painting. Light sanding of the airframe followed.
closed up
the fuselage and added the wings, tail, and landing gear. I was extra careful
with construction because I did not want to sand off the beautiful raised detail
while cleaning up the seams. I assembled and painted the engine but left it off
until after painting. Light sanding of the airframe followed.
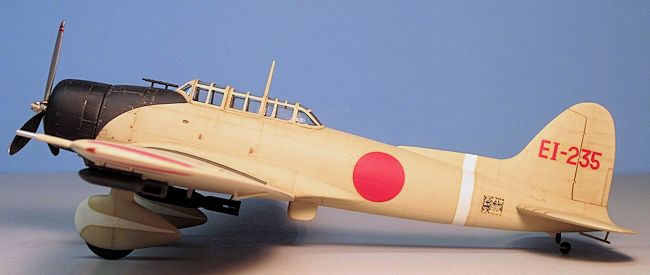
The engine cowl was assembled next and I thinned the rear
of the cowl flaps and drilled out the machine gun ports during the process. I
also drilled out the machine gun ports on the fuselage and installed Evergreen
rod for the gun barrels. In looking at reviews of the Hasegawa kit, I noticed
that the oil coolers were angled on their front edges so I cut down the kit
parts accordingly. I also drilled out the exhausts and used Evergreen strip to
box in the fins of the bombs.
As the final step in preparation for paint, I added the
canopy. The clear parts were dipped in Future prior to assembly. I used Tamiya
tape to mask the clear parts. If I were to tackle this project again, I would
either use a different canopy or spend less time and effort on the interior
since it simply could not be seen once the kit part was installed.
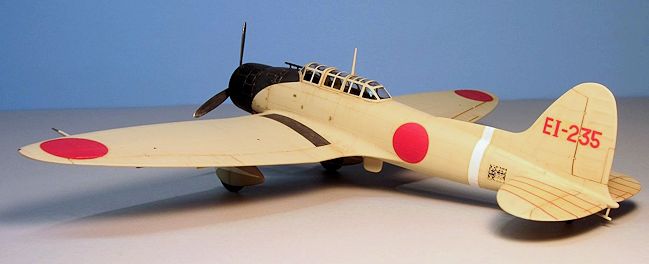
| COLORS & MARKINGS |
Since I had already modeled a Zero which flew from the
carrier Shokaku during the Pearl Harbor raid, I decided to model Val EI-235
which also flew from Shokaku. All paints used in this build were Polly Scale
acrylics. First, French Khaki was sprayed on the canopy framing. I then painted
my custom mixed tan gray over the rest of the airplane. Finally, I masked the
airframe and airbrushed Japanese Cowl Color (again
 custom
mixed) on the nose and engine cowl.
custom
mixed) on the nose and engine cowl.
At this point I used pastels to emphasize the panel lines
and dirty the airframe up a bit. I tried to keep things subtle, adding just
enough shade variation to enhance detail. I then sealed everything with a coat
of Future in preparation for decals.
As noted above, I used decals from a Testors/Fujimi Val for
this one. The red decals went on fine but all the white decals decided to
shatter. After much effort, I was able to get most of the pieces in place. I
used white paint to touch up the decals that misbehaved. After weathering the
decals, I gave the plane a final flat clear coat.
The engine, cowl, prop, bombs, and other details were added
at this time. Final detailing was then completed.
| CONCLUSIONS |
Based on what I started with, I’m happy with the way this kit turned out. It was a fun challenge to update an oldie. The extra effort improved the basic kit, though my efforts on the interior remain unseen. While the Hasegawa Val remains the definitive kit in 1/48th, the Fujimi Val is easy enough for a beginner and cheap enough that most can afford it. I recommend it accordingly.
March 2014
If you would like your product reviewed fairly and fairly quickly, please contact the editor or see other details in the Note to Contributors.