| KIT: | Revell 1/32 A6M5 Zero |
| KIT #: | ? |
| PRICE: | $? |
| DECALS: | Guess so |
| REVIEWER: | Ralf Pätzold |
| NOTES: | Probably not easily found |
| HISTORY |
The year was 1944. It was a dark and stormy October night in the Leyte gulf, and there was a nasty nip in the air. Major Watsa Mantodo took a last look at the map on his knees before dipping the nose of his…
Awww, who am I kidding.
Whatever I know about the war fought during the middle of the previous century in what’s known as the “Pacific Theatre” I have researched (an old-fashioned term meaning “googled”) on the Internet or viewed on History Channel documentations, so any attempt on my part at a Tom Cleaver style introduction is kind of doomed from the outset.
If you are interested in the details (as you should be), just follow my lead – there’s a world of knowledge out there.
| THE KIT |
 First off, I would
like to apologize for the lack of in-progress photos – but this was over quicker
than you can say “photo-etched metal detail set”.
First off, I would
like to apologize for the lack of in-progress photos – but this was over quicker
than you can say “photo-etched metal detail set”.
We’re all modelers, but we’re all in it for different reasons. Some of us build “scale replicas”. Some build models. I build kits.
Case in point: the venerable Revell/Monogram 1/32 scale A6M5, dating back to 1987. I snapped up a copy of this kit for the princely sum of 3 Euros.
Never having heard of the kit before, my main intention was to use it as a test bed for trying out techniques to use in the building of Tamiya’s impressive equivalent which I was about to tackle. I wasn’t even sure whether I would actually complete the kit – after all, another modelling website in praising the Tamiya kit boldly states that “If you own one (or more) of these kits, you can sell, give away, or toss any A6M5 in any scale that you may have as you won't want to look at them again.”
Maybe it’s just me – but people suggesting to “toss” a kit are monsters! Especially when it turns out that something regarded with utmost disrespect by one can turn into a lot of fun for another…
| CONSTRUCTION |
You are probably aware of the number of parts in Tamiya’s zero kit. Revell’s has about fifty. And a very straightforward and simple breakdown, too. I have always preferred the “one part with many details” philosophy (as practiced by e.g. Monogram) to the “let’s make that an individual dust-mote sized part” approach (e.g., Hasegawa). Not that there’s too much detail here – but 5 parts, to my mind, are enough for an engine that cannot be seen anyway.
 The kit features
raised panel lines and rivets. I do not subscribe to the view that engraved
panel lines are more realistic by definition, though one has to admit that in
some situations, they make possible the use of modelling techniques that do not
work with raised panel lines. In the case of this build, anyway, the whole issue
was kind of irrelevant as the methods employed work equally well with both kinds
of panel lines.
The kit features
raised panel lines and rivets. I do not subscribe to the view that engraved
panel lines are more realistic by definition, though one has to admit that in
some situations, they make possible the use of modelling techniques that do not
work with raised panel lines. In the case of this build, anyway, the whole issue
was kind of irrelevant as the methods employed work equally well with both kinds
of panel lines.
As to the general accuracy of the kit, I know little about the Zero, and am in no position to make judgments. And anyway, it’s not something that I was concerned about in this case.
I cut the parts from the sprues while watching a movie on TV, and I was finished with this task plus cleanup plus completion of some subassemblies (engine, canopy, wheels) well before the credits were rolling (happens to me a lot – I once inadvertently finished most of the construction of a Tamiya Kyofu during an extended session in the bathroom). It was then that I decided that not only would I finish the kit, but that this was going to be a real labour of love.
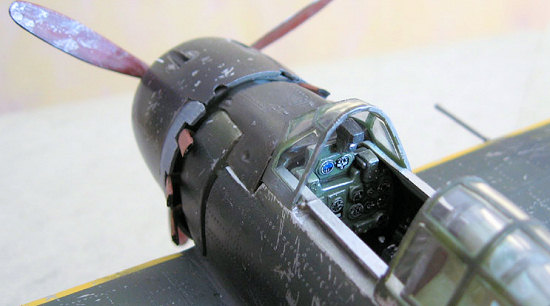 The design of the
kit required finishing the cockpit first, which I did in a fairly standard way –
successive layers of black; Tamiya “Cockpit Green (IJN)”; Future; dark wash;
Future flattened with Tamiya Flat Base; drybrushing. Revell of Germany includes
decals for the cockpit instruments in this edition of the kit, but totally
forgets to mention them in the instructions! I tried to use the Tamiya kit for
reference, but the Revell instruments seem to have nothing at all in common with
what Tamiya provides. In fact, this is true for the whole of the cockpit, but
I’m not one to worry about things like these too much, so I finished the whole
thing using a mixture of common sense and artistic license.
The design of the
kit required finishing the cockpit first, which I did in a fairly standard way –
successive layers of black; Tamiya “Cockpit Green (IJN)”; Future; dark wash;
Future flattened with Tamiya Flat Base; drybrushing. Revell of Germany includes
decals for the cockpit instruments in this edition of the kit, but totally
forgets to mention them in the instructions! I tried to use the Tamiya kit for
reference, but the Revell instruments seem to have nothing at all in common with
what Tamiya provides. In fact, this is true for the whole of the cockpit, but
I’m not one to worry about things like these too much, so I finished the whole
thing using a mixture of common sense and artistic license.
With the cockpit glued into its place on the bottom wing, it was time to mate the fuselage and wing parts. This was surprisingly simple – the parts fit rather well, thanks in part to a clever bit of engineering that for some strange reason isn’t a standard device: there is a little hook on the fuselage sides that kind of grips the wings into place, preventing major gaps. What little remained in the way of gaps, mostly where the front of the wing joins the fuselage, was filled with stretched sprue and putty.
| COLORS & MARKINGS |
As this was still going to be a test bed, the first step in painting the fuselage was to apply a car paint from a spray can – “Volkswagen Diamond Silver Metallic Spray Paint” by Halfords (you are now free to make educated guesses as to the make and colour of my car).
This is really
mean stuff – it reeks like hell (I went into the cellar to do the spraying), and
bites into the plastic like a mastiff into a baby’s backside. When I touched a
small area with my finger (I told you this was supposed to be an experiment),
not only the colour came away – I also ended up with a blemish of the p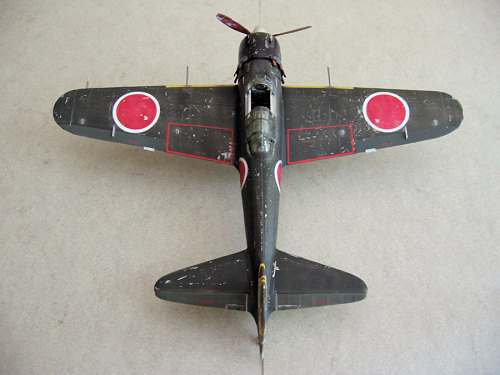 lastic
surface which seemed to have reacted with the paint like it would with glue. I
was more than just a little worried at this point – though this was kind of what
I wanted to achieve, it seemed to work a little too well!
lastic
surface which seemed to have reacted with the paint like it would with glue. I
was more than just a little worried at this point – though this was kind of what
I wanted to achieve, it seemed to work a little too well!
Thankfully, after letting everything dry for a day, not only was the plastic in pristine condition, but the paint layer proved to be rock hard and ready to take a beating (which it soon would).
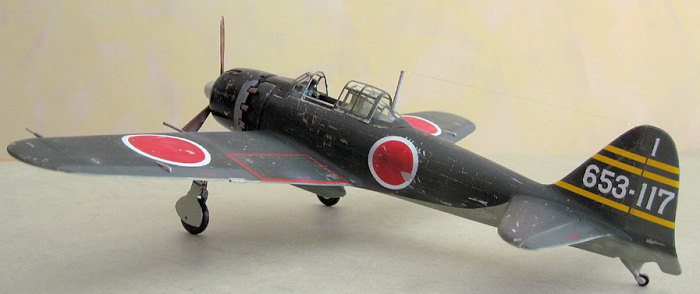
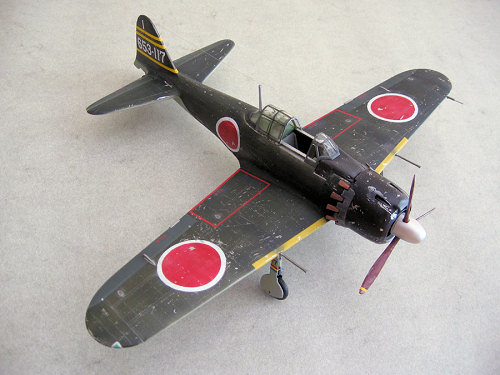
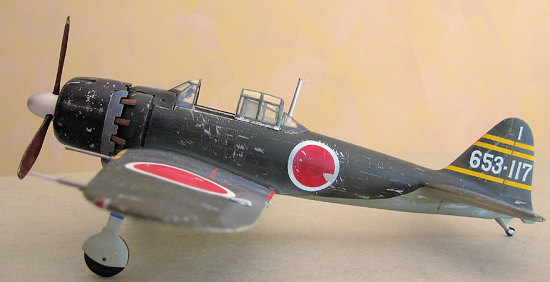
The next order of business were the main camouflage colours, for which I used Tamiya Japanese Navy Green and Grey. I wanted to do some chipping, and in order to have a paint layer that would allow me to do this properly, I thinned the colours with about 25% water. Doing sections of the fuselage at a time, I sprayed on the colours with high pressure and a little unevenly (intentionally so!), and immediately proceeded to do some chipping using small pieces of packaging tape glued onto and then ripped violently from the painted area. It worked like a charm, allowing me to adjust the “damage” to just the right degree, and I sat there for about an hour with a big grin on my face, alternatively spraying and ripping. The tape also produced variations in colour tone and sheen which look very intriguing on the green areas of the model, but seem to be too delicate to be reproducible using digital imaging.
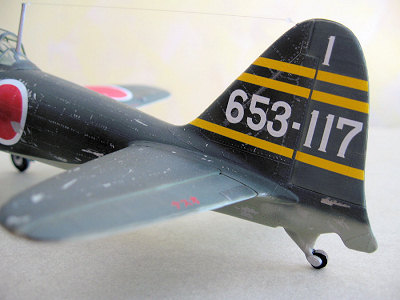
Next, I sprayed on the hinomaru (aka “meatballs”, aka “national insignia”) – another first for me, which turned out a lot simpler than I thought. All that was required were a couple of address labels from my desk drawer, and a compass cutter. I cut two concentric circles, one the size of the red part, and another one the size of the white. I then attached the address label minus the area within the wider circle to spray the white part, then added the outer ring of the remainder to cover the white and sprayed red. After each layer, I did my chipping routine, with the same intriguing effects on the red colour as previously on the green.
 It turned out,
though, that I was a little careless in placing the first part of the label, as
the hinomaru on the left and right hand size ended up in different locations –
different enough to be noticeable. I had expected all kinds of problems, but not
that!
It turned out,
though, that I was a little careless in placing the first part of the label, as
the hinomaru on the left and right hand size ended up in different locations –
different enough to be noticeable. I had expected all kinds of problems, but not
that!
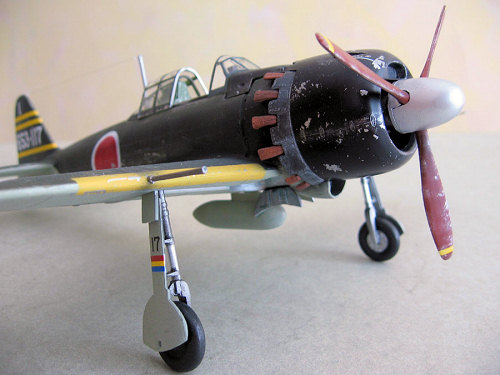
Then, it was on to details such as the yellow markers on the wings, the control surfaces with their very subtle and convincing fabric effects which were sprayed a lightened version of the original camouflage colours, the gloss black/dark blue engine cover, and so on.
I was very taken with the subtle tonal variations of the camo colours, and I wanted at all costs to preserve it that way. This meant that the usual coat of Future in preparation for the decals, followed by a flat coat, was out of the question. Anyway, with the hinomaru sprayed on, there were only few decals left.
I decided to apply these the way I usually apply decals with transparent areas, or decals which require especially strong adhesion for other reasons: decals are dipped in a mix of Future and water before being placed on the model. This worked perfectly, even on the flat (colour-wise) control surfaces with their delicate textures.
Lastly, some drybrushing with silver colour was performed to bring out a little more surface detail, and highly thinned dark gray was sprayed to simulate streaking behind the engine and guns.
| FINAL CONSTRUCTION |
It was now time to attach the gear, prop/spinner, canopy, and antenna mast. The antenna was made from fishing line with white glue drops to simulate insulators.
| CONCLUSIONS |
 And there she was – a big,
fat Zero, one that was quick to build and a joy to paint. Now, that’s modelling
heaven to me. I could sit for hours and stare at that green, which seems to suck
you in like a maelstrom, and blissfully ignore all comments as to the models
authenticity (or lack thereof).
And there she was – a big,
fat Zero, one that was quick to build and a joy to paint. Now, that’s modelling
heaven to me. I could sit for hours and stare at that green, which seems to suck
you in like a maelstrom, and blissfully ignore all comments as to the models
authenticity (or lack thereof).
It’s probably impossible to have more fun with your clothes on – sadly, modelling without clothes on is a no-no for me as the window of my workshop opens onto a busy Berlin street, and the resulting attention from passers-by would be too distractive to be welcome.
Am I going to build the Tamiya Zero now? Not anytime soon, I think. The Revell offering is a kit, and the Tamiya counterpart a complex collection of materials to be used in the construction of a sophisticated near-perfect replica. For the time being, I think I’ll stick with kits.
Coming back to the opening remarks of this article – should you consider “tossing” this kit, or similar ones, make sure you toss them in my direction. Or in the direction of some kid in the neighbourhood, as this would be a perfect first-timer for a budding modeller.
| REFERENCES |
See “History” section above.
March 2007
If you would like your product reviewed fairly and quickly by a site that has over 350,000 visits a month, please contact me or see other details in the Note to Contributors.