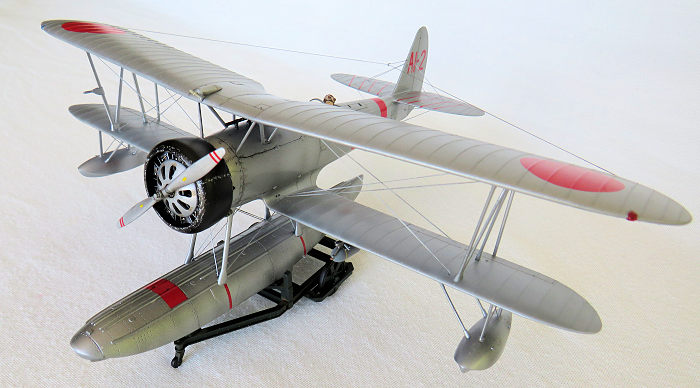
Hasegawa 1/48 E8N1 Type 95
| KIT #: | |
| PRICE: | |
| DECALS: | |
| REVIEWER: | Michael Rohde |
| NOTES: |
| HISTORY |
 In 1933 the Imperial Japanese Navy issued an
order to Nakajima to design and develop a reconnaissance seaplane to replace
an earlier design , the E4N2 , also built by Nakajima.
In 1933 the Imperial Japanese Navy issued an
order to Nakajima to design and develop a reconnaissance seaplane to replace
an earlier design , the E4N2 , also built by Nakajima.
The new prototype was a bi plane , featuring a central main float ,two outrigger floats and accomodation for a pilot and observer. Nakajima’s design displayed good performance, manouverability ,good aqua dynamic handling and range. Facing strong competition by Kawanishi and Aichi, Nakajima after all won the contract in September 1935 and the new aircraft was approved by the IJN and given the designation of ‘Type 95 Reconnaissance Sea Plane ( E8N1).
A total of 755 aircraft were produced until 1940 . These served on all capital ships. 16 cruisers and 5 sea plane tenders. Due to it’s good performance, the aircraft was also used to carry out dive bombing attacks and was even involved in aerial combat.
From 1940 onwards the E8N was gradually withdrawn from front line service and replaced by Aichi E 13 A’s and Mitsubishi FM 1’s. All remaining E8 N’s were extensively employed in training duties until the end of WW II.
| THE KIT |
 This 1/48 kit was released in 2017 and does offer
Hasegawa’s high standard , well designed and easy to assemble. The decals
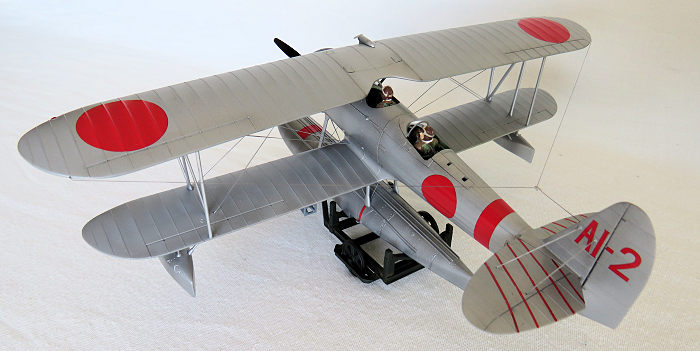
are excellent and provide several options in regards to aircraft numbering (
all of these for planes stationed on the battle ship YAMATO during 1942.
This 1/48 kit was released in 2017 and does offer
Hasegawa’s high standard , well designed and easy to assemble. The decals
are excellent and provide several options in regards to aircraft numbering (
all of these for planes stationed on the battle ship YAMATO during 1942.
Parts are carried on 8 frames plus on clear frame and a set of nylon bushes for the propeller. Total parts count is 114. There is no flash or mould shift apparent. Surface detailing is excellent. Two nice figures ( pilot and observer) are included. These are segmented and allow posturing to some degree. One frame carries all the parts for a nicely detailed beaching dolly and support frame.
The instructions are typical Hasegawa ,arranged into 12 steps and easy to follow. One small problem though: We are not given a diagram for the rigging. Optional photo etch for this job has to be purchased or a bit of research is necessary if one does want to do the rigging with EZ line.
| CONSTRUCTION |
I started off with painting and assembling the cockpit. As in most cases, the majority of the interior is well hidden after the fuselage is closed up, even more so once the pilot and observer figures are in place. Needless to say that the detailing of the cockpit interior is nicely done and lends itself to dry brushing and weathering. The parts will form the cockpit tub which will be inserted into the fuselage with the figures in place. No issues when it came to putting the fuselage shells and the fuselage decking together. Only a minute amount of filler was needed to clean up the seams.
The lower wings went together nicely and the fitting
these onto fuselage was done in no time. Tailpla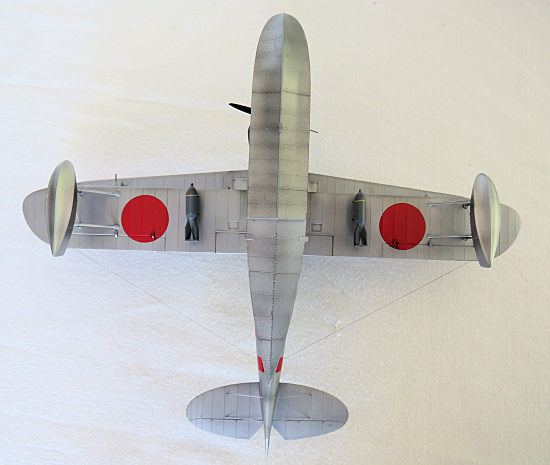 ne and rudder were attached
after the glue on the lower wings had set.
ne and rudder were attached
after the glue on the lower wings had set.
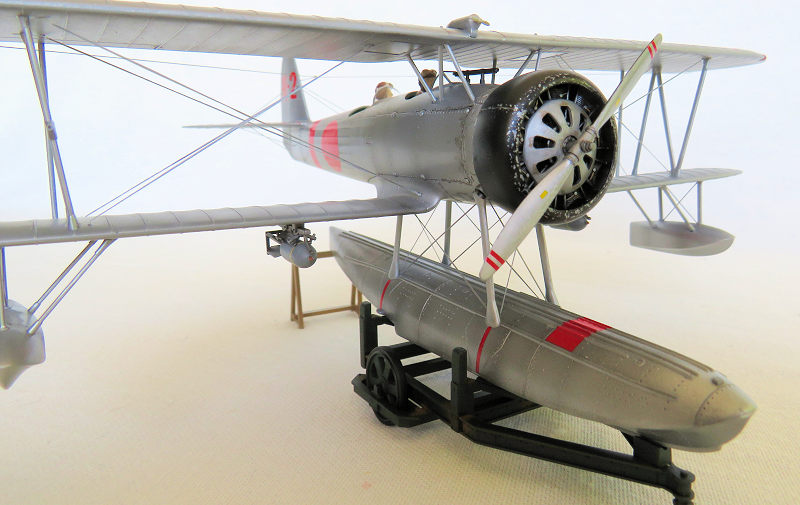
The nicely detailed engine assembly was straight forward. The 3 piece cowling was easy to fit onto the radial engine. Small locator pins on the cylinder heads made it east to fit the 3 individual parts precisely by aligning recesses inside the cowls with the pins. The fit was so great that the seams were hardly visible and look like panel lines. ( well done Hasegawa !!)
Now it was time to move on to step 7 and 8 . This involved putting the upper wing shells together ( again great fit--o hassle) and fitting the cabanes and N struts. Aligning these parts are made easy by precisely located recesses. Still, I made sure to measure the distance between the mounting points and checked these again while the glue was setting. When the time came that the struts and cabanes did not move easily any more I placed the upper wing onto a small jig made of cardboard and the model in such a position so that the struts and cabanes fitted perfectly into their recesses and left this set up alone for a few hours.
Next I drilled all the holes for the rigging and the antenna wires using a .10 mm drill. As I mentioned already, there is no info or a diagram in the instructions on where exactly these attachment points are going. It is up to the modeller to find references. The assembly and fitting of the main and outrigger floats was again straight forward. No issues here except that one has to drill the holes for the rigging before attaching these components.
In this case I actually fitted the rigging wires before airbrushing because access is a bit tricky and it is just somewhat easier to handle the model when it is not painted. The bracing wires on the outrigger floats were made with bits of guitar string. The wind shield frames were painted by hand and then carefully glued into place.
Now it was time to move on to airbrushing the model. Beforehand I carefully masked the clear parts and the pilot and observer.
| COLORS & MARKINGS |
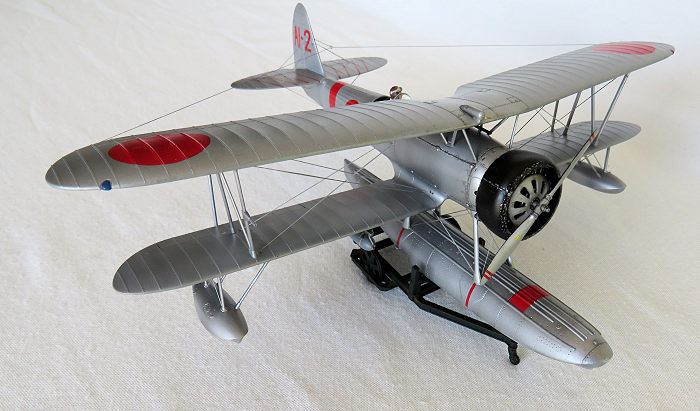
I started with pre shading using Tamiya flat black. The fabric covered surfaces were painted with Tamiya flat aluminium and left to dry.
Next I masked off the demarcation lines between the fabric surfaces and the metal and sprayed the metal panels with Tamiya chrome silver. Care was taken not overspray and not to eliminate the pre shading. That turned out quite nicely as one can see on the photos.
 The upper wing was painted as a separate item. I made
sure that the recesses for the struts were covered with small bits of masking
tape. A thin coat of Tamiya gloss clear was applied to all surfaces. I left
everything alone overnight so that the paint had ample time to dry.
The upper wing was painted as a separate item. I made
sure that the recesses for the struts were covered with small bits of masking
tape. A thin coat of Tamiya gloss clear was applied to all surfaces. I left
everything alone overnight so that the paint had ample time to dry.
The rigging was straight forward. There are four landing and four flying wires to be attached. The tailplane does need four landing and four flying wires as well. I did the rigging on the wings first by attaching the EZ line onto the bottom wing.
Then I glued the upper wing onto the struts using a CA glue and finished off by attaching the rigging wires to the upper wing. It is important though to remove any paint residue in the holes where the EZ line is glued into. CA glue does dissolve paint and that in return slows down the setting time.
The decals went on like a dream and settled well with the help of a bit of Microsol. The decals were sealed with a thin coat of Tamiya gloss .clear . The final touch was to apply some mild weathering. As an aircraft stationed on a battleship weathering is generally limited to exhaust stains and some oil streaks around the panel lines close to the engine and the engine itself.
| CONCLUSIONS |
Avery nice model of a IJN float plane by Hasegawa. Easy to build . No issues with the fitting of parts. Surface detail nicely rendered . Highly recommended!
14 April 2020
Copyright ModelingMadness.com
Thanks to
for the review kit. You can find this one at your favorite hobby shop
or on-line retailer. If you would like your product reviewed fairly and fairly quickly, please
contact
the editor
or see other details in the
Note to
Contributors. Back to the Main Page
Back to the Review
Index Page
Back to the Previews Index Page